Author: Masumi Goldman

  • Pincha Mayurasana:  The Art of Falling

    Pincha Mayurasana: The Art of Falling

    If you’ve recently added Pincha Mayurasana (forearmstand) to your inversion practice, you may be wondering when or if you should move away from the safety of a wall.  As a general rule, you should NEVER move your inversion practice away from the wall until you have perfected your exit strategy.

    Falling flat onto your back and injuring yourself is NOT an exit strategy.  Falling safely out of an inversion is FallingFromPincha
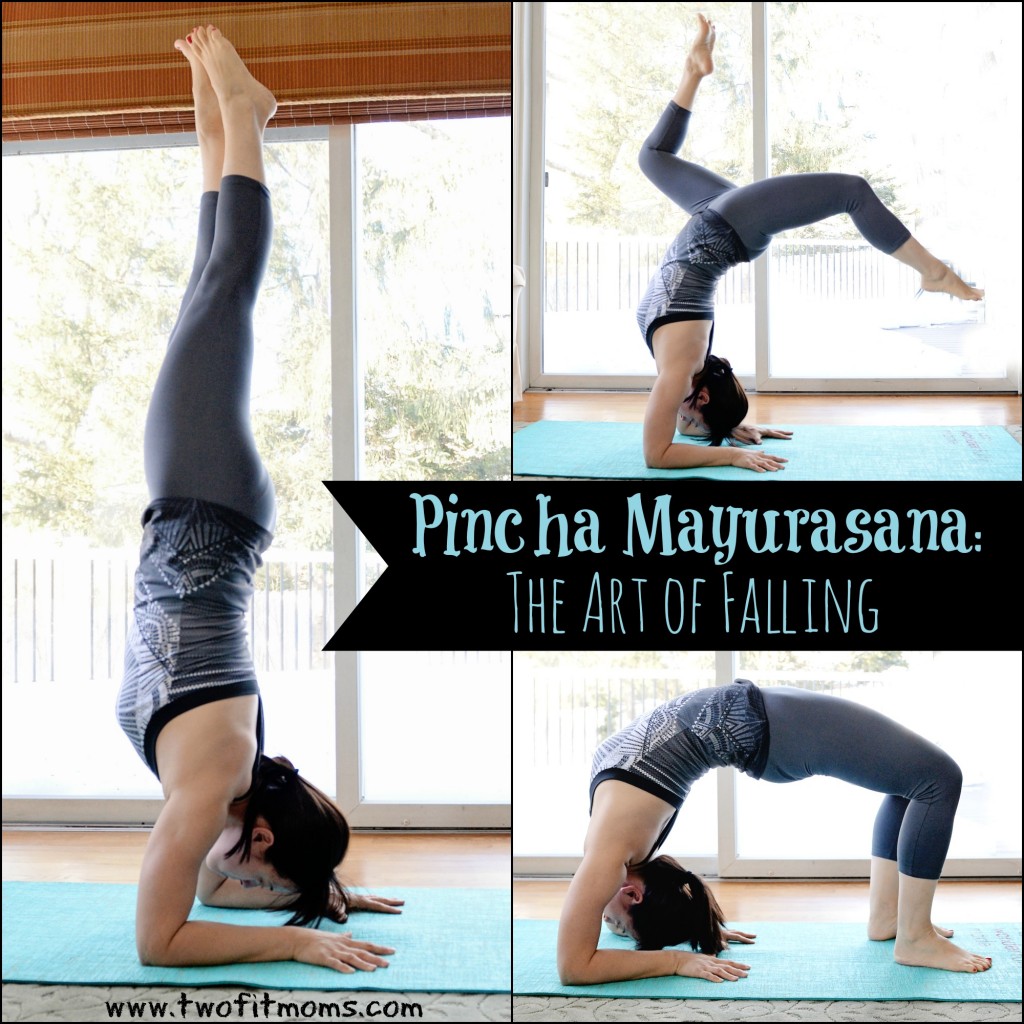
actually a skill, and today, I will show you how to turn your fall out of forearmstand into a controlled transition.

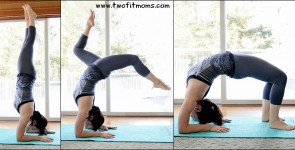
    The goal?  Forearmstand into forearm wheel.  Yes, forearm wheel is a deep pose requiring flexibility, but once you master this pose and this transition, you will practice in the middle of the room without fear.

    Getting into Forearm Wheel
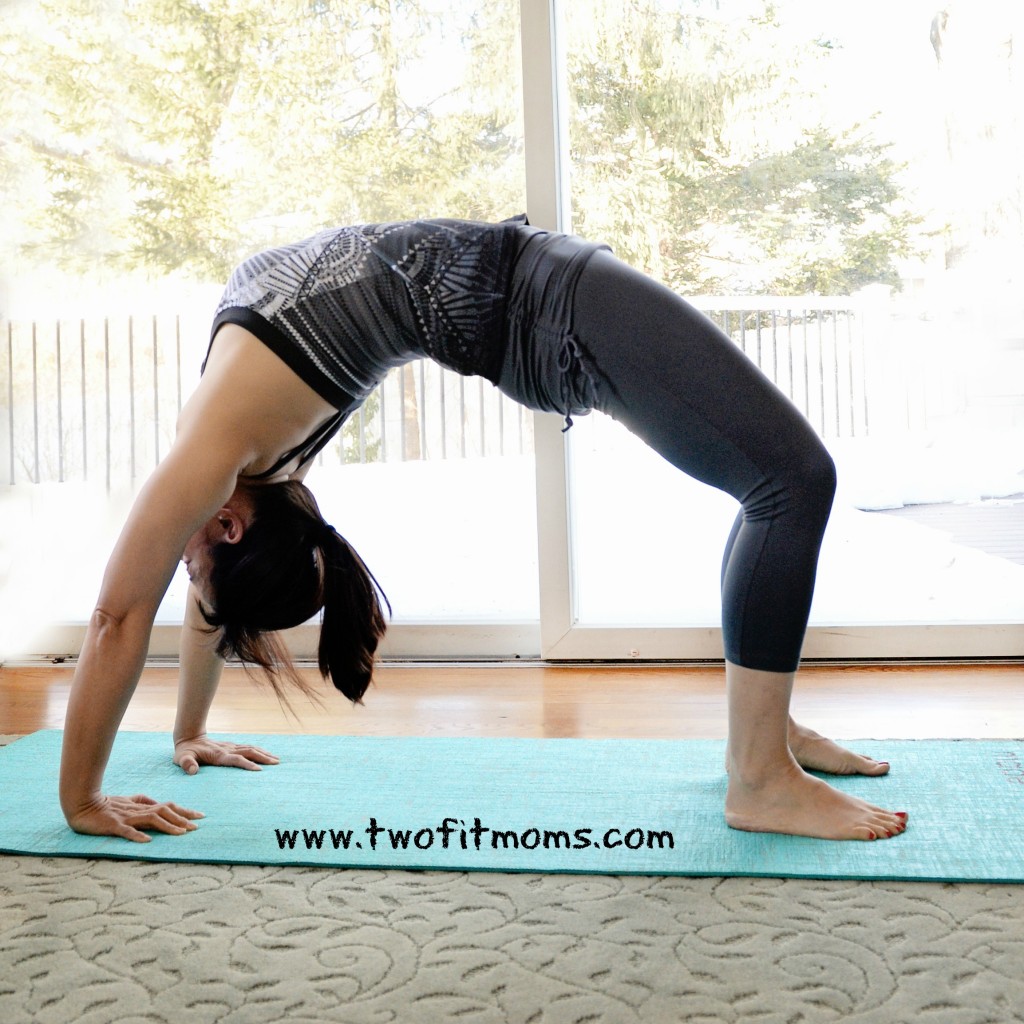
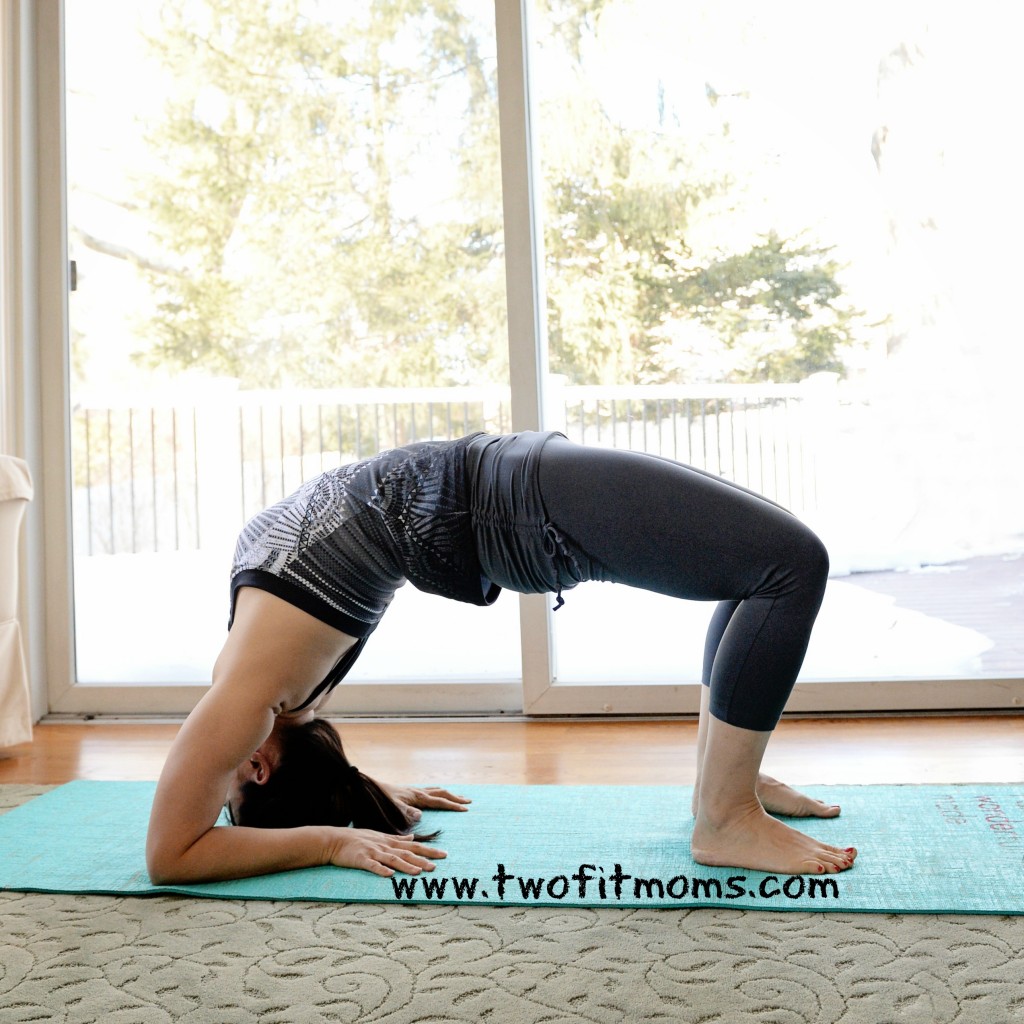
    The first step in perfecting this transition is to practice the final pose:  forearm wheel.

    Step 1
    Lie on your back, with your knees bent and feet flat on the floor. Place your palms onto the mat on either side of your head with your fingers pointing toward your feet.  Press through your hands and feet and gently lift up onto the crown of your head for a breath or two.  Continue to press through your hands and feet, lifting your head from the floor. Straighten both arms and lift your hips toward the sky for wheel pose.  If you are unable to do wheel pose, please continue to practice your forearmstands against a wall and re-visit this article at a future date.  Being comfortable with your backbends is essential for this exit strategy.
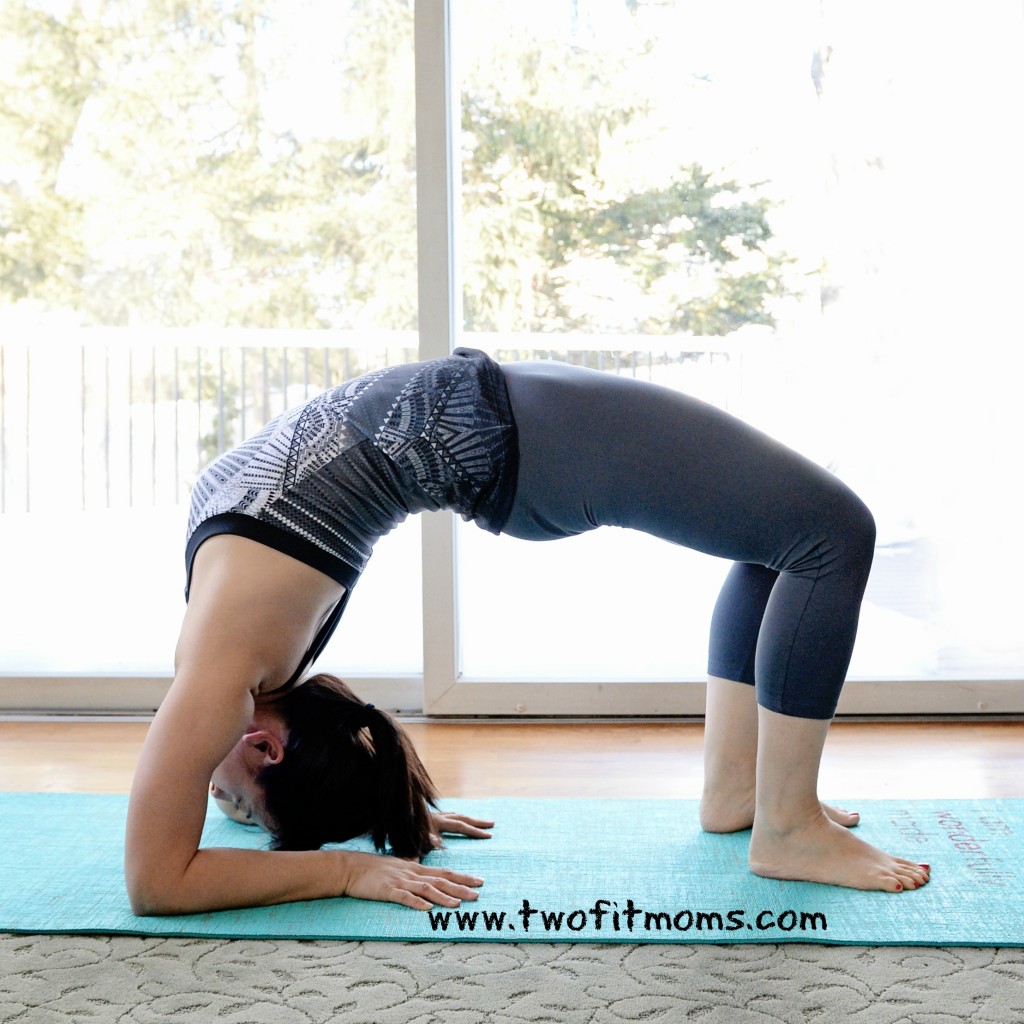
    WheelPose
    Step 2
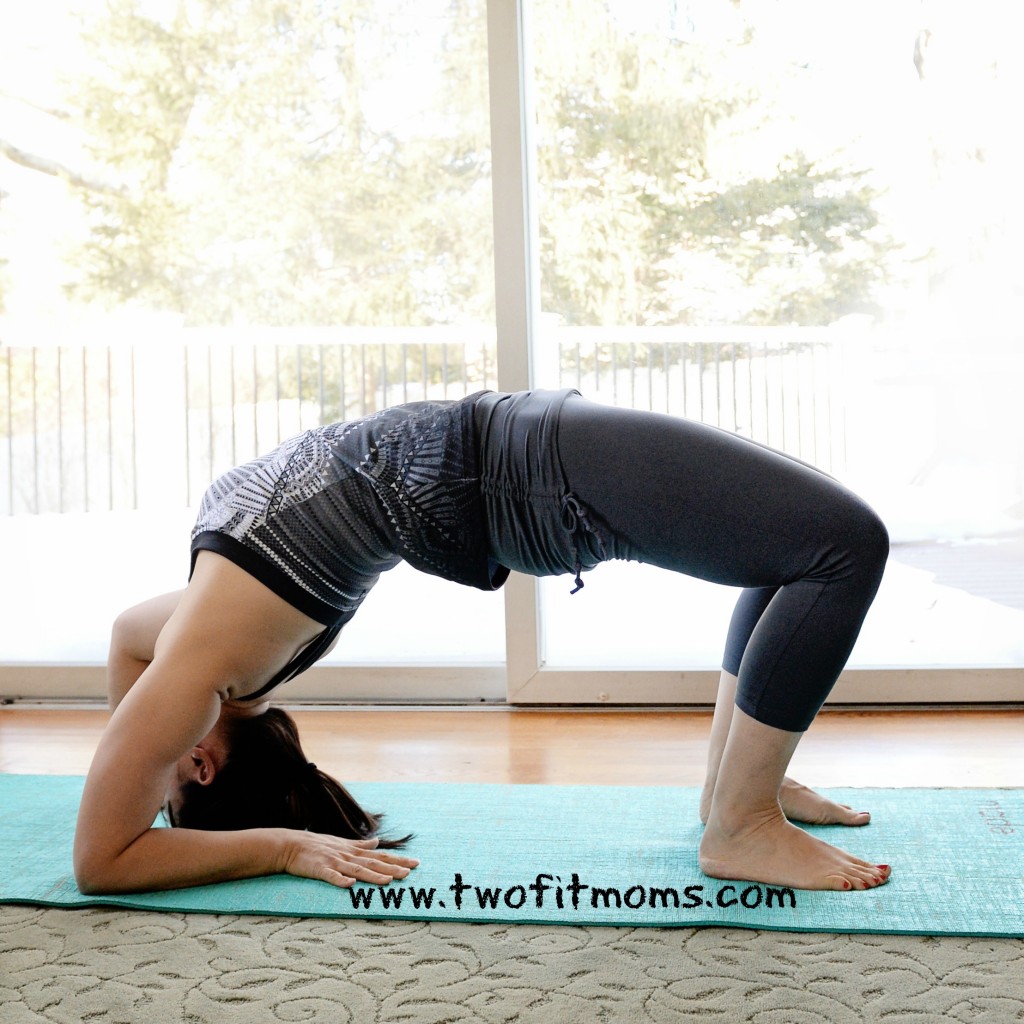
    Slowly bend your elbows and gently lower the top of your head to the mat. Keep your elbows stacked above your wrists and your chest lifted.
    LowerOnToHead
    Step 3
    Slowly lower yourself onto one forearm.  If the stretch feels too intense, stop.
    WheelOneArmDown
    Step 4
    If your back is not straining, lower yourself onto the other forearm.
    WheelBothArmsDown
    Step 5
    Press down firmly through your forearms and lift your chest to raise your head off the mat.
    ForearmWheel
    If you are unable to do this forearm backbend with ease, then please continue practicing your forearmstands with a wall.  Falling into a deep backbend from a height is potentially harmful until your flexibility improves.  Each day, make it a point to work on your backbends and to open up your chest, shoulders and hip flexors.  The sooner you become comfortable in your backbend practice, the sooner you will become free from the wall.

    Practicing the Transition
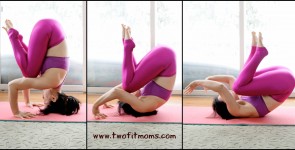
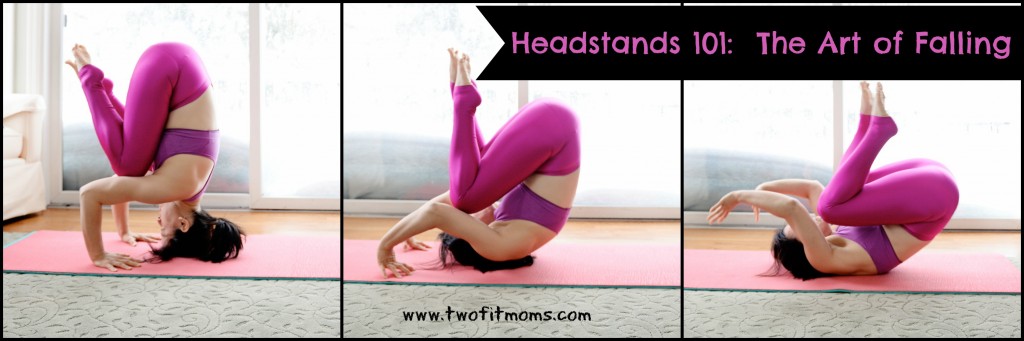
    Now that you’ve mastered the forearm wheel, let’s practice falling into it.  Make sure you are thoroughly warmed up before attempting.  When you begin to lose your balance in your forearmstand, your natural inclination is to simply tip over.  Work with that natural momentum, and do not try to fall to the side or to lift your forearms from the ground.  Keep your forearms firmly rooted into your mat, with your elbows stacked right under your shoulders.  Do not collapse into your arms!  If you stay strong through your shoulders and arms, your legs will touch down, your head will never touch the mat, and you will be in a forearm backbend.

    Remember:
    Keep your inversion practice at the wall until you perfect your exit strategy.  Perfecting an exit strategy, however, may take a great deal of time.  Do not get discouraged.  Your yoga practice is not a race, and it is here to serve you through your lifetime.  Practicing your inversions with a wall is FINE.  Be prudent and use a wall if your body is not quite ready for the exit strategy presented here in this article.  Good luck!

  • Double Chocolate Chip Pancake Surprise

    Double Chocolate Chip Pancake Surprise

    DoubleChocChipPancake
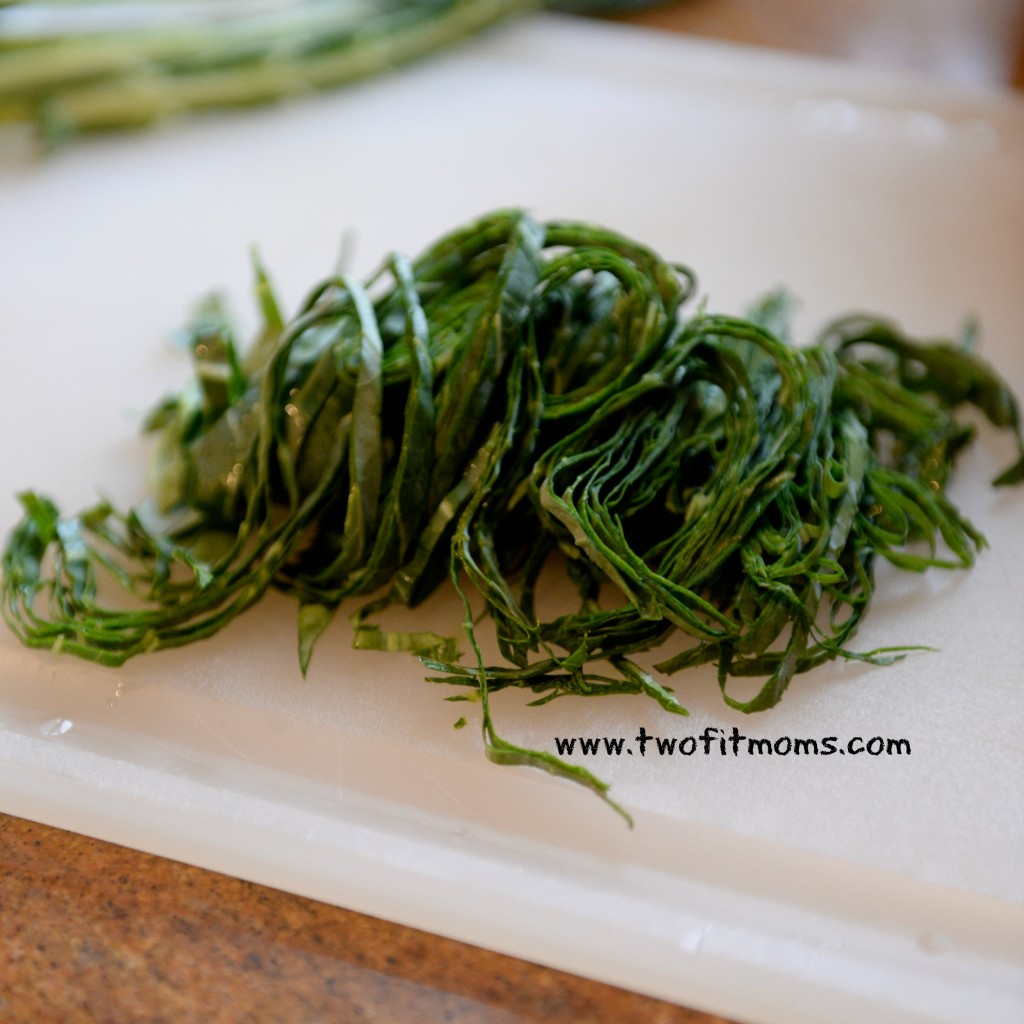
This recipe is regularly on the menu in my house.  My kids get so excited when they see chocolate pancakes on the table.  They have no idea that mama put a nice collard green-blueberry surprise into the batter.  Don’t worry—you won’t notice either, and it’s a great way to use up all of those hard collard green stems that usually end up in the trash.

    Last week, I walked you through my daily routine of preparing greens.  In that article, I mention that you should save all of the hard collard stems in a plastic bag in the refrigerator.  Hopefully, you have those stems ready to use!

    (This delicious recipe was inspired by Missy Chase Lapine – aka the Sneaky Chef.)

    Ingredients
    10 stems from a bunch of organic collard greens
    1 cup frozen wild blueberries
    2 tablespoons water
    1 cup brown rice flour (or any flour of your choice)
    ½ cup wheat germ
    2 teaspoons baking powder
    ½ teaspoon salt
    4 tablespoons unsweetened cocoa powder
    2 teaspoons vanilla extract
    ½ cup soy/almond/rice milk
    2 eggs
    3 tablespoons pure maple syrup
    mini chocolate chips (optional)

    Step 1
    Boil or steam 10 collard stems for 4-5 minutes.  Blend the cooked stems, 1 cup of frozen wild blueberries, and 2 tablespoons of water in your blender.  This should make about 1 cup of puree.  You will only need half of this puree.  Freeze or refrigerate the other half of the puree for another day.  (Or throw the extra into your next smoothie)

    Step 2
    Mix all of your dry ingredients into a bowl:  1 cup of brown rice flour, ½ cup wheat germ, 2 teaspoons baking powder, ½ teaspoon of salt, and 4 tablespoons of unsweetened cocoa powder.

    Step 3
    Mix all of your wet ingredients in a bowl:  ½ cup of blueberry-collard stem puree, 2 teaspoons of vanilla extract, ½ cup of soy milk, 2 eggs and 3 tablespoons of pure maple syrup.

    Step 4
    Combine wet ingredients and dry ingredients into one bowl, and mix well.

    Step 5
    Drop heaping tablespoons of batter onto your griddle.  Cook over low heat to avoid burning.  Add 3-4 mini chocolate chips to the top of each pancake.  Peek at the underside of the pancakes to determine when it’s time to flip them.  Serve pancakes with pure maple syrup.  Please do yourself a favor and spend the extra money for real maple syrup, and avoid pancake syrups, which are a mix of corn syrup, artificial colors and artificial flavors.

    Makes about 16 pancakes.

    Tip:  Refrigerate any leftover pancakes.  They make a great portable snack.  When you are hungry, just wrap them up and take them with you.  They are thick and sturdy like cookies!

    You know I’m always trying to get more greens and veggies into my family’s diet!  If you are too, you might want to check out Missy Chase Lapine’s cookbook, The Sneaky Chef.

  • Pre-Workout Tea Spritzer!

    Pre-Workout Tea Spritzer!

    TeaSpritzerPhoto
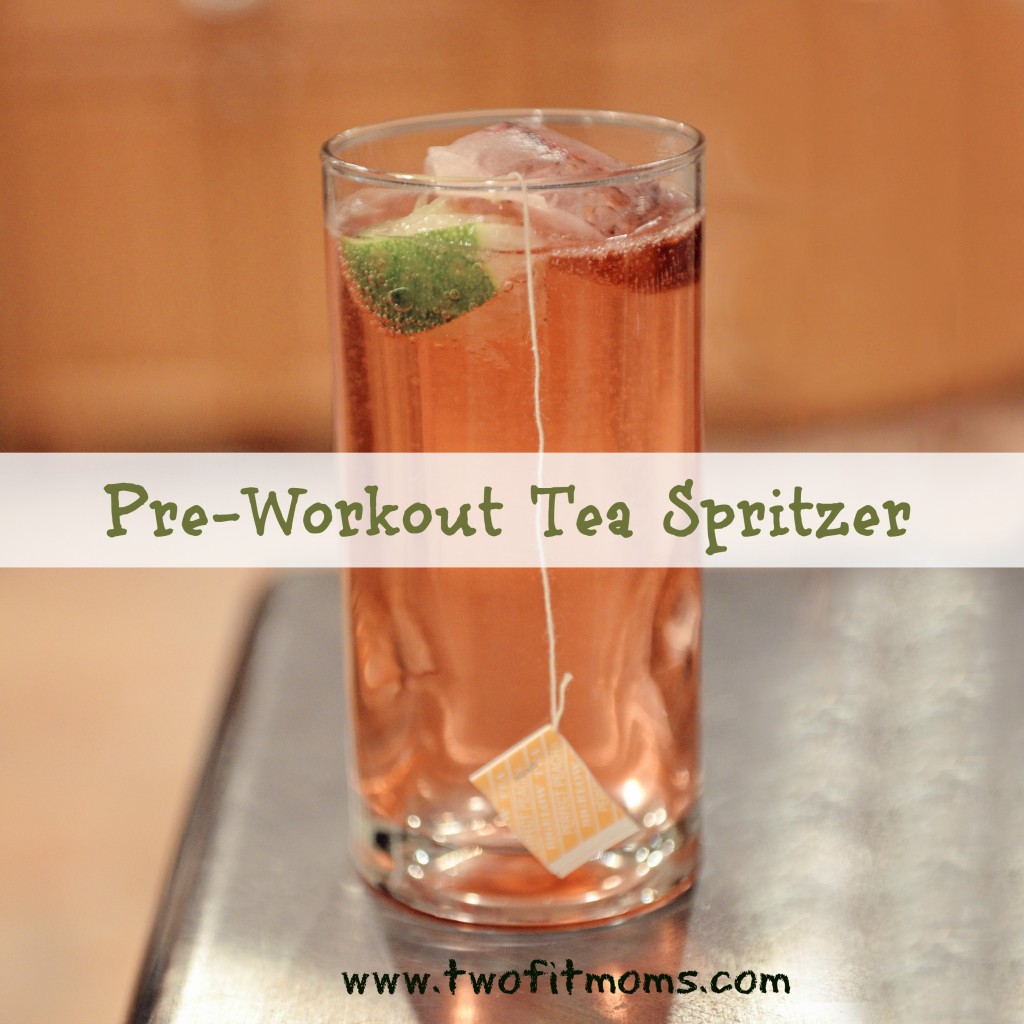
Are you drinking enough BEFORE exercising?  The importance of staying hydrated during and after an exercise session is common knowledge, but drinking prior to a workout is just as essential.

    According to the American College of Sports Medicine, you should consume 17 ounces of fluid about two hours prior to exercising to be adequately hydrated and to allow time for excretion of excess water.

    If you are looking for a more palatable solution than plain water but don’t want to reach for an artificially flavored/colored sports drink, consider this refreshing alternative—Create your own tea spritzer!  It’s delicious, portable, and it will get you ready and hydrated for your workout.

    Directions:

    1. Fill a tall glass (or thermos) with unflavored seltzer water.
    2. Squeeze ⅛ or ¼ of a lime into the water.
    3. Steep 1 tea bag for 5 minutes.  Fruit-flavored teas work really well, and they are caffeine free!
    4. Drink up, and enjoy your workout.
  • Instagram Quick Tip:  Accentuate Muscle Tone

    Instagram Quick Tip: Accentuate Muscle Tone

    Navigating the world of photo-editing apps is tedious, especially if you are new to photography and new to Instagram. Rather than wasting money on apps that you may not like or use, let me introduce you to my favorite tips and programs for creating visually appealing photos.

    “Simply HDR” is one of my favorite apps for adjusting shadow, light, grain and contrast. The result of using such an app? Greater detail and more dramatic photos. Do you want to accentuate your existing muscle tone? If so, this is the app for you.
    HDRBeforeAfter
    Take a look at the two images of me lifting my leg over my shoulder. The top photo is straight out of the camera with no editing at all. The bottom photo is the same image with about 10 seconds of editing in “Simply HDR.” As you can see, the app doesn’t create muscles where there are none, but it certainly accentuates what currently exists!

    Photo editing is a fun and creative way to express yourself. Create beautiful and dramatic images by adding depth and shadow. Please keep in mind that I just focused on one aspect of this app. Obviously it can be used in many ways, not just to define one’s physique. Accentuating bodies is clearly not the purpose of this program, but it’s one application of it. Take a look at this app, and research some others on your own. Have fun!

  • Instagram Quick Tip:  Use Your Glassware!

    Instagram Quick Tip: Use Your Glassware!

    Over the past year and a half, we have received numerous questions about our Instagram photos.  These questions have ranged from, “Who takes your photos?” to “What app did you use to create that effect?”

    In order to help you navigate the fun world of Instagram, we will be writing short posts to bring you Instagram quick tips!  We will share our ideas for creating fun and interesting content for your own Instagram pages, and we will share our favorite apps for editing photos and videos.

    Today’s Quick Tip
    Stop putting your phone at risk each time you take an Instagram photo!  Many of you who use a self-timer to take your own yoga portraits are leaning your phones on precarious ledges around the house in order to find the perfect photo angle.  If you haven’t cracked your phone screen as a result of it tipping over onto a hard surface, InstagramQuickTipconsider yourself lucky.

    Here’s our solution to taking photos and videos with your phone safely.  Place your phone into a heavy, short glass.

    Carry the glass around the house with you and place the glass, rather than the phone itself, onto ledges, bookshelves, counters, etc.  If necessary, stuff a washcloth in front of (or behind) the phone to get the desired photo angle.  Get the perfect shot every time using this method without the fear of cracking your phone screen!

  • Balsamic Brussel Sprouts

    Balsamic Brussel Sprouts

    Brussel sprouts conjure up images of my childhood….not the good moments, unfortunately.  I remember whining and crying at the dinner table as I faced a plateful of mushy baby cabbages that made me BrusselSproutsPic
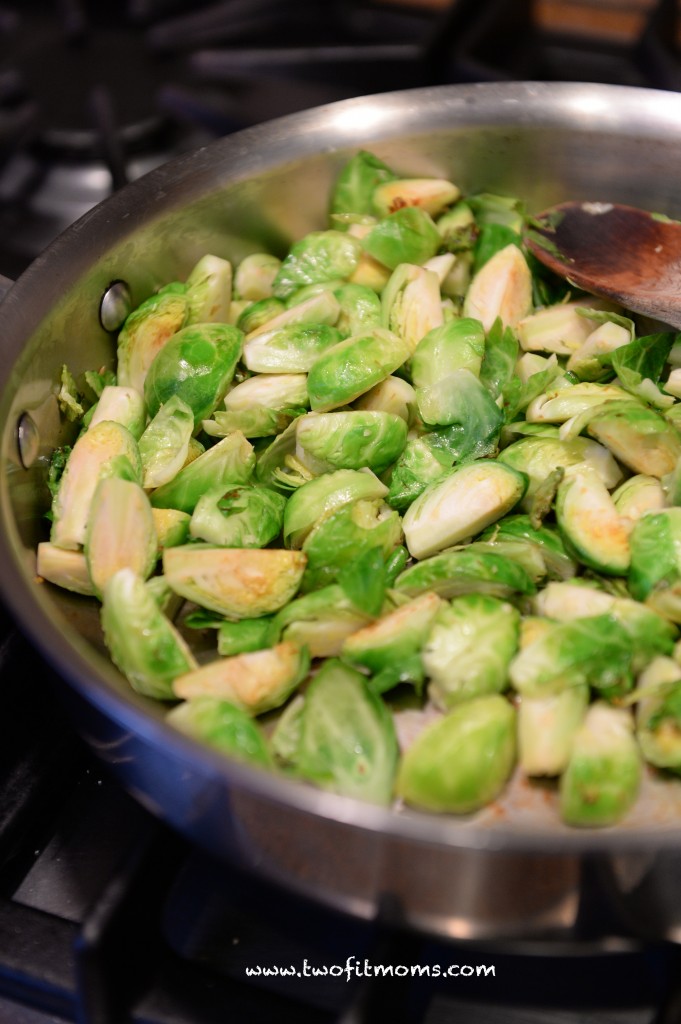
want to gag.  I know that so many of you must have had similar experiences, which is why I am SO excited to introduce you to THIS recipe.  I’m not exactly sure when my mom started making this version of brussel sprouts, but I am very grateful for the change.  Trust me.  This recipe makes me WANT to eat brussel sprouts just about every day.  Give this a try.

    Ingredients:

    1 lb brussel sprouts
    1 Tbsp olive oil
    2 tsp balsamic vinegar
    ¼ cup vegetable broth
    ⅓ cup crushed walnuts
    salt & pepper (optional)

    Step 1
    Cut the hard end off of each brussel sprout, and slice each one into fourths.
    Step1

    Step 2
    Heat 1 tablespoon of olive oil in a deep pan, and sautee the brussel sprouts for 5 minutes until they are golden in color.
    Step2

    Step 3
    Add ¼ cup of vegetable broth and 2 teaspoons of balsamic vinegar to the pan.  Stir the liquid, and then cover the pan.  Allow ingredients to simmer over a low flame for 5 minutes.
    Step3

    Step 4
    Mix ⅓ cup of crushed walnuts into the pan.  Add salt and pepper to taste.
    Step4

  • Healthy Quick Tip:  Steaming Greens

    Healthy Quick Tip: Steaming Greens

    Creating a healthy lifestyle does not have to be an overwhelming experience.  I’m not sure when “all or nothing” became the mantra for healthy living, but it really does not have to be that way.  You can build a healthy life, step SteamGreens
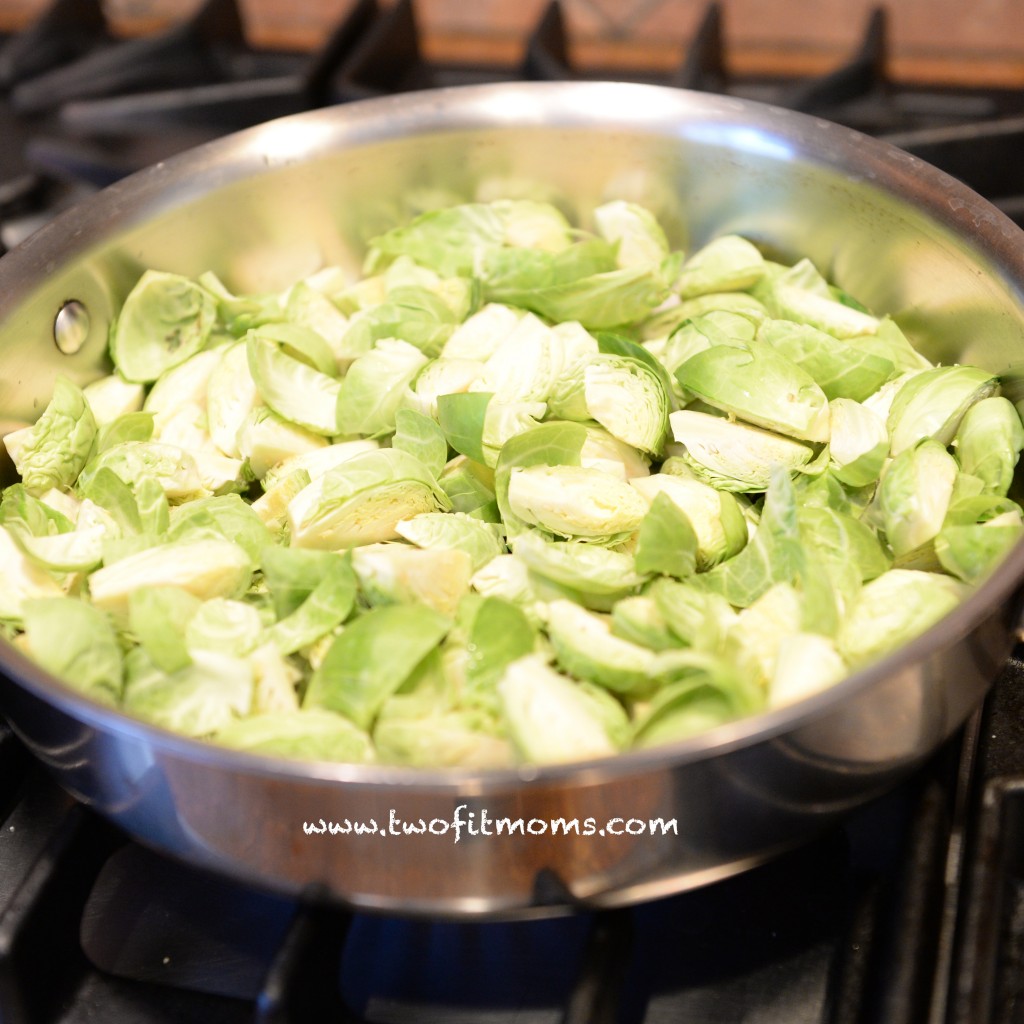
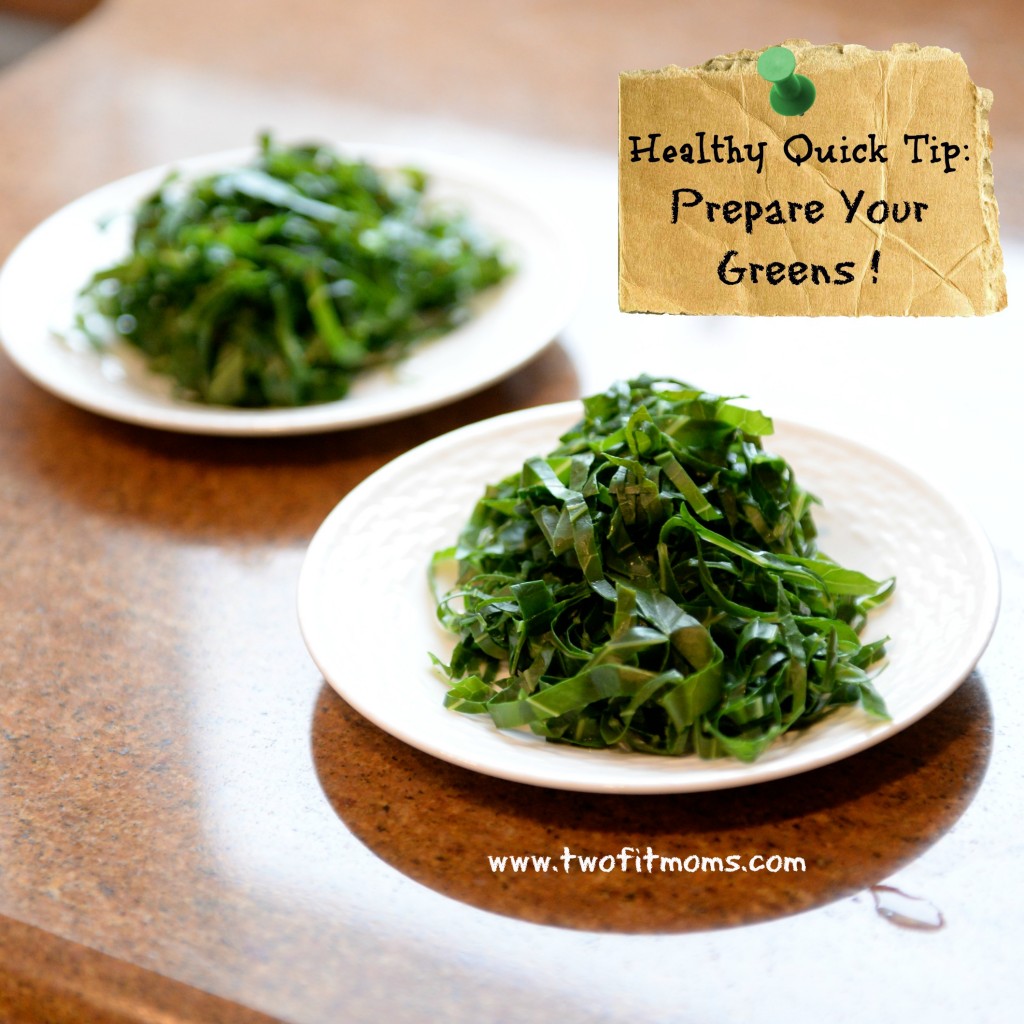
by step.  Simply start by incorporating one small, healthy change into your routine.  My favorite quick tip for better health is to steam leafy green vegetables on a daily basis.  This is such an easy way to kickstart your healthy eating plan.  In the time it takes to boil a few inches of water in a pot, your greens will be washed and ready to cook.

    I do this every single day.  Let me tell you why.

    Finding Inspiration
    When I was diagnosed with an autoimmune illness, I went to a natural healing facility to learn how to balance my body and health.  I was in tremendous pain, but I did not want to start taking the very harsh drugs that are the usual course of treatment for illnesses similar to mine.

    While I was at this healing center, I met a number of individuals with various types of catastrophic illnesses.  They turned to this healing facility as a last resort.  Many of them were given death dates and told that there was nothing else left to be done medically, and many were told to go see the world and say their last goodbyes.  It was only under these dire circumstances that these individuals turned to macrobiotics, a lifestyle and diet to balance the body and mind.

    As I spoke to some of these individuals with cancer and tumors all over their body, I learned that some of them were just beginning their macrobiotic journey, but many of them had been living macrobiotically for years and had long since surpassed their so-called death dates.  How were these people recovering and healing from illnesses that were deemed terminal?!!  It was amazing to witness, and I knew that if they could find healing with these horrific diseases, then I certainly could find healing, too.

    I will not go into macrobiotic theory in this article, but I WILL tell you one thing that EVERY one of these sick people did at EVERY meal.  They ate large quantities of cooked, leafy green vegetables—leafy green vegetables that are low in oxalic acid (not spinach or swiss chard).  Yes, they ate many other very important healing foods, but this is such an easy one for anyone to do!  Imagine the health benefits of eating greens three times a day! (Or even once or twice a day.)  Who knows what kind of weirdo illness you can help ward off with this very simple habit!

    The knowledge that I gained at this healing center was invaluable, and with this knowledge, I have been able to stay out of the hospital and manage my illness without drugs.  I have incorporated greens into my daily routine, and I’m here to tell you that it’s easy, and you can do it, too.

    Let me show you how.

    Step 1:
    Boil water in your steamer pot, or if you do not have a steamer, boil about 1-2 inches of water in the bottom of a pot.  While your water is boiling, wash your green leafy vegetables in cool water.  (Ideally, you will have access to organically grown produce.)  In the photo below, I’m working with collard greens.

    WashGreens

    Step 2:
    Slice the leaf along either side of the hard stem, but do not discard the stems! Organic vegetables are expensive, so you will want to use every part of the plant.  Dry the stems and save them in your refrigerator for another day.  I will post another article and tell you how I use up my collard stems.

    SliceGreens

    Step 3:   
    Make a pile of the leaf halves.

    StackGreens

    Step 4:
    Start at one end, and begin to roll your stack of greens into a tube.

    RollGreens

    Step 5: 
    Hold your tubes of collard greens on one end, and begin to slice your greens from the other end into thin shreds.  By slicing the collards into thin shreds, a typically very tough green can be steamed and softened quickly.

    FinalStep

    Step 6:
    Drop your shredded greens into your steamer or into your boiling water.  Cover the pot for two minutes.  After two minutes, your greens are ready to eat.

    You can have your greens alongside your breakfast (which is what I do) or pack them up to eat with your lunch or dinner later in the day.  Throw them into soup or chili, or eat them as a side dish with a drizzle of your favorite vinegar.  Remember that preparation is key!  The greens will not magically appear if you do not prepare them.  Give this healthy tip a try.  Be proactive about your health, and fuel up on nutrient-dense foods.

    If you would like to ease into macrobiotics, Alicia Silverstone’s cookbook, is a great one to try. The “Superhero” diet that she presents is actually a macrobiotic diet. She also includes many vegan and non-macrobiotic recipes that the whole family will enjoy. There is no pressure at all to adapt a new diet and lifestyle…just a lot of encouragement to dabble and enjoy!

  • Headstands 101:  The Art of Falling

    Headstands 101: The Art of Falling

    I would be remiss to write a “Headstands 101” series of articles and not touch upon the topic of falling.  Falling is the greatest fear in practicing any inversion.  Nobody wants to fall because it feels so uncontrolled and unexpected and could result in an unwanted injury.

    Today, I’m here to tell you that falling is a skill.  You CAN and WILL turn your falls into transitions.  You will no longer fall out of a headstand.  When you feel your body wavering as you balance on your head, you will not flail around and fall flat onto your back.  Instead, you will execute a controlled transition from one pose into another.  The goal?  Tripod headstand into a somersault.  Once you master this transition, your headstand practice will soar to another level.  When you can practice without fear, amazing things will happen on your mat.  Let’s get started.

    Channel Your Inner Kindergartener
    First, remind yourself what it feels like to do a somersault.  Squat down onto your mat as you rest on the balls of your feet.  Keep your knees together and place your hands down onto the floor in front of you.  Spread your fingers and begin to lean forward, putting pressure into your hands.  Tuck your chin to your chest and place the back of your head onto the ground, slightly in front of your hands.  Round your back, push off of your feet, and turn yourself into a tight ball.  Somersaulting should not hurt!  Keep practicing this move until it feels natural and smooth.

    Once you feel comfortable somersaulting, come into a tripod egg to practice the exit strategy.  If you need a refresher on getting into a tripod egg, click HERE to review the steps for this pose.

    Banner
    From your tripod egg, tuck your chin to your chest, round your back by squeezing your knees into your body, and safely roll out of the headstand.  Practice this over and over until it is second nature to tuck and roll as soon as you feel as though you no longer have control of the pose and may tip over.  Once you can tuck and roll out of a tripod egg, lift your knees from your triceps a few inches and try somersaulting again.  Keep lifting your legs and practicing your forward roll until you can safely tuck and roll out of the full expression of the pose with your legs fully extended.

    If you cannot master the somersault, don’t worry about it.  You can always re-visit this transition at some later date.  Until you can MASTER the somersault, however, you should NOT move your headstand practice away from the support of a wall.  There is no purpose in practicing if you put yourself in danger.  You must be able to safely exit a headstand in the middle of a room via forward roll, and until you are comfortable practicing somersaults, you should continue practicing with a wall behind you.  This is all a process, so please do not be discouraged if you are struggling.  It does not need to happen today.  Or tomorrow.  Or even a year from now.  Let yoga be a lifelong practice.  Be safe, have fun, and practice without fear.

  • How to Create a Yoga Playlist

    How to Create a Yoga Playlist

    I am a big believer that ANY kind of music can effectively be used in a full-spectrum vinyasa yoga class.  Does it make sense to play heart-pumping booty music in a candle-lit, restorative yoga class that introduces five poses YogiwithHeadphoneswithin an hour?  Probably not.  But for the high-energy, sweat-inducing type of yoga that I practice and teach, it makes sense, and it can be done.  If you are ready to raise your home practice to another level, make your own yoga playlist.  I’ll show you how.

    First off, there is a method to the madness. 
    You will not enjoy your yoga experience if you simply string 60-minutes of your favorite songs together.  A yoga practice has ebb and flow—like a wave that builds, reaches a peak, and then falls off into peacefulness. The music must follow this wave-like trajectory to mirror the movement of the practice.

    Here’s the basic structure of my own 60-minute practice and how I pick the music to fit.

    0:00 – 5:00 minutes
    Type of Music:  Peaceful instrumental
    I like to use the first five minutes of my practice to sit in peace.  I close my eyes, I breathe deeply, I do some very light stretching (like reaching my arms overhead), and I set an intention for my practice.  I find it necessary to remind myself why I step onto my mat.  I set my purpose.  I find it difficult to do this however, if the music playing in the background is distracting.  I need purely instrumental music to tune into my own inner voice.  The perfect song for my first five minutes of practice is “Beyond this Moment” by Patrick O’Hearn.  Go listen to it.  I bet you’ll want to add it to your own playlist.

    5:00 – 10:00 minutes
    Type of Music:  Slow tempo
    In the next five minutes, I usually do a number of warm-up poses.  Seated twists, light hamstring stretches, a few cat-cows to warm up the chest and back, and maybe a nice long downward facing dog.  In these five minutes, I am beginning to move.  I am no longer sitting with my eyes closed as I was in the first five minutes, but I am also not moving through a flow.  It makes sense for the music to remain low key.  I do not usually pick an instrumental song, but I do pick something with a slow tempo that will match my slow movements.

    10:00 – 15:00 minutes
    Type of Music:  Faster tempo; upbeat
    At this point, I’m ready to start moving and raise the heart rate.  In these five minutes, I am doing multiple rounds of sun salutations.  I find this to be a great way to build heat and to fire up all of the muscles.  The music should reflect the increased pace of movement.  I love doing the sun salutation portion of my practice to “Sadeness, Pt. 1” (Extended Trance Mix) by Enigma.

    15:00-30:00
    Type of Music:  Upbeat, good energy, makes you want to move
    Between minutes 15 and 30, I’m seriously flowing through my practice.  I love having music in the background that makes me want to move.  I don’t find it distracting to play hip hop, R&B, rap music or top 40 hits.  I actually enjoy it!  I like fast-paced fitness yoga, and I choose music that matches that level of energy.  I love Tupac, Jay Z, Gyptian, MC Yogi and many, many others.

    30:00-40:00 min
    Type of Music:  Upbeat, but a little slower for balance series
    Between the 30 and 40-minute mark, I slow the music down just a bit.  I am still standing, but moving through a slower flow, as I practice my standing balance poses (dancer, tree, single-leg balance poses, etc.).  To me, it makes sense to lower the energy of the music just a bit as my heart rate decelerates slightly.  My song choices for this segment of my practice include “One Day” by Matisyahu, “Alone” by Heart, and “Bless the Broken Road” by Rascal Flatts.

    40:00-50:00 min
    Type of Music:  Slower for backbends and inversions
    Slow it down even more!  Remember that you are building a playlist that rises, peaks and then gently falls.  We are in the falling stage here, and you want to pick music that is not distracting.  Backbends and inversions require slow focus, and the music should reflect that mood.  Some of my favorite choices for this part of my practice are “Down to the River to Pray” by Alison Krauss and “Higher Love” by James Vincent McMorrow.

    50:00-55:00 min
    Type of Music:  Peaceful music for seated/reclined stretches
    In the final segment of my practice before savasana, I choose a song that is so peaceful that it could be used during savasana, too.  This is the part of my practice where I might take a gentle supine spinal twist or spend a few breaths in a seated forward fold.  Right now, my playlist includes Sarah McLachlan’s “Possession (Piano Version)”.

    55:00-60:00 min
    Type of Music:  Restful music (possibly instrumental) for savasana
    What we’ve all been waiting for…savasana!  We’ve all been to yoga classes with savasana music that is distracting and actually detracts from the experience.  Fortunately, with your own playlist, you can choose the music that works best for YOU!  Personally, I do not mind music with lyrics.  I am still able to release tension and fall away into my own little world.  If it doesn’t work for you, then find a slow peaceful song that does not distract you.  Try an instrumental piece or even music with lyrics in another language so it is less distracting.  One of my absolute favorite savasana songs is “Fields of Gold” by Eva Cassidy.  This woman’s haunting, beautiful voice guides me right where I need to be.  I have structured this hypothetical class to be 60-minutes, but if you have time, enjoy a longer savasana.

    Finally, let me introduce you to my favorite hour-long playlist.  If you are looking to start your own playlist, feel free to use my songs as a starting point.  Good luck, and happy flowing!

    MY FAVORITE PLAYLIST

    Screen Shot 2014-01-07 at 1.16.21 AM


  • Two-Ingredient Pancakes

    Two-Ingredient Pancakes

    Just when you thought it couldn’t get any easier than 5-ingredient banana-oat muffins, I am introducing you to two-ingredient banana pancakes.  You know why I love these pancakes?  I get the SAME amount of credit from my kids for making these pancakes as I do for making a more time BananaPancakesintensive flour-based pancake batter from scratch—And you KNOW how annoying it is to pull out all of the ingredients to make real pancake batter with flour, sugar, baking powder, milk, eggs, etc.  Who has time for all of that on a weekday?  Or even on a weekend, for that matter.  If the kids don’t even have a preference, I’m going with the two-ingredient version.

    Another benefit of these pancakes is that they don’t need syrup.  They are naturally sweet.  Do they taste like “regular” pancakes?  No, not exactly.  The eggs certainly give these pancakes a little more of an omelette consistency, but they are passable, and my kids have never asked whether these are “real” pancakes.  If you need more of a flour-y texture, add a third ingredient—2 tablespoons of brown rice flour or another flour of your choice!  Enjoy.

    Ingredients:
    1 ripe banana (with brown spots is best!)
    1 egg

    Optional ingredients:  Add 2 tablespoons of brown rice flour for a more typical pancake consistency.  Feel free to top each pancake while cooking with mini chocolate chips, blueberries or nuts.

    Directions:
    Mash the banana and egg together.  Mix ingredients into a smooth batter.  Heat and grease a frying pan/griddle, and drop tablespoon-sized dollops of batter into the pan.  Cook on medium heat, lifting the edges occasionally to check the underside of the pancakes for doneness and to avoid burning.