Author: Masumi Goldman

  • Falling off the Wellness Wagon

    Falling off the Wellness Wagon

    Running a health and wellness website like this one has its unique challenges.  We want to post as many articles as we can to keep you motivated and on the path to wellness, but in the process, we don’t want to paint an unrealistic picture of our lives.  We are busy mothers, and sometimes, that means skipping a workout to care for a sick child or ordering a pizza on a particularly busy night.  Our diets aren’t perfect, our exercise schedules aren’t perfect, and our willpower isn’t perfect.  Our goal is to inspire you and to encourage you, NOT to overwhelm you and make you believe that we live perfect lives that you should try to emulate.

    Choice of pastry against a white backgroundYes, we want you to join us in our daily quest for wellness, but when life gets in the way, and it will, we want you to know that it’s okay.  You are normal.  You can recover.  Don’t throw in the towel.  Just acknowledge that life isn’t perfect, and get right back on track the next day.  “Healthy” does not mean perfect.

    We are ALL human, and falling off the wagon is just part of life.  Yes, it would be wonderful if all of our meals were organic, all of our snacks were unprocessed, and all of our cravings were for cauliflower rather than cake.  The fact of the matter is, life just doesn’t work that way, and we all slip up.

    Everyone has an “off” day.  You know the kind of day that I’m talking about.  You bolt out of bed and race through your morning routine after realizing that you slept through your alarm.  No time for a healthy, home-cooked breakfast.  No time for a morning workout either.  You start your day with a cup of coffee and large muffin that you buy at the convenience store on your way to work.  You end up feeling annoyed and defeated because you ate the muffin and skipped your workout.  You decide that you’ve ruined your clean eating plan for the day anyway, so you say yes to the piece of cake being offered at work.  You then choose the sweetened chai tea latte instead of the chamomile tea during your break.  You eat multiple pieces of bread out of the breadbasket at dinner, order Fettuccine Alfredo instead of grilled fish, and finish off your meal with ice cream for dessert.  At this point, you are defeated and disappointed and the self-loathing begins.  Maybe you’ll even head home to binge on cookies and chocolate later.

    Why will the hypothetical scenario described above resonate with so many readers? It will resonate because it is truly that common.  You are not alone.  Whether you fall off the wagon for a few hours or a few days, there is no need to feel defeated and angry.  Remember that you are in this for the long haul.  What you do over the course of a few hours or a few days or a few weeks has no significance in the long run.  What matters is the trajectory of your life over months and years.  Long-term habits matter, not short-term slip ups.  Allow yourself to have an “off” day from time to time.  It cannot break you if you maintain a long-term perspective.  Forgive yourself for not being perfect, and move on.

  • Orange Dreamsicle Smoothie

    Orange Dreamsicle Smoothie

    When I was a kid in summer camp, I remember being offered an Orange Creamsicle bar every afternoon. It was such a cold, sweet treat after a long day in the sun. The creamy orange flavor will always remind me of the carefree days of summer. Although I no longer sit around eating Creamsicles every afternoon, I love recreating the delicious flavor of my favorite childhood ice cream treat by blending orange smoothies! It’s a great, healthy alternative to store-bought frozen desserts.  Enjoy!OrangeSmoothie

    Ingredients
    -Zest from 1 orange
    -1 peeled orange
    -1 frozen banana (sliced before freezing)
    -1 tsp vanilla extract
    -2 pitted dates
    -½ cup soy milk (or milk of your choice)
    -Handful of ice cubes

    Directions
    If possible, use a washed, organic orange for this recipe, as we will include the outer skin in the smoothie.

    Orange zest is the top layer of an orange peel and is the source of essential oils, which adds great orangey flavor to your food. In order to zest an orange, use a fine grater and scrape only the orange coloring from the peel. Avoid grating the orange down to the white pith, which tastes bitter.

    Add the zest to your blender, along with the peeled orange, 1 frozen banana, 1 tsp vanilla extract, 2 pitted dates, ½ cup of soy milk, and a handful of ice cubes. Blend all of the ingredients until you have a creamy consistency.

  • So You Can Crow…Now What?

    So You Can Crow…Now What?

    Recently, I wrote a short article about the empowering nature of an arm balance practice.  If you’ve taken that article to heart, you may be just beginning your arm balance journey with Crow pose.  For a beginner, Crow pose (bakasana) is a seemingly impossible arm balance.  I still vividly remember the struggle—sweating, engaging every muscle in my body, and trying to balance without tipping forward onto the pillow on the floor in front of me.  I assure you that with consistent practice, it will stop feeling impossible, and one day, it will somehow feel comfortable!  When you get to that day, you will be excited to move on to the next challenge.  This article is for those of you who are ready and eager to move on.

    SoYouCanCrow
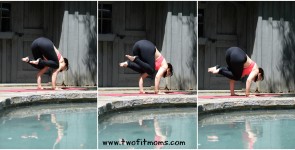
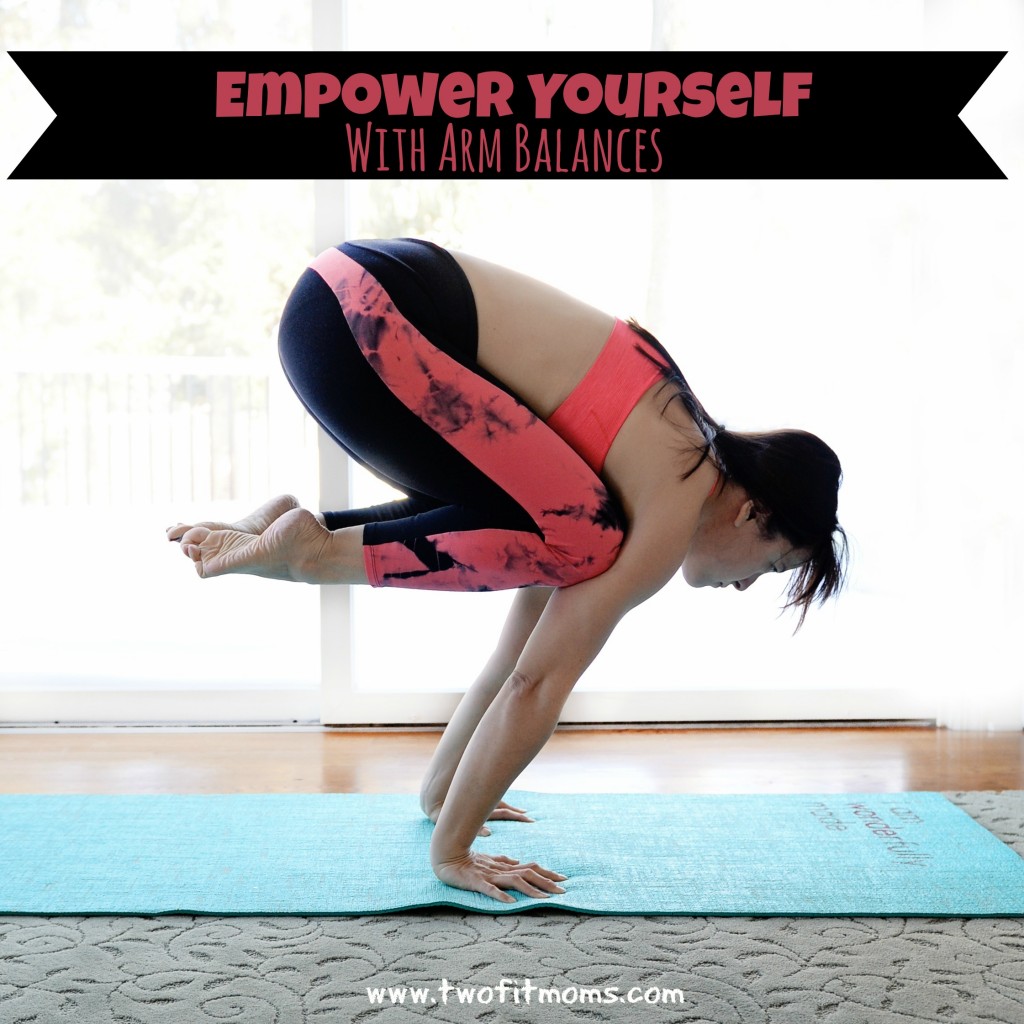
Once you are able to balance in crow pose for 4-5 breaths, you are ready to add an element of difficulty.  Rather than introducing you to one-legged crow (eka pada bakasana), which is the typical progression, I recommend trying a slightly less challenging, core-engaging crow exercise, which I call “sliding crow”.  The mechanics of this exercise are similar to one-legged crow in that you must engage your core muscles and lift one knee off of your tricep, but it will feel less intimidating because your knees will not move more than an inch or two off of your arms.

    To begin, start off in crow pose, and review your alignment checklist.

    -Are your fingers spread wide and gripping the mat?

    -Is your upper back rounded like a cat to help engage the core and redistribute your weight on the back of your arms?

    -Is your core engaged?

    -Are your thighs squeezing inward?

    -Are your elbows squeezing inward?

    -Are you pulling your heels up toward your bottom?

    -Are you gazing forward past your fingertips?

    If you have answered “yes” to each of the questions above, your crow is in good form, and you are ready to move on.

    From crow pose, begin to shift your weight onto the back of your left tricep without actually lifting a knee.  To an observer, your weight-shifted crow may look no different from your regular crow.  This is just a shift in weight.  Pause here, and find your balance in this variation of crow, where the majority of your weight has moved onto the back of your left arm.

    If you feel stable, the next goal is to lift the right knee from the back of the right arm by just an inch or two.  In order to accomplish this, pretend that your belly is connected to your right knee by a string.  I know it sounds odd, but this visualization works.  You have the ability to lift the right knee from the back of the right tricep by engaging your core even more than it currently is, and pulling your knee up using the imaginary string.

    If you are able to lift your right knee about an inch, slowly begin to slide that knee over to the left tricep.  The end goal of this exercise is to ultimately be resting with both knees on the back of the left arm.

    SlidingCrow

    Pause for a moment, and return the right knee to the right tricep.  Repeat this sliding crow exercise, but this time, shift the weight onto the back of the right arm and slide the left knee to the right tricep.

    Once you develop the balance and control to do this exercise, your crow will be ready to take flight into one-legged crow (eka pada bakasana).  Good luck, and have fun!


  • Pushing Past Fear

    Pushing Past Fear

    One day, you will be given an incredible opportunity.  It may be a new job, or an acceptance into a great school, or an invitation to perform or speak in front of an audience.  Your friends will cheer, your family will feel great pride to hear about this new opportunity, and you will smile and thank everyone for the encouragement, but deep down inside, you will have a feeling of dread.  You will be afraid.

    TFMDancers
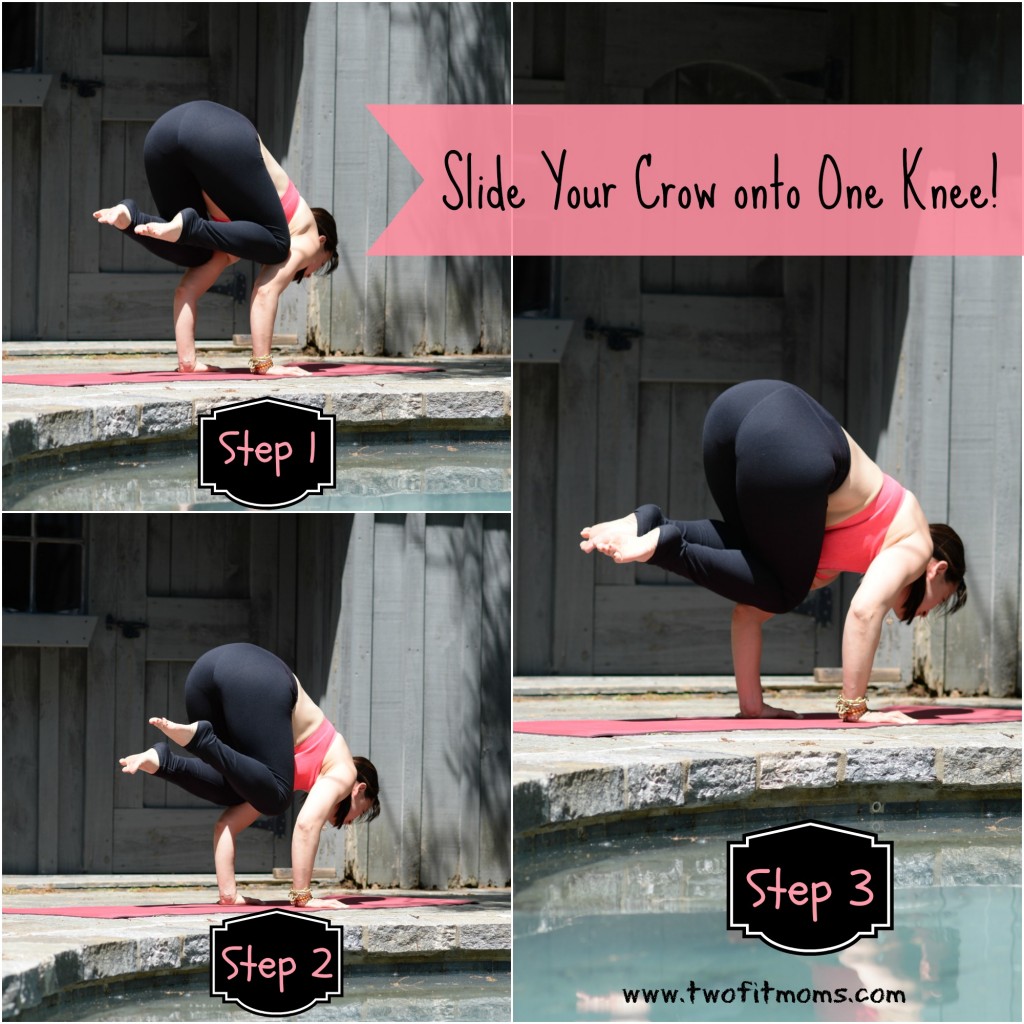
Let me remind you now that with any great opportunity come feelings of unease…a fear of failure, a fear of success, fear of the unknown and feelings of inadequacy.  You may feel that you are being pushed so far past your comfort zone that you cannot succeed, but this is when you must remind yourself that you wouldn’t have been chosen for this great opportunity if others didn’t see your potential.  You CAN rise to meet this challenge, and you WILL thrive, if you just believe.

    This past week, Laura and I traveled to Boulder, Colorado to film five instructional yoga videos for Gaiam.  It was overwhelming to know that a company like Gaiam, with its vast wellness empire, would be interested in being affiliated with two yoga moms from New Jersey.  It all felt surreal, and it stirred up all sorts of doubt in our minds.  What if we didn’t sound good on camera?  What if no one liked the videos?  What if we are unable to project our true personalities because we are so nervous?  The insecurities were abundant, but we pushed forward anyway.  We planned our sequences, filmed test videos, chose our clothing, and boarded the flight to Boulder.

    TFMHollowbackWhat we found when we arrived at Gaiam just a few short hours later was comforting. The air was fresh, the surrounding mountains were picturesque, and the familiar stress of New York City was thousands of miles away.  We were greeted by friendly faces that felt more like a big family than a big company. This certainly was not the fearful, intimidating environment that I had pictured in my head.  Imagine if our fears stopped us from pursuing this opportunity?  We would have missed out on this amazing experience.

    Yes, the filming of the videos was still nerve-wracking.  And yes, it was hard work, but in the end, we tolerated the fears and feelings of discomfort, and we overcame them all. The feelings of inadequacy were just that—feelings. We were prepared, and what we brought to the table was enough.

    Sometimes, you just need to muster up the courage to move forward.  Push right through that comfort zone and into the unknown.  Take risks, overcome your fears, and you will see that you are much stronger and much more capable than you ever thought you could be.

    “Take the first step in faith. You don’t have to see the whole staircase, just take the first step.” – Martin Luther King, Jr.


  • Empower Yourself with Arm Balances

    Empower Yourself with Arm Balances

    I still remember the first time I was able to hold crow pose for more than a second.  I wanted to jump for joy and announce my accomplishment to anyone who was willing to listen.  Crow pose, which once seemed so impossible, became a reality.  I watched an impossibility morph right into a possibility, and then into an accomplishment.  What an empowering process!  If I can accomplish an “impossible” feat on my yoga mat, think of all of the possibilities for my life off of the mat.Crow

    I want to share this inspiration with others, and that is why I continue to teach arm balances to anyone who wants to learn.  I want others to get a glimpse of their own potential.  THAT is the gift I want to give others—not the gift of arm balancing.  Balancing and twisting into interesting shapes and poses is fun, but it’s just the medium for delivering the greater gift—confidence in one’s own abilities.

    It doesn’t have to be perfect.  Some days, it will feel effortless, and other days, it may not be a pretty sight.  No one will show up at your front door and give you a medal for arm balancing beautifully.  Likewise, no one will show up to berate you for your clumsy form.  The idea here is to empower yourself OFF the mat by breaking through barriers ON the mat.

    Get inspired, stay motivated, and practice often.  You can do amazing things!

    To access tutorials and tips for your own arm balance practice, CLICK HERE!

  • Handstands:  The Art of Falling

    Handstands: The Art of Falling

    If you are ready to move your handstand practice away from the safety of a wall, you must embrace the art of falling.  I call it an art because there is actually a bit of technique involved. Once you master the technique, you will not be afraid of practicing in the middle of a room.  You will realize that falling out of any inversion can be a controlled transition from one pose to another.  When you feel your body wavering as you balance on your hands, you will not flail around and then land flat on your back.  You will be armed with a game plan—a real exit strategy.  You will fall (or transition) from handstand into wheel pose.TheArtofFalling

    Practice Wheel Pose
    Before moving your handstands away from the wall, you MUST be very comfortable in wheel pose.  You will be falling into this deep backbend from a height, so you certainly don’t want to fall into this pose if you are uncomfortable or feel any strain at all when you lift into wheel from the floor.  Please review the proper form for wheel pose HERE.

    If you cannot do this pose with ease, continue to practice your handstands with a wall.  Every day, you can continue to work on your backbends and heart/shoulder opening stretches until wheel pose is no longer a struggle.

    At this point, if you are uncomfortable with wheel pose, you may be wondering if there are other alternatives to exiting a handstand.  Yes, there are other options, but I don’t like teaching them.  Falling into a cartwheel, for example, is a very popular exit strategy from handstand, but it doesn’t make sense for beginners.  As a recent beginner myself, I know that once you begin to lose your balance in a handstand, you do not have enough control to do anything but fall straight back.  Attempting to do anything else (like lift one hand to cartwheel to the side) is dangerous and could result in injury.  Trust this process.  If wheel pose is difficult, keep practicing your backbends each day.  Soon enough, you will be practicing handstands in the middle of the room, and you will stay safe because your hands will be rooted in one spot and remain there for the duration of any fall/transition.

    Practice the Transition
    Make sure you are warmed up before practicing this transition.  Kick up into any variation of handstand that feels stable, and when you begin to lose your balance, don’t fight the natural momentum.  The inclination will be to fall straight back, and that is what you will do.

    The most important step in this transition is to maintain straight arms the entire time.  If you bend your elbows during the fall, you might hit your head or land flat on your back.  Just think—strong, straight arms.  Repeat it over and over in your mind.  One way to stay strong is to grip your mat firmly with your fingertips.  By maintaining an engaged feeling in the tips of your fingers, you will be reminded to engage the entire length of your arms by staying strong and straight.

    If You are Scared…
    Kicking up into handstand in the middle of a room and then falling back into wheel requires a huge leap of faith.  You must believe that you have the strength in your arms, the flexibility in your back, and the overall balance necessary to land on your feet in wheel pose.  If you are not convinced of your own ability to do this, don’t be discouraged.  You can practice transitioning into wheel from handstand WITH the safety of a wall.

    To begin, lie down on your back with your knees bent, the soles of your feet flat on the ground, and the tips of your toes against a wall. Review your form before continuing—make sure that your heels are as close to your bottom as possible.  Bend your elbows, and bring your hands alongside your ears, with your fingers pointed toward your body.  You are now set up on the floor as if you were going to lift into wheel pose with your toes against a wall.  Take note of where your hands are relative to the wall.  THIS will be your starting point for your handstand practice.  No need to lift into wheel pose right now.  Go ahead and stand up, and place your hands down onto this starting point that you just determined.  Kick up into handstand, and when you lose your balance, allow your legs to fall against the wall.  Keep your arms strong and straight, and begin to walk your feet down the wall onto the floor into wheel pose.  Repeat this exercise as many times as necessary to become accustomed to the feeling of transitioning from handstand to wheel.  Once you feel confident, go ahead and try the transition in the middle of the room.

    Stay safe, believe in yourself, and enjoy the process.

  • Instagram Quick Tip:  Creating Inspirational Posts

    Instagram Quick Tip: Creating Inspirational Posts

    When I first joined Instagram, I found myself taking lots of screenshots of inspirational posts— amazing quotes, yoga photos, running trails, exotic locations, and fitness routines.  As I scrolled back through these captured images on my phone’s camera roll, I realized that most of Inspirationthese posts had one thing in common:  they all had some sort of caption or inspirational quote right on the image itself.  I assumed that these images were all professionally produced until I came across the Over app.  Over will help you create your own inspirational image by quickly adding a quote or your own motivational words to a photo.

    There are many typography apps on the market, but this app is my favorite because of the variety of professional looking fonts that are offered, and the ease of use.  Even if you have very little experience with apps or photo editing, you will find this program to be intuitive and simple to use.  The app gives you complete control over the size, alignment and color of the font, so each photo can be customized to your liking.  If you are looking for a free version of this app, download Overgram instead.  The functionality is the same, but each image will be branded with an Overgram watermark unless you upgrade.

    Go ahead and give the free version of this app a try to see if you like it.  Think of your favorite quotes.  Look through your photos to find your most inspirational images.  Combine the two to create your own inspirational posts for others to enjoy and share on Instagram.  It’s fun, it’s easy, and you never know whose life you may touch with the right words and the right image at the right time.  Enjoy.

  • 10 Reasons I Do Instagram Yoga Challenges

    10 Reasons I Do Instagram Yoga Challenges

    Over the past year, Laura and I have been very active in the Instagram yoga community.  We’ve hosted some of the very first yoga challenges offered on Instagram, and we continue to remain active in hosting and participating in challenges today.

    Since our early days of posting very detailed step-by-step picture tutorials, we’ve watched thousands of people connect and grow a virtual Instagram yoga community just by attempting the GrasshopperPrepdaily pose of the day and posting a photo of their attempt to a designated hashtag.  What an overwhelmingly positive experience to watch Instagram yogis grow, inspire, and BE inspired!
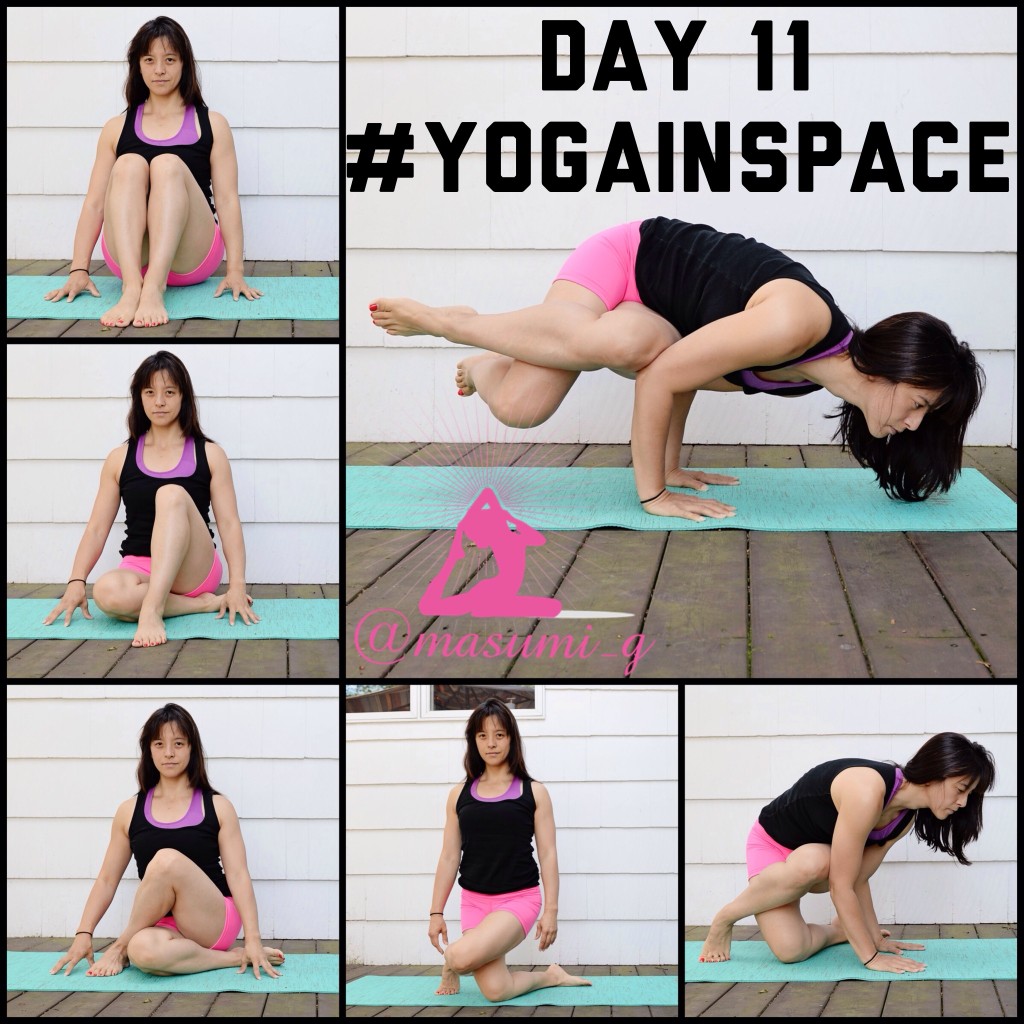
    If you have not yet given a challenge a try, I suggest that you pick one and get involved today.  Here are my top reasons for participating each month.

    It Creates a Daily Habit
    A daily yoga challenge makes you commit to a daily practice.  Let’s be honest—it’s hard to commit to a daily hour-long yoga session.  We are all tired and busy, but, I assure you that it feels much less overwhelming if we believe that we just need to stretch and warm up for one yoga pose.  This is a great way to take baby steps toward a longer more meaningful daily practice.  Get in the habit of rolling out your mat daily by participating in a challenge.

    It’s Fun
    Everyone loves a good challenge.  I still remember the first time I saw a photo of an arm balance pose on Instagram.  It looked incredible.  How was it even possible to balance in that way?!!!  I was fascinated and excited to get on my mat and try.  Perfecting the pose was not the goal.  The goal was to try, and practice, grow and play.  As adults, we rarely play.  Practicing new yoga poses each day awakens our inner child, and it’s just downright FUN.

    It’s Free
    Do I have to say more?  It’s free.  Free instruction, free participation, free fun, and often, you can even score a free prize!  Not everyone has the money to take a yoga class in a studio.  By participating in an Instagram yoga challenge, you can get your yoga fix without shelling out the big bucks.

    SideCrowIt’s Inspiring
    It’s incredibly inspiring to look through a yoga challenge hashtag and see thousands of yogis from all walks of life doing the same pose.  These yogis are different ages, races, sizes and nationalities, but they have all come together to participate and grow in their practice.  Seeing a yogi that is twice your age is inspiring.  Seeing a parent and child together attempting a pose is inspiring.  Seeing yogis that are overcoming sickness and pain by using yoga as a healing tool is inspiring.  All of this inspiration will make you want to come back day after day and practice with the Instagram community.

    It Can Be Done from Home
    Some people don’t have the money to take a yoga class, and others don’t have the time to take a class.  As a mother of young children, it takes a village for me to be able to leave my house to do basic things—like shop for groceries or get a haircut.  Traveling to a yoga studio does not happen often, and it doesn’t happen without planning in advance for babysitters.  By getting involved with Instagram challenges, I can practice at home whenever it’s convenient—even if that means taking photos of poses at midnight.

    It Documents Your Journey
    For better or for worse, if you participate in a daily Instagram yoga challenge, you will have a visual record of each pose that you attempt.  In the beginning, seeing your poor form or lack of flexibility may be discouraging, but as time passes, you will be grateful for these photos.  It amazes me to look back at my old yoga photos and see how far I’ve come in my practice.  My posture, flexibility, strength and form have improved dramatically, and I am aware of the progress that I’ve made over weeks or months.

    It’s a Great Way to Meet Yoga Friends
    The Instagram yoga community is an amazingly supportive group.  Everyone is encouraging and supportive, and that is a great kind of environment to learn and grow in your practice.  When you join an Instagram yoga challenge, you get the feeling that you are a part of something greater than yourself.  As soon as you join a challenge, you are no longer alone.  You have joined a movement, and it feels amazing to get caught up in the positive energy and practice (virtually) alongside your new Instagram yogi friends.

    FlyingLizard
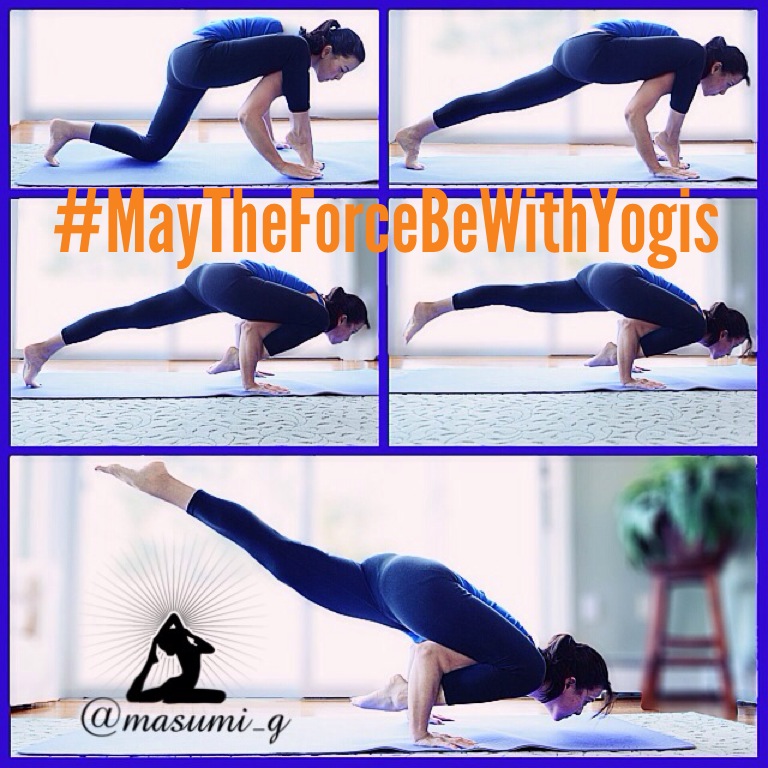
It Creates a Well-Rounded Practice
    We all have our strengths.  We all also have our weaknesses.  I’ve found that when I practice yoga on my own, I have a tendency to work on poses that come easily to me, and I avoid working on the poses that target my weaker/less flexible body parts.  The wonderful thing about Instagram yoga challenges is that the pose of the day forces you to work on body parts that you might otherwise completely avoid.  If the challenge pose is a backbend, you will work on backbends, even if you dislike them.  If the challenge pose is a deep hamstring stretch, you will spend time stretching the backs of your legs.  I’ve found this aspect of the challenges to be very beneficial.  Rather than focusing on just the poses that I enjoy, I also work diligently on the poses that I don’t enjoy so much.  By doing this, I’ve become much more well-rounded in my practice than I otherwise would be.

    It Exposes You to Different Types of Yoga
    I used to think that there was one type of yoga—the kind where you sit with your hands in prayer and maybe do a warrior 1 pose from time to time.  The idea of doing yoga used to bore me to tears.  I had no idea that yoga could be a challenging, sweat-inducing workout.  There is a type of yoga for everyone, and the world of Instagram yoga has opened my eyes to it all.  Who knew that yoga could include inversions like headstands and handstands or arm balances that tested your strength, balance and flexibility?  Take a look through all of the available challenges this month and you will see how much variety yoga has to offer.

    TreeEnjoy the Non-Physical Benefits of Yoga
    If you join an Instagram yoga challenge and you’ve never tried yoga before, you might start out just enjoying the physical benefits of the poses.  That’s definitely the experience I had.  I would stretch, strengthen, sweat, take a photo of the pose of the day, and move on with my life.  Over time, however, I’ve noticed that my body has loosened up to the point where my practice has truly become a moving meditation.  I can find peace in each pose, as the poses become more accessible.    I am now able to focus on the present moment as I’m living it, and THIS is an invaluable skill on and off the mat.

  • Building a Healthy Pantry

    Building a Healthy Pantry

    PantryJarsA well-stocked pantry can help you stay on track with your healthy eating plan.  With the right ingredients on hand, meal planning can become an intuitive and simple part of your life.  Quick meals will come together with just a few fresh ingredients from the supermarket, and healthy snacks will always be available.  As with any endeavor, preparation is key.  Stock your pantry with healthy staples, and you are bound to make healthy choices in the kitchen.

    Because the pantry is home to all of your long-shelf-life items, it has the potential to hold lots of unhealthy food choices that are chock full of preservatives and processed with unrecognizable ingredients.  This week, start out by making room for healthy pantry staples.

    Get rid of the junk food, the highly processed canned goods, the refined flour and sugar, anything with artificial sweeteners, hydrogenated oils, artificial dyes, or ingredients that you can’t pronounce. Once you purge all of the obvious items that will not serve you in your wellness journey, move on to re-stocking.

    Be economical.  Build your pantry slowly.
    Before you get started, keep in mind that re-stocking a pantry takes time and money.  Rather than spending a small fortune on your first trip to the market, plan on buying a few new items each time you shop.  Don’t try to buy every type of organic bean that you find.  Pick one or two varieties for now.  Likewise, pick one or two grains to purchase.  You can always add to your pantry staples over time.

    Here are my suggestions to build a solid, healthy foundation for your pantry.

    Whole grains
    I like to keep several different types of whole grains in my pantry, but steel-cut oats and brown rice are two examples to get you started.  Oats are a great way to start the day, and brown rice provides a great base for a quick vegetable stir fry.

    Quinoa
    It cooks like a whole grain, it looks like a whole grain, but technically speaking, it’s a seed.  I always have quinoa on hand.  It is packed with nutrition, and it cooks very quickly (15 minutes or less) in comparison to other whole grains like brown rice, which can take nearly an hour.

    Beans
    Beans are the perfect addition for soups, stews or salads.  You can also puree beans to create hummus or a tasty spread for sandwiches.  Keep a variety on hand—canned chickpeas, kidney beans and black beans are my favorites.  Also, make sure to buy some dried beans, too. Dried lentils or split-peas have a long shelf life and are quick to cook.

    Cold pressed oil
    When shopping for oil, look for cold pressed oils like olive oil, or if you prefer oil without a distinctive flavor, try safflower oil.  The goal is to avoid oils (such as canola) that are refined through solvent extraction, neutralization and bleaching.

    Nut butter
    Almond butter, cashew butter or peanut butter…take your pick!  Nut butters are a great addition to smoothies (see our Apple Pie Smoothie recipe), and they make a quick snack or lunch for you and the kids.  This is one pantry staple that you will not regret buying!

    Vinegar
    If you love making salads of any kind—vegetable salad, noodle salad, potato salad, rice salad, etc, you will want to have a variety of vinegars on hand.  Vinegar adds lots of flavor, and it is a picnic-safe alternative to mayonnaise.

    Liquid for your smoothies
    Keep your pantry stocked with organic non-GMO soy milk, almond milk, rice milk or coconut water so that you have liquid to blend your smoothies.  Smoothies make a great breakfast or snack.  Yes, you can buy soy milk in the refrigerated section of your supermarket, but if you don’t use it regularly, pick up a box of shelf-stable soy milk, and leave it in your pantry until the urge for a smoothie arises.

    Nuts
    I know that I already listed nut butter on the pantry essentials list here, but nuts are also great to have on hand.  This is a great portable snack to keep in your bag or desk drawer at work.  Throw a handful of crushed nuts onto your oatmeal in the morning or into a salad for lunch to make your meal heartier.

    Vegetable broth
    In an ideal world, we would all have time to simmer our own big pot of vegetable stock.  Fortunately for us, there are a few excellent, organic vegetable broth options right on the shelves of your supermarket.  I like to always keep a minimum of two cartons of broth in my pantry. Use vegetable broth instead of water to cook couscous or to make soup, simmer vegetables, add flavor to sauces or stews, etc. The possibilities for vegetable broth are endless.

    Canned tomatoes
    Canned tomatoes can be used in soups, stews, bean salads, or marinara sauce.  I like to keep a variety of tomatoes in my pantry:  crushed, diced, pureed and whole.  For a quick meal idea using canned tomatoes, see this week’s recipe for Weeknight Marinara.

  • Set a Daily Intention

    Set a Daily Intention

    How do you start your morning?  What is the first thing you do?  Do you groggily open your eyes, roll over in bed to reach for your phone, check your Facebook, Instagram and weather apps, stumble into the bathroom to wash up and then find yourself in the kitchen where you begin to pour yourself a large mug of caffeine?

    Window seat with cushions, book and mug; fall viewIf this is your typical morning, I am here to tell you that it can be SO much more.  You can change the frenetic pace of your day and start off feeling organized and peaceful.  Each morning does not have to be a sudden jolt out of Sleepyland into Caffeineville.

    I’m going to avoid the word “meditation”, because that word has the tendency to freak people out.  No, I’m not asking you to meditate.  I’m asking you to take 5 minutes each morning to sit quietly, breathe, give thanks, and set a daily intention.

    Start out by finding a peaceful, clean place to sit.
    I recommend setting a 5-minute timer (especially if you prefer lying down during this exercise) so you don’t drift off and miss your train to work.  You can either sit on the floor on your yoga mat, on a pillow or in a comfortable chair.  Just find a place that is away from the daily noise of your life.  No catalogs, bills, permission slips for school, chapstick, tissue boxes or other visual clutter.  I prefer sitting near a window because I love how I feel when natural light is pouring into my house.

    Express gratitude
    Next, close your eyes and say a simple prayer of gratitude.  Whether or not you believe in a higher power, it is an important exercise to acknowledge and give thanks for everything in your life.  Does it really matter if it’s a blessing from above or a matter of good circumstance?  No.  You are fortunate, and by actively recognizing that each morning, you will start the day on the right foot.

    Breathe deeply
    Once you’ve expressed gratitude, move on to an easy breathing exercise.  Here is my favorite breathing technique that I learned during my yoga teacher training:  Inhale deeply through the nose for a count of eight, hold the breath in the lungs for a count of four, and then exhale through the nose for a count of eight.  In my mind, I count like this:  Inhale, 2, 3, 4, 5, 6, 7, 8.  Hold, 2, 3, 4.  Exhale, 2, 3, 4, 5, 6, 7, 8.  Repeat this count over and over in your mind until you are breathing in this manner without having to count in your head at all.

    When your 5-minute timer buzzes, slowly open your eyes, and set an intention for the day.  It doesn’t have to be an elaborate plan—it can be as basic as, “Today, I will welcome each challenge as an opportunity to grow.”

    Starting each morning with peace, gratitude and a positive statement can make all the difference in the trajectory of your day.  Give it a try, and let us know how it goes.