Category: Uncategorized

  • White Bean Dip with Seasoned Pita Chips

    White Bean Dip with Seasoned Pita Chips

    white bean dipThis white bean dip recipe that I’m sharing with you is a modified version of a dip that I found in a Giada DeLaurentiis cookbook (Everyday Italian) years ago.  It’s become our hummus alternative.  In fact, it’s a family favorite and frequently graces our events (right alongside my husband’s famous guacamole!).  And, it very may well be on the menu this Memorial Day weekend!

    It’s really a cinch to make.  With only a few ingredients, and a food processor on hand, you will have a delicious homemade white bean dip in no time!

    I serve my dip with seasoned pita chips — a homemade take on a store-bought favorite.  This too requires very little effort and, I bet you have most, if not all, of the ingredients in your pantry.  Once you make homemade pita chips, you will turn your nose up at the store-bought kind! The pita chip recipe follows as well.

    As with most of our recipes, this one can be modified and adapted to suit your needs and tastes.  You will also notice that we generally “season to taste” which allows you to control the amount of spices, specifically salt.

    Enjoy!

    white bean fp upcloseWhite Bean Dip

    Yields approximately 2 cups of dip.

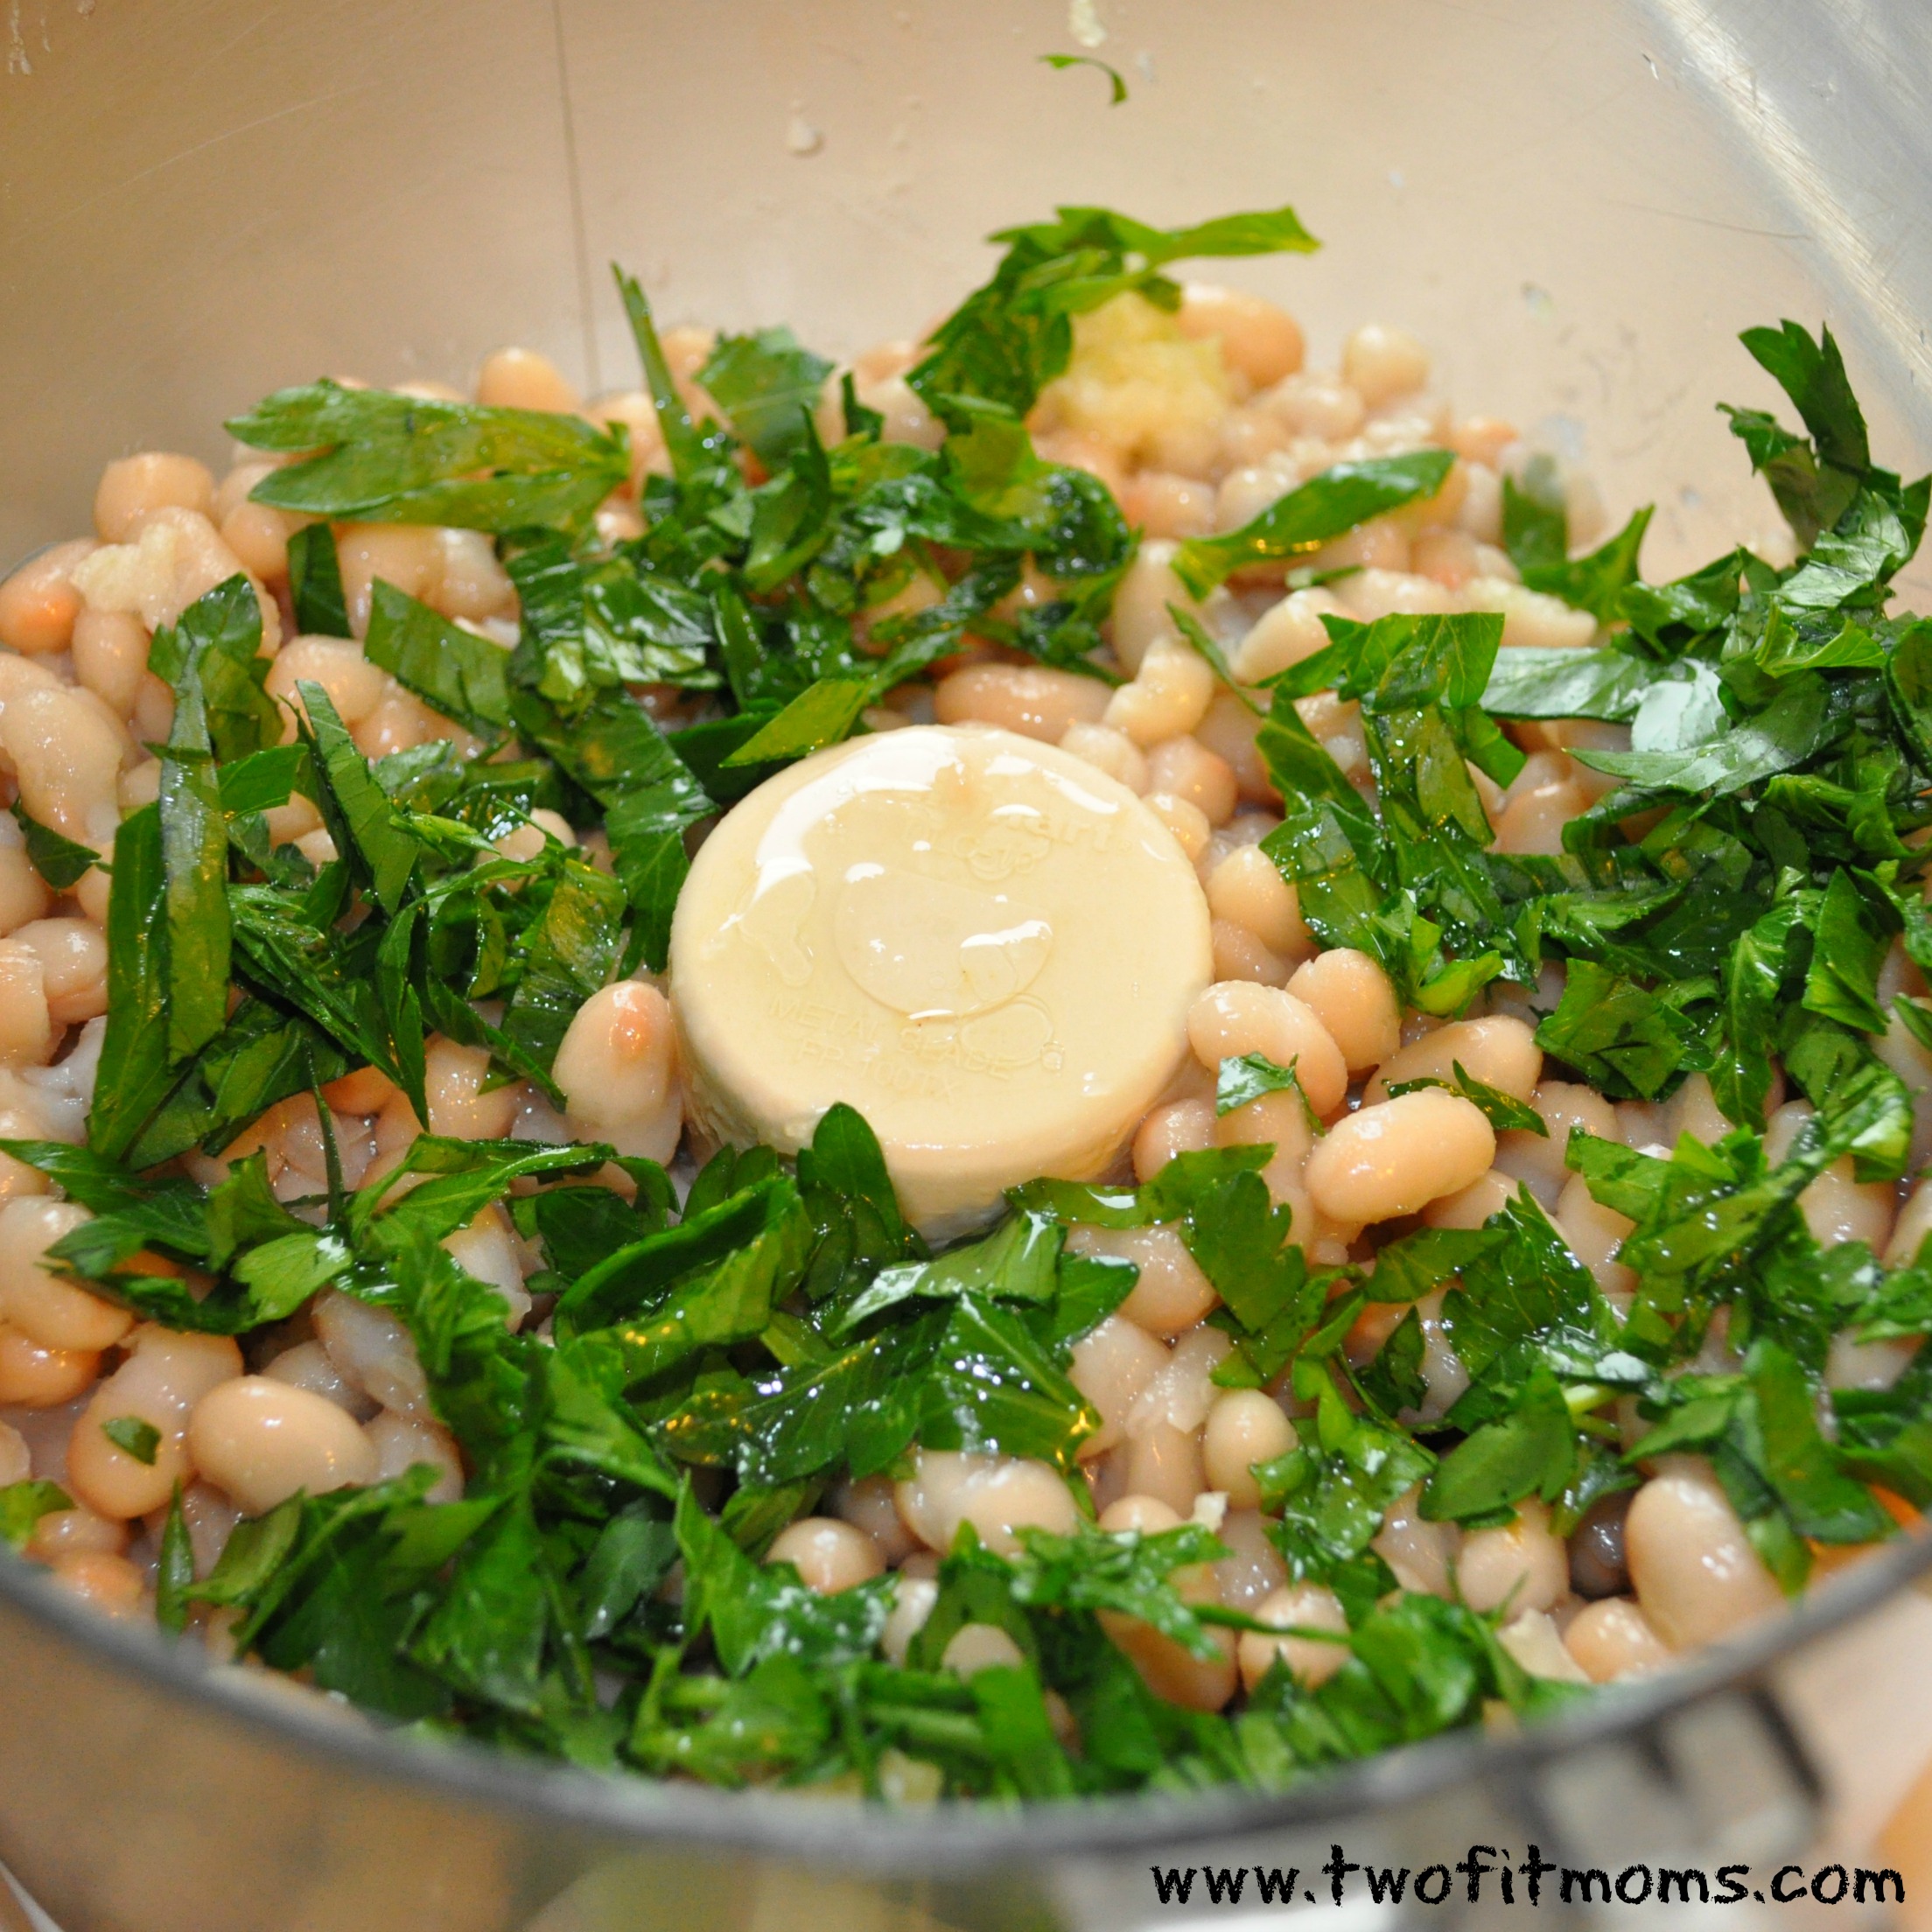
    2, 15 ounce cans of white cannellini beans, rinsed and drained
    1/2 cup of olive oil
    1/2 cup of parsley
    1 clove of garlic, crushed
    1 teaspoon of salt
    1/8 teaspoon of pepper
    4 tablespoons of fresh lemon juice

    Add beans, olive oil, parsley, garlic, salt, pepper and juice of one lemon to the bowl of a food processor.  Pulse until combined and creamy.

    Serve with homemade pita chips (recipe follows) or fresh veggies.

    pita  upclose
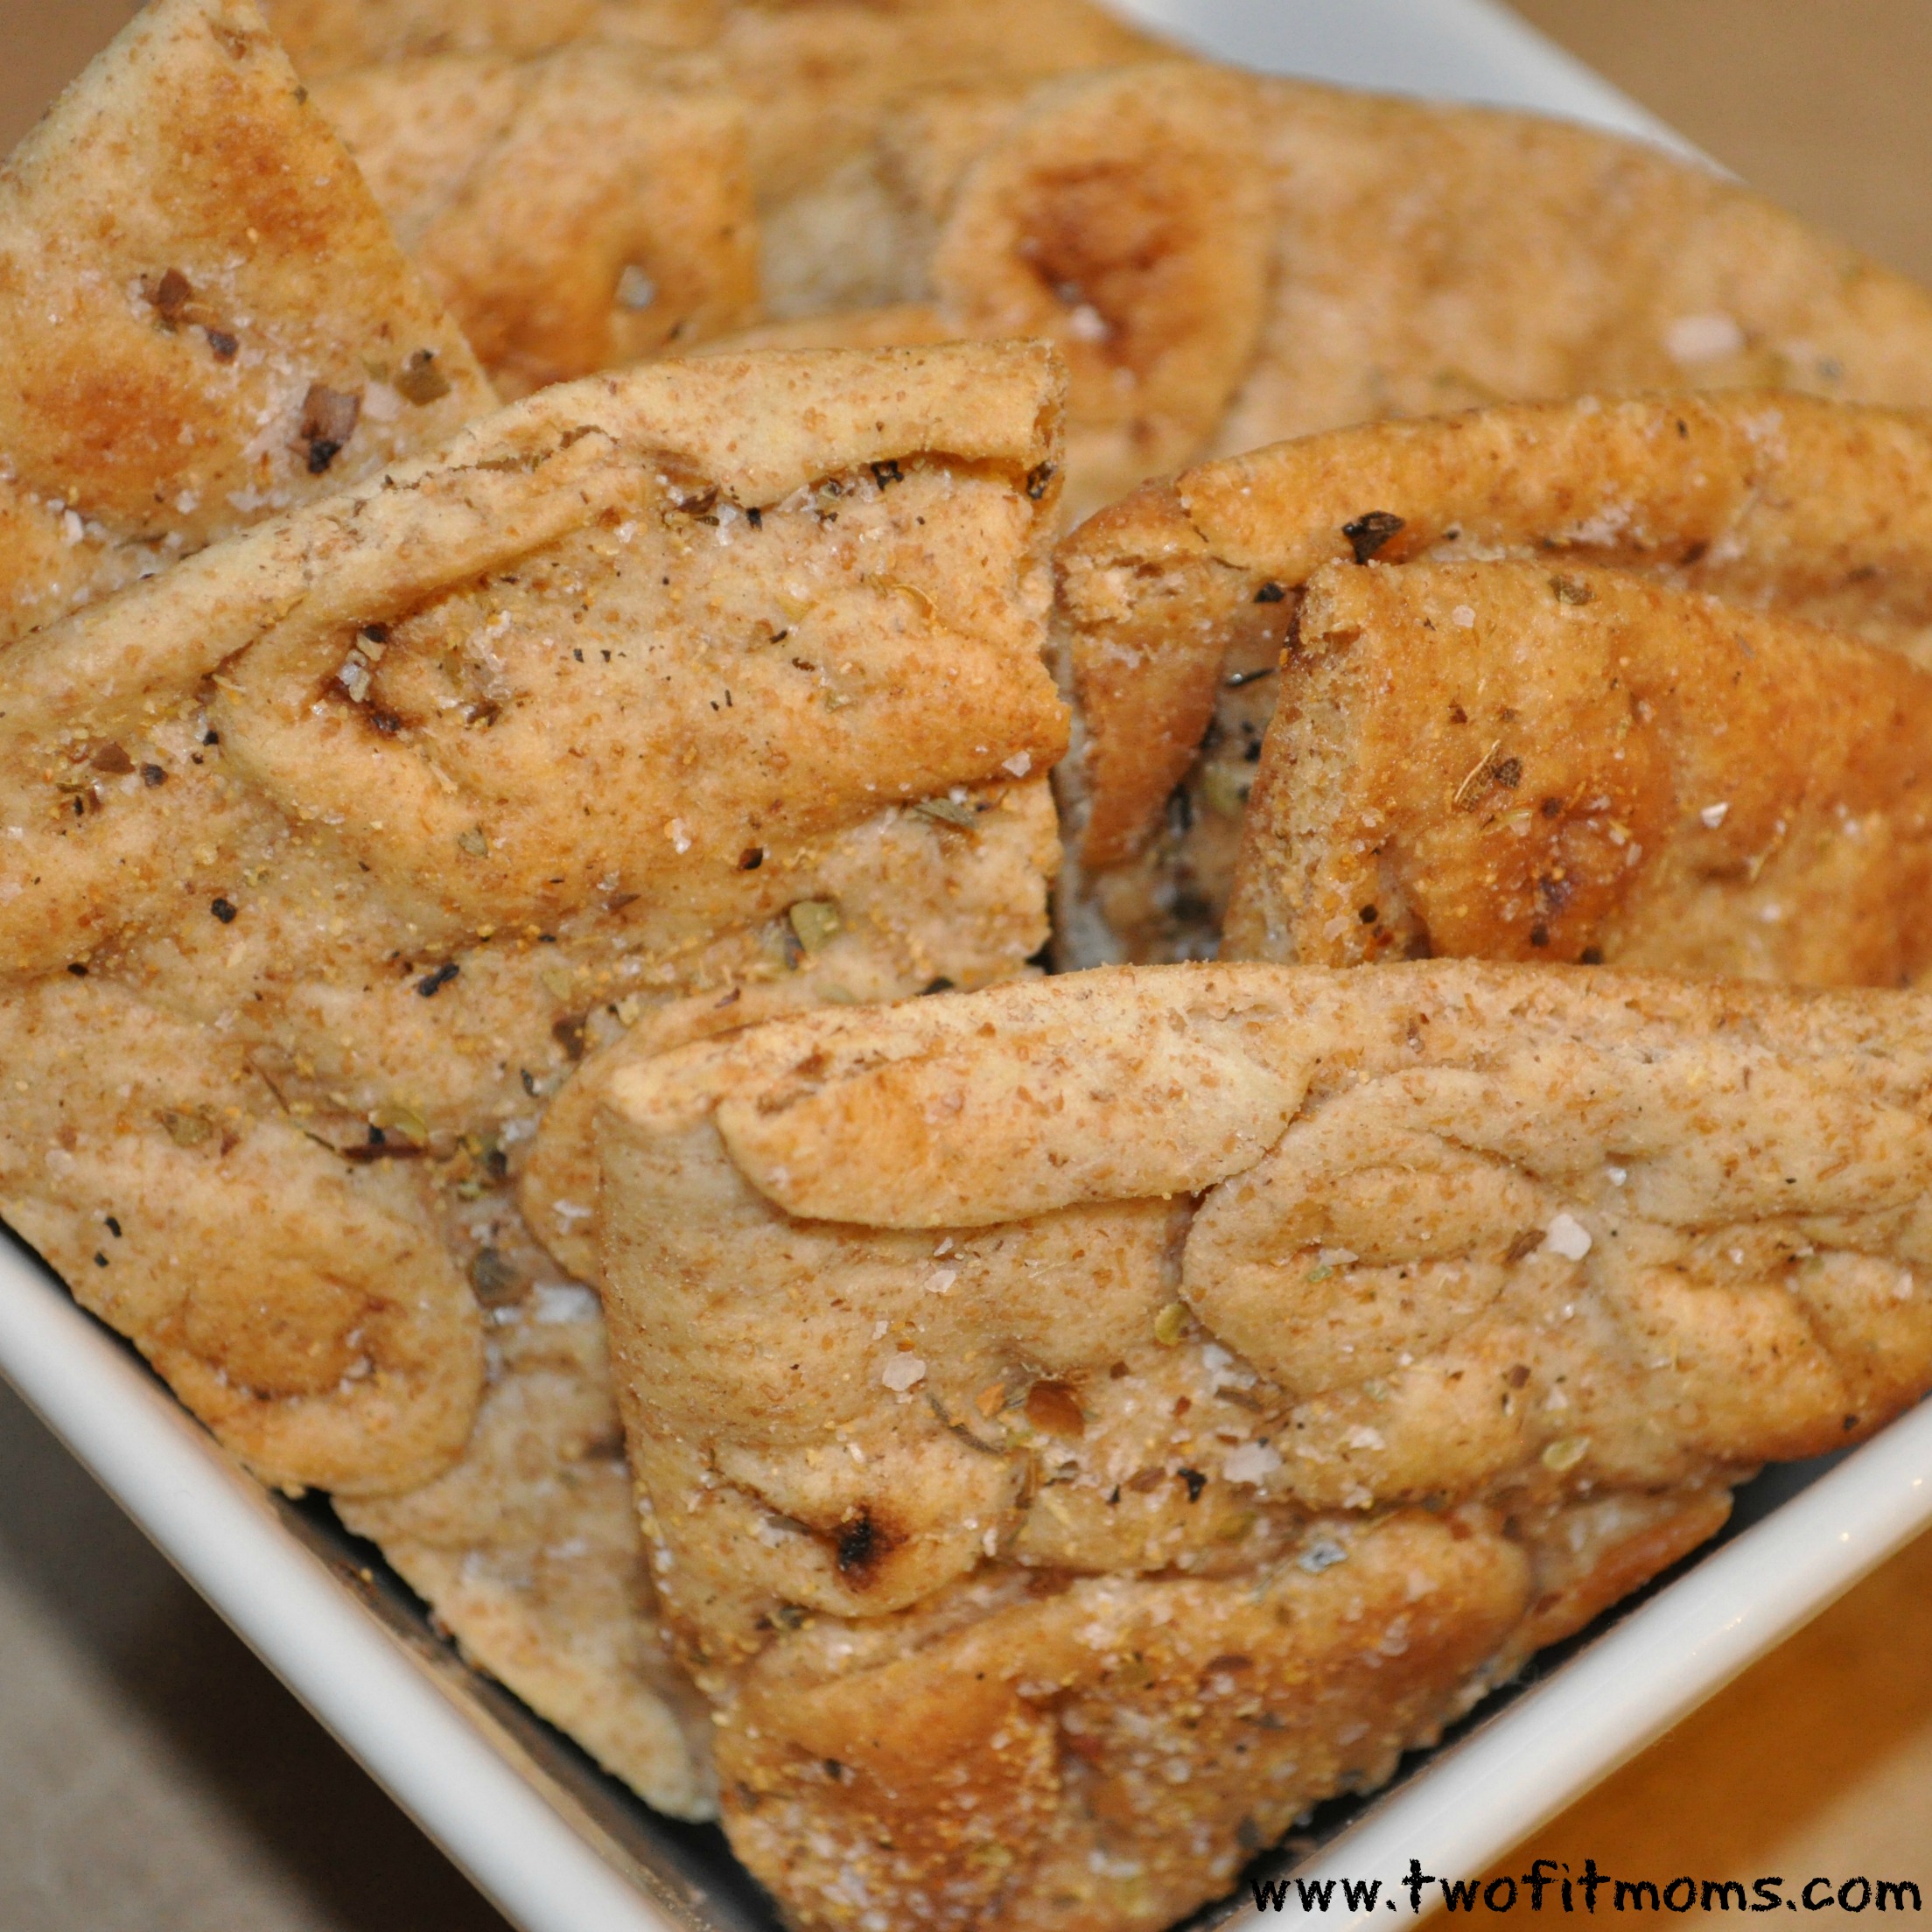
    Homemade Seasoned Pita Chips

    four large, whole wheat pita rounds, cut into eighths
    olive oil
    oregano
    garlic powder
    salt
    pepper

    Preheat oven to 400 degrees.

    Arrange pita on an oiled sheet pan (you might need two depending on the size of your pan).  Drizzle with olive oil and sprinkle with oregano, garlic powder, salt and pepper.

    Bake for 10-15 minutes until toasted and lightly browned.

    Pita will harden as it sits.

  • Daily Practice: 5 Reasons to Do a Headstand Every Day!

    Daily Practice: 5 Reasons to Do a Headstand Every Day!

    Headstand, or Sirsasana, is often referred to as the “King of all asanas”… and rightfully so. It requires both physical and mental preparation to practice this inversion. Getting upside down can be a scary experience! The fear of falling, the fear of failing, the fear of the unknown, all come into play. Once you get over the initial fear though, the practice of inverting will offer new perspective and many benefits. Here are my top five reasons why I love to flip upside down every day.

    If you’re a newbie to headstands, no worries!  Check out the beginner’s guide to getting into a headstand here.

    DSC_1213s

    #1: Increases Blood Flow to the Head

    Getting upside down reverses the flow of blood from the heart, giving your heart a much needed break.  Blood is able to flow more easily to your brain including the pituitary and hypothalamus glands. These two glands play a vital role in your mental and physical well-being, and regulate all other glands in your body. They also regulate sex hormones, so daily headstands can improve your sex life!

    DSC_8068s

    #2: Fountain of Youth

    Added blood flow to your head also means added blood flow to your scalp and face. These added nutrients can possibly delay the onset of gray hairs and also give you an instant face lift by reversing gravity. Who needs botox and hair dye when you can just invert every day!

    DSC_5624s

    #3: Happy, Happy, Joy, Joy!

    The pituitary gland located at the base of your brain controls the release of endorphins. Endorphins trigger a positive, happy feeling in your body. The extra blood flow to this gland, helps to release more endorphins, thus making you a happier person.  It also helps to relieve stress, anxiety and depression. You cannot help but smile while upside down!

    DSC_9672s

    #4: Tones and Strengthens

    Headstands are a FULL BODY exercise.  You use every single muscle in your body in order to get into a headstand! Doing a headstand every day will strengthen every muscle in your neck, arms, shoulders, back, abdominals and legs.

    DSC_4142s

    #5: Become the Life of the Party!

    Headstands are just plain fun to do and there’s nothing wrong with that! Bust them out at parties or in the park! Your friends and family will be impressed!


    As always though…practice mindfully and honor your body! Have fun and laugh lots!

    XOXO

    Blog Signature


  • Daily Practice: Make It a Family Affair!

    Daily Practice: Make It a Family Affair!

    With Mother’s Day around the corner, spending time with my children is top of mind.  And, I can’t think of anything else I’d want to do more than practice yoga with them! Yoga can be so beneficial to your children’s physical and mental well-being.  Physically, it can improve flexibility, strength, coordination and body awareness.  Mentally, it can alleviate stress and anxiety. You probably remember my post from a few weeks back that offered suggestions on how to get your family involved.  This post elaborates, offering five great poses to get you and your family practicing yoga together!


    Here they are:

     #1: Downward Facing Dog

    DSC_4595f

    This is the first pose both of my kids learned from watching me. For both adults and children, it is a pose that works every muscle of your body…your arms, shoulders, core, back, hips and legs! Try to hold this for 10-15 breaths.  Your child will probably come out sooner, but that’s OKAY! My minis generally use me as a “tunnel”…making it more fun for me to hold!

    #2: Cobra Pose

    DSC_1183f

    Cobra Pose was the first backbend my kids learned. Kids are naturally flexible so they most likely will find this pose super fun…especially if you ask them to try to touch their toes to their head! Cobra Pose is a great way to stretch out the entire front body and strengthen the arms. Once your child has learned Downward Facing Dog, you can start to teach them to transition right into Cobra Pose.

    #3: Child’s Pose

    DSC_6159f

    Who doesn’t love a good Child’s Pose? It releases any tension in the back, shoulders, chest and arms. It also begins to calm the mind and bring the focus back to your breath. If your kids are like mine…they are constantly on the go! This pose can be used as a first step to calm them.

    Once your child learns this, you can start to flow these poses together almost like a dance! Downward Facing Dog to Cobra Pose to Child’s Pose…Repeated a few times is a mini-workout!

    #4: Seated Forward Fold

    DSC_5197f

    Seated Forward Fold is one of the easiest poses to teach children.  Having flexible hamstrings is so important and improves everything we do . . . walking, running, bending, even tying your shoes! This is the perfect pose to help your kids remain flexible as they grow.

    #5: Easy Pose or Criss-Cross Applesauce with Meditation

    DSC_5126f

    At the end of your practice with you family, take a moment to sit and close your eyes. Encourage your children to do the same. Taking a moment to be still and breathe can help relieve stress and relax your mind. For your children, this moment may only last 30 seconds — and that’s OKAY! Eventually, they will learn to sit quietly for longer periods and to use this pose to look within themselves.

    Practicing yoga with your kids will not be perfect, but the key is that you are doing it together.  And, if you are smiling, you are doing it right!

    XOXO

    Blog Signature

  • Daily Practice: Get Your Down Dog On!

    Daily Practice: Get Your Down Dog On!

    Downward Facing Dog, or Adho Mukha Svanasana, is one of the most well-known yoga poses. It is the pose we come back to as we move through our flow. It is also a resting pose. Since we are most frequently in Down Dog, we sometimes forget to pay attention to our form.  So, let’s break down Downward Facing Dog to help you get the most out of this pose.

    DSC_4264s


    Hands & Feet: Where should they be?

    Generally speaking, if you come into Plank Pose (or the top of a push up), your hands and feet are in the perfect position for Downward Facing Dog. This is the ideal place to start; however, it may not work for you.  I walk my feet in about an inch when doing this. Play with it, everyone’s body is different!

    If you are coming into Down Dog from Tabletop position (on all fours), you can either move your hands a few inches past your shoulders OR move your knees back a few inches before lifting the hips.

    Here’s your Down Dog checklist:

    DSC_4277s

    – Are my hands and feet shoulder width apart?

    – Are my fingers spread? Index fingers parallel or slightly turned outward?

    – Do I feel my palms connected to my mat?

    – Are my biceps slightly externally rotating? In simple terms, are the eyes of my elbows moving towards the front of my mat (external rotation) or in towards each other (internal rotation).

    – Are my shoulders rolling down my back away from my ears?

    – Is there any strain in my neck? Are my ears alongside my biceps?

    – Am I sagging into my chest? If so, can I corset my low rib cage together to prevent lower back strain?

    – Are my abs engaged?

    – Is my lower back rounded or strained? If so, maybe I need to put a slight bend in my knees.

    – Are my quadriceps, or the front of my thighs, engaged?

    – Are my inner thighs internally rotating?

    – Is the intention of my heels moving towards my mat?

    I know this is a long checklist, but start by remembering two or three of these pointers until they become commonplace in your Downward Facing Dog.  This pose strengthens every part of your body. Respect it, and show it some love!

    XOXO

    Blog Signature


  • Daily Practice: 3 Core Exercises for Everyday

    Daily Practice: 3 Core Exercises for Everyday

    When someone refers to your “core”, people immediately think of the abdominal muscles.  But, your core is so much more! Essentially it is the complex group of muscles in your entire torso…your abdomen, pelvis, spine, back, shoulders and gluteus. All of these muscles work together to help you stand, walk, sit, turn, run and lift. So it is vital, to keep these muscles healthy and strong. Here are three quick exercises you can do daily to strengthen your core.

    #1: Dolphin Plank Pose

    DSC_9263s


    Key Points:

    – Shoulders stack over your elbows creating a 90-degree angle in your arms.

    – Elbows are shoulder width apart.

    – Hands can be flat on your mat or together.

    – Shoulders roll down your back.

    – Navel pulls up toward your spine.

    – Tailbone lengthens towards your heels.

    – Quadriceps, or the front of your thighs, pull up.

    – Try to keep your body in a straight line from head to heel…no butts up in the air and no sagging!

    – Stay here for 15 seconds, eventually working up to a minute or more!

    – Repeat 3-5 times, taking a child’s pose between each set.

    MODIFICATION:

    – Drop onto your knees while keeping the plank shape.

    #2: Boat Twists

    DSC_9233s

    DSC_9240s

    Key Points:

    – Keep your spine lengthened.

    – Try to keep your shins parallel to your mat.

    – Move slowly…tapping the block on one side, pausing at the center, then tapping the block on the other side.

    – Try to repeat this three times…increasing the repetitions as you get stronger.

    MODIFICATIONS:

    – Do not use a block.

    – Keep your feet flat on your mat.

    #3: Knee Planks

    finalxx

    Key Points:

    – Start off in Downward Facing Dog and lift the right leg (Three-Legged Dog). Moving on an exhale…shift forward and bring your right knee to the right tricep. Inhale, go back to Three-Legged Dog. Exhale, shift forward and try to kiss your knee. Inhale, go back to Three-Legged Dog. Exhale, shift forward and bring your right knee to the left tricep. Inhale, go back to Three-Legged Dog. Repeat using the left leg.

    – Move slowly with your breath.

    – Round the upper back and lift the hips slightly.

    – Try to keep the knees tight into your body.

    – Pull your navel up towards your spine as you crunch.

    – Start off by doing a full round of these. You can add on repetitions as you get stronger.  You can also add these movements into your yoga practice.

    MODIFICATIONS:

    – Your knees DO NOT have to touch your arms/face.

    – You can also do this from Table Top position or all-fours.

    XOXO

    Blog Signature

  • Quick Tips for Preparing Asparagus

    Quick Tips for Preparing Asparagus

    asparagus with bannerI love asparagus, and recently my kids started to really like it too – which means it will be a staple on my menu this season.

    I have a feeling, though, that many people pass up asparagus because they don’t know how to prepare it.  So, this article serves two purposes — one, to get you to try asparagus, and two, to help you learn how to prepare it properly.

    First, when you go to the market, look for a bunch of asparagus that has uniform thickness.  This will ensure that the asparagus cooks evenly. You also want to make sure it’s fresh — it should be crisp and bright green.

    The most important part of prepping asparagus is removing the lower, tough portion of the spear.  Most people just chop the bottoms off the spears without much thought, but there’s actually a method to trimming asparagus.

    Rather than randomly cutting a portion off the bottom, you take the spear between both of your hands and bend.  The spear will break naturally separating the tough lower portion from the more tender, upper portion of the spear. (For those of you looking to make use of the trimmings, you can reserve them for stock!)asparagus collage
    The spears may not all be the same exact length, but that won’t affect the cooking process.

    asparagus zfeatured

    Now that we have prepped the asparagus, let’s cook them! I prefer to roast them, but you could also saute them in a pan with olive oil or blanch them in a pot of boiling water. We are big on roasting our veggies these days, so here’s a quick and tasty preparation for roasted asparagus!

    Lemon-Garlic Scented Asparagus

    Serves 4-6 adults (with leftovers!)

    Before we launch into the recipe I just want to point out that you DO NOT want to pour lemon juice on top of your asparagus.  The lemon juice will turn your asparagus gray — it will turn most other green veggies the same color.  Instead, we are using lemon zest which will not affect the color of your asparagus, but will scent it with a wonderful lemon flavor!

    2 bunches of asparagus, stems trimmed

    1 lemon, zested

    1 garlic clove, crushed

    olive oil

    salt and pepper to taste

    Preheat oven to 400 degrees.

    Arrange trimmed asparagus in a single layer on a large baking sheet. Drizzle a few tablespoons of olive oil over the asparagus, season with salt and pepper to taste. Roast asparagus for approximately 20-30 minutes, turning them occasionally, until tender and browned (cooking time will vary based on the width of the asparagus).

    While the asparagus is roasting, mix together the lemon zest, crushed garlic and 2 tablespoons (or so) of olive oil in a small bowl.

    Remove asparagus from the oven and arrange on a platter.  Drizzle lemon/garlic/olive oil mixture on top of the asparagus.

    Serve and enjoy!

    The good thing about this recipe is that you can modify the amount of garlic and lemon zest you use, so make it your own!

  • Daily Practice: 4 Must-Do Hamstring Stretches

    Daily Practice: 4 Must-Do Hamstring Stretches

    Your hamstrings are the three muscles that run along the back side of your thighs. We use our hamstrings everyday in activities such as walking, running and jumping. In yoga, flexibility in your hamstrings can make all the difference, so it is important to work them everyday. They can be notoriously tight if you spend a lot of time sitting. Here are four hamstring stretches that I incorporate in my daily practice. Take these stretches slowly and never force yourself deeper!

     #1: Uttanasana or Standing Forward Fold

    DSC_2158s

    Key Points:

    – Keep the torso lengthened.  Try not to round the back and hunch.

    – If you cannot reach the ground, use blocks or hold onto opposite elbows.

    – Shift your weight slightly towards the toes so the hips stack over the ankles.

    – Keep a slight bend in your knees to avoid hyper-extension.

    – Upper thighs internally rotate.

    – With every few breaths try to deepen the fold.

    – Stay in the pose for about a minute.

    #2: Parsvottanasana or Pyramid Pose

    DSC_7592s

    Key Points:

    – Both feet face towards the top of your mat.

    – Stance is about a leg’s distance apart.

    – Try to keep your hips as square as possible.

    – Squeeze both thighs in towards one another.

    – Keep your torso lengthened.

    – Use blocks if you cannot reach the ground.

    – Stay in the pose for 30-60 seconds, then switch sides.

    #3: Prasarita Padottanasana or Wide-Legged Forward Fold

    DSC_7102s

    Key Points:

    – Feet will be anywhere from 3-4 feet apart. Try not to over-exaggerate the distance because you are trying to get your head to the ground.

    – Feet will be parallel to each other.

    – Do not roll onto the inside edges of your feet.  Press into the outside edges of your feet.

    – Draw your quadriceps up; keep them engaged.

    – Shift your weight slightly towards your toes so you are perpendicular to the ground. Don’t sink back into your heels.

    – Keep your torso lengthened.

    – Use blocks if you cannot reach your mat.

    – With every few breaths, try to deepen the fold…working the crown of your head towards your mat.

    – Stay in this pose for about a minute.

    #4: Janu Sirsasana or Head to Knee Forward Bend

    DSC_1271s

    Key Points:

    – Use blocks and/or a blanket to support yourself. Sitting on a blanket can ease any discomfort in your sacrum. Use a block or blanket under your bent knee if it does not easily come onto your mat.

    – Keep your torso lengthened as you fold forward.

    – Slightly twist your torso as you fold so the center of your torso folds over the leg.

    – Keep the foot flexed on the straight leg and press the back of the leg down towards the mat.

    – With every few breaths, try to deepen your fold.

    – Stay in this pose for about a minute, then switch sides.

     XOXO

    Blog Signature

  • Roasted Potato Leek Soup (Gluten- and Dairy-Free!)

    Roasted Potato Leek Soup (Gluten- and Dairy-Free!)

    leek soup updatedLeeks are a spring vegetable.  And, now that they are in season, it’s the perfect time to incorporate them into into your cooking.

    If you’ve never cooked with leeks, this roasted potato leek soup is a great, and simple, introductory recipe. The roasted vegetables offer depth of flavor and compensate for the lack of dairy in the soup (potato leek soup usually contains cream).  It’s also gluten-free!

    Leeks have a mild onion flavor.  The dark green portion of the stalk, which is too tough to eat, is removed (wash and save it for stock!), using only the light green and white portion. Learning how to clean the leek is important since sand tends to get caught in the stalk.  Therefore, you need to take a few steps to prep the leeks before proceeding with the recipe.

    First, remove the dark green portion of the stalk.
    leek 1
    Then cut about a 1/4-1/2 inch from the bottom, white portion, of the stalk.
    leek 2
    Next, cut the leek lengthwise.
    leek 3
    Rinse the leek under cold running water to remove the sand.
    leek 4
    Then, put the leeks cut side down and cut the leeks in 1/2 inch slices.
    leek 5
    Toss the leeks into a colander, separate the layers and run under cold water to make sure all of  the sand is removed.
    leek colander

    Now you are ready to prepare the soup.

    Here’s the full recipe:

    Roasted Potato Leek Soup

    4 leeks, washed and prepared as noted above (1/4-1/2 inch slices)

    3 large russet potatoes, peeled and chopped into 1/2 inch dice

    1 teaspoon of salt

    1/2 teaspoon of dried thyme

    1/4 teaspoon of black pepper

    3-4 tablespoons of olive oil

    6 cups of organic, gluten-free chicken stock or vegetable stock (non-tomato based)

    chopped chives for garnish (optional)

    Preheat oven to 400 degrees

    Arrange sliced leeks and diced potatoes on a large cookie sheet.  Top with salt, thyme, pepper and olive oil (feel free to add more olive oil if necessary) and mix to coat.  Roast the vegetables for approximately 50 minutes, stirring them frequently.  Once potatoes are tender, remove from oven.  At this point, you might notice a few dark pieces of leek, you can toss those.  Transfer roasted leeks and potatoes to a large stock pot.  Add the six cups of chicken stock and bring to a boil over medium heat.  Remove mixture from the heat.  Blend the soup in two batches in a blender (please note, a Vitamix or other high powered blender, may be too strong for this job — you do not want to over-blend the soup.  It will yield a gummy consistency).

    Serve hot or at room temperature.  Top with chives.

    Yields two quarts of soup.


  • Looks Funny, Feels Great!

    Looks Funny, Feels Great!

    Yoga classes are often serious, but once in a while, you find yourself in an embarrassing or funny looking pose that just makes you laugh.  I know, I know… yoga is NOT about how a pose looks, but how it feels. Sometimes though… You just have to LAUGH.

    Here are my top four favorite “It-Looks-Funny-But-Feels-Great” yoga poses.

    #1: Puppy Pose

    Extended Puppy Pose is one that I do everyday and usually very early into my practice.  It feels great on my shoulders and upper back, and just starts to wake up my spine after sleeping. There are a lot of things that race through my mind when doing it but I’ll  keep it G-rated here. After months of teaching it in my classes, it has become clear to me what the actual name of this pose SHOULD be.  It should be called the “Are-My-Yoga-Pants-See-Through” pose. As a teacher who likes to walk around while teaching… It is clear to me that we should also be doing this pose to check the transparency of our new pants.

    DSC_6827s

    #2: Star Pose

    Let’s face it… by the end of my practice, I do not want my face anywhere near my feet, but Star Pose is usually something I will do at the end. Unlike Baddha Konasana, your feet are further away from your body. When you fold forward, your face will come closer to your feet. From this moment on, I shall call this pose… the “Do-My- Feet-Smell” pose.

    DSC_6872s

    #3: Happy Baby (You knew this one was coming!)

    Happy Baby pose or what I affectionately like to call “the hottest pose in yoga”! It feels wonderful rolling around on your mat like a two year old with your legs spread open, right?  To all of my fellow moms… I bet you’ll agree that this stretch should actually be called the “Am-I-Giving-Birth” pose.

    DSC_6913s

    #4: Lion’s Pose or Lion’s Breath

    This one just cracks me up. I usually incorporate Lion’s Breath in Downward Facing Dog after I’ve worked my students hard. It’s a great way to release tension and frustration during your practice.  It’s also hysterical to see how timid students are in letting go of their breath and ego, and allowing themselves to really let it go!  My first-time students usually feel weird when I tell them to stick out their tongues and really exhale. I really think there is no better name for this exercise than the “W…T…F…” pose.

    DSC_6888s

    Always remember to practice safely and stay playful!  You do not always have to take your practice so seriously.  Don’t forget to laugh at yourself once in a while.

    “Don’t sweat the petty things… And don’t pet the sweaty things.” – George Carlin

    XOXO

    Blog Signature

  • Learn to Balance in Toe Stand

    Learn to Balance in Toe Stand

    Toe Stand looks simple, but it actually requires a lot of concentration and focus. You will wobble, fall over and probably be pretty frustrated, but keep at it!  The good news is that the more you practice, the easier it becomes! Make sure to warm up the hips thoroughly. Do not practice this pose if you have any hip, knee or ankle injuries. Always remember to listen to your body and work the pose at your own pace.

    Step 1: Figure “4” it!

    Start by standing up tall, feet together and spine long. Shift your weight into your right foot and cross the left ankle just above your right knee. If you have really open hips, you can place your left ankle up near your right hip bone for half lotus. In either variation, the knee should be pointing down toward the ground. Keep driving the knee back, hips open.

    DSC_5186s

    Step 2: Fingertips to your mat!

    Hinging from your waist, slowly start to bend the right knee and place your fingertips onto your mat or onto blocks.

    DSC_5190s

    Step 3: Squat down

    Slowly lower the hips even further down coming up onto the ball of the right foot.  The right thigh should be parallel to the mat. Your buttasana will rest on your right heel. From here, you can walk your fingertips back so that they are closer to your hips. Keep your core engaged, spine long! This will help you balance. If this is your first attempt, stay here and breath.

    DSC_5197s

    Step 4: Hand up!

    Look straight ahead and find something to focus on! Slowly try to bring one hand up to heart center while maintaining your balance.

    DSC_5200s

    Step 5: Toe Stand!

    Staying focused and calm, try to bring your second hand up to meet the first hand. Namaste!

    DSC_5206ss

    XOXO

    Blog Signature