Category: Inversion

  • Dream Big in March!

    Dream Big in March!

    Hello to our online community!

    Tonight, we kick off our March yoga challenge on Instagram by posting instructions for the first pose.  The theme this month is “Dream Big”.  We are gearing up for the launch of our new clothing line with Gaiam in April, and honestly, it wouldn’t be happening if we didn’t start with a dream.  DreamBigWithTFM

    We want you to DREAM BIG, too, and develop a yoga practice that you love.  The goal of the challenge is to commit to your practice and to participate in some way, every day.  Can’t do all of the poses shown?  No problem.  Show us what you CAN do.  Modify. Get creative.  Have fun, and realize that you can be your own source of inspiration!

    For complete details about this challenge, follow @twofitmoms on Instagram, and find the full list of instructions for the challenge.

  • 4 Ways to Challenge & Enhance Your Practice with Yoga Blocks

    4 Ways to Challenge & Enhance Your Practice with Yoga Blocks

    If you think yoga blocks are just for beginners that can’t touch their toes or for injured yoga practitioners that can’t sit between their heels in hero pose, think again. There are plenty of ways to get creative and use your blocks to deepen your practice in a challenging, fun way. Here are four suggestions:

    Twist & Tap
    Fire up your core in boat pose by holding a yoga block. Slowly twist from the lower belly to the right, tap the block on the ground to the right, and untwist your torso, coming back to center. Begin to twist to the left, tap the block on the ground to the left, and come back to center. Consider that to be one repetition. Keep your core engaged, your chest lifted, and avoid collapsing into your belly and rounding the back. The shins can remain parallel to the ground throughout the exercise, or you can extend your legs straight for a more intense variation. Work up to 12-15 repetitions.TwistAndTap

    Chest & Tricep Opener
    Place two yoga blocks on the ground, shoulder width apart. Kneel on the mat, and rest your elbows and triceps on the blocks. Keep your hips stacked over the knees, and begin to sink your chest toward the ground as you bring your hands together in prayer over your head. This pose is very much like puppy pose with the added benefit of a deep tricep stretch. Hold this pose for 5 to 10 breaths, sinking your chest lower with each breath.ChestTricepOpener

    Squeeze a Block in Inversions
    If your eyes glaze over when you hear your yoga teacher talking about internally rotating the thighs and hips while performing inversions, no need to worry. This exercise will solidify the concept in your mind, and you won’t forget anytime soon. By squeezing a yoga block between your feet as you slowly lift into an inversion, not only will you train your core muscles, but you will also automatically create a slight internal rotation in your legs that will help you stabilize and build strength. Go ahead and try this exercise with any inversion of your choice.HeadstandCollage

    Relaxing, Deep Backbend
    In my own personal practice, I’ve found this to be the single most effective stretch for the upper back and chest. If you are looking to deepen your backbend practice, it’s so important to stretch in various ways to help create an even backbend through your lower, middle and upper back. Place a block underneath your shoulder blades as you lie on the ground. If you tend to be very tight across the chest and back, start out by placing the block on shortest height. Breathe for 5-10 breaths before turning the block so that it’s resting in its next tallest orientation. Again, breathe for 5-10 breaths, and allow the chest and back to open up bit by bit. Finally, if your flexibility allows, turn the block to its highest orientation, and lie across the block for another 5-10 breaths. Try placing a second block under your head like a pillow for more support.UpperBackOpener

  • Pose of the Week: Sirsasana A

    Pose of the Week: Sirsasana A

    Time to get upside down! This week’s TFM Pose of the Week is Sirsasana A or Supported Headstand. Check out the following modifications and feel free to use a wall for support!  You may also like to check out my top 5 reasons to get upside down everyday HERE. Have fun and be safe!

    Level 1 Modification: Keep your feet on the ground! You don’t need to take your feet off of the ground to experience the benefits of inversions. Start by sitting up on your shins and clasp your hands loosely, remembering to tuck the bottom pinky in! Place your forearms down on to your mat, elbows at shoulder width distance. Place the crown of your head in front of your hands. Root down through your forearms as you tuck your toes under and lift the knees up. Squeeze your elbows in as you draw your shoulders away from your ears. Walk your feet in as you begin to stack your hips over your shoulders. Your forearms should be bearing most of your weight.  It should feel like you can almost pick up your head. Stay here and take about 5-10 breaths. Slowly release down into Child’s pose.

    Dolphin Pose

    Level 2 Modification: Knees hug in! Start by sitting up on your shins and clasp your hands loosely, remembering to tuck the bottom pinky in! Place your forearms down on to your mat, elbows at shoulder width distance. Place the crown of your head in front of your hands. Root down through your forearms as you tuck your toes under and lift the knees up. Squeeze your elbows in as you draw your shoulders away from your ears. Walk your feet in as you begin to stack your hips over your shoulders. Slowly bend one knee into your chest. Press actively into your forearms and engage your abs to tuck the second knee into your chest. Your forearms should be bearing most of your weight.  It should feel like you can almost pick up your head. Stay here and take about 5-10 breaths. Slowly release down into Child’s pose.

    Sirsasana Modification

    Level 3 Modification: Time to extend up! Start by sitting up on your shins and clasp your hands loosely, remembering to tuck the bottom pinky in! Place your forearms down on to your mat, elbows at shoulder width distance. Place the crown of your head in front of your hands. Root down through your forearms as you tuck your toes under and lift the knees up. Squeeze your elbows in as you draw your shoulders away from your ears. Walk your feet in as you begin to stack your hips over your shoulders. Slowly bend one knee into your chest. Press actively into your forearms and engage your abs to tuck the second knee into your chest. From here, slowly extend one leg up towards the sky, then the other…or, if you are capable, both legs at one time. Keep your thighs hugging in and feet active! Remember, your forearms should be bearing most of your weight.  It should feel like you can almost pick up your head. Stay here and take about 5-10 breaths. Slowly release down into Child’s pose.

    Sirsasana A

    Be sure to check out our inversion tutorials in the Yoga pull down tab on our website, and if you are considering a headstand practice, check out: Headstands 101: The Art of Falling.

  • Eliminate the Struggle in Tripod Egg Headstand

    Eliminate the Struggle in Tripod Egg Headstand

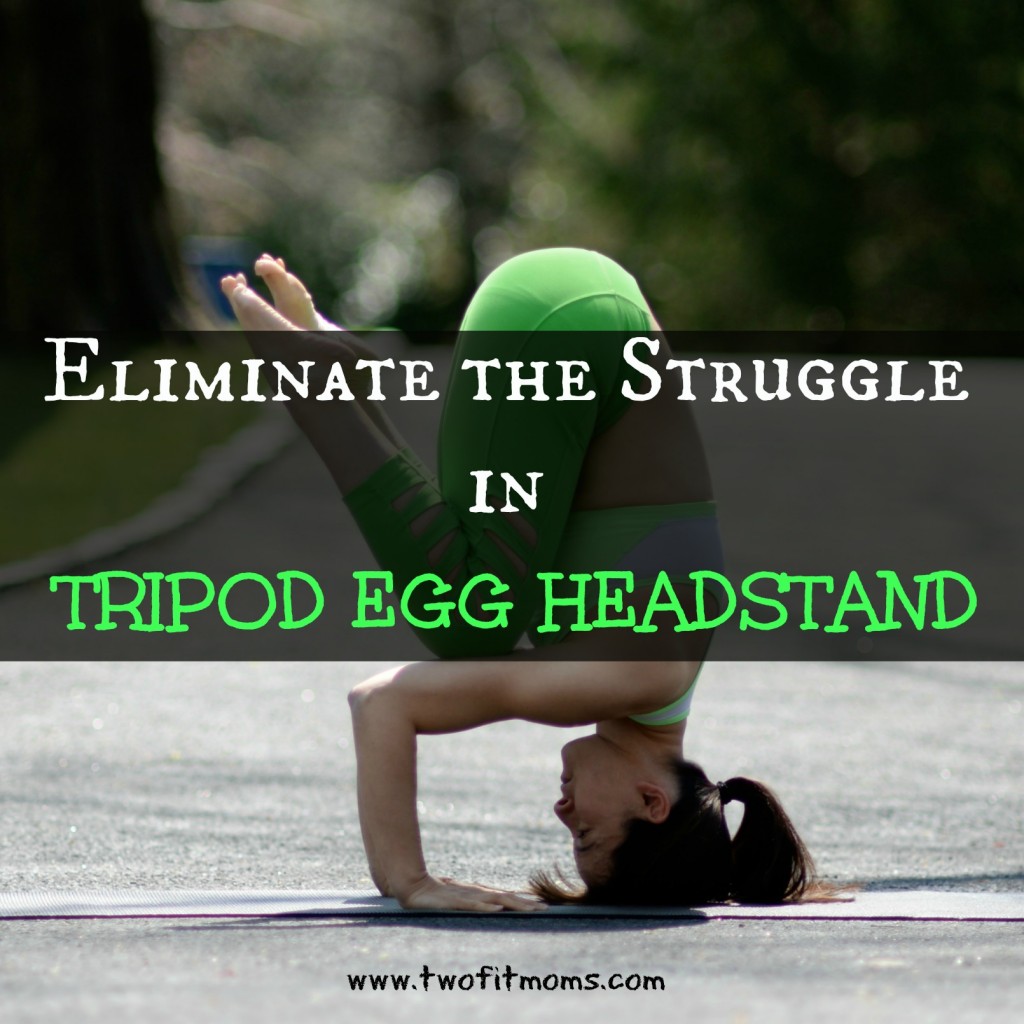
    Have you tried our Tripod Egg Headstand tutorial without much success?  Are you stumped as to why you are unable to get into this inversion?  If so, this article may shed some light on the topic and help you re-focus your efforts.

    There are many elements that play into the perfect headstand— core strength, neck stability, concentration, balance, hand placement, head placement, etc. The list of factors is surprisingly long, but if I had to pick just one factor that determines whether or not a beginner can successfully perform a Tripod Egg Headstand, I would have to say… HAMSTRING FLEXIBILITY!

    TripodEggBannerThat’s right— the tightness (or looseness) in the backs of the legs. Does that surprise you? It might. Most people rarely make the connection between hamstrings and headstands, but the connection is real. If you are struggling to climb into a Tripod Egg, your hamstrings may be the issue.

    Let me explain.

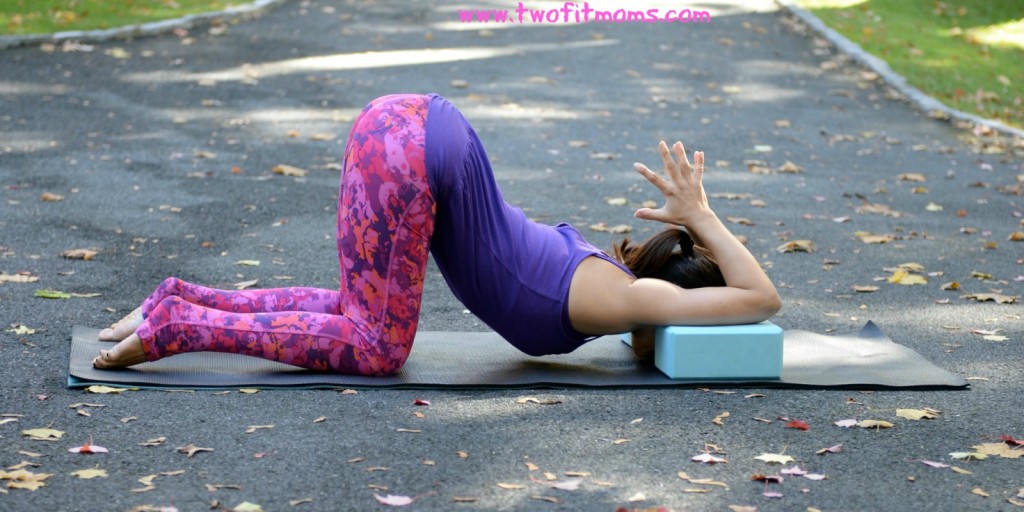
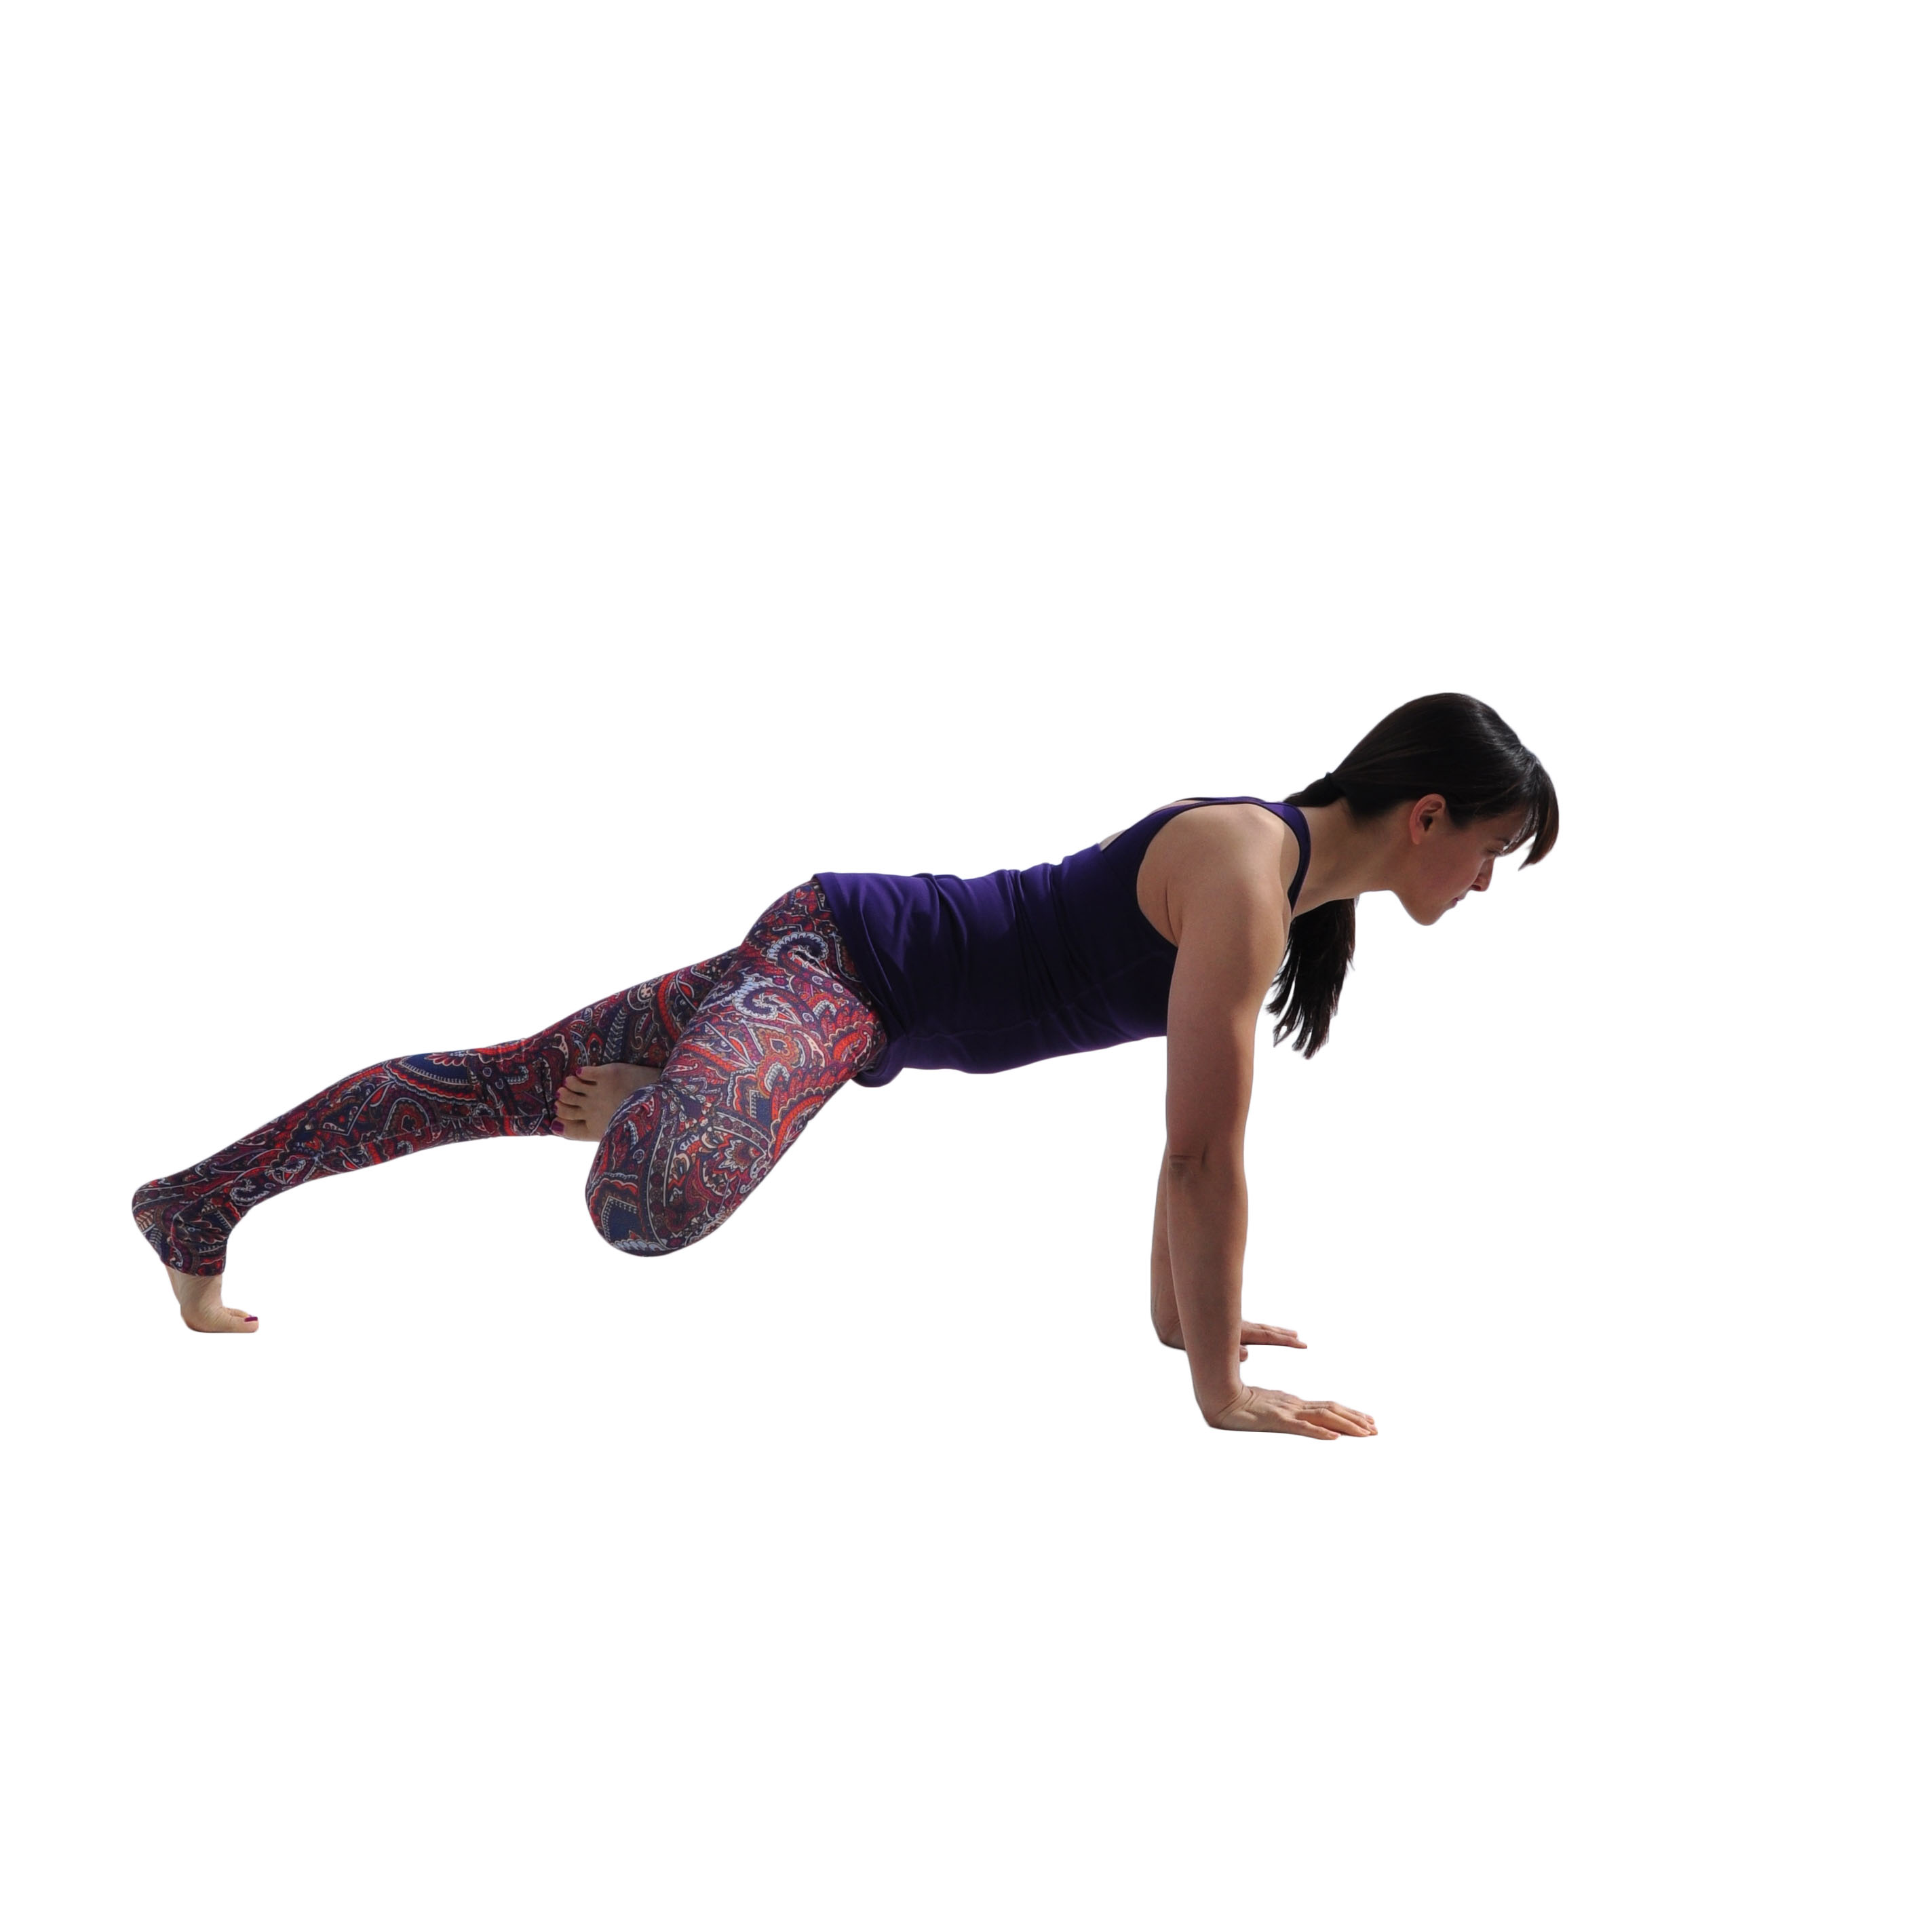
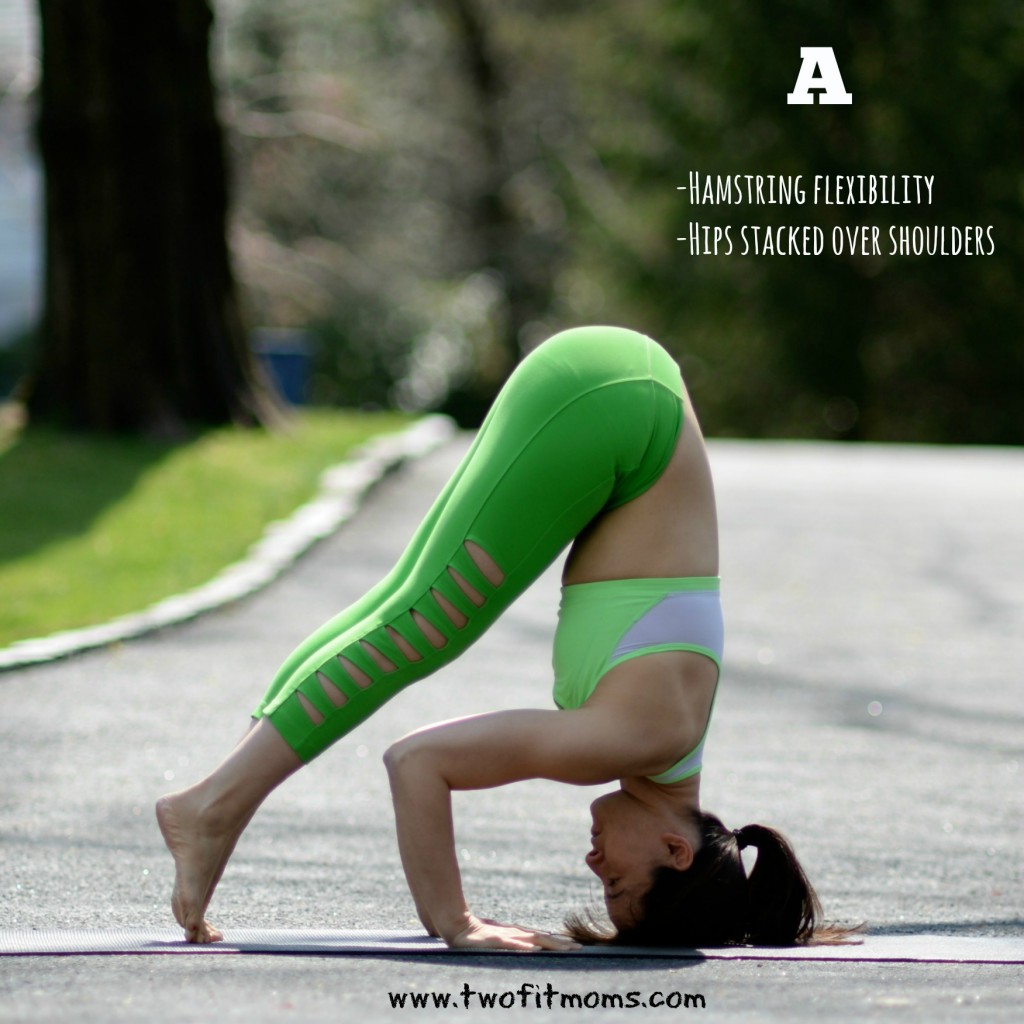
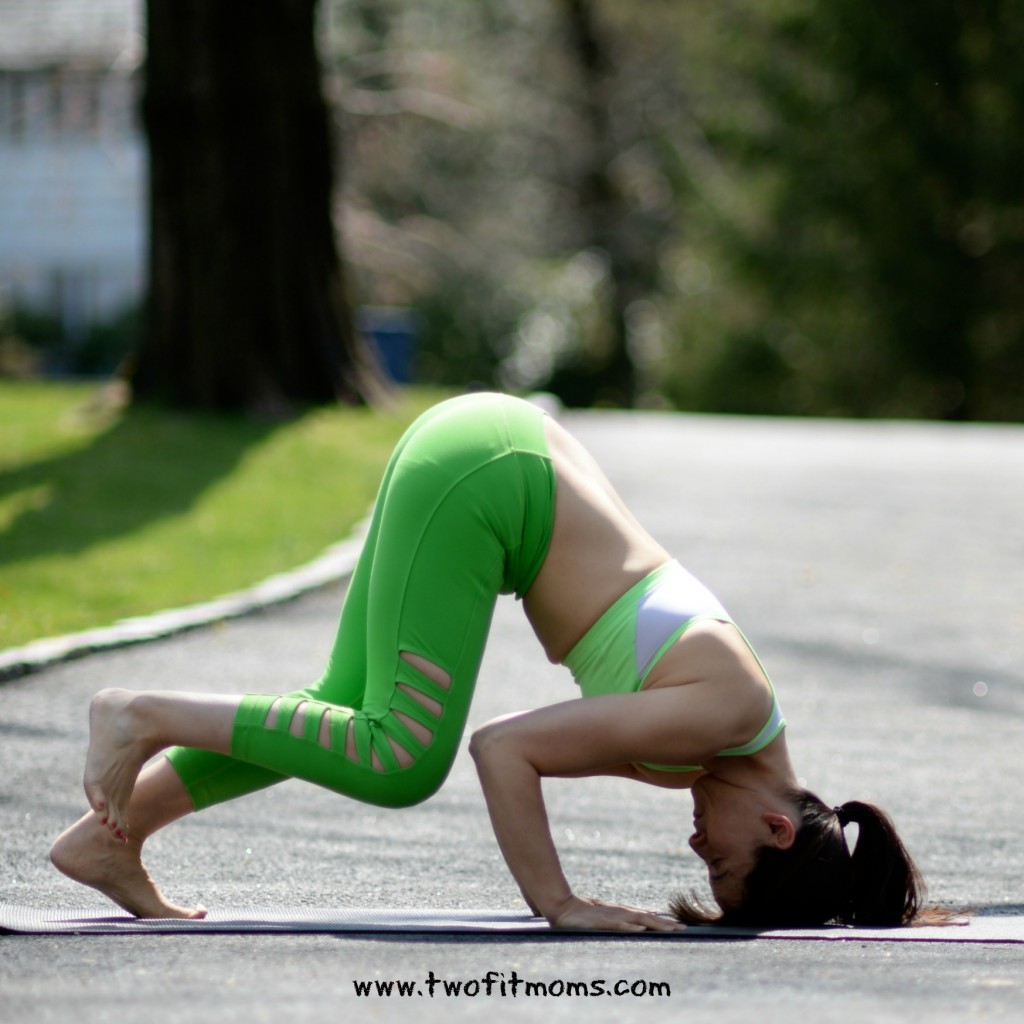
    Take a look at photo A below. No, it’s not really a headstand…I haven’t taken flight just yet, but this posture basically looks like a headstand with my feet still resting on the mat. In fact, if you only look at my arms, head and torso and use your hand to cover my legs in this photo, you’ll probably think that I am balancing in a headstand.  The reason why this image resembles a headstand is because my hips are stacked right above my shoulders. Hip stacking is what makes it possible to easily perform a Tripod Egg headstand. How does one stack the hips over the shoulders? By walking the feet toward the elbows— a task that requires hamstring flexibility. Walking the feet toward the elbows may feel effortless to someone with loose hamstrings, but it will feel very difficult to someone with limited hamstring flexibility.

    HamstringsLooseText

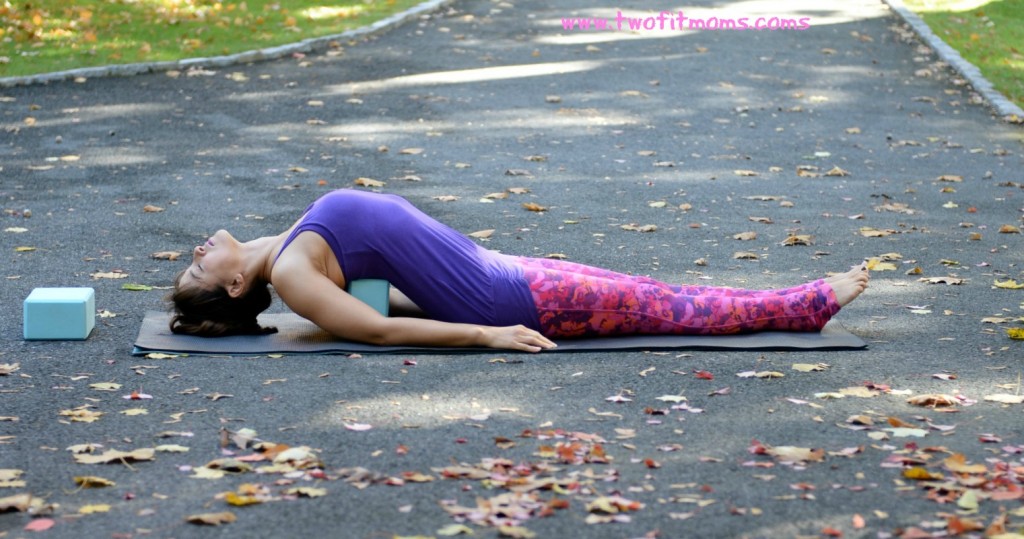
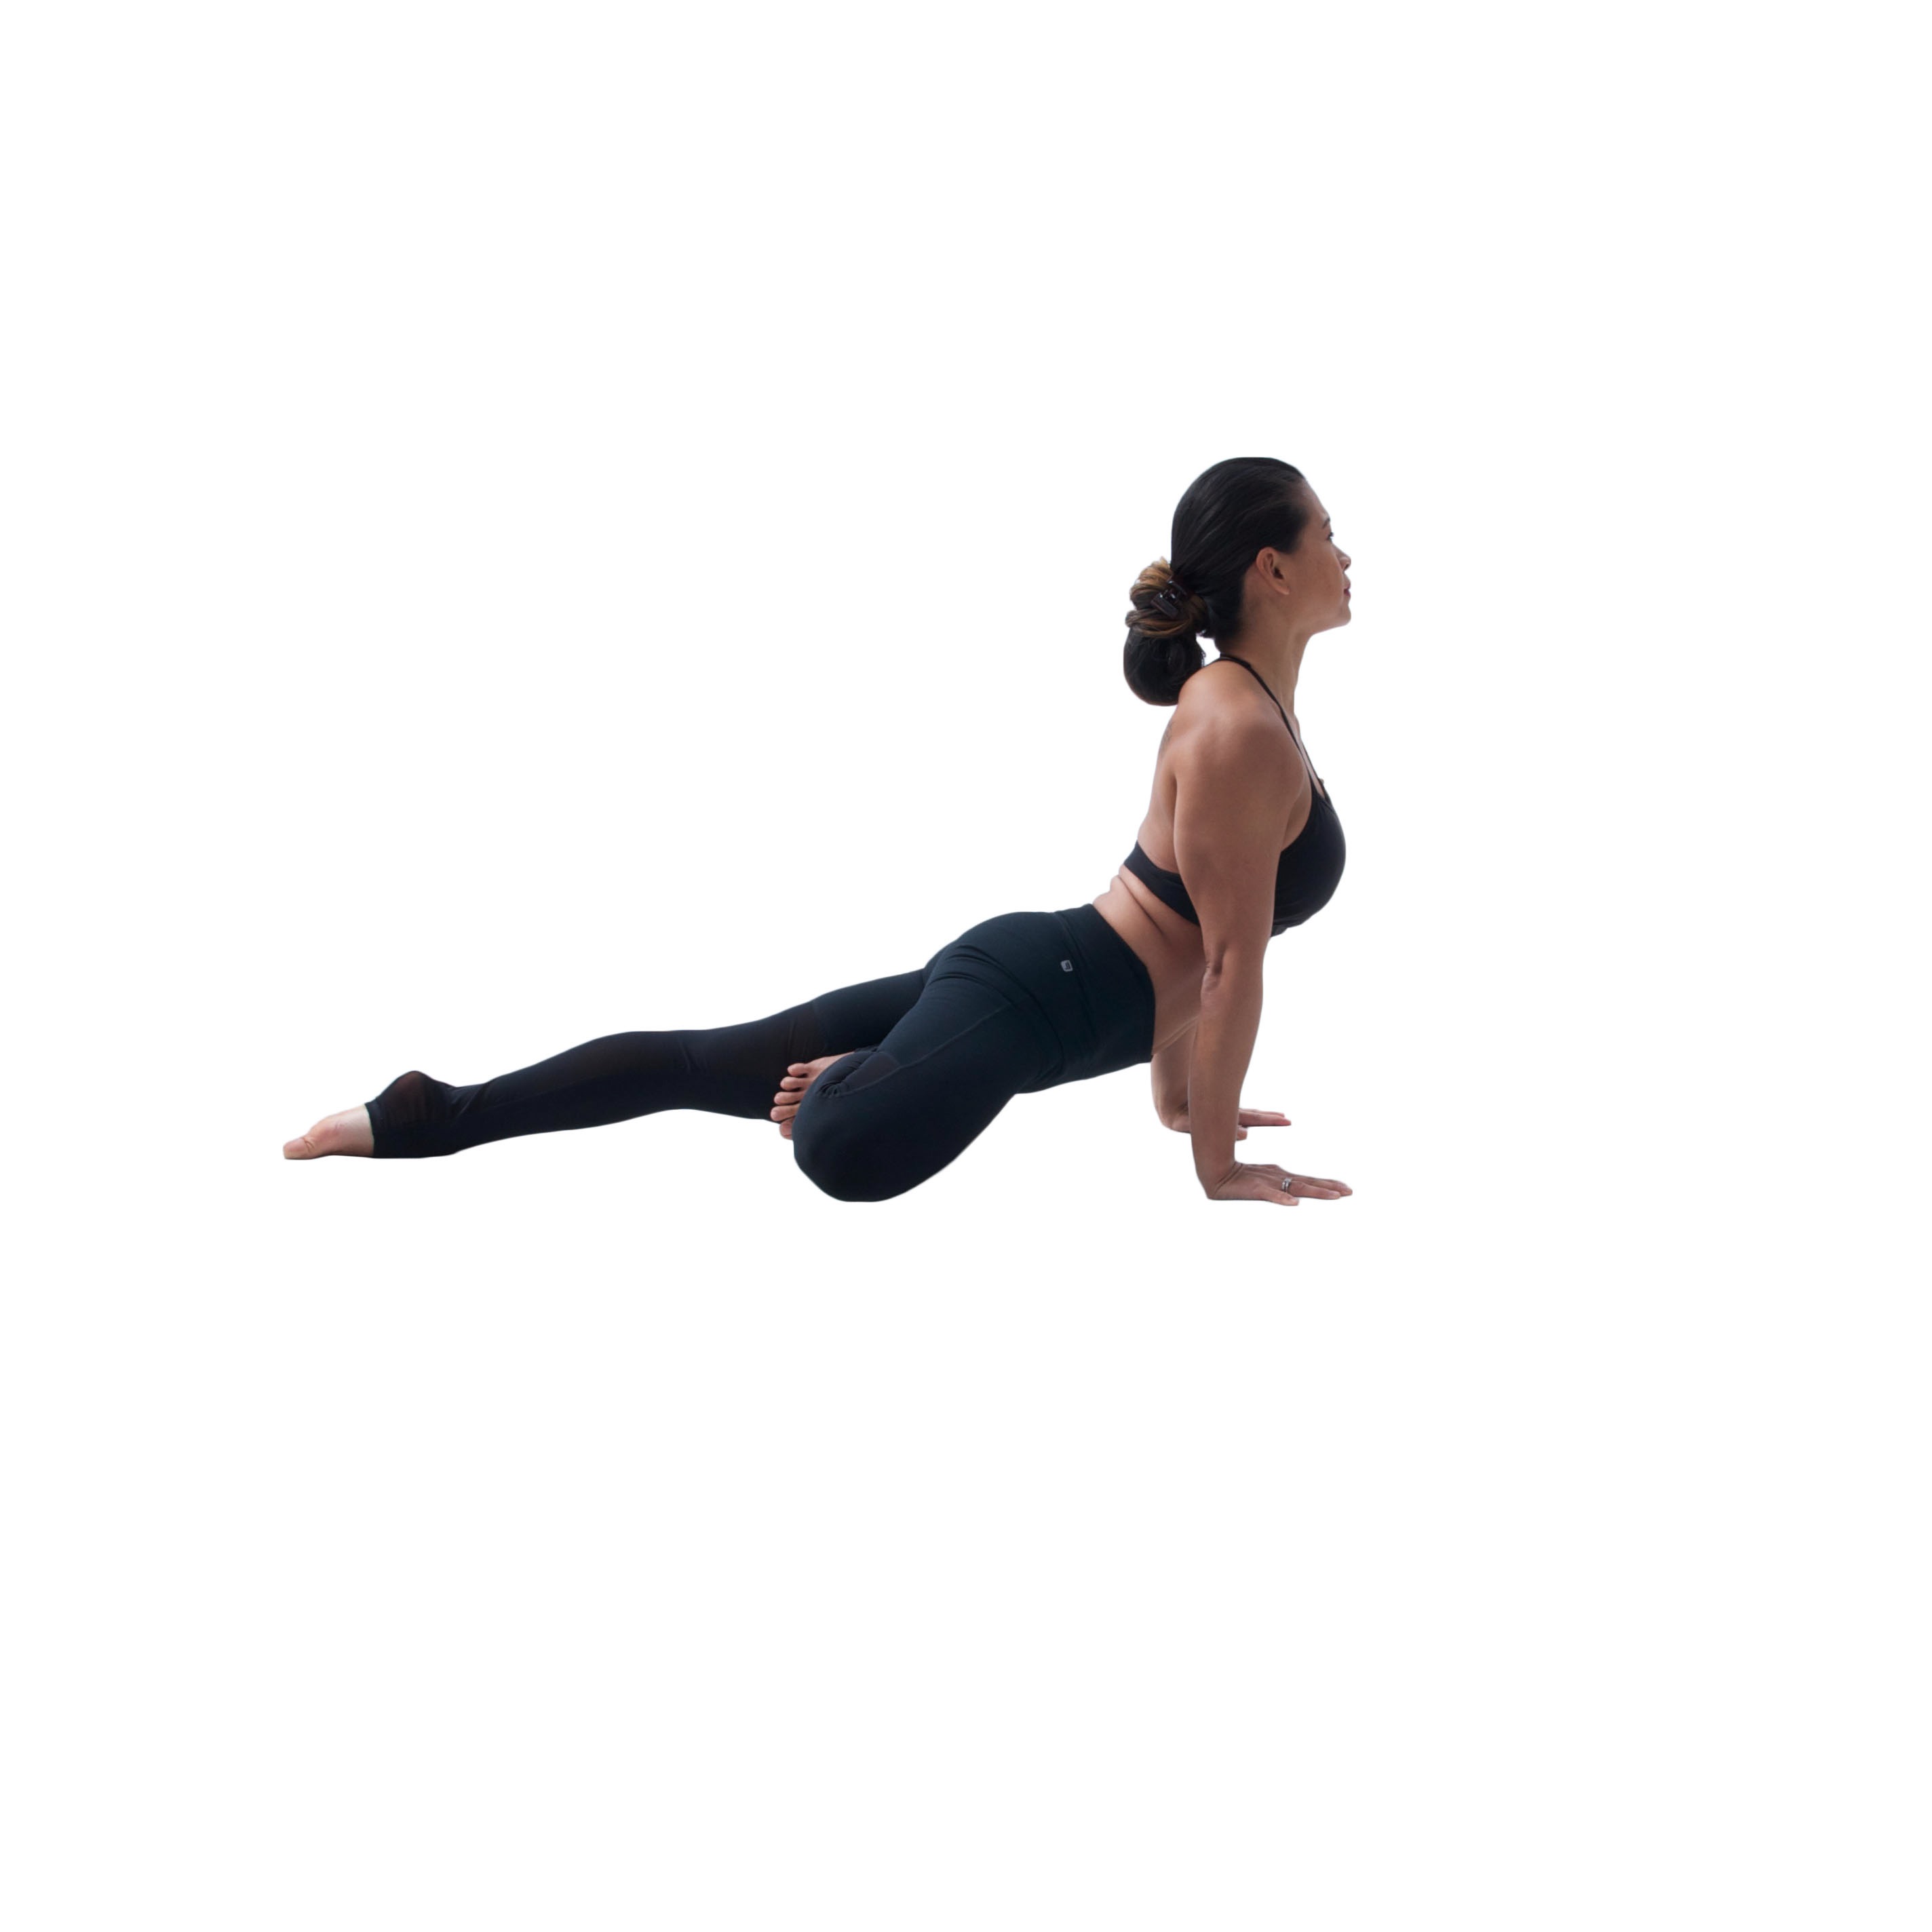
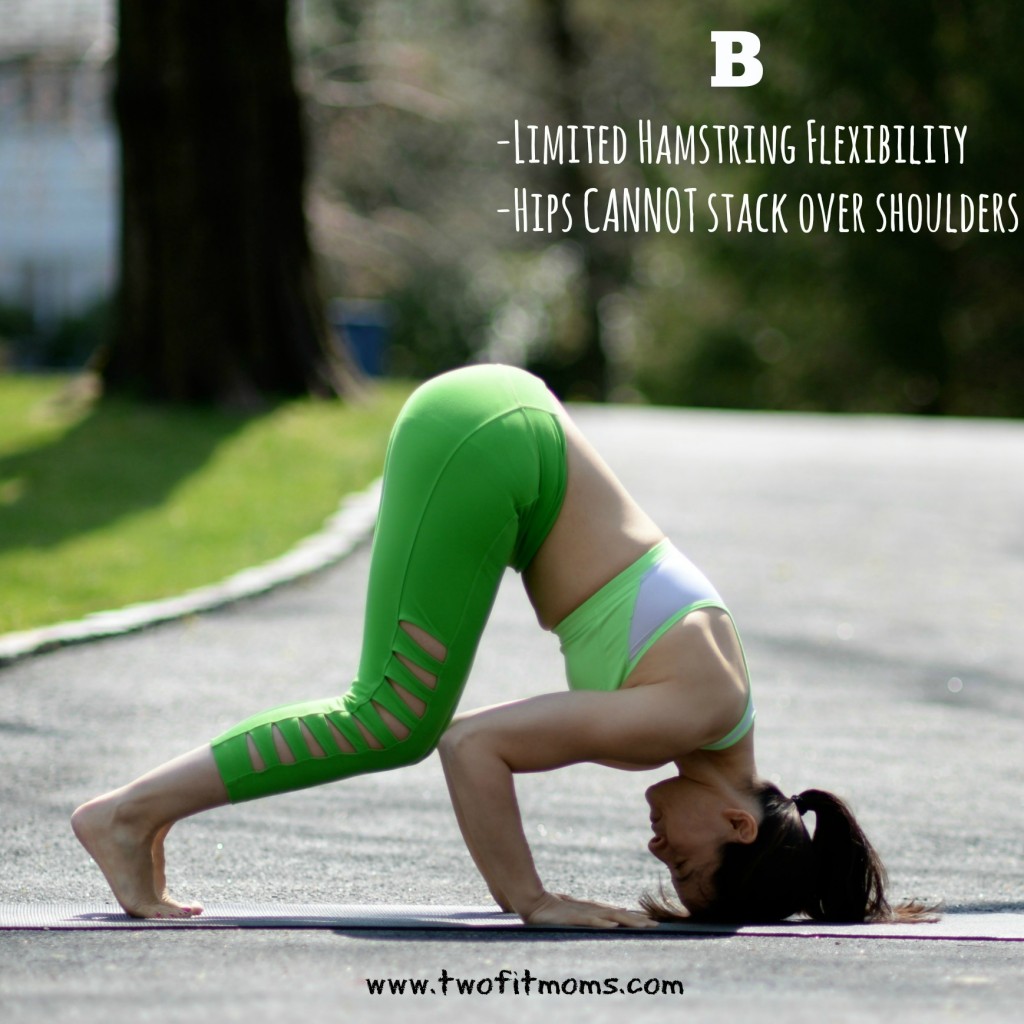
    Take a look at photo B where I simulate a case of tight hamstrings. My knees are bent, and as a result, I am unable to stack my hips over my shoulders. If you draw an imaginary vertical line through my hips, you will easily see that my hips are not even close to being aligned over my shoulders. So now we have this important realization: Without hamstring flexibility, hip stacking doesn’t happen.

    HamstringsTightText

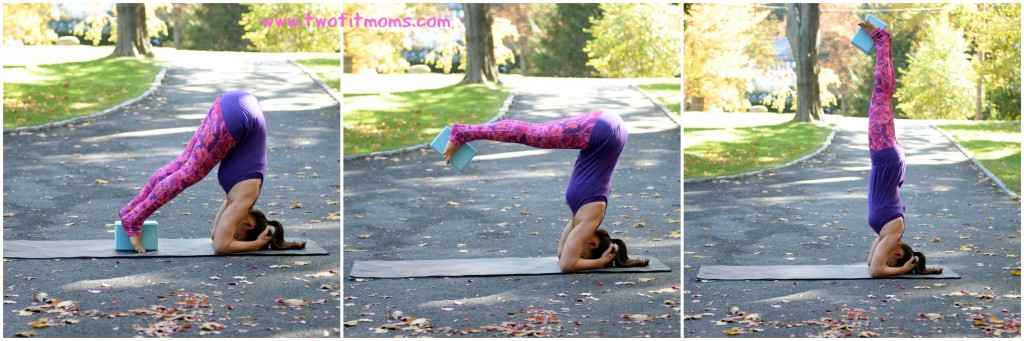
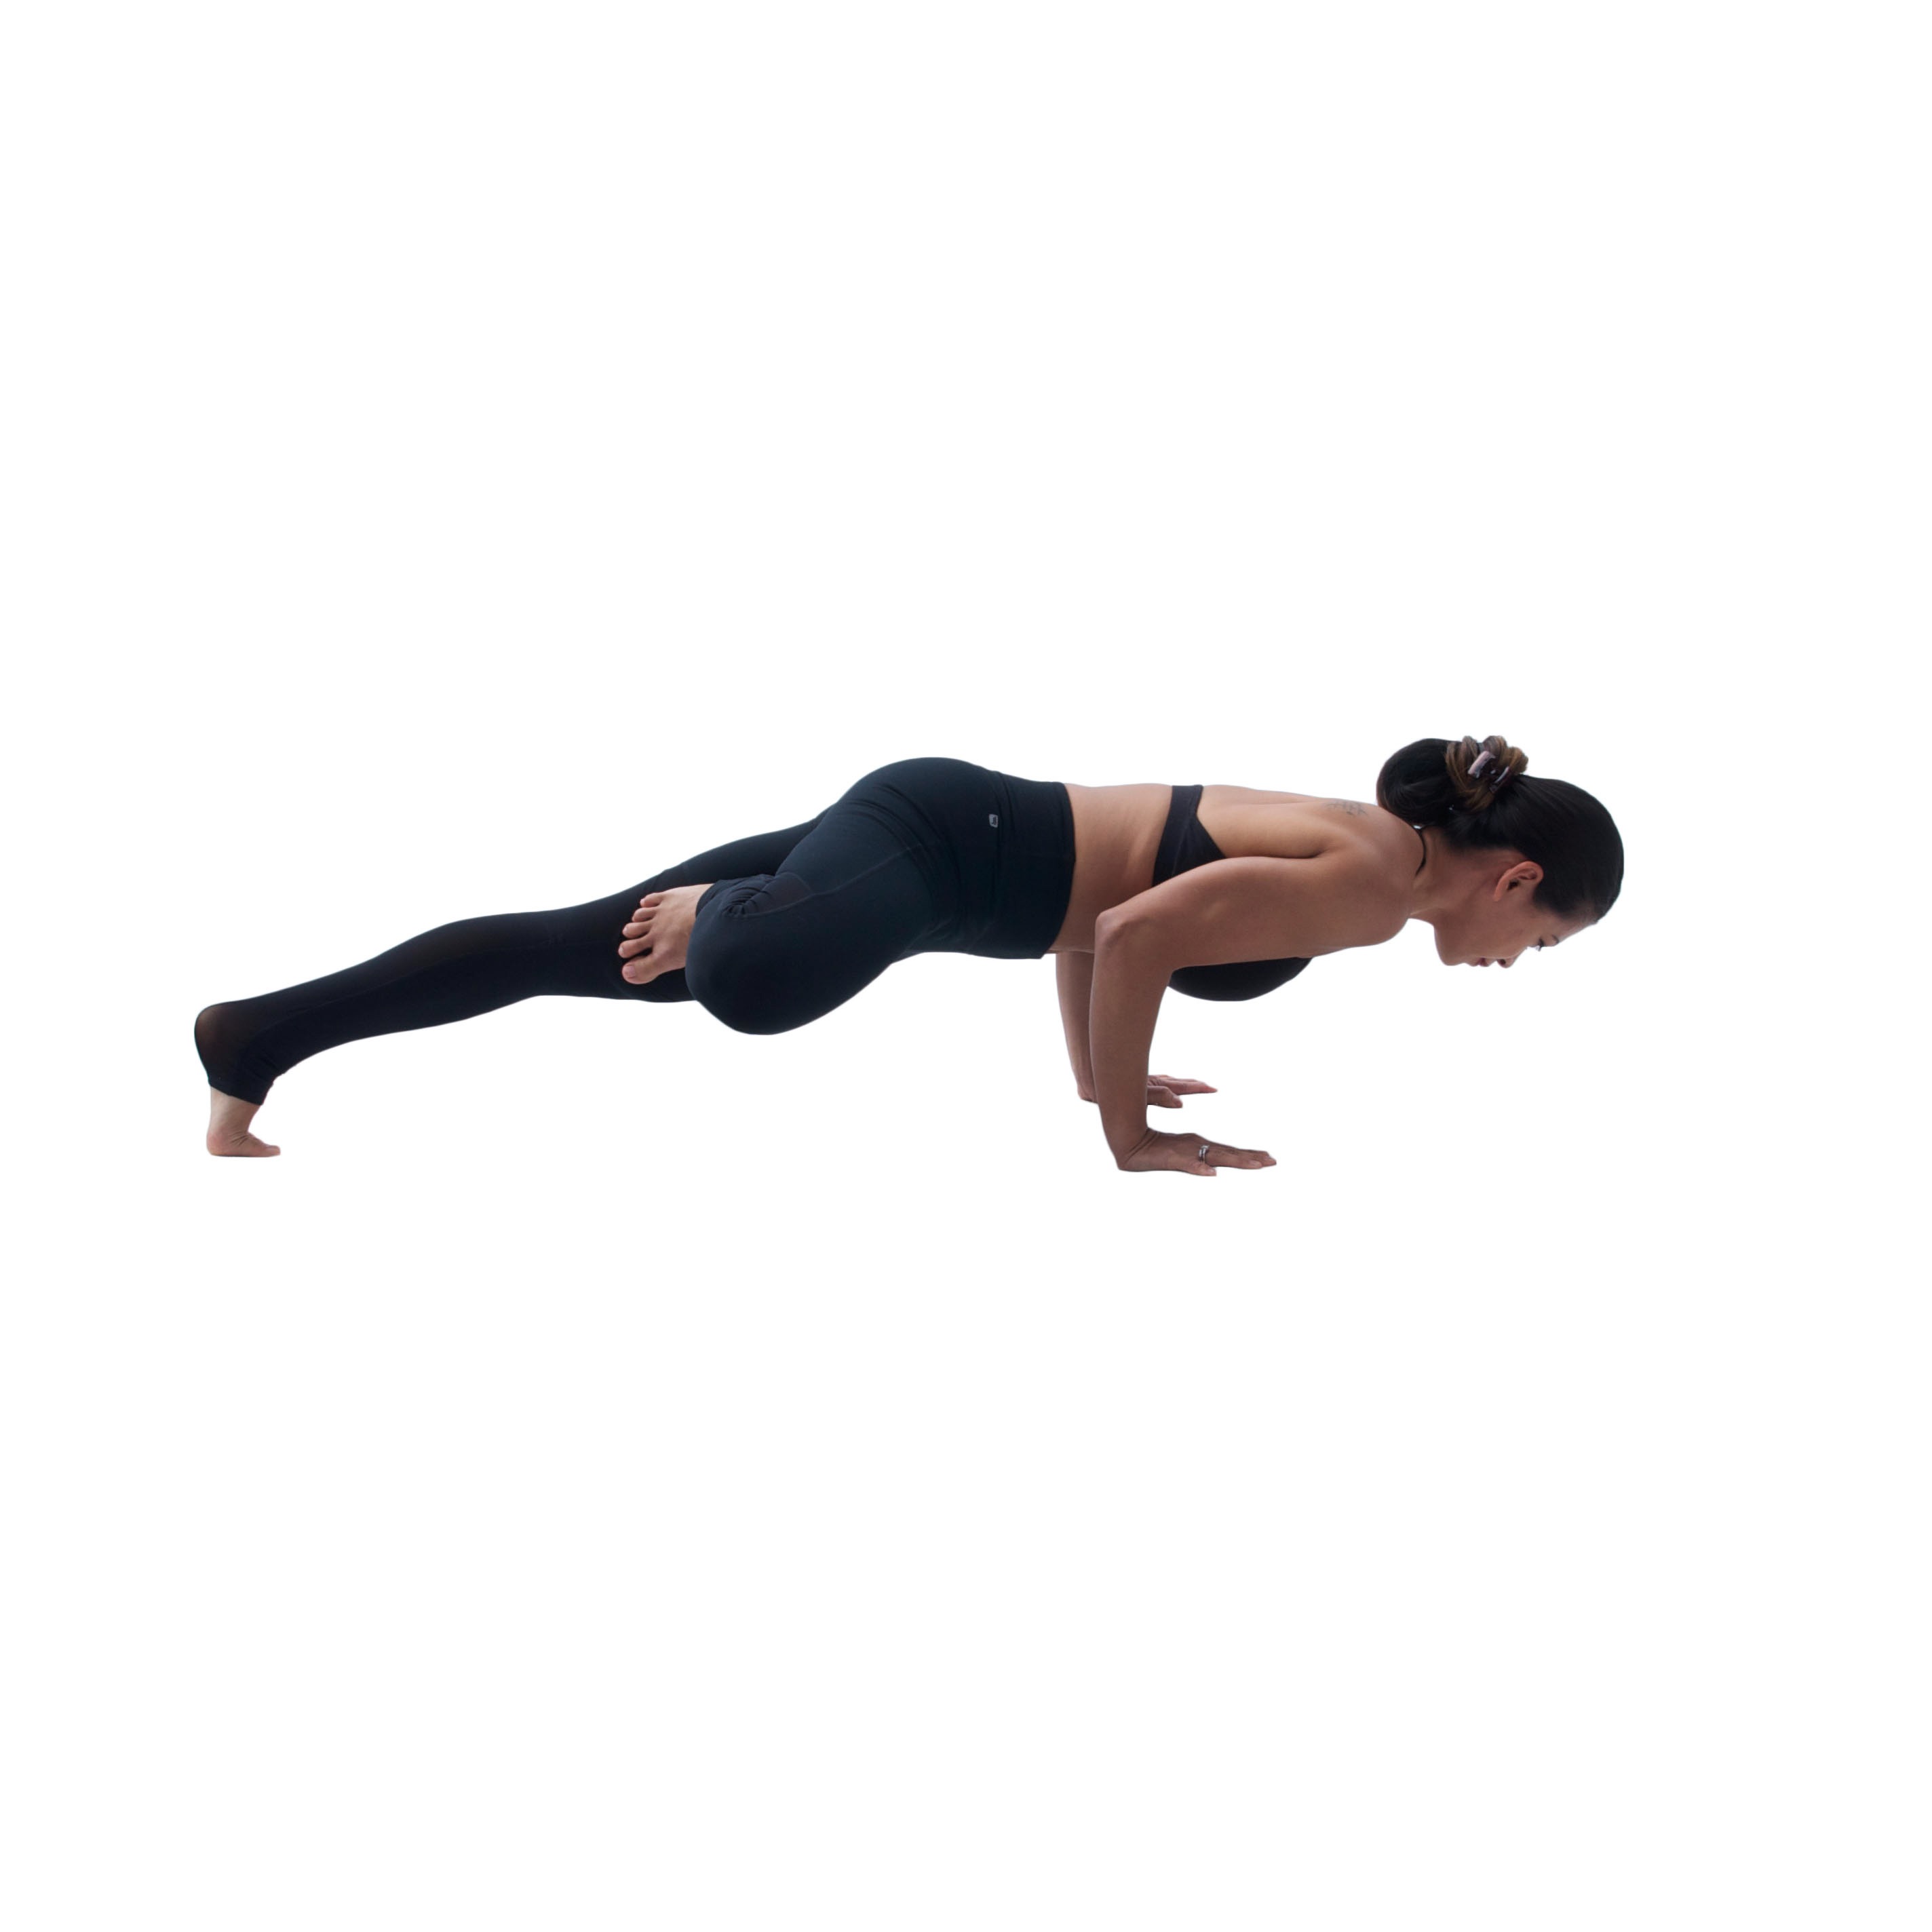
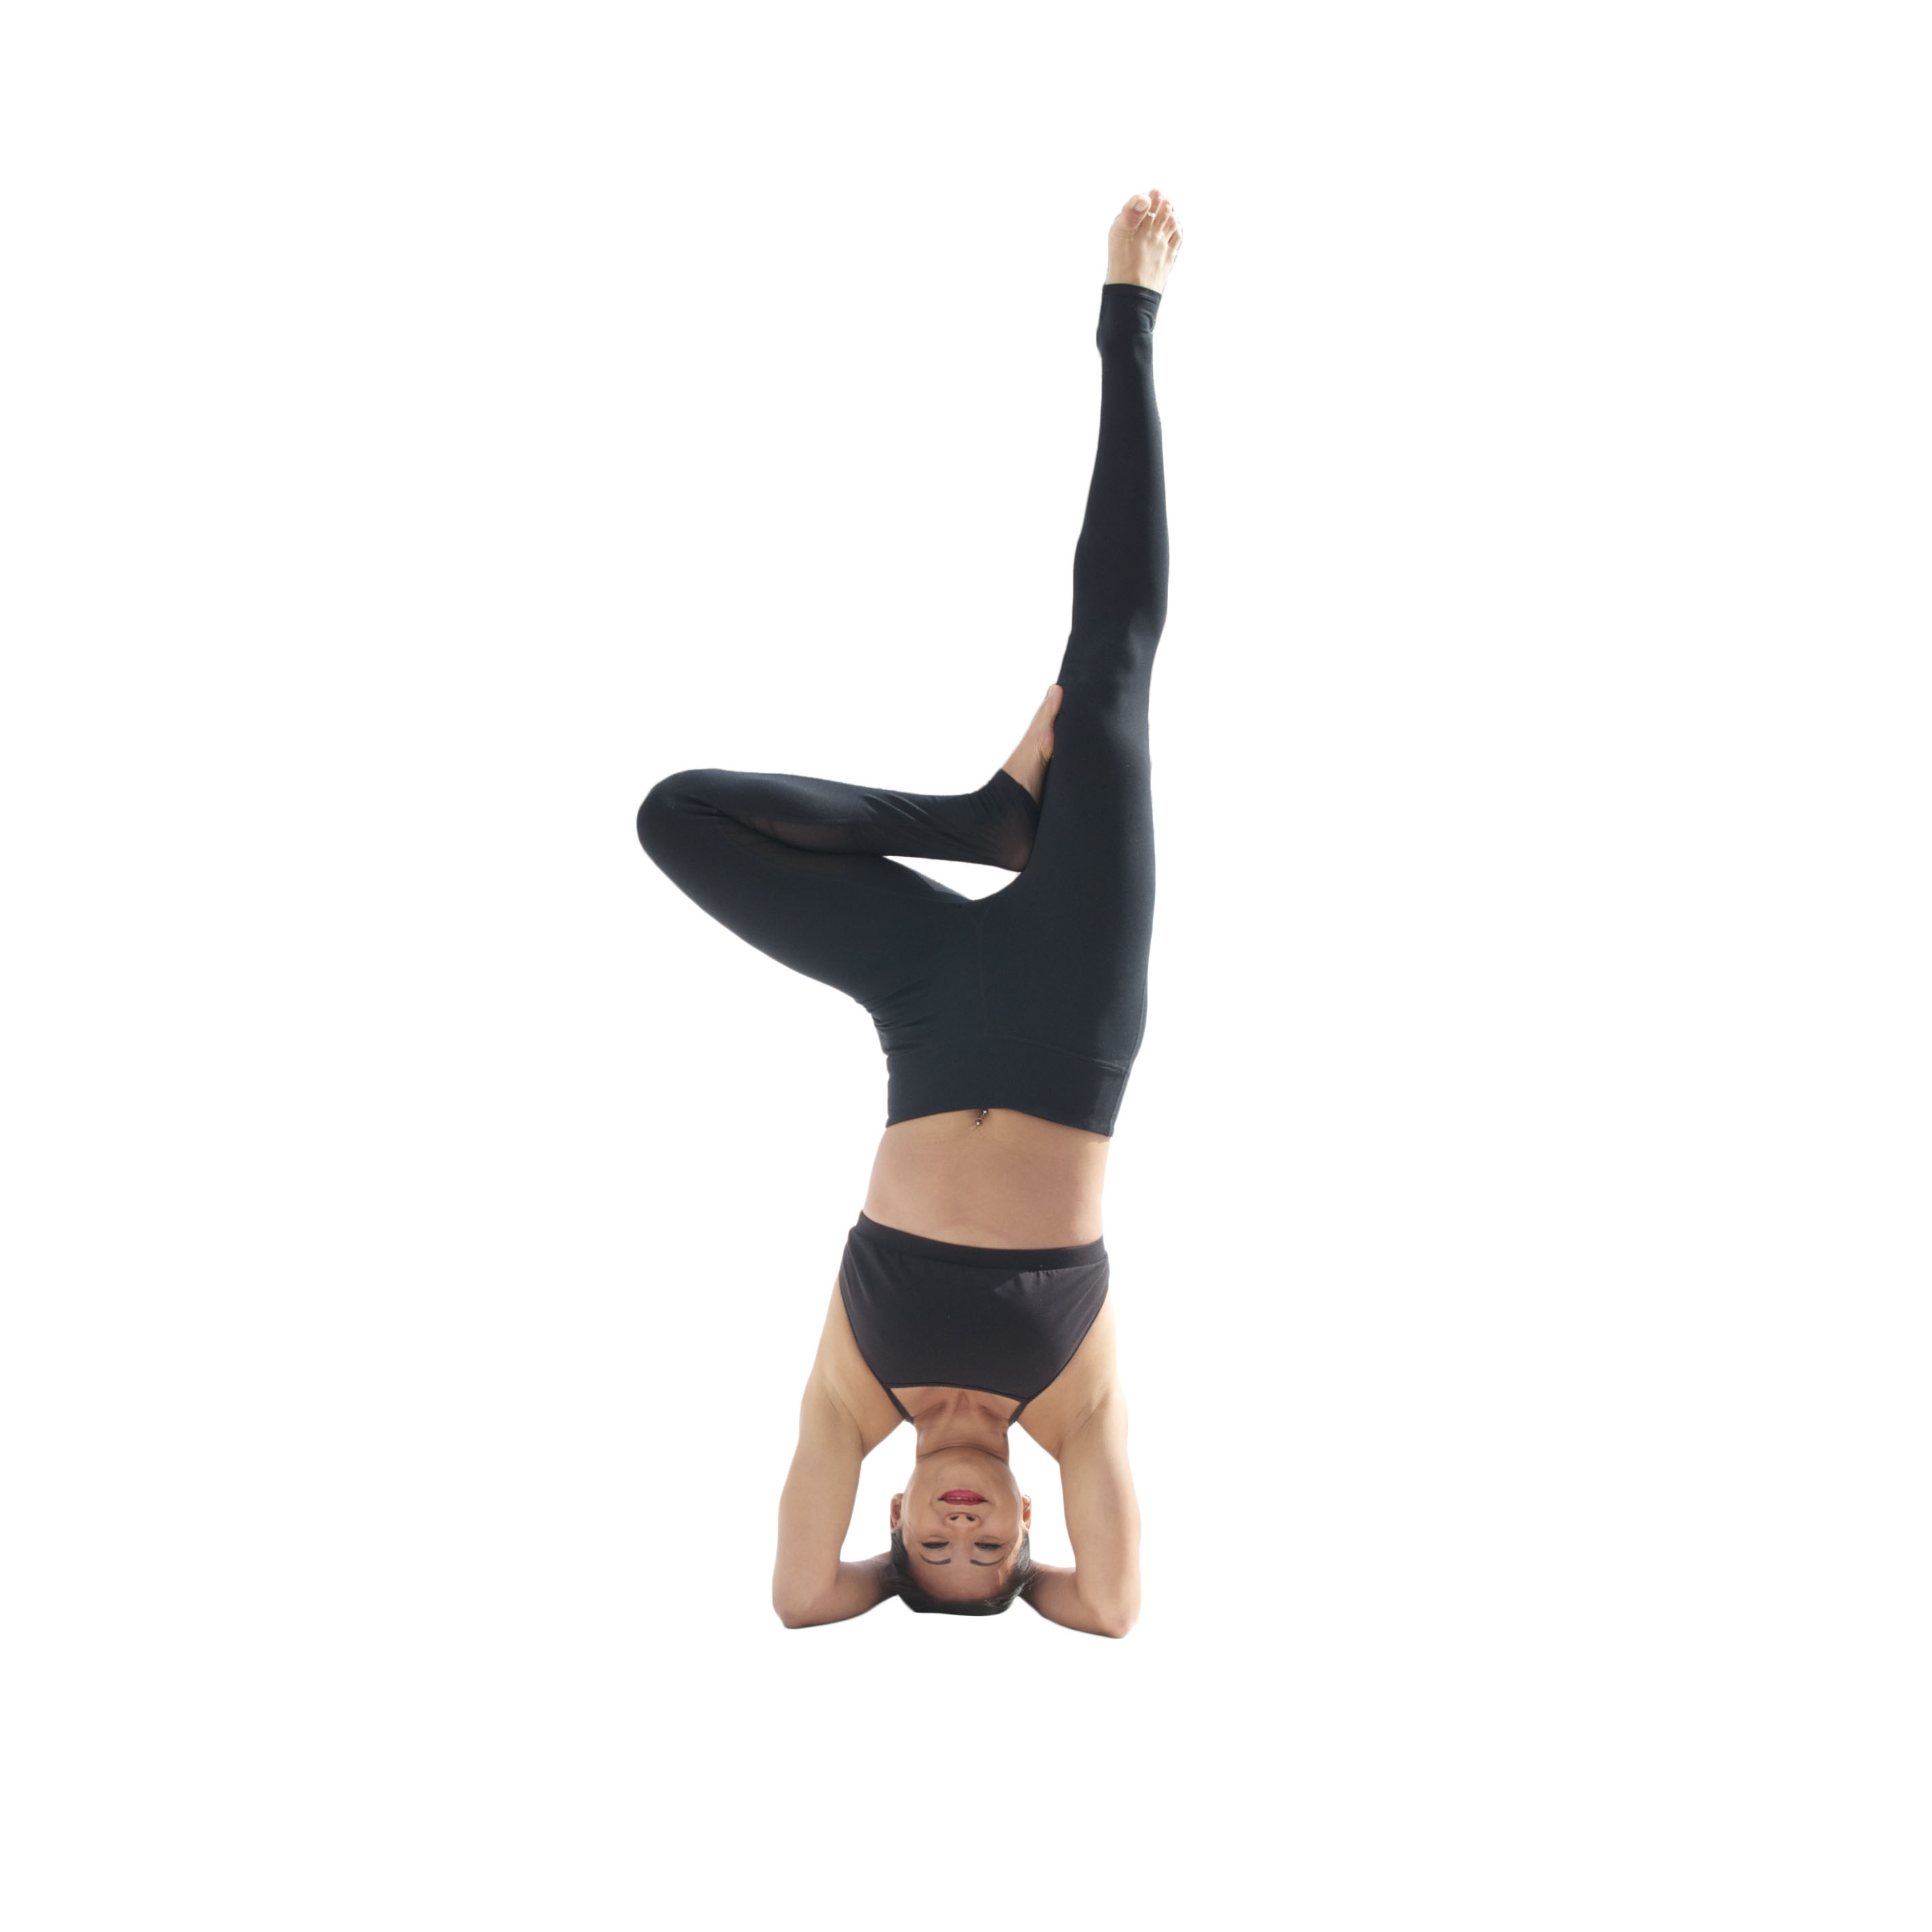
    Assuming I have plenty of flexibility in my hamstrings, I can stack my hips and easily place my right knee onto my right tricep.  Take a look at this next photo and compare it to photo A above.  Yes, I have to engage my core to lift my knee, but I don’t have to change anything else about my posture. My body is already aligned and ready to go. This posture is possible because of the hip stacking.  And in turn, the hip stacking is possible because of the hamstring flexibility. The final motion of lifting the left knee onto the left tricep doesn’t require much additional effort once the hips are stacked and the first knee is in place.

    OneLegBentTFM

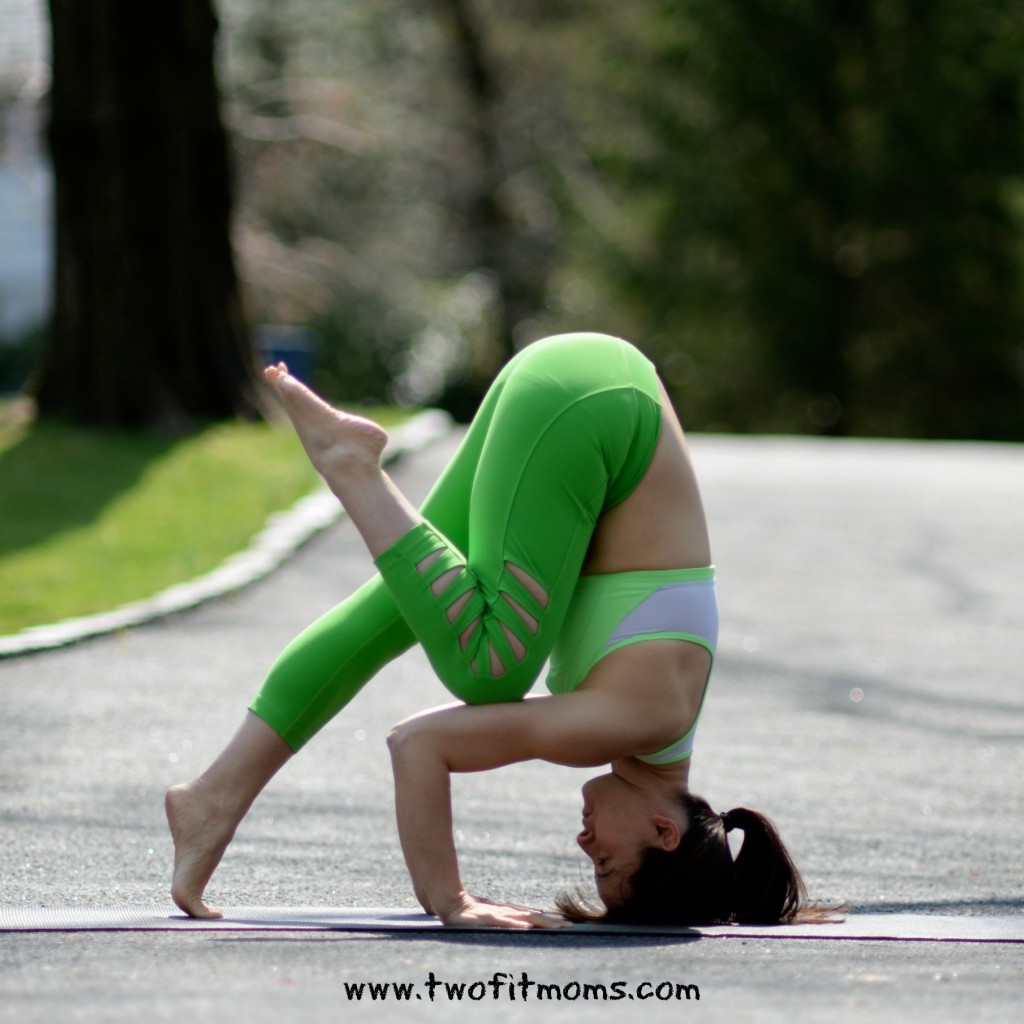
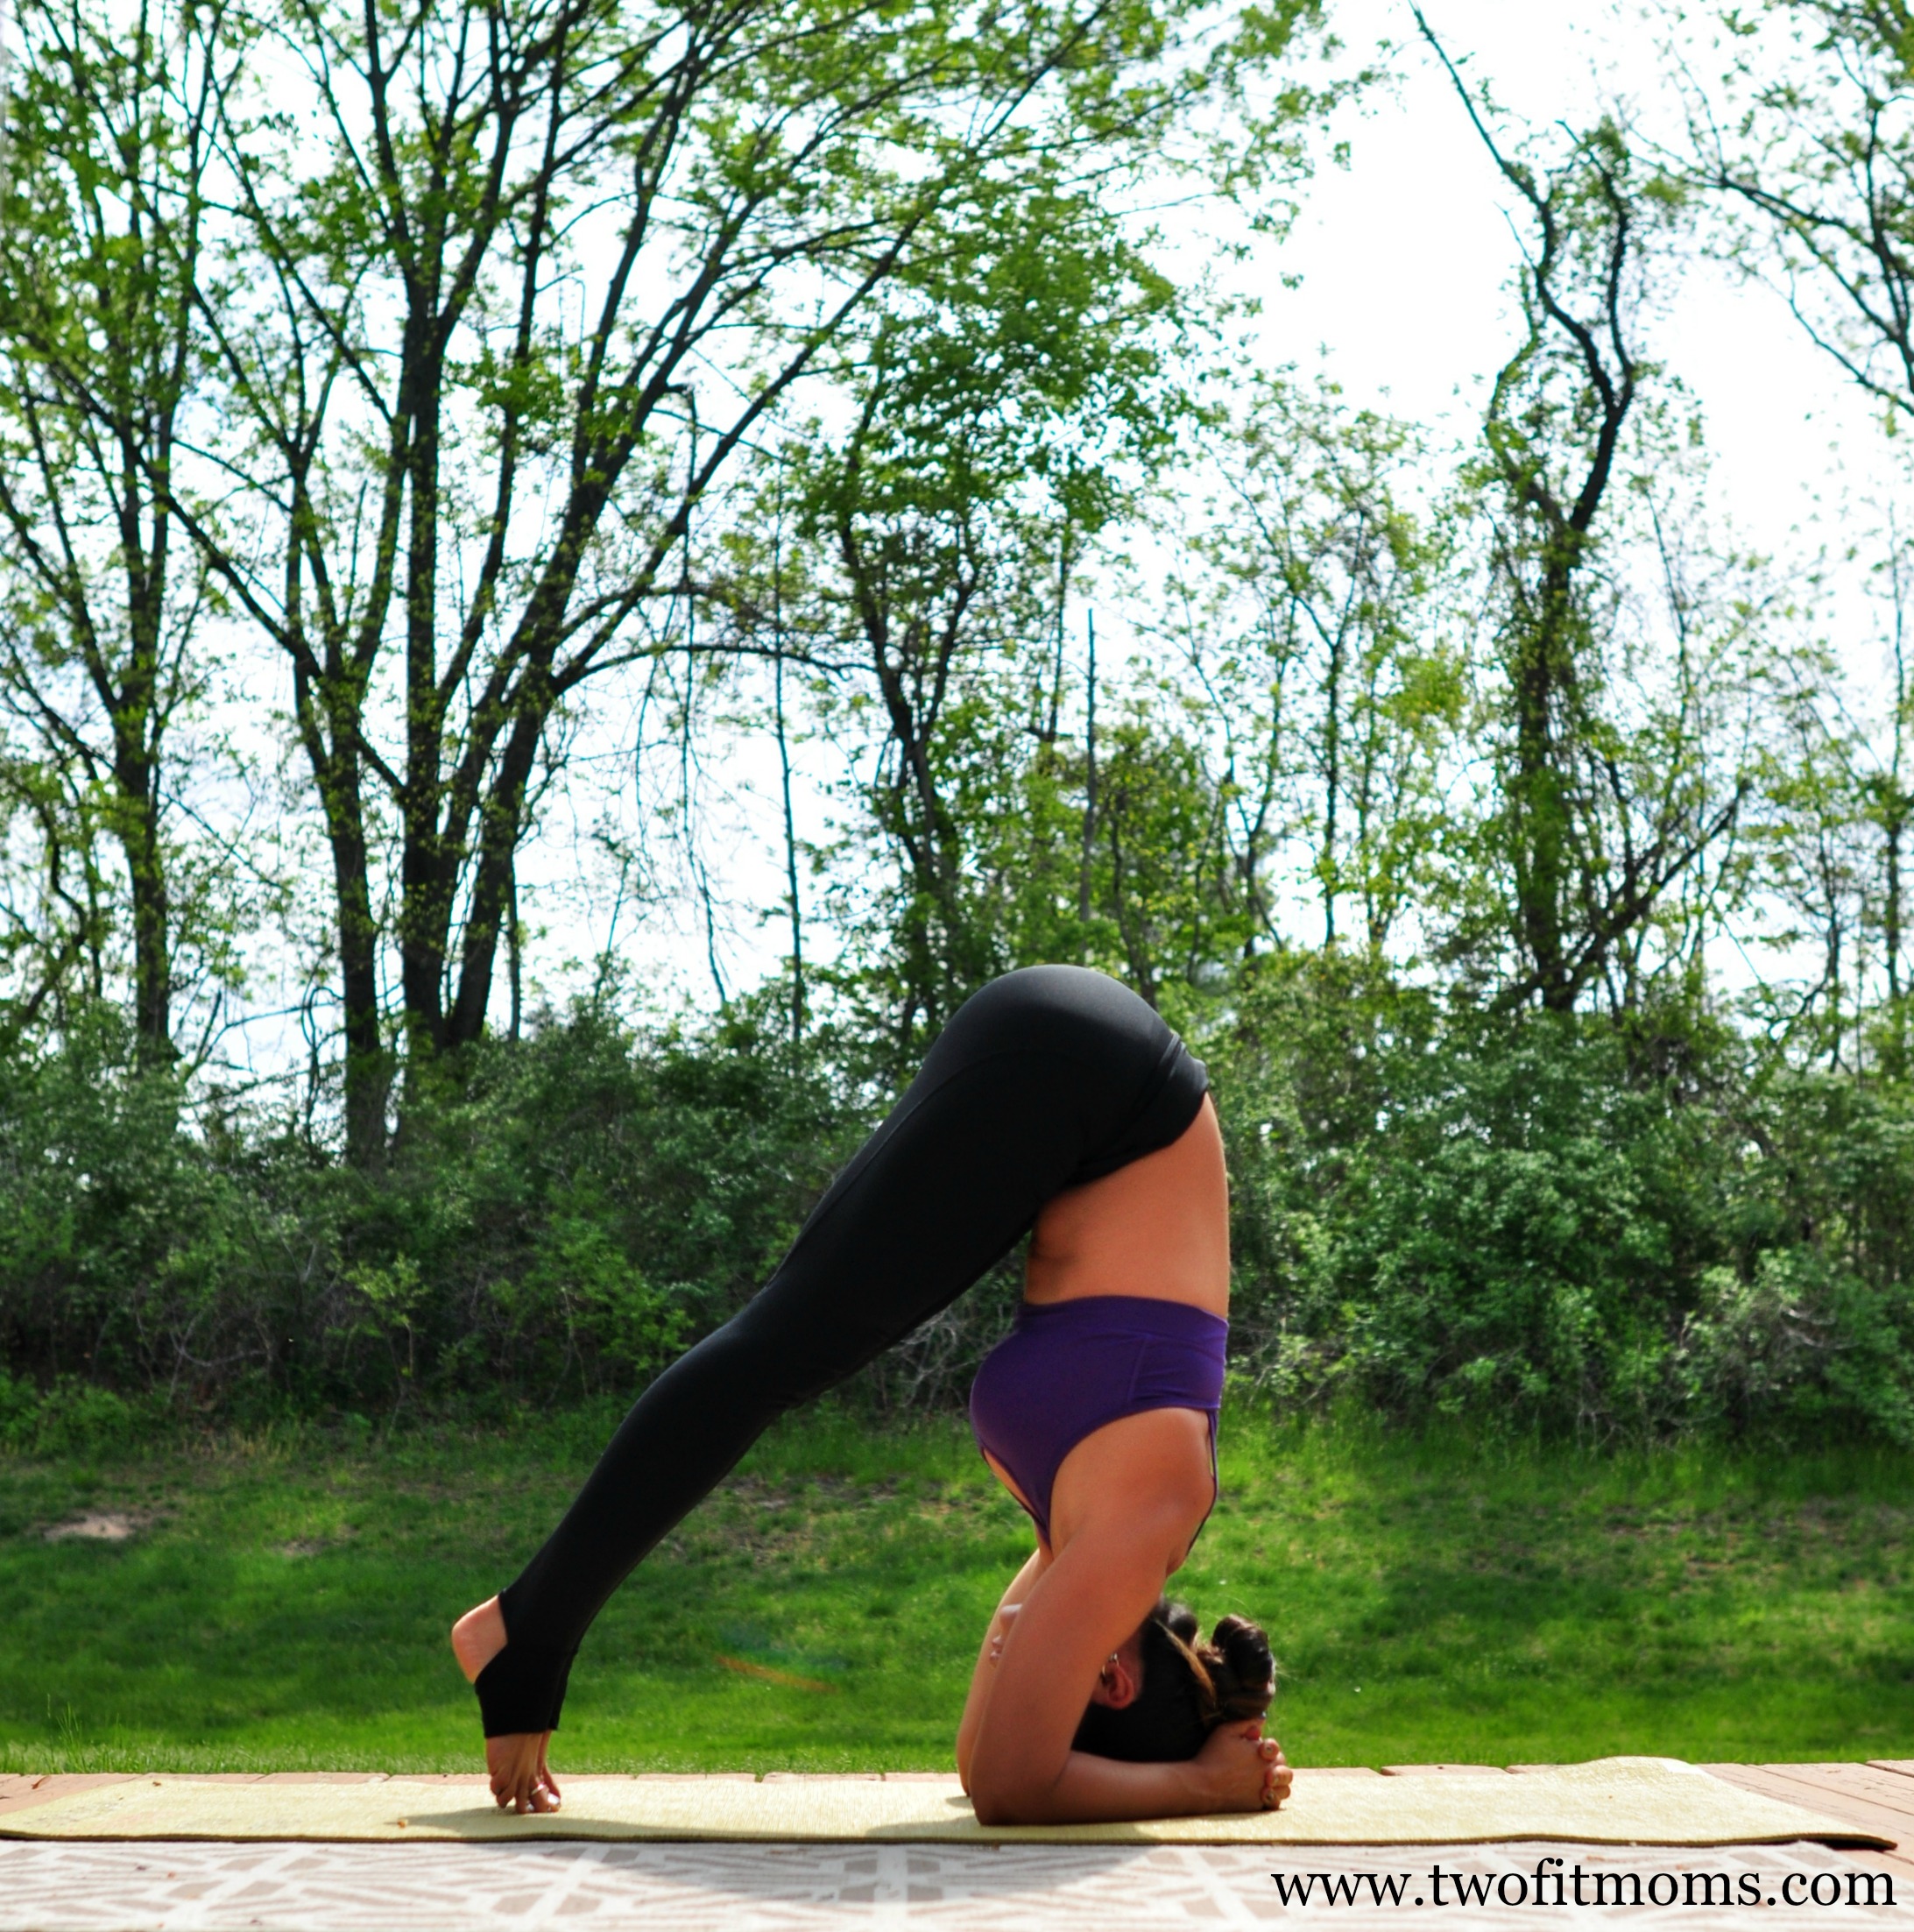
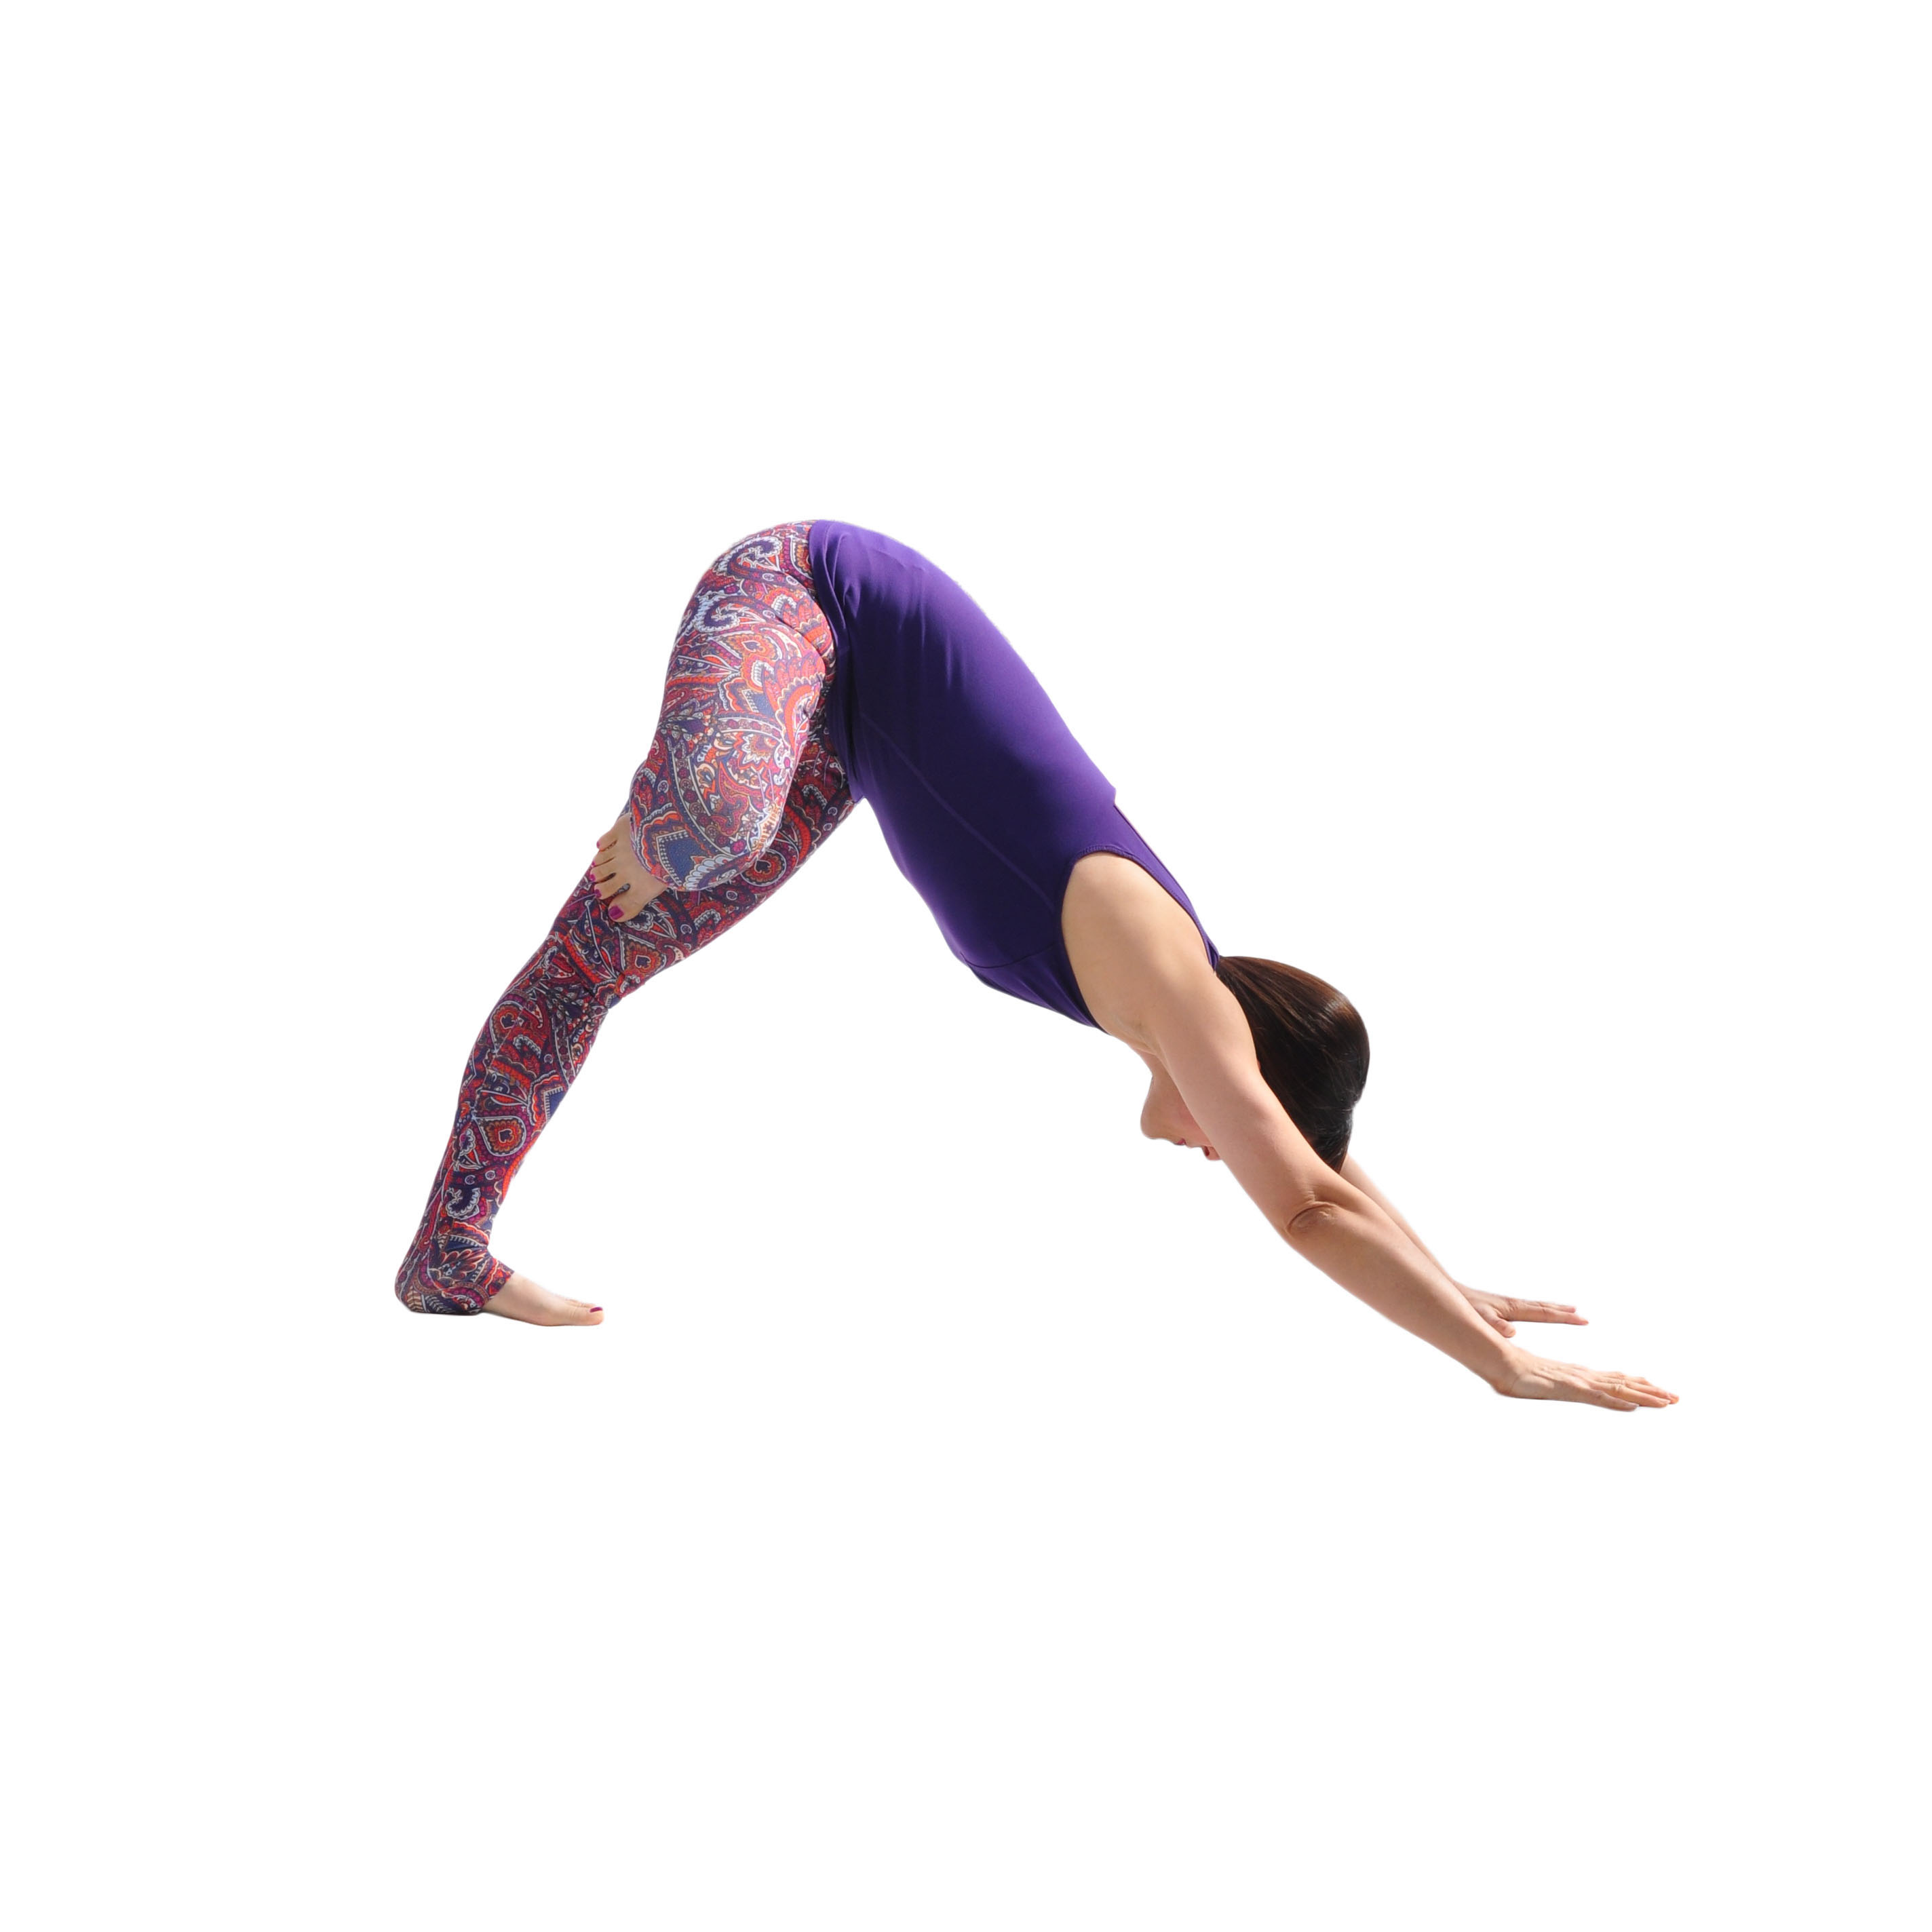
    By now, you see the importance of having loose hamstrings, but let’s go through one final illustration.  In the photo below, I am simulating a scenario where my hamstrings are tight, and I am attempting to put my knee onto my tricep.  With tight hamstrings, I cannot straighten my legs.  If I cannot straighten my legs, I cannot stack my hips.  Consequently, it’s not even possible to get my knee onto the back of my arm.  My knee is actually BELOW the level of my tricep.  Even if by some strange miracle, I could crunch my body and round my back in such a way to allow the knee to rest on the tricep, what are the chances of balancing with both knees on both triceps if the hips are not aligned over the shoulders?  Slim to none, and slim just left town.

    TightHamstringAttemptTFM

    If you are struggling with your Tripod Egg, and you don’t know why, I encourage you to set this inversion goal aside for a little while and focus on gaining more hamstring flexibility. Once you make progress, re-visit the inversion. I bet you’ll notice quite a difference!

    If you are looking for suggestions on improving your hamstring flexibility, we can help!  Please warm up with a few rounds of Sun Salutations, and practice these hamstring stretches on a daily basis. If you own a yoga strap, give this stretch a try, too.  Good luck!


  • Springtime Flow

    Springtime Flow

    Spring is a season characterized by rebirth, renewal and growth.springtimeflowforig Many of us are looking forward to longer, lighter evenings and the uplifting energy of Spring. To celebrate the season (and to help you out of bed before the sun has risen), we are putting a fresh spin on a traditional sequence. Each pose within the sequence becomes a hybrid — and a hip opener — by keeping the legs in tree pose. Challenge your balance and flexibility by practicing this variation of Sun Salutation that pays homage to blooming trees and fresh routine. Remember to practice the sequence on both sides of your body, and breathe deeply through each pose.

    1. Tree Pose

    Start in Mountain Pose at the back of your mat. Toes are spread, spine is lengthening towards the ground. Slowly shift your weight into your left foot and pick up your right foot. With the help of your right hand, place the sole of the right foot onto the inner left thigh. Find stability in this pose by pressing your right foot firmly into your left thigh, and your left thigh firmly into the sole of your right foot. Keep your right knee pressing out. Bring your hands together at heart center. Take 5 deep breaths, then on your next inhale sweep your hands up towards the sky.

    Tree Pose


    2. Standing Forward Fold with Tree Legs

    On an exhale, swan dive down into this Standing Forward Fold variation. Continue to keep your right knee open to the side. Feel the hamstring stretch along the back of your left leg and the stretch in your right hip. Stay here for 3-5 breaths.

    Standing Forward Fold

    3. High Plank Pose with Tree Legs

    Rather than stepping or jumping back into Plank Pose, as you would in a traditional Sun Salutation, on an exhale, slowly walk yourself out into Plank Pose with Tree Legs.  Continue pressing your right foot firmly into your left thigh, and try to make a straight line with your body from head to heel. Stay here for 3-5 breaths.

    YJMarch3

    4. Side Plank Pose with Tree Legs

    Before moving into your Chaturanga Dandasana, which is usually the next pose in the Sun Salutation, take a short detour into Side Plank Pose with Tree Legs. On an inhale, shift your weight onto your left hand, roll onto the outer edge of the left foot and pop up onto your right fingertips. Find your balance here. On the exhale, slowly extend your right hand up towards the sky. Keep your hips lifting as you continue to root down through your left hand. Look up at your right hand for an added challenge.  Stay here for 3-5 breaths and return into your High Plank Pose with Tree Legs.

    YJMarch4


    5. Low Plank Pose with Tree Legs

    From High Plank Pose, slowly shift slightly forward. On an exhale, bend your elbows coming into Low Plank Pose (or Chaturanga Dandasana) with Tree Legs. Hug your elbows in and engage your core to maintain stability.

    YJMarch5

    6. Upward Facing Dog with Tree Legs

    On an inhale, roll over the left toes and come into Upward Facing Dog with Tree Legs. Feel free to modify by taking the Cobra Pose variation with hips on the ground. Press into your hands, lift your heart and relax your shoulders. Take 3-5 breaths.

    YJMarch6

    7. Downward Facing Dog with Tree Legs

    On an exhale, roll back over your left toes and come into your Downward Facing Dog with Tree Legs. Spread your fingers wide, relax your shoulders and engage your belly. Stay here and hold for 5 deep breaths. Complete your Sun Salutation by walking your hands back to your left foot and then slowly lifting back up into Tree Pose! Release the right foot, shake it out and repeat on the other side.

    YJMarch7

    8. Optional: Supported Headstand with Tree Legs

    For an added challenge, feel free to add an inversion at the end of your Sun Salutation practice. Keep your elbows hugging in, neck long, belly engaged and legs energized! To maintain our tree theme, slowly bend on knee and bring the sole of the foot to the inside of the other thigh, then switch! Remember to continue breathing. Take a well deserved Child’s Pose after you come down.

    YJMarch8

  • Move over Cupid:  Fallen Angel Tutorial

    Move over Cupid: Fallen Angel Tutorial

    With Valentine’s Day on the horizon, you may be looking to channel your inner cupid.  Well, we are here to help.  Put on your wings and get ready to enter one of the prettiest yoga poses—Fallen Angel.

    Fallen Angel is a great hybrid pose for anyone looking to dabble in the realm of arm balances and inversions — its hybrid nature combines elements of both worlds, resulting in a posture that offers a surprising amount of stability.Photo Feb 02, 1 14 00 PM

    We love teaching this pose because of its beauty and accessibility.  A rock solid arm balance practice is not required.  Side crow is just a brief moment in the transition to Fallen Angel—it’s okay if you can’t hold it for five long breaths!  Likewise, an advanced inversion practice is not a prerequisite for this pose.   The arched shape eliminates the possibility of tipping over, which is a common fear for beginners attempting a traditional headstand where the hips are stacked directly over the shoulders.

    If you need a bit of a pep talk before getting started, start HERE and read about the empowering nature of arm balances.  Once you are inspired, warm up your body by doing a few rounds of Sun Salutations and a series of twists.  You are now ready to move forward.


    Step 1
    Lower your body into a squat, resting on the balls of your feet.  Twist your body to the left, placing your hands onto the mat so that the outside of your left thigh rests along your triceps.

    Step 2
    Begin to lean and shift weight onto your hands, being mindful to keep your elbows squeezing inward.  If you are comfortable, slowly lift your right foot from the mat.

    Step 3
    Here is your (modified) side crow transition!  It’s modified because you are resting your left thigh across both triceps rather than on just the right tricep.  If you are unable to hold this balance for long, don’t worry.  Move right on through to step 4.

    Step 4
    Slowly lower the left side of your head onto the mat, and see if you can lift your right leg off of your left leg even by just an inch or two.  If that goes well, keep lifting the right leg, extending it straight into the air.

    Step 5
    The left thigh will remain on the back of the right arm throughout the pose, but you will need to rotate the left leg a bit in order to be able to point the left leg up to the sky.  In the final expression of the pose, the left leg is parallel to the right leg.


  • Day 10: Adho Mukha Vrksasana or Handstand

    Day 10: Adho Mukha Vrksasana or Handstand

    Welcome to Day 10 of the #YogawithTFM 10-Day Challenge! You made it! Today’s pose is Adho Mukha Vrksasana or Handstand!

    Check out this article for a full tutorial on Handstand.

    If you are new to Inversions and are looking for more help, download our Inversions Tutorial on iTunes.

    You can also view the video below for a live tutorial and variations.

    [KGVID poster=”http://www.twofitmoms.com/wp-content/uploads/2014/10/Video-Oct-09-6-05-43-PM_thumb11.jpg” width=”640″ height=”360″]http://www.twofitmoms.com/wp-content/uploads/2014/10/Video-Oct-09-6-05-43-PM.mov[/KGVID]

    Don’t forget to keep these three things in mind when getting into the pose:

    – Use your fingers to help you find balance!  Think CREEPY FINGERS as you grip your mat.

    – Corset your low ribs together to help eliminate dumping into the lower back. It’s the same feeling you get when you catch a football!

    – It’s all about the stack!  Shoulders over the heels of the hands, hips over the shoulders, feet over the hips.


  • Day 9: Pincha Mayurasana or Forearmstand

    Day 9: Pincha Mayurasana or Forearmstand

    Welcome to Day 9 of the #YogawithTFM 10-Day Challenge! Today’s pose is Pincha Mayurasana or Forearmstand.

    For a tutorial on Pincha Mayurasana, view this article.  For a variation, check out our Funky Pincha Mayurasana.

    View the video below for a live tutorial, and keep in mind the following three tips.

    [KGVID poster=”http://www.twofitmoms.com/wp-content/uploads/2014/10/Video-Oct-08-3-10-37-PM_thumb13.jpg” width=”640″ height=”360″]http://www.twofitmoms.com/wp-content/uploads/2014/10/Video-Oct-08-3-10-37-PM.mov[/KGVID]

    – Keep your elbows shoulder width apart. Your hands and forearms can be parallel or together.  It’s what you feel comfortable doing! Use a strap right above your elbows if you need help keeping them in.

    – Exhale before you kick up to help engage your core.

    – Gaze down between your thumbs to help balance.

  • Day 7: Adho Mukha Vrksasana Prep or “L” Handstand

    Day 7: Adho Mukha Vrksasana Prep or “L” Handstand

    Welcome to Day 7 of the #YogawithTFM 10-Day Challenge! Today’s pose is Adho Mukha Vrksasana Prep or “L” Handstand.

    If you are new to Handstands, you must check out our article, “Handstands 101: Building Your Foundation.” You might also want to check out our Inversions Tutorial available on iTunes!

    If you are more experienced view the video below:

    [KGVID poster=”http://www.twofitmoms.com/wp-content/uploads/2014/10/Video-Oct-06-3-44-01-PM_thumb10.jpg” width=”640″ height=”360″]http://www.twofitmoms.com/wp-content/uploads/2014/10/Video-Oct-06-3-44-01-PM.mov[/KGVID]

    Remember to take a few gentle kick ups to get the feel of being on your hands! Actively engage that top leg and send energy all the way up through your toes!

  • Day 6: Baddha Hasta Sirsasana A or Supported Headstand

    Day 6: Baddha Hasta Sirsasana A or Supported Headstand

    Welcome to Day 6 of the #YogawithTFM 10-Day Challenge! We are more than half way there! Today’s pose is Baddha Hasta Sirsasana A or Supported Headstand.

    View the video below for variations and check out the three steps below to help you get into this inversion!

    If you are new to headstands and are looking for guidance, check out our Inversions Tutorial HERE!

    [KGVID poster=”http://www.twofitmoms.com/wp-content/uploads/2014/10/Video-Oct-03-2-36-10-PM_thumb9.jpg” width=”640″ height=”360″]http://www.twofitmoms.com/wp-content/uploads/2014/10/Video-Oct-03-2-36-10-PM.mov[/KGVID]

    – Most of the weight should be in your forearms!  It should feel like that at any moment, you could slide a piece of paper under your head.

    – Draw the shoulders down and away from your ears…keeping your neck long.

    – Engage everything…especially your core and legs!