Category: Z Featured

Our editors pick the cool stuff for you

  • Instagram Quick Tip:  AfterFocus App

    Instagram Quick Tip: AfterFocus App

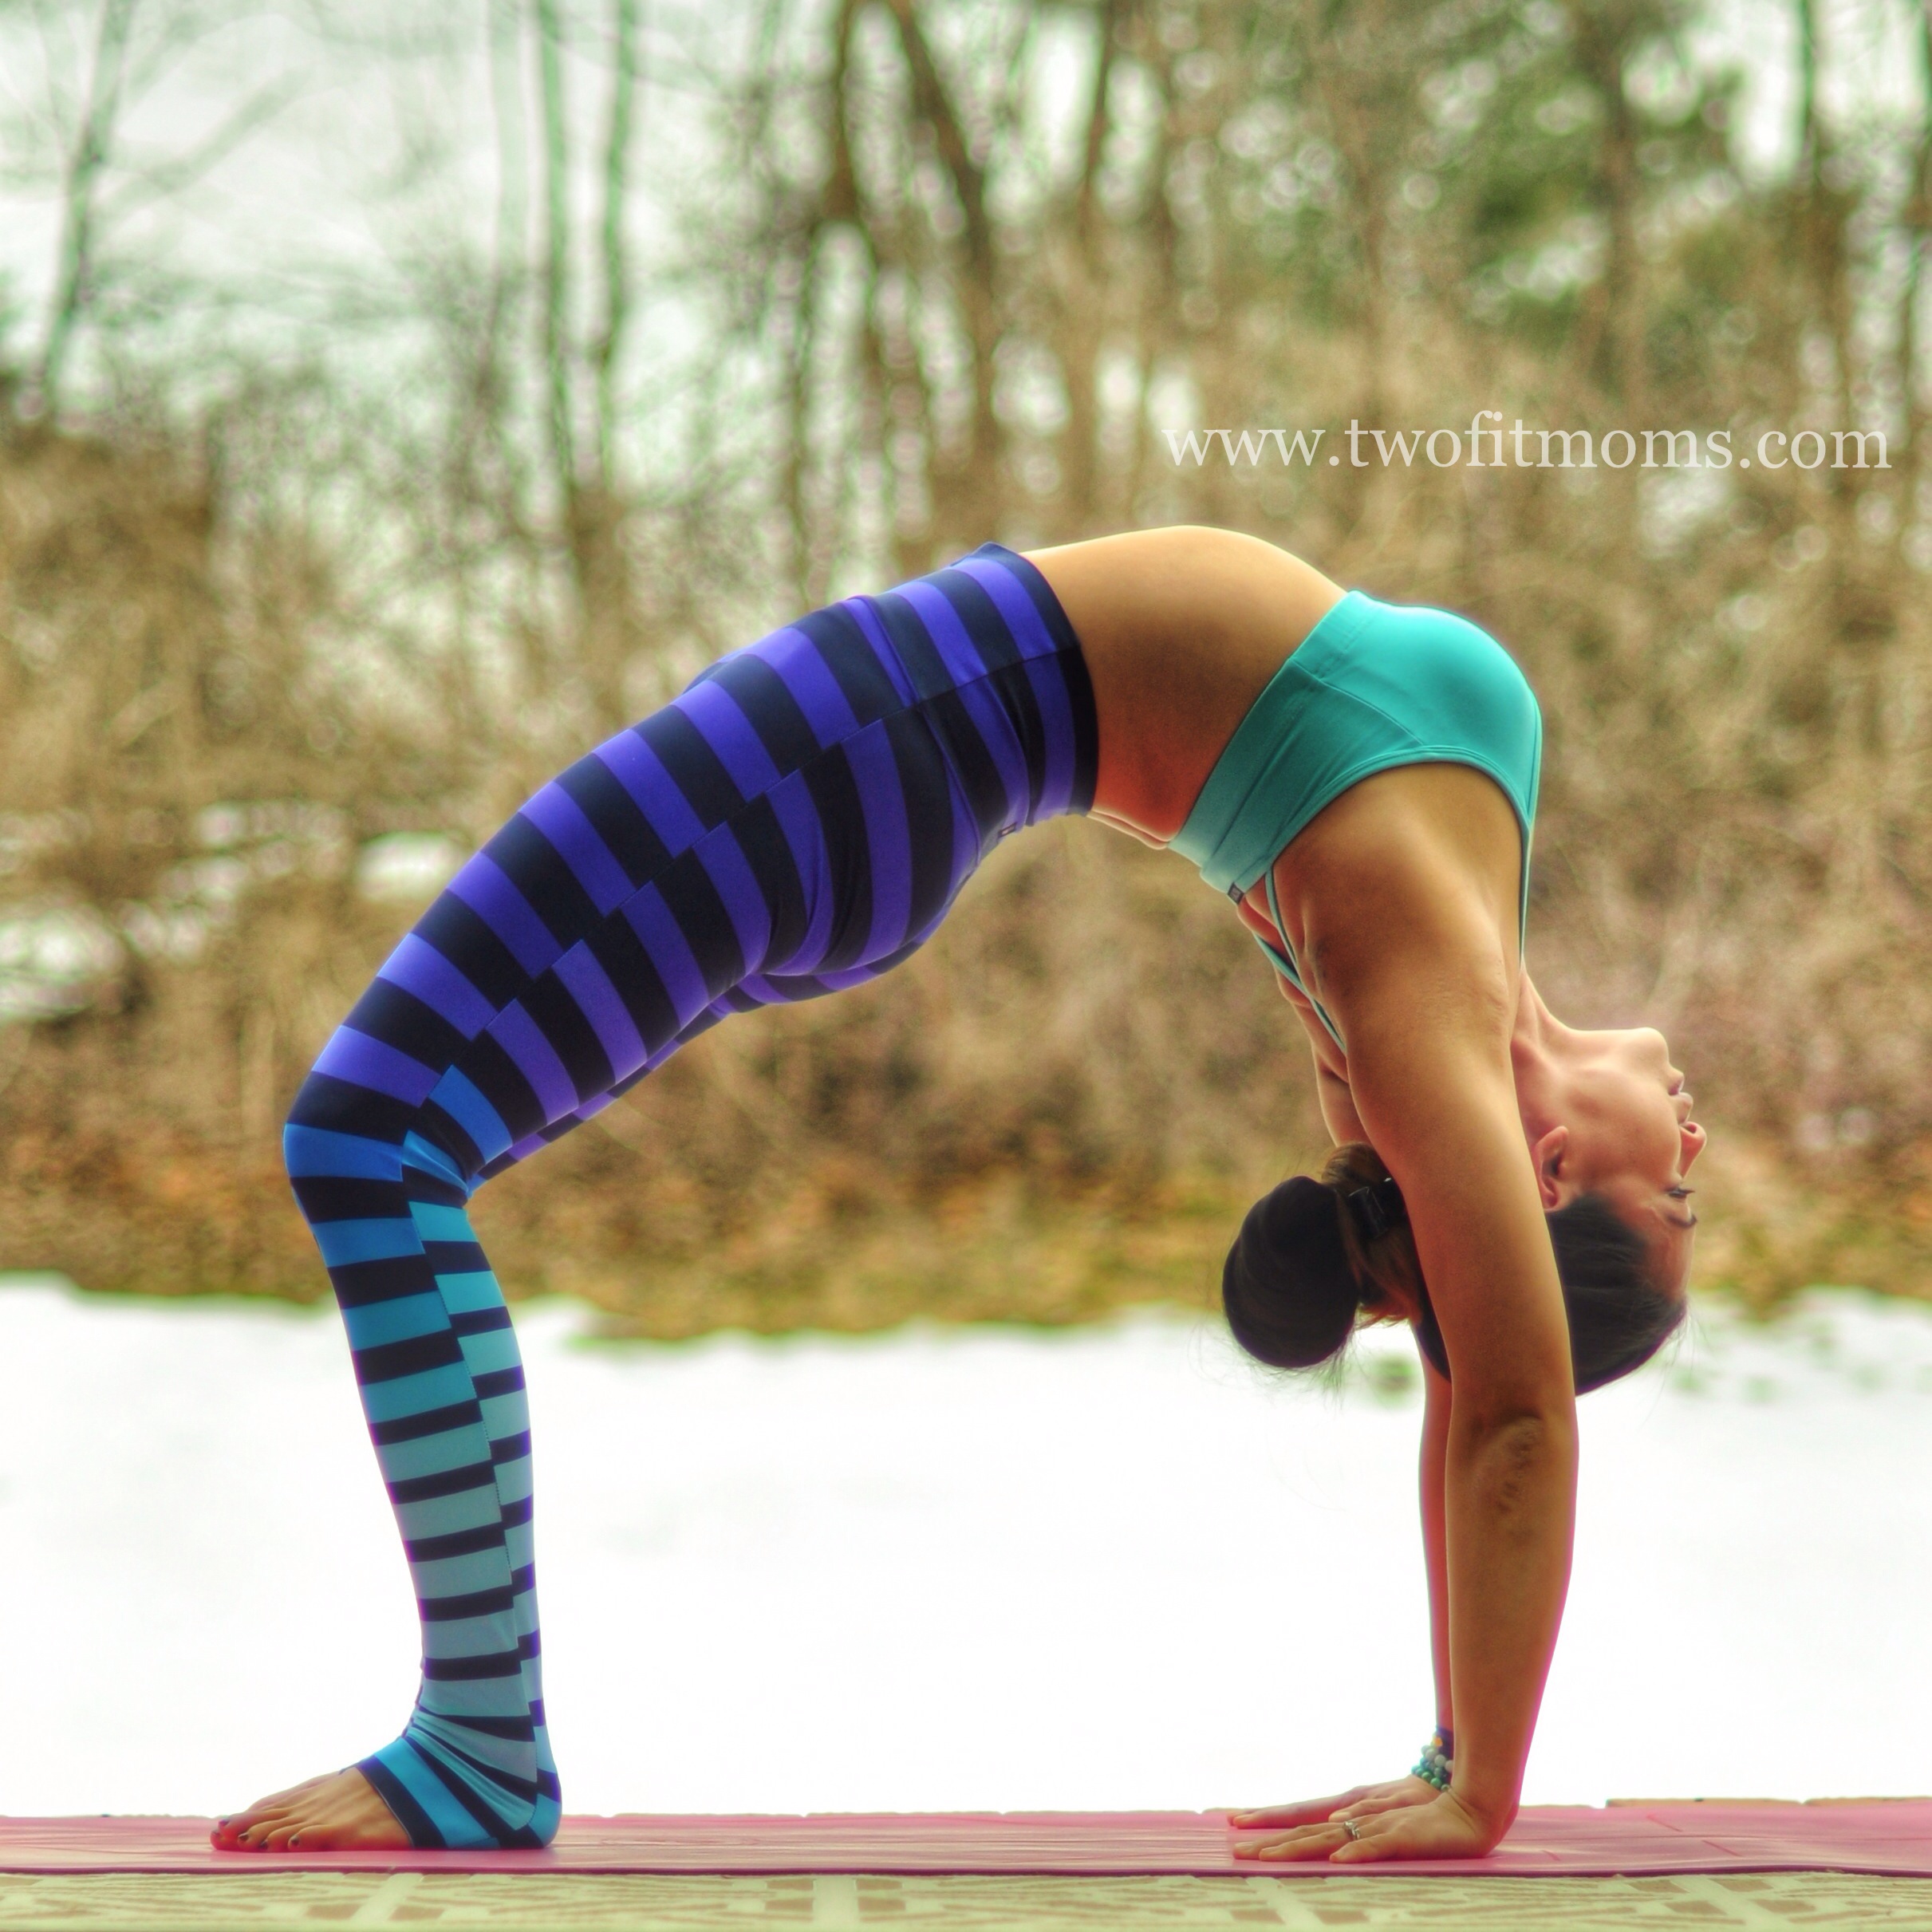
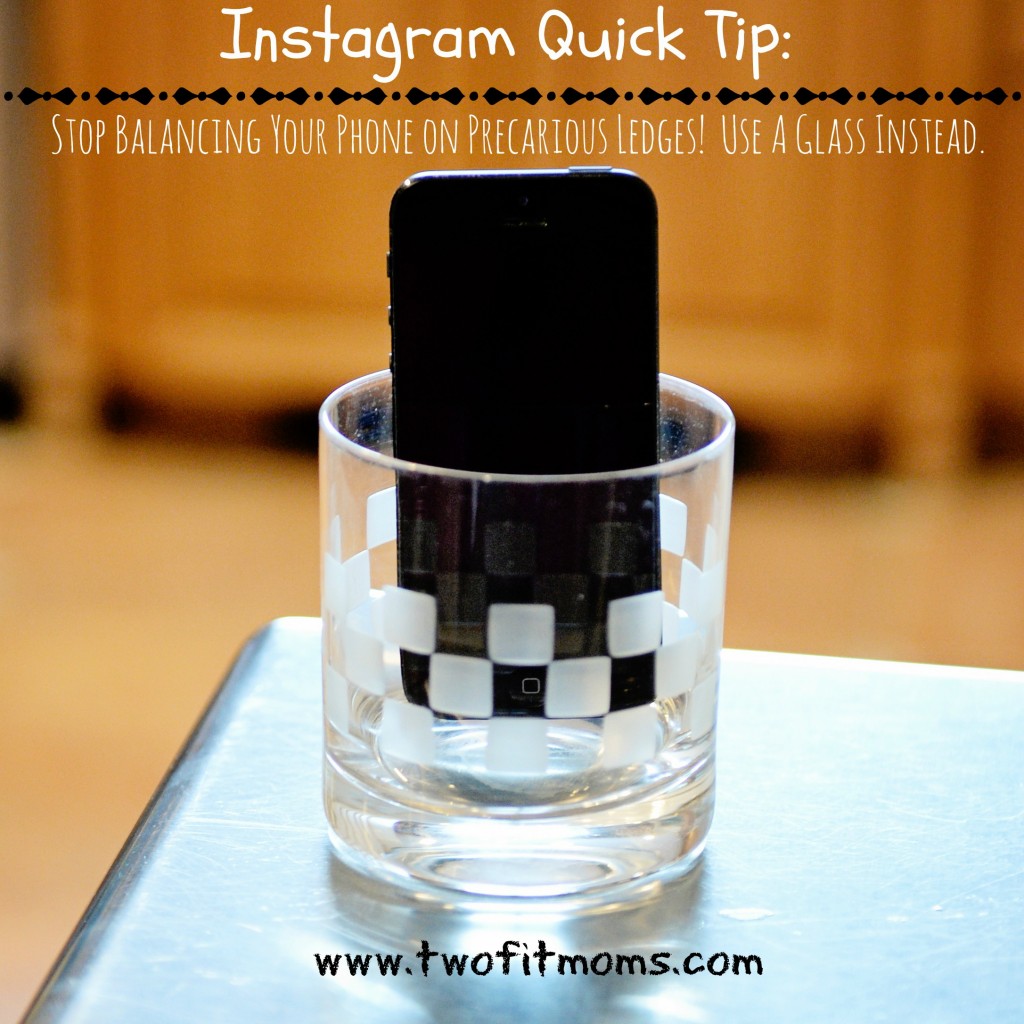
    One of my yoga students recently asked me if I had an app that would clean her house.  I laughed, but then I realized that for Instagram purposes, I had an app that virtually accomplished the same thing.  Do you find that many of your Instagram yoga poses are plagued by cluttered backgrounds or distracting details?  If so, look no further.  I have the perfect app for you:  AfterFocus.

    With a few swipes of your finger, you can keep the subject of your photo in perfect focus while blurring the background.  This is a great app for removing the focus from other people or objects that happen to make it into the frame of your photo and detract from your fabulous yoga pose.

    AfterFocus
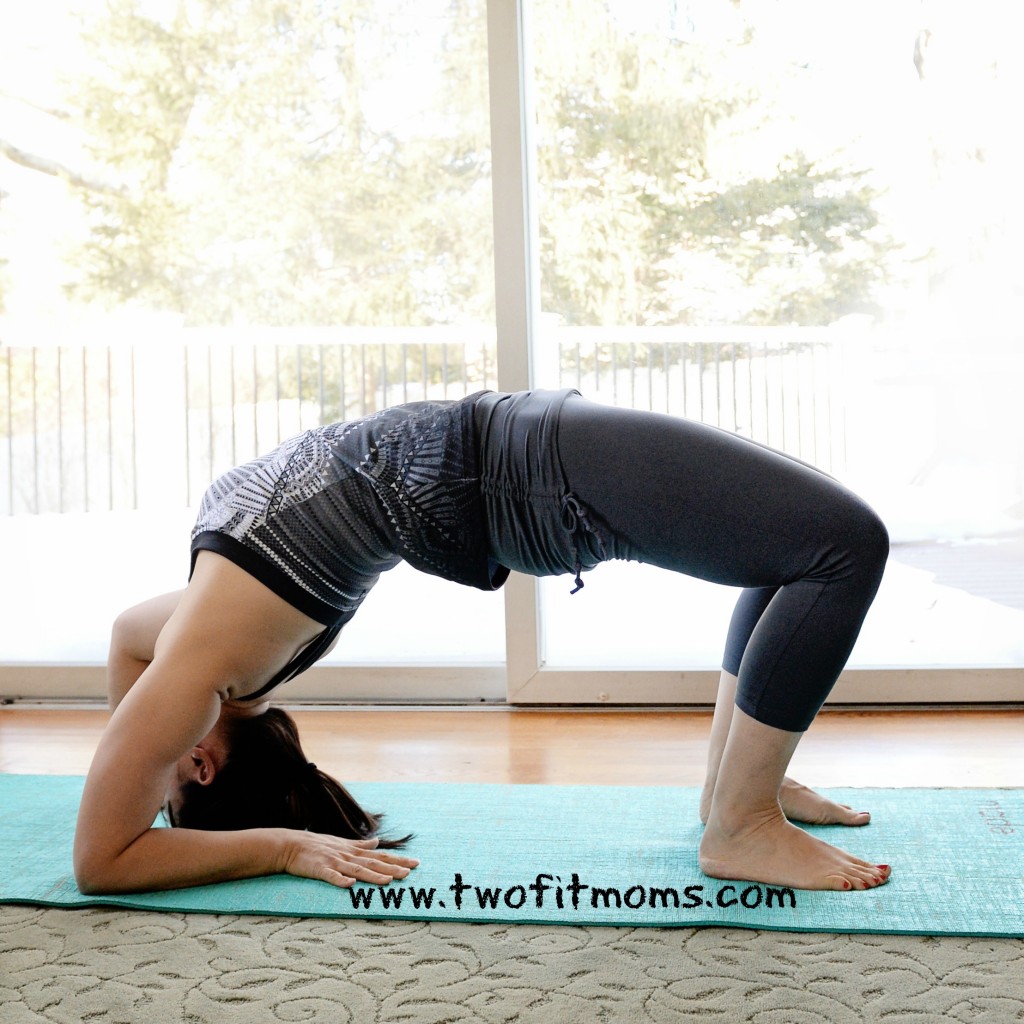
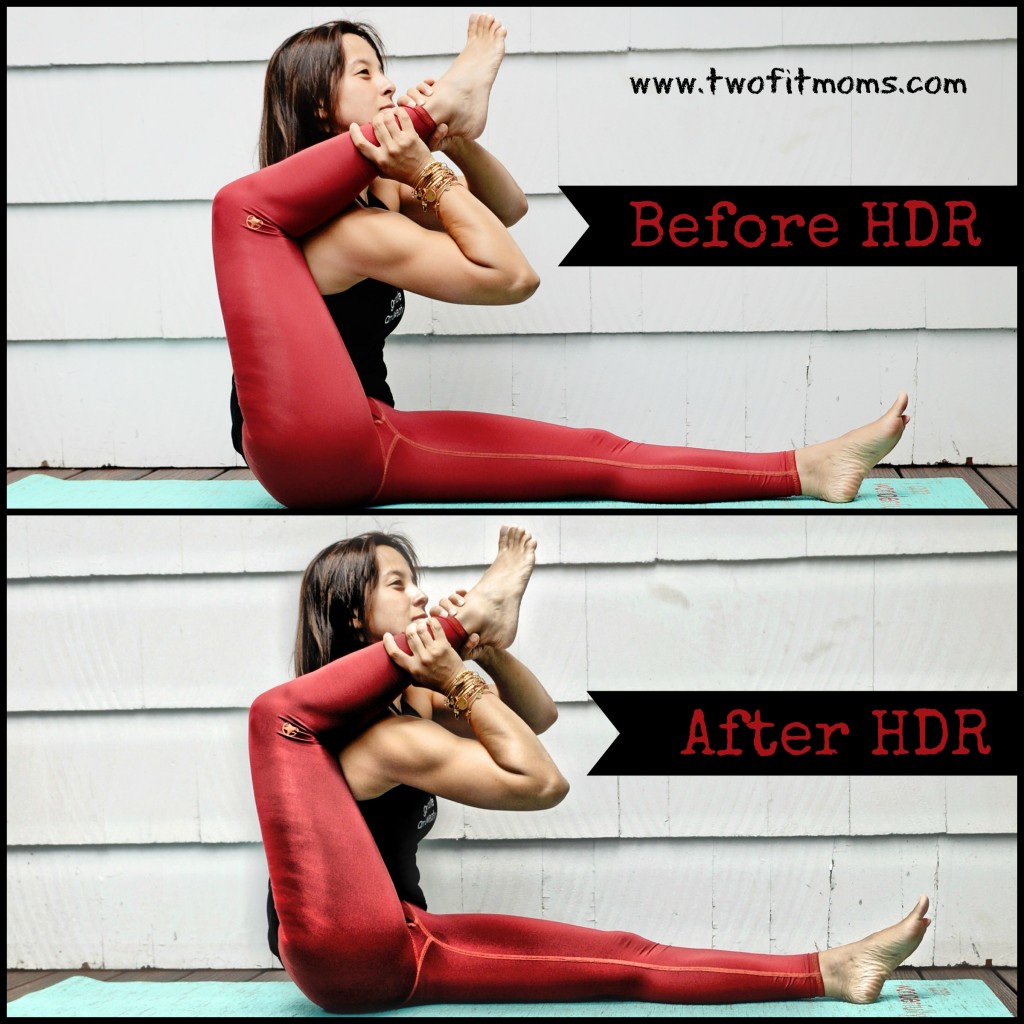
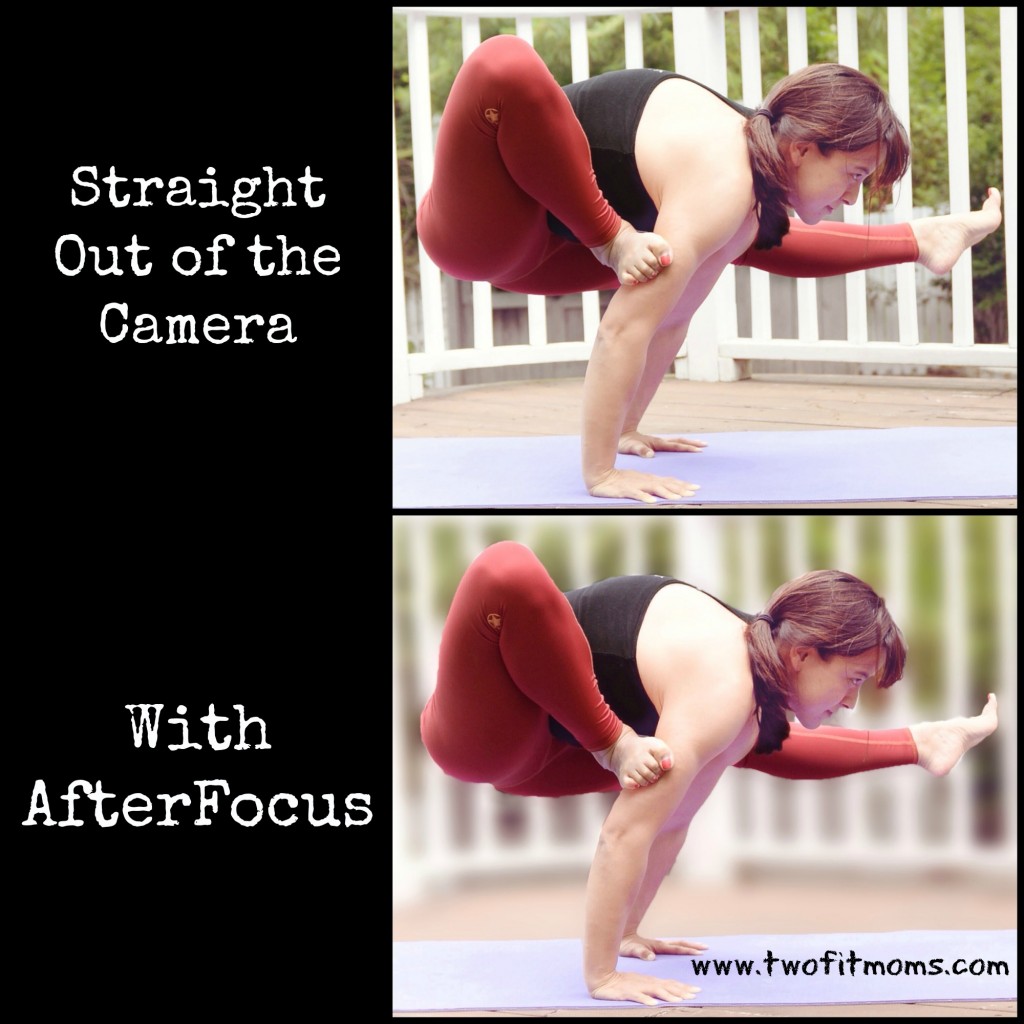
Take a look at my two photos.  In the top picture, the white fence in the background isn’t an eyesore, but it is receiving the same amount of attention as the yoga pose.  By running the photo through the AfterFocus app, I can blur the fence into the background. This app will automatically recognize your focus object and blur the background, just by drawing a few lines with your finger inside the object of focus.

    Give this app a try, and allow some of the visual clutter and distractions to blend away into a soft haze. Enjoy this Instagram quick tip, and please let us know if there are specific topics that you would like to see addressed in this series!

  • Simple Broccoli Rabe Pesto

    Simple Broccoli Rabe Pesto

    broc rab pesto up close with banner with tfm squareDo you ever get sick and tired of the taste of your own recipes?  Some days, I feel like all of my meals taste the same, even if I change most of the ingredients.  When I fall into this kind of cooking funk, I call up my childhood friend, Kate, for inspiration. I know that Kate will have a delicious recipe for me that can be modified to fit my diet, even on its strictest days.  She also has an amazing knack for creating meals that my children find just as delicious as I do.  This recipe is no exception and will become a staple in your house, as it is in mine.

    Today, I want to introduce you to a versatile, easy-to-make sauce:  broccoli rabe pesto.  In the summer, we generally turn to herbs like basil and parsley for pesto, but this time of year, let’s work with a cold weather green like broccoli rabe.

    Broccoli rabe is known to be a little bitter, however, blanching it takes away the bitterness and makes it perfect for blending into a tasty pesto.

    Traditionally, pignoli nuts (and sometimes walnuts) appear in pesto recipes. This recipe, however, is nut free.  Feel free to experiment and make this recipe your own!  Throw a handful of toasted nuts into the food processor along with the rest of the ingredients.

    This pesto can also be used as a condiment on sandwiches, a marinade for fish and poultry, or a sauce to toss with pasta.  While Kate’s original recipe was made with cheese and wheat pasta, we were able to modify it so that it was both gluten and dairy free.

    Enjoy!

    Broccoli Rabe Pesto

    1 large bunch of broccoli rabe (stems removed)

    3 cloves of garlic, crushed

    ¼ cup of olive oil

    Salt

    Pepper

    1 lb of cooked pasta of your choice

    Cook broccoli rabe in a large pot of salted boiling water for 3-5 minutes – until just tender.  Drain and rinse with cold water to stop cooking.  Pat dry with a towel/paper towel.  Add broccoli rabe to the bowl of a food processor, add crushed garlic, olive oil and salt and pepper.  Pulse until emulsified.

    If you would like to add cheese, feel free to mix in ¼ cup of parmigiano reggiano cheese after the mixture has been pureed.

    Serve over pasta — or any other way you would like!

    Yields 1 healthy cup of pesto (enough to top approximately a pound and a half of pasta)

  • Urdhva Dhanurasana: Getting into Wheel Pose

    Urdhva Dhanurasana: Getting into Wheel Pose

    Our journey into backbending continues with Urdhva Dhanurasana or Wheel Pose. As we discussed in the Bridge Pose tutorial, backbends can be energizing…flooding your body with oxygen while stretching out the entire front body, shoulders and chest. Be mindful when practicing and continue to take each posture slowly.

    Step 1: Lie down on your mat. Extend your legs out and take a couple of deep breaths. Bend your knees and bring your feet down onto your mat. Your feet should be parallel to one another and hip-width distance apart. Try to get your heels as close to your buttasana as possible. Bend your elbows and place your hands down alongside your ears. Fingers will point TOWARD your body. Squeeze the elbows in.

    Photo Mar 12, 1 57 37 PM

    Step 2: Take a deep inhalation. On the exhale, push into your feet and lift your hips up. Feet remain parallel and knees squeeze in. Try to keep your buttasana relaxed by drawing the tailbone slightly up. Take a breath. On another exhale, push into your hands this time and come up onto the crown of your head. Elbows squeeze in as your shoulder blades hug your back. I like to walk my hands closer to my body at this point. This is just an option though! Take a breath or two here.

    Photo Mar 12, 1 57 44 PM

    Step 3: On an exhalation, push firmly into your mat with your feet and hands and try to straighten the arms. Remember to keep the feet parallel. There will be a slight internal rotation of the thighs…this is what will prevent your feet and knees from spinning outward. Draw your tailbone down and relax your buttasana.  Keep your shoulders engaged and hugging your back.  Let your head fall neutral. Stay here and take 3-5 breaths.

    Photo Mar 12, 1 58 08 PM

    When you are ready to come down, bring your chin to your chest and slowly bend your elbows bringing the back of your head and your body gently onto your mat. Hug your knees into your chest and relax.

    XOXO

    Blog Signature

  • Getting Your Kids Involved In Your Yoga Practice

    Getting Your Kids Involved In Your Yoga Practice

    Health and fitness has always been an integral part of my life. When I found out that I was pregnant in March of 2005, I was overjoyed that I was going to be a mom, but I was also panicked about how it was going to change my body and how I was going to get it back to its pre-pregnancy state. It wasn’t until after I had my son that I realized that life and fitness don’t end when you have a child. My body was still mine. I just had to reclaim it!


    Fast forward to today. I’m 36, I have two kids, a husband, a full time job and a growing business…My goals of staying fit have not changed…HOW I make the time and get it done has changed. One of my favorite things to do now is to get my kids on my mat with me! Whether it’s for 5 or 10 minutes, it’s an opportunity to get them involved in my exercise routine.

    Here are five quick tips on how I got my kids involved!

    1. DO NOT expect them to do a full practice! I know that sounds obvious, but when my son and daughter started to join me, I thought they would just fall in love with yoga and practice the full 30-45 minutes with me. WRONG. Children under the age of 10 do not have that long of an attention span, but they can manage 5-10 minutes on the mat. So, start there!

    2. Begin with the basics! Kids love Downward Facing Dog. Another favorite is Cobra pose, Tree Pose, Warrior II and seated Easy Pose or Sukhasana. These are great beginner poses, in general.

    3. Teach them…but don’t expect perfection! Teach them the names of the poses. You will be amazed how quickly they will pick them up. Teach them what they SHOULD be doing, and don’t fret if the poses aren’t perfect. Just make sure they are not going to hurt themselves.

    4. Get them their own yoga gear! I don’t know about your kids, but mine love to have their own stuff…their own space and their own gear. So maybe look into a toddler mat or even an inexpensive full-sized mat! They will feel grown up and you won’t have to share your mat!

    5. Make it fun! Remember to keep it light and fun! In my experience, it’s all about the memories you are building with your child while instilling the importance of fitness. Keep your practice with them consistent.  It builds their knowledge and makes it part of their daily routine…something that can last a lifetime!

    “The best thing to hold onto in life is each other.” – Audrey Hepburn

    Yoga with mini
    [KGVID poster=”http://www.twofitmoms.com/wp-content/uploads/2014/03/Video-Mar-13-11-40-24-AM_thumb9.jpg” width=”1280″ height=”720″]http://www.twofitmoms.com/wp-content/uploads/2014/03/Video-Mar-13-11-40-24-AM.mov[/KGVID]


    XOXO

    Blog Signature

  • Pincha Mayurasana:  The Art of Falling

    Pincha Mayurasana: The Art of Falling

    If you’ve recently added Pincha Mayurasana (forearmstand) to your inversion practice, you may be wondering when or if you should move away from the safety of a wall.  As a general rule, you should NEVER move your inversion practice away from the wall until you have perfected your exit strategy.

    Falling flat onto your back and injuring yourself is NOT an exit strategy.  Falling safely out of an inversion is FallingFromPincha
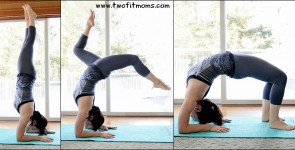
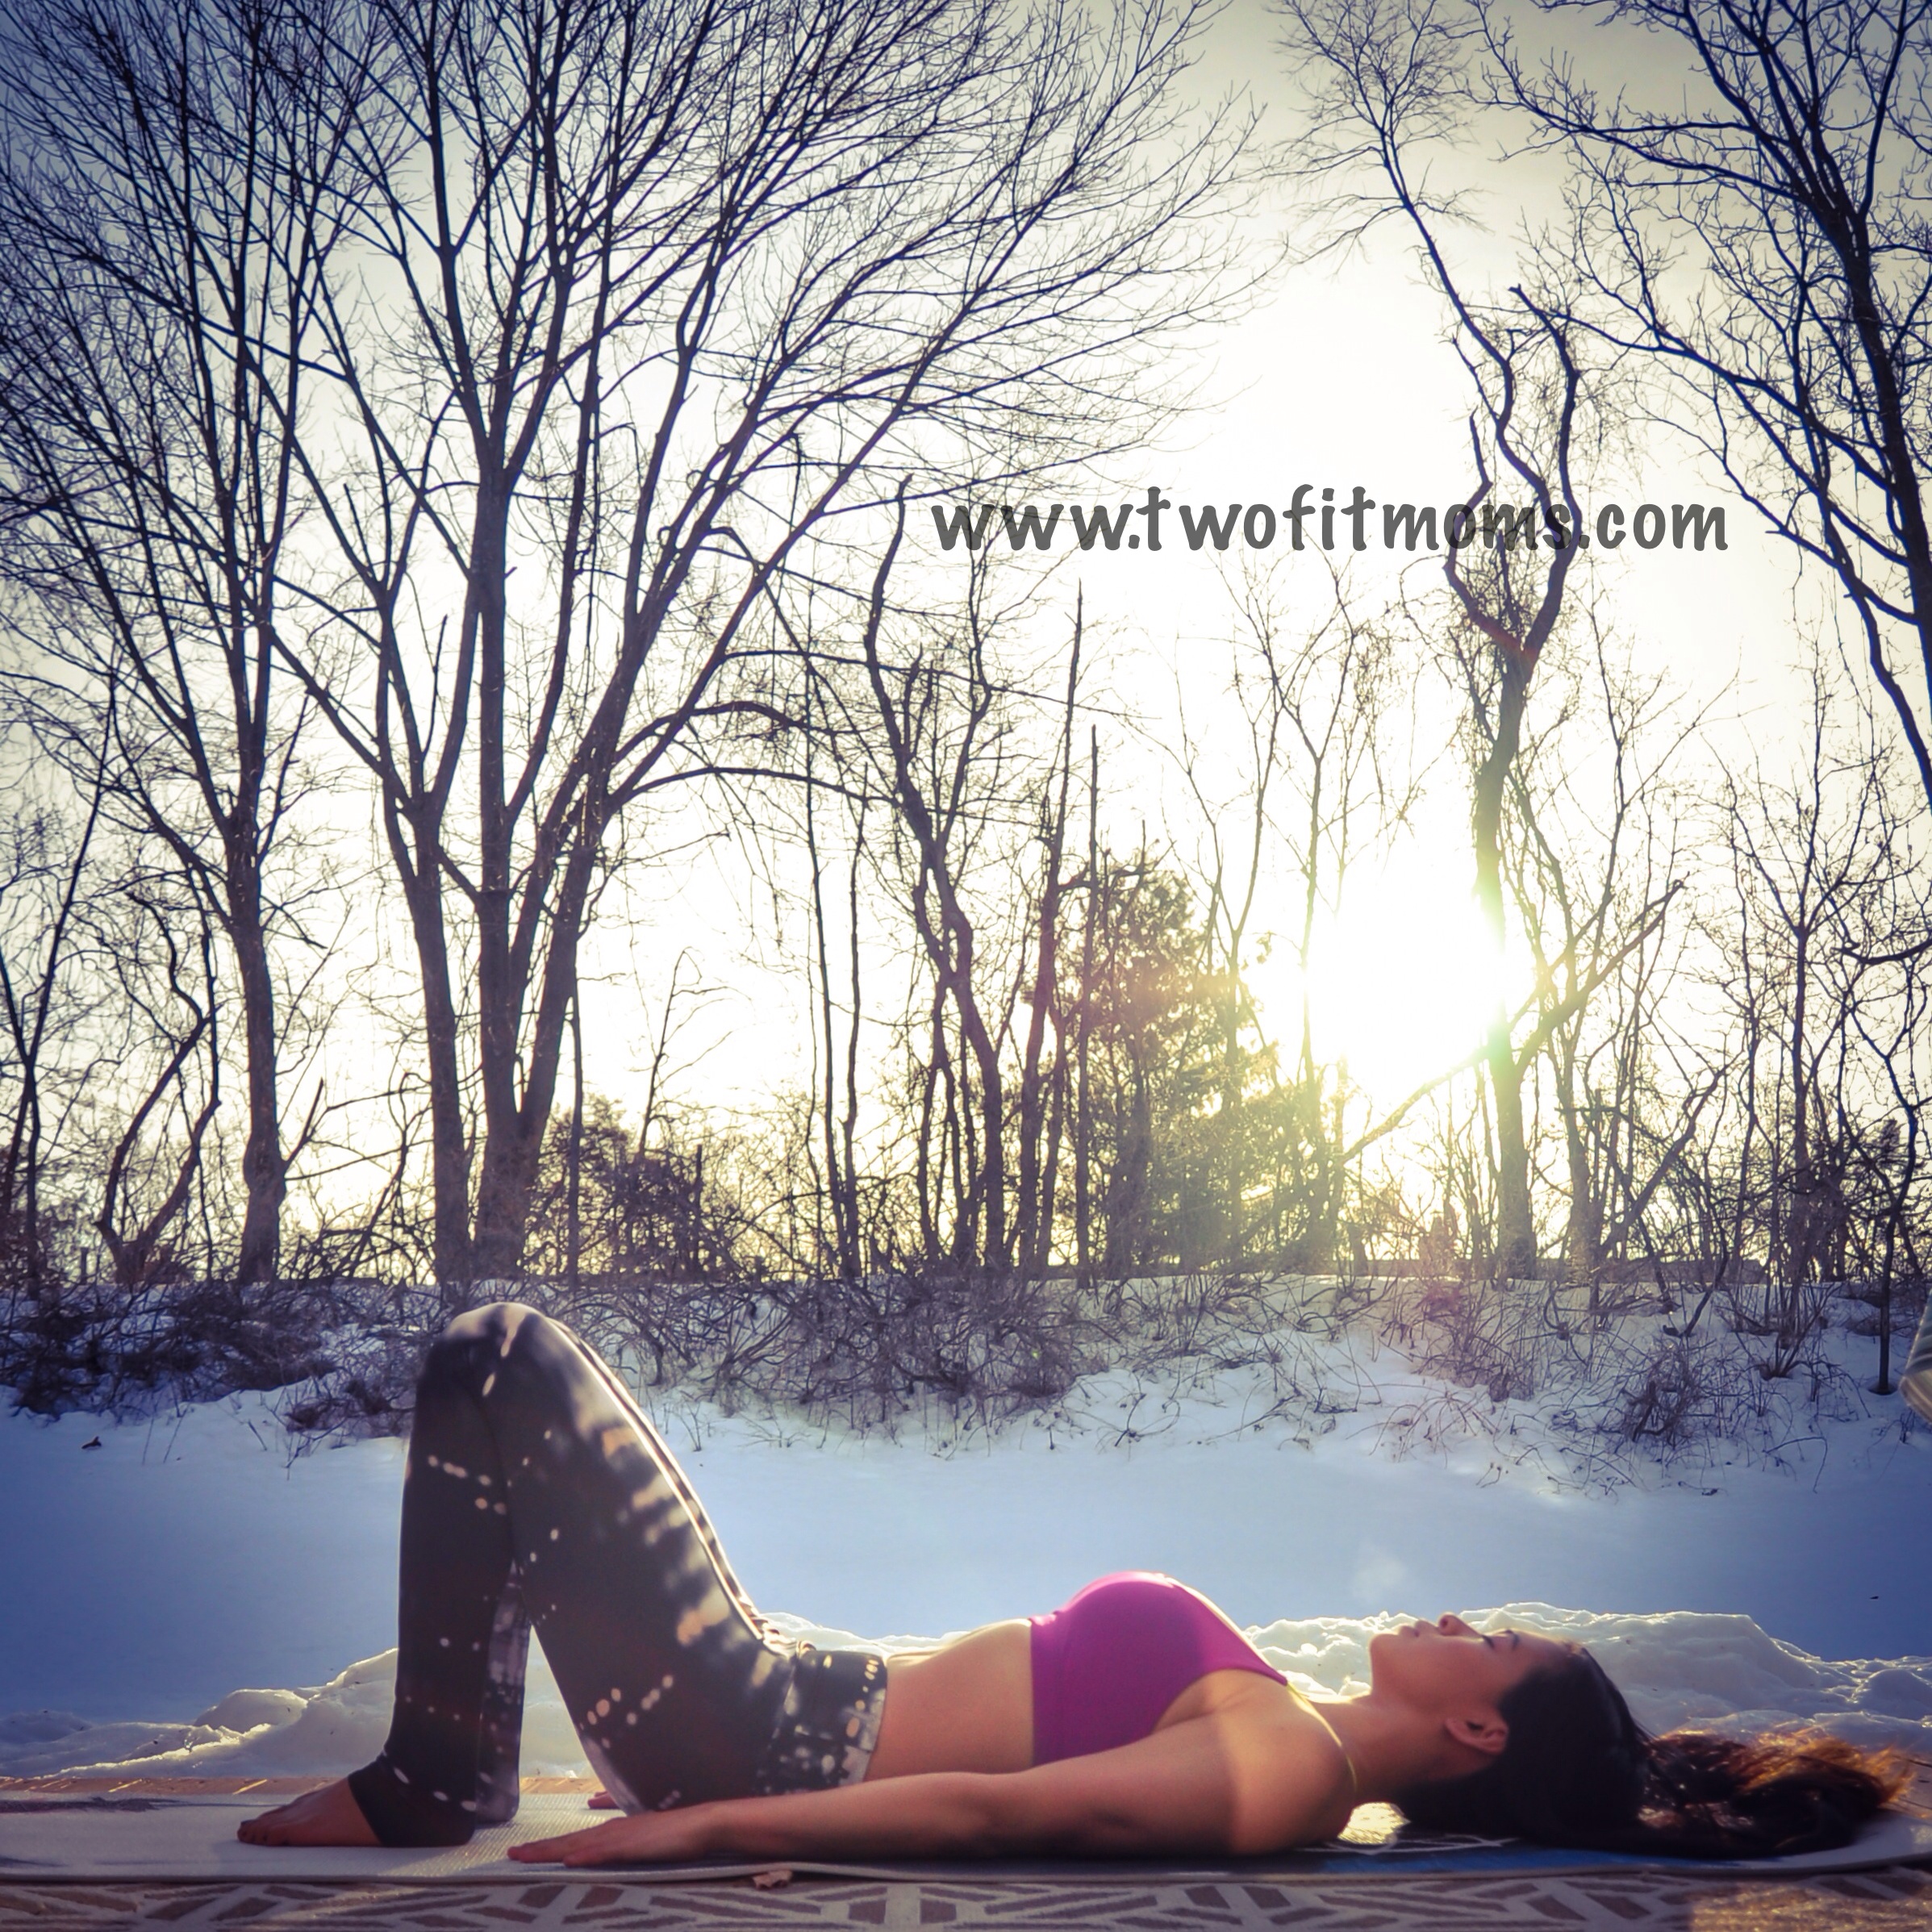
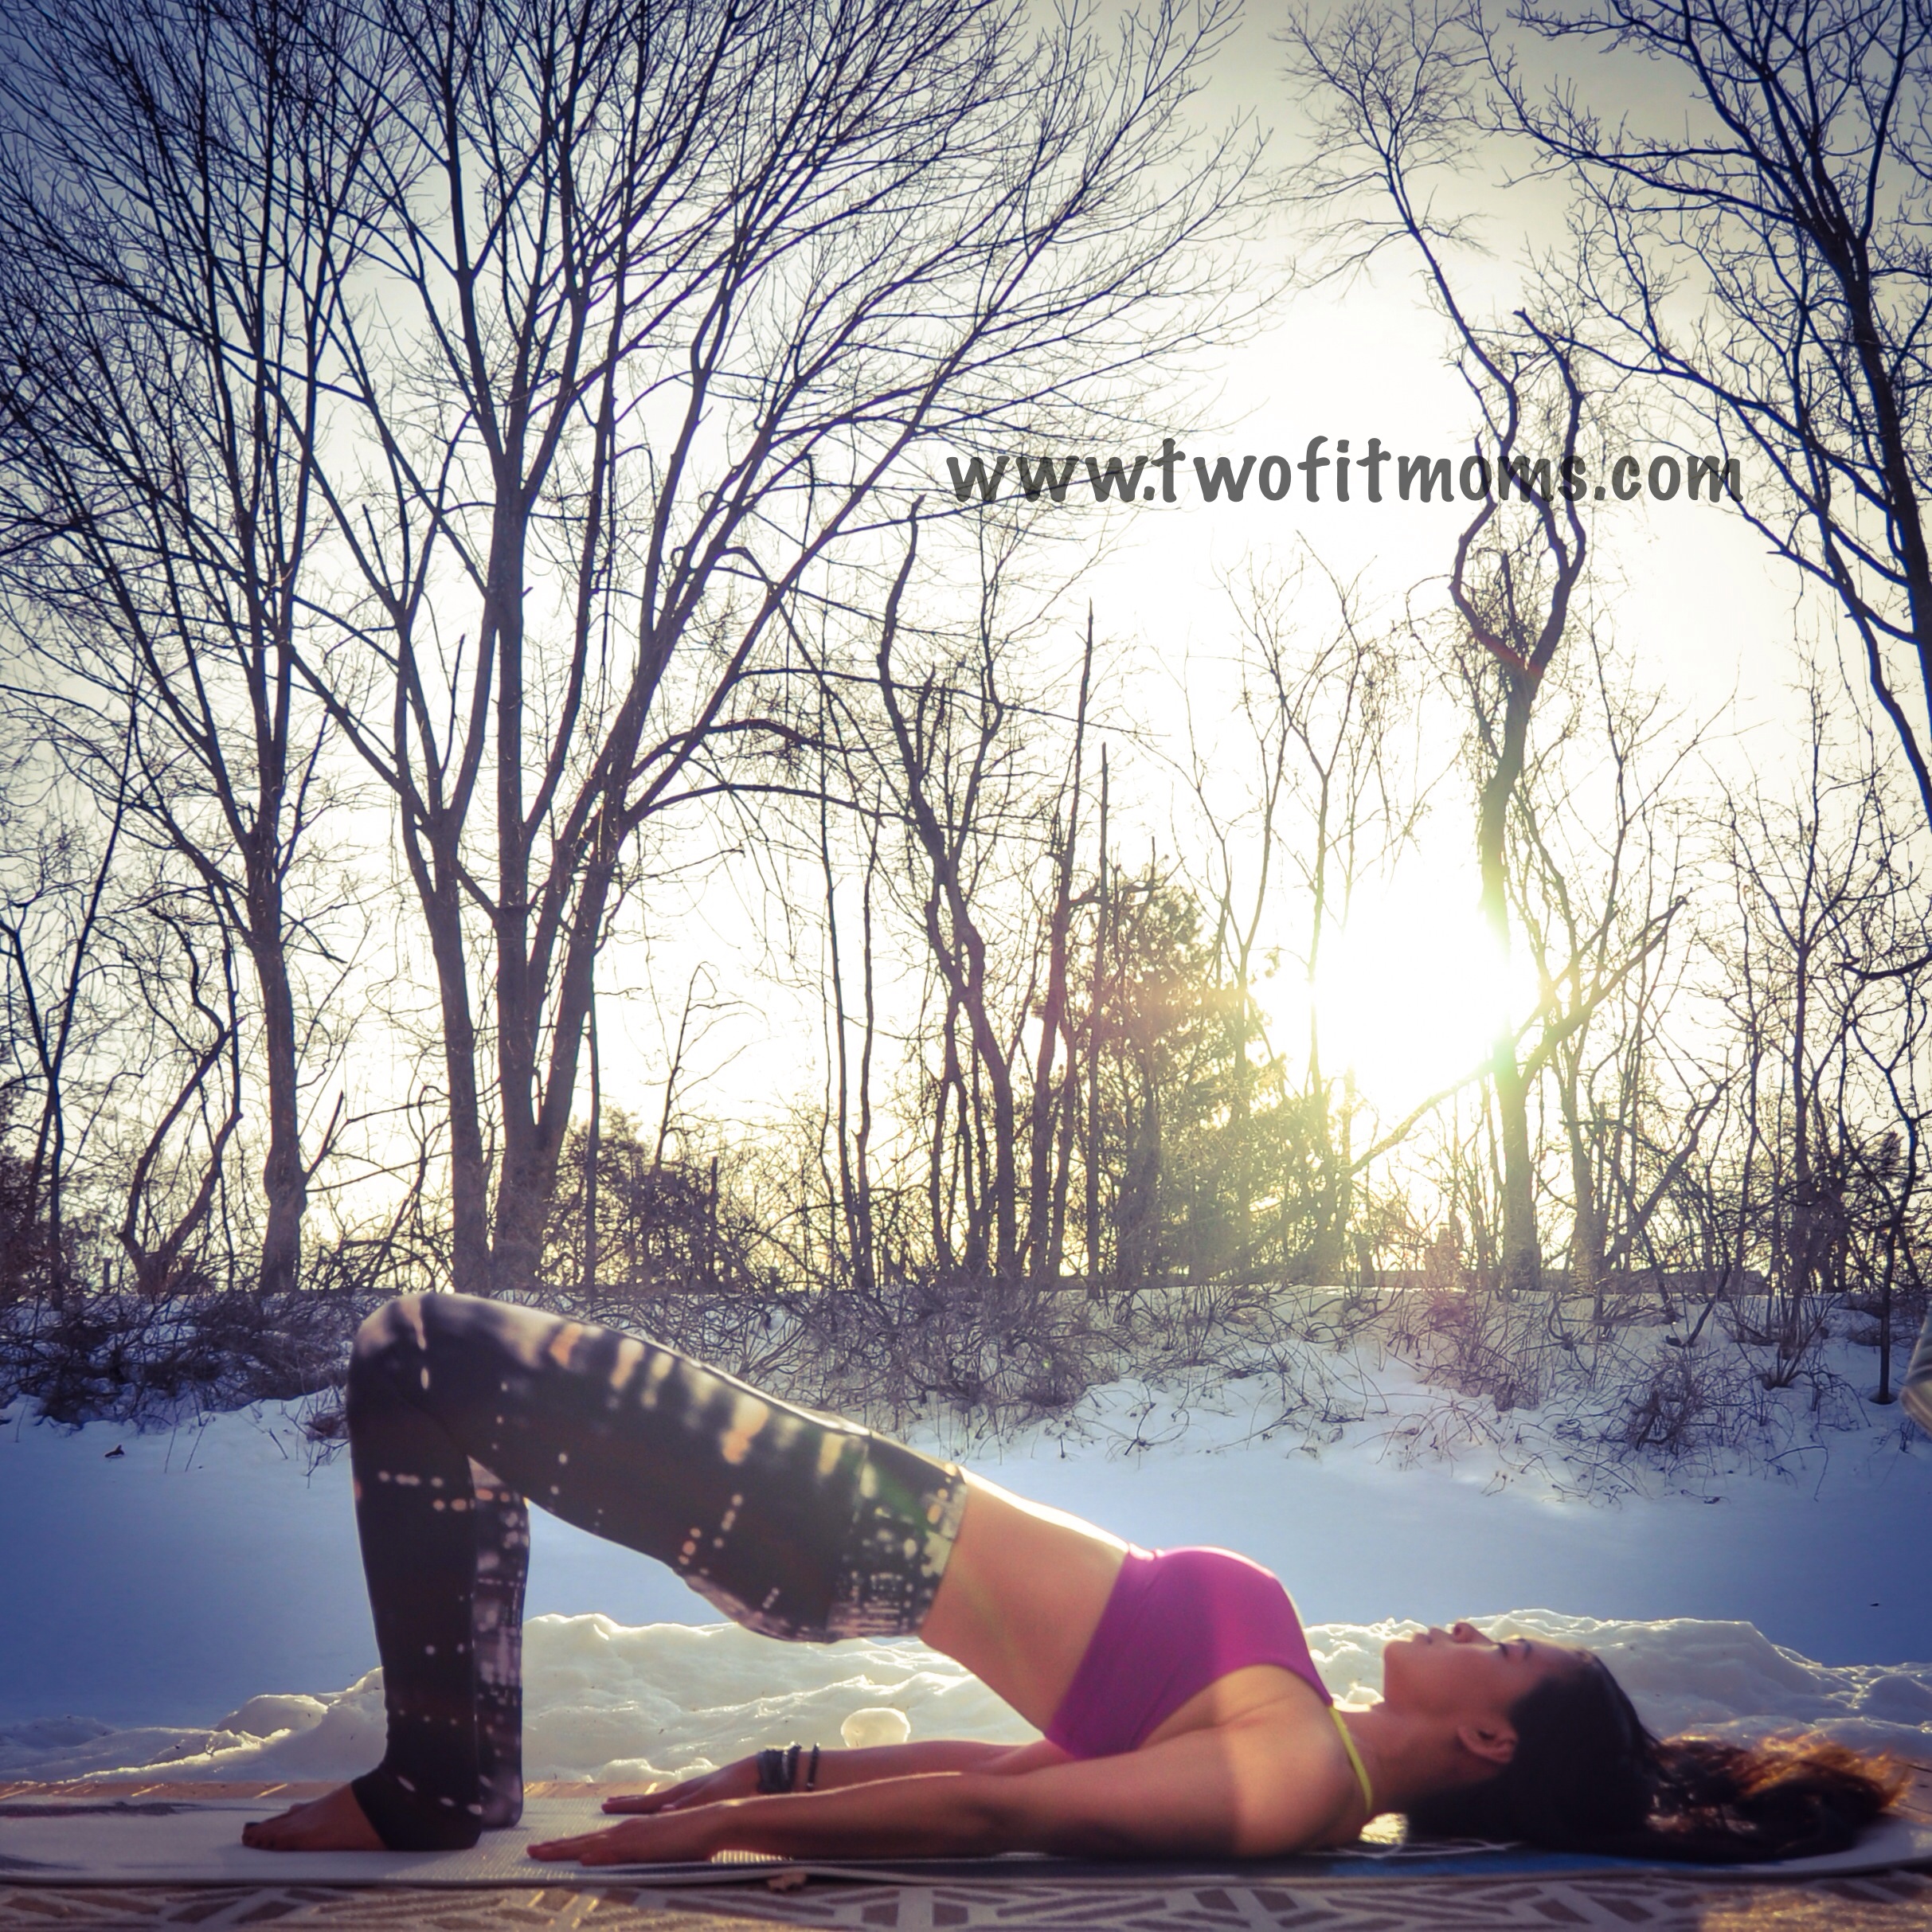
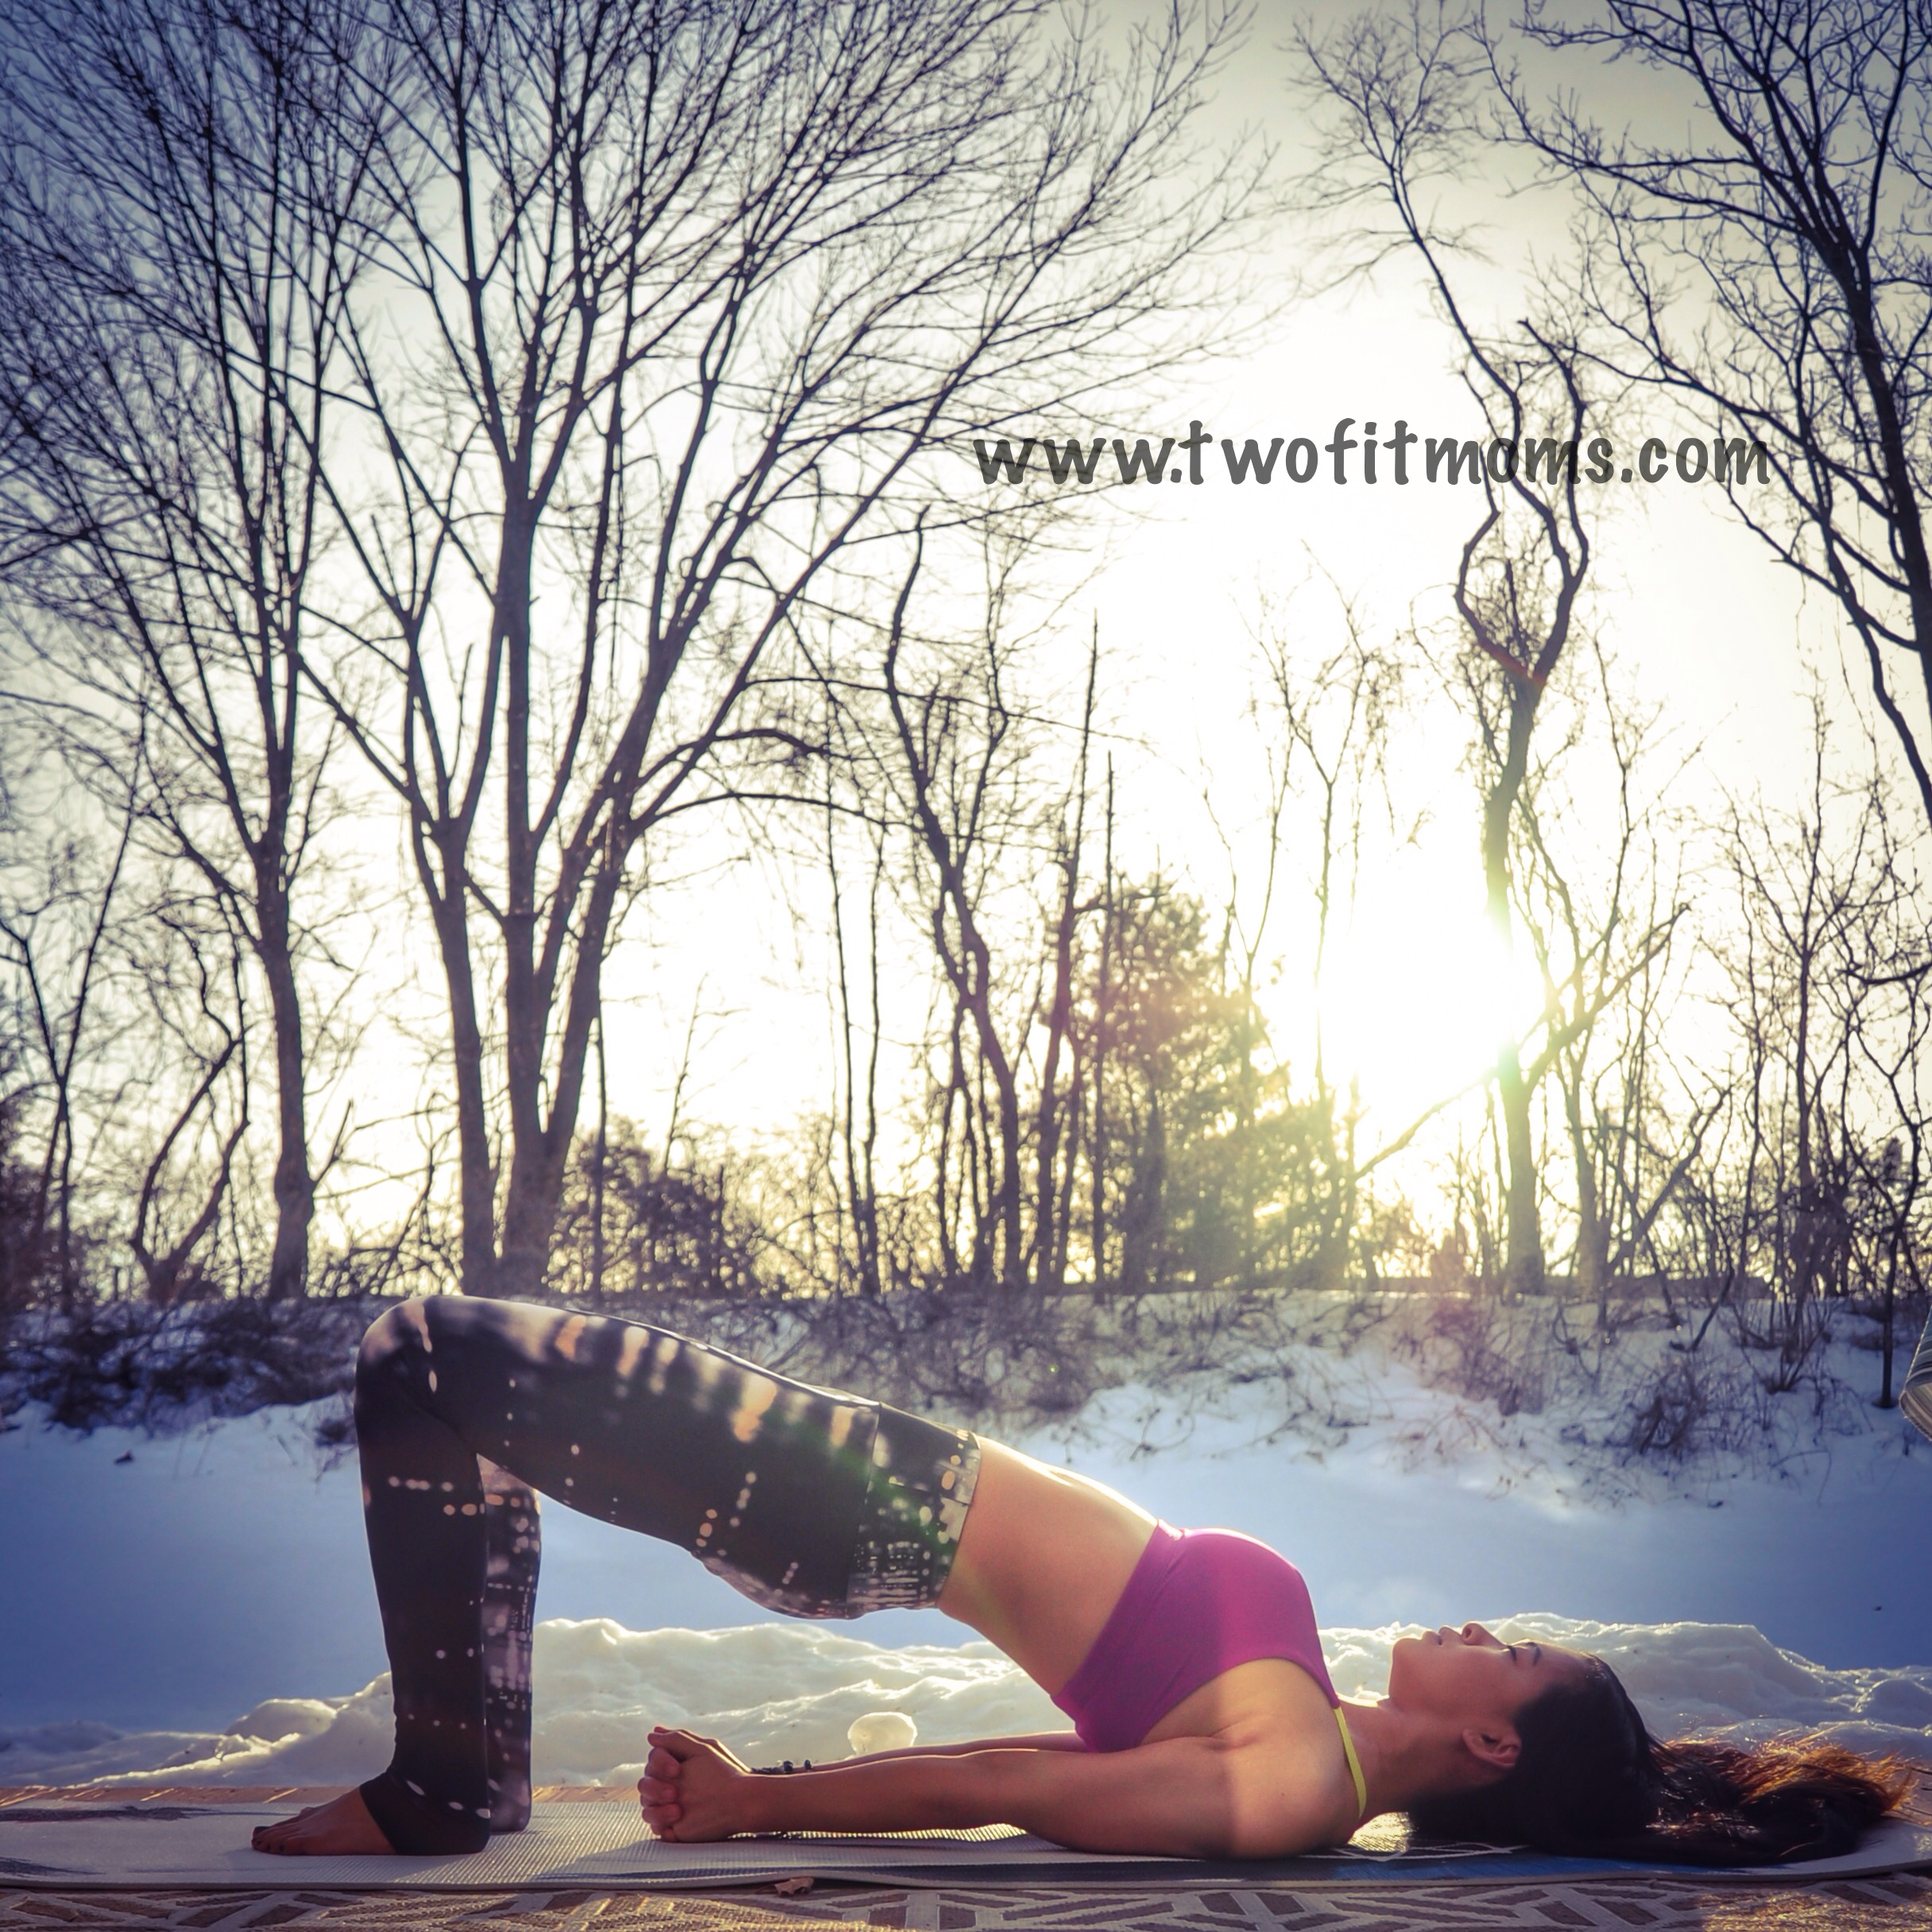
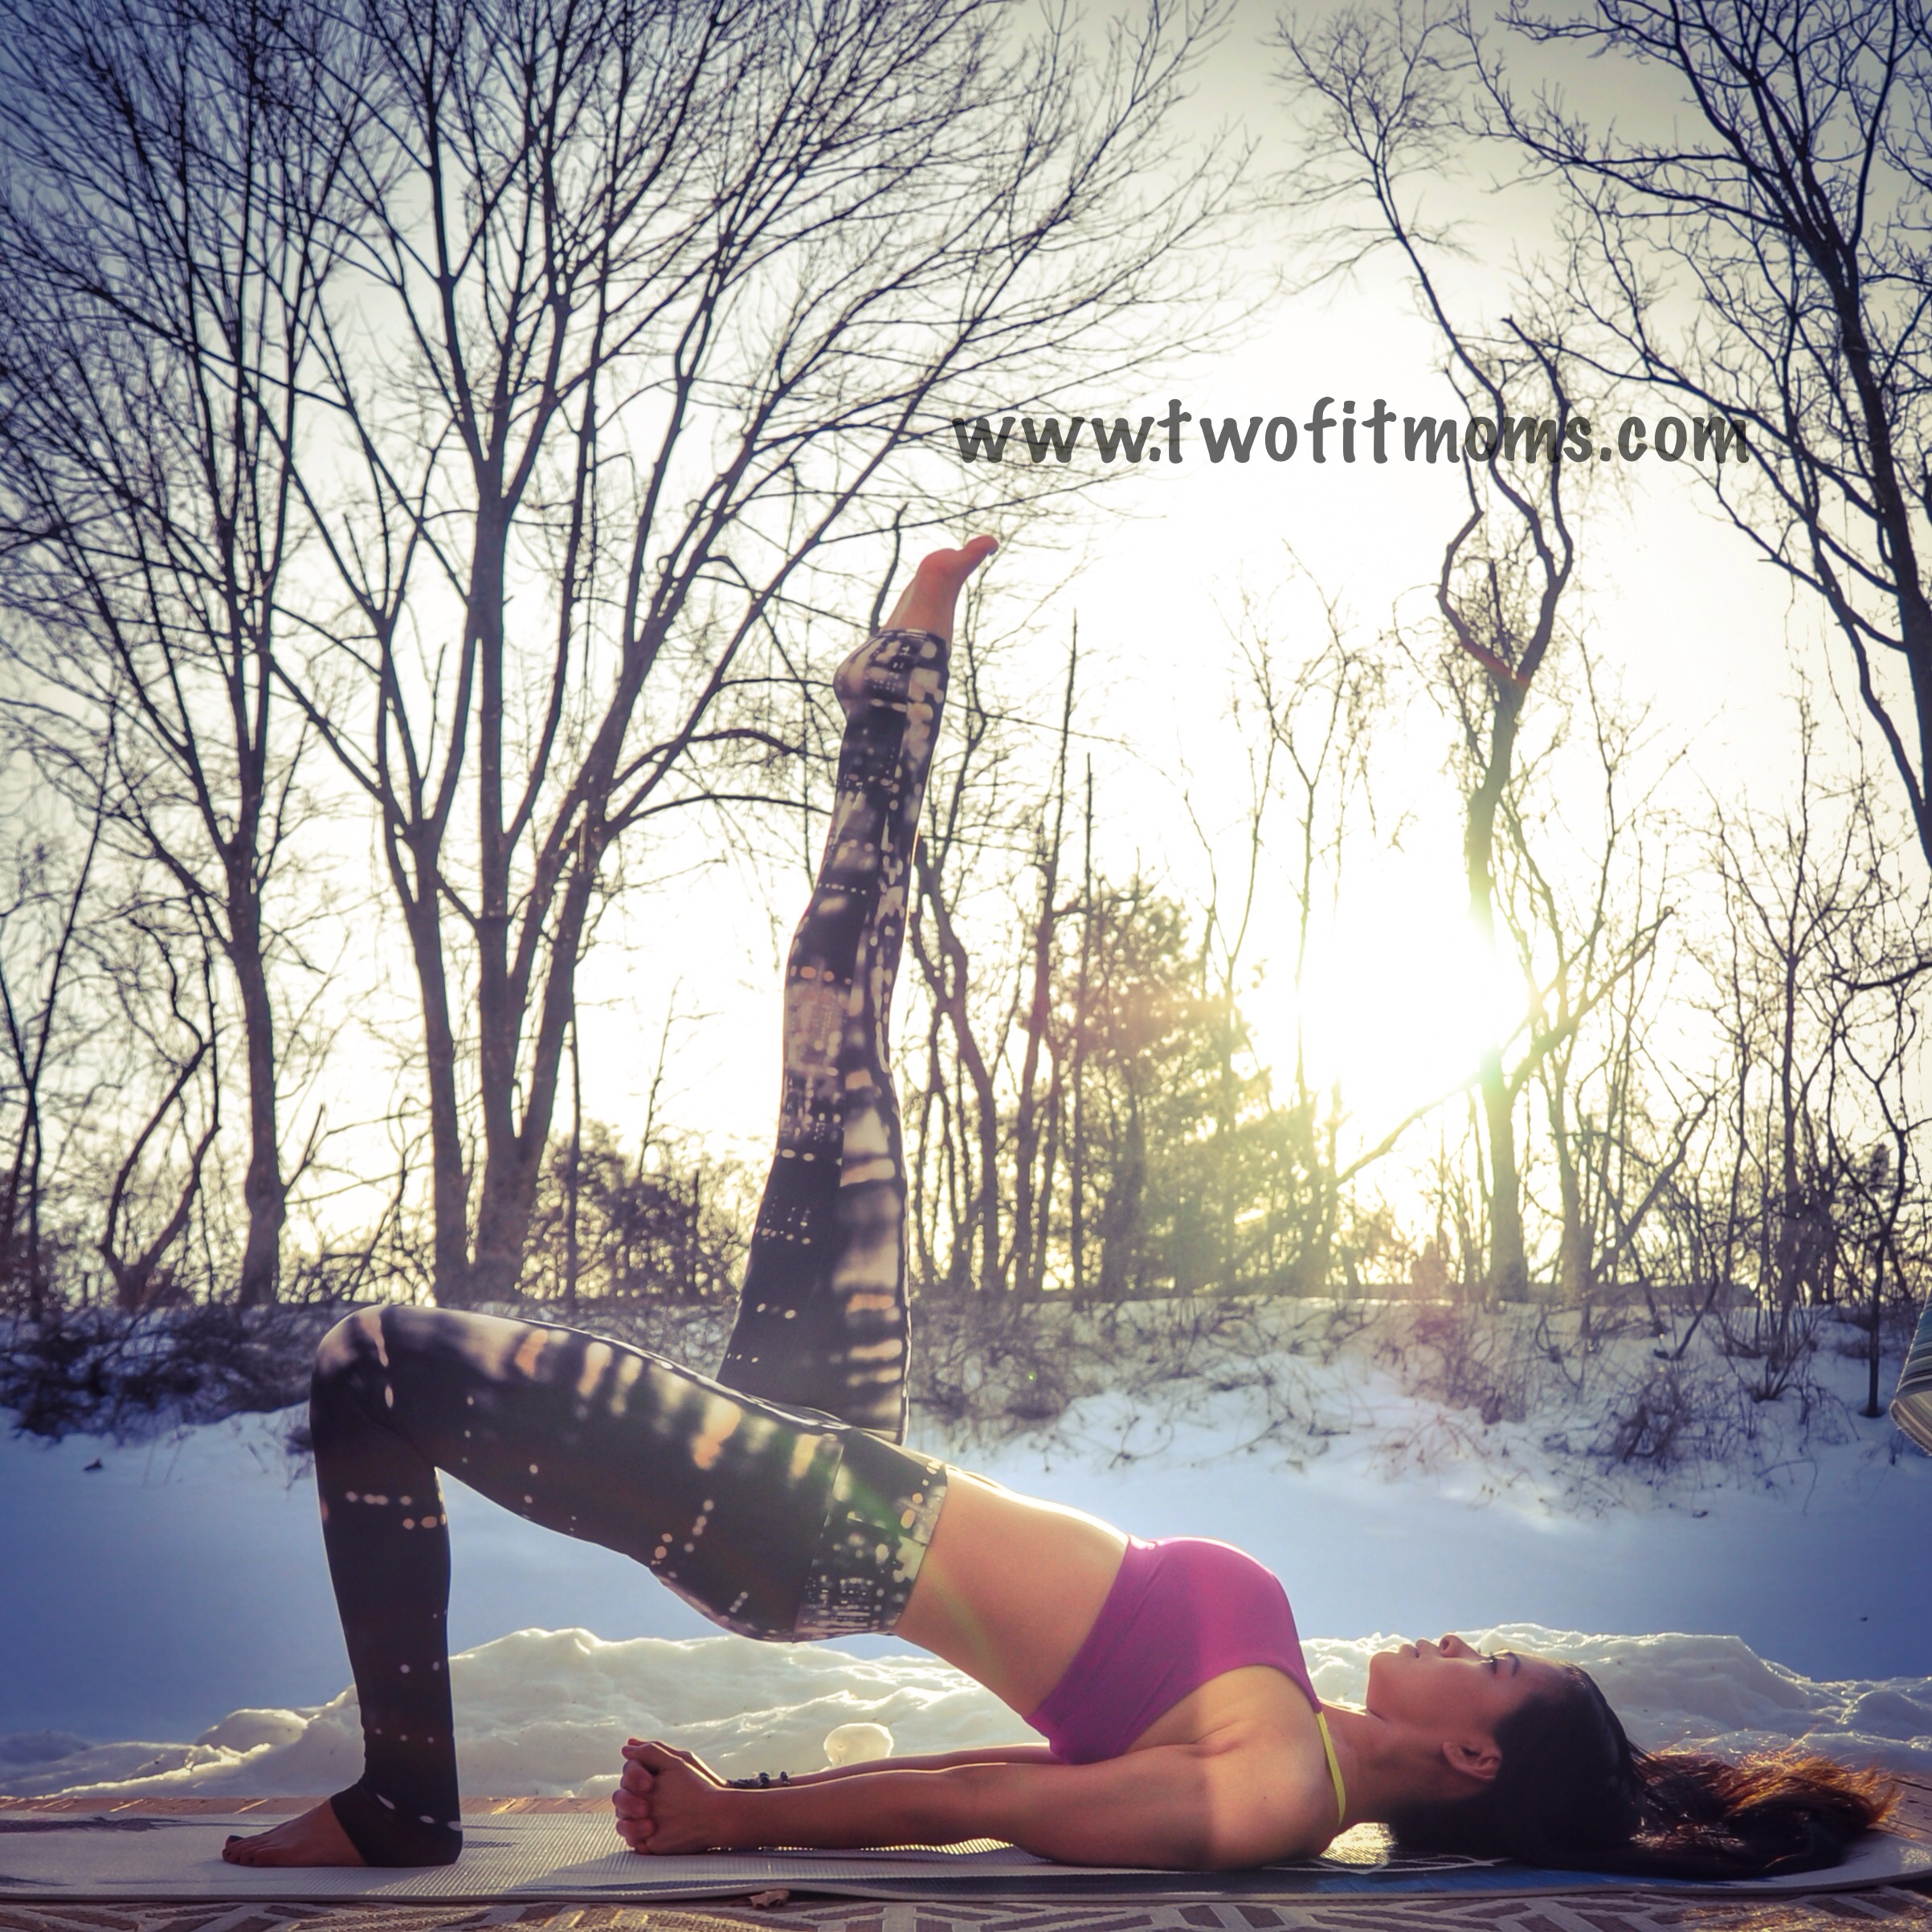
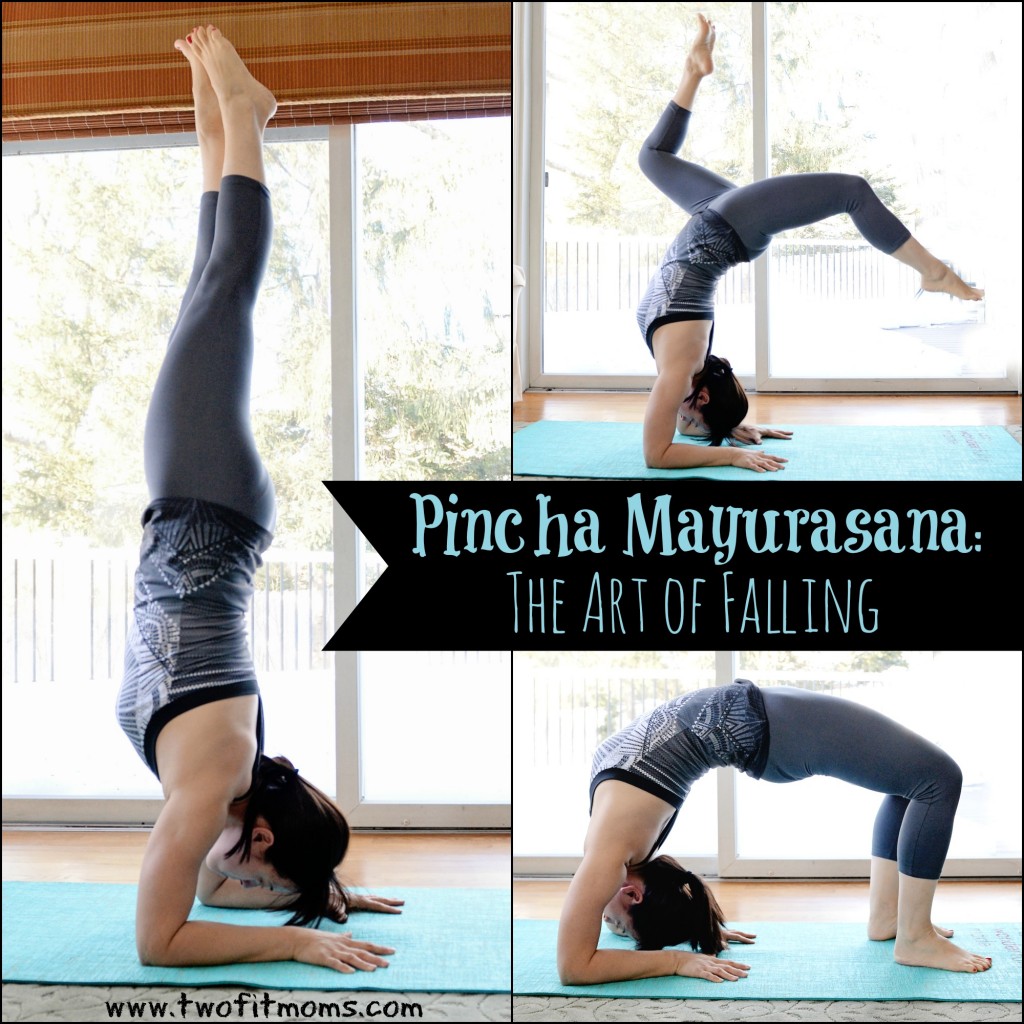
actually a skill, and today, I will show you how to turn your fall out of forearmstand into a controlled transition.

    The goal?  Forearmstand into forearm wheel.  Yes, forearm wheel is a deep pose requiring flexibility, but once you master this pose and this transition, you will practice in the middle of the room without fear.

    Getting into Forearm Wheel
    The first step in perfecting this transition is to practice the final pose:  forearm wheel.

    Step 1
    Lie on your back, with your knees bent and feet flat on the floor. Place your palms onto the mat on either side of your head with your fingers pointing toward your feet.  Press through your hands and feet and gently lift up onto the crown of your head for a breath or two.  Continue to press through your hands and feet, lifting your head from the floor. Straighten both arms and lift your hips toward the sky for wheel pose.  If you are unable to do wheel pose, please continue to practice your forearmstands against a wall and re-visit this article at a future date.  Being comfortable with your backbends is essential for this exit strategy.
    WheelPose
    Step 2
    Slowly bend your elbows and gently lower the top of your head to the mat. Keep your elbows stacked above your wrists and your chest lifted.
    LowerOnToHead
    Step 3
    Slowly lower yourself onto one forearm.  If the stretch feels too intense, stop.
    WheelOneArmDown
    Step 4
    If your back is not straining, lower yourself onto the other forearm.
    WheelBothArmsDown
    Step 5
    Press down firmly through your forearms and lift your chest to raise your head off the mat.
    ForearmWheel
    If you are unable to do this forearm backbend with ease, then please continue practicing your forearmstands with a wall.  Falling into a deep backbend from a height is potentially harmful until your flexibility improves.  Each day, make it a point to work on your backbends and to open up your chest, shoulders and hip flexors.  The sooner you become comfortable in your backbend practice, the sooner you will become free from the wall.

    Practicing the Transition
    Now that you’ve mastered the forearm wheel, let’s practice falling into it.  Make sure you are thoroughly warmed up before attempting.  When you begin to lose your balance in your forearmstand, your natural inclination is to simply tip over.  Work with that natural momentum, and do not try to fall to the side or to lift your forearms from the ground.  Keep your forearms firmly rooted into your mat, with your elbows stacked right under your shoulders.  Do not collapse into your arms!  If you stay strong through your shoulders and arms, your legs will touch down, your head will never touch the mat, and you will be in a forearm backbend.

    Remember:
    Keep your inversion practice at the wall until you perfect your exit strategy.  Perfecting an exit strategy, however, may take a great deal of time.  Do not get discouraged.  Your yoga practice is not a race, and it is here to serve you through your lifetime.  Practicing your inversions with a wall is FINE.  Be prudent and use a wall if your body is not quite ready for the exit strategy presented here in this article.  Good luck!

  • Double Chocolate Chip Pancake Surprise

    Double Chocolate Chip Pancake Surprise

    DoubleChocChipPancake
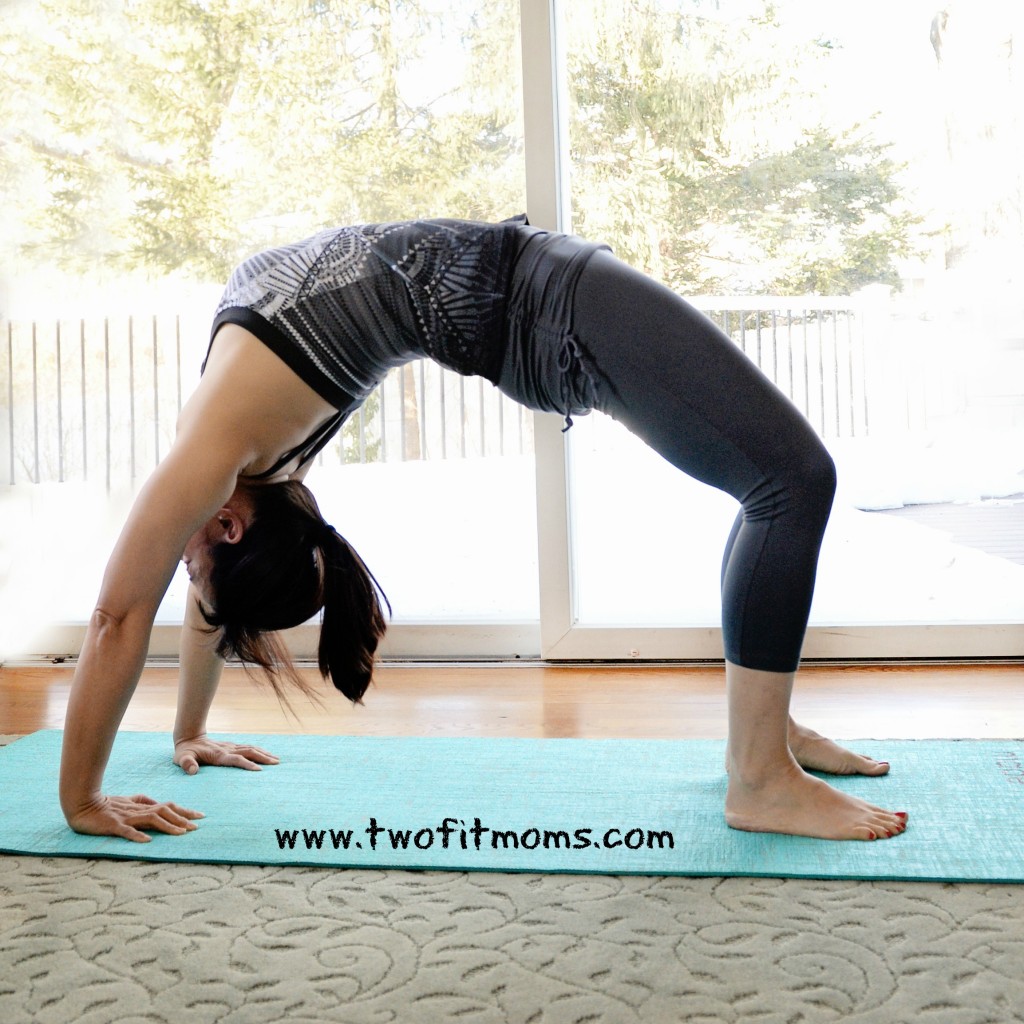
This recipe is regularly on the menu in my house.  My kids get so excited when they see chocolate pancakes on the table.  They have no idea that mama put a nice collard green-blueberry surprise into the batter.  Don’t worry—you won’t notice either, and it’s a great way to use up all of those hard collard green stems that usually end up in the trash.

    Last week, I walked you through my daily routine of preparing greens.  In that article, I mention that you should save all of the hard collard stems in a plastic bag in the refrigerator.  Hopefully, you have those stems ready to use!

    (This delicious recipe was inspired by Missy Chase Lapine – aka the Sneaky Chef.)

    Ingredients
    10 stems from a bunch of organic collard greens
    1 cup frozen wild blueberries
    2 tablespoons water
    1 cup brown rice flour (or any flour of your choice)
    ½ cup wheat germ
    2 teaspoons baking powder
    ½ teaspoon salt
    4 tablespoons unsweetened cocoa powder
    2 teaspoons vanilla extract
    ½ cup soy/almond/rice milk
    2 eggs
    3 tablespoons pure maple syrup
    mini chocolate chips (optional)

    Step 1
    Boil or steam 10 collard stems for 4-5 minutes.  Blend the cooked stems, 1 cup of frozen wild blueberries, and 2 tablespoons of water in your blender.  This should make about 1 cup of puree.  You will only need half of this puree.  Freeze or refrigerate the other half of the puree for another day.  (Or throw the extra into your next smoothie)

    Step 2
    Mix all of your dry ingredients into a bowl:  1 cup of brown rice flour, ½ cup wheat germ, 2 teaspoons baking powder, ½ teaspoon of salt, and 4 tablespoons of unsweetened cocoa powder.

    Step 3
    Mix all of your wet ingredients in a bowl:  ½ cup of blueberry-collard stem puree, 2 teaspoons of vanilla extract, ½ cup of soy milk, 2 eggs and 3 tablespoons of pure maple syrup.

    Step 4
    Combine wet ingredients and dry ingredients into one bowl, and mix well.

    Step 5
    Drop heaping tablespoons of batter onto your griddle.  Cook over low heat to avoid burning.  Add 3-4 mini chocolate chips to the top of each pancake.  Peek at the underside of the pancakes to determine when it’s time to flip them.  Serve pancakes with pure maple syrup.  Please do yourself a favor and spend the extra money for real maple syrup, and avoid pancake syrups, which are a mix of corn syrup, artificial colors and artificial flavors.

    Makes about 16 pancakes.

    Tip:  Refrigerate any leftover pancakes.  They make a great portable snack.  When you are hungry, just wrap them up and take them with you.  They are thick and sturdy like cookies!

    You know I’m always trying to get more greens and veggies into my family’s diet!  If you are too, you might want to check out Missy Chase Lapine’s cookbook, The Sneaky Chef.

  • Pre-Workout Tea Spritzer!

    Pre-Workout Tea Spritzer!

    TeaSpritzerPhoto
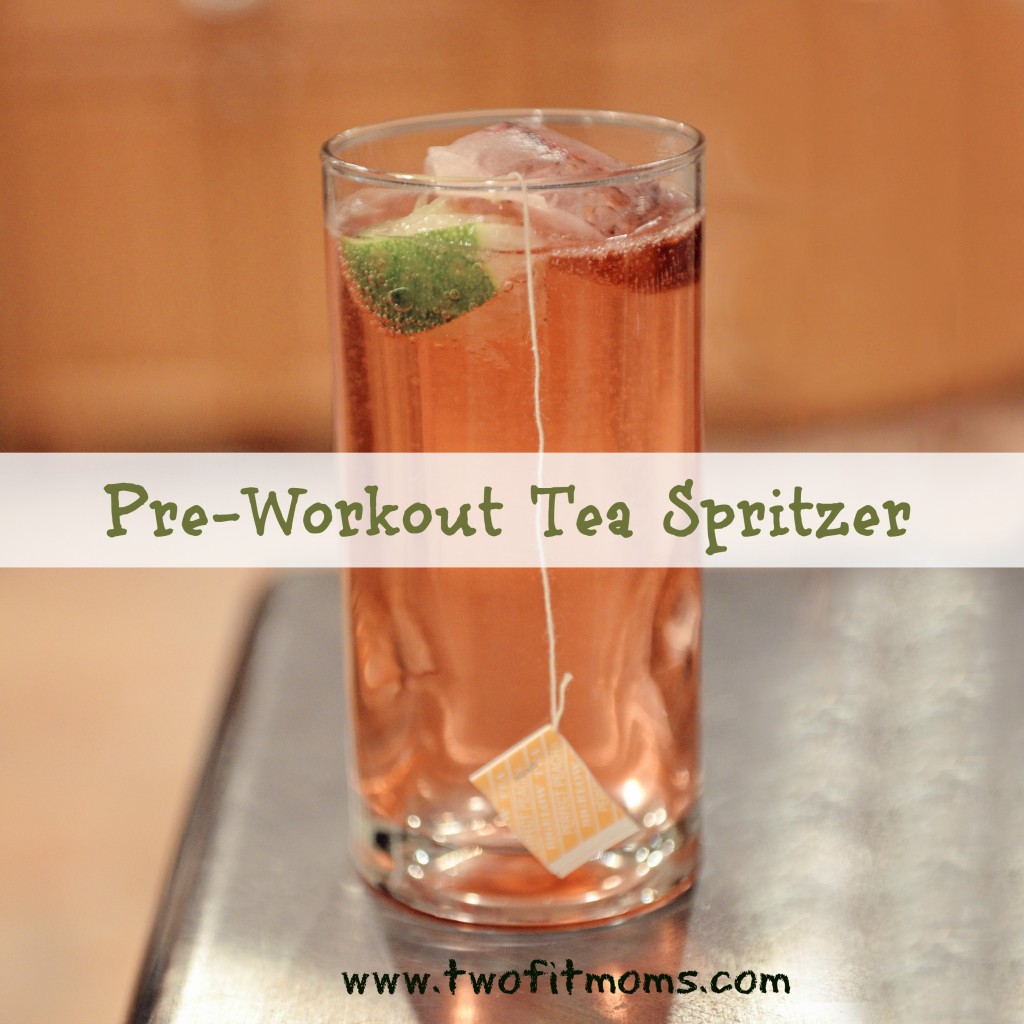
Are you drinking enough BEFORE exercising?  The importance of staying hydrated during and after an exercise session is common knowledge, but drinking prior to a workout is just as essential.

    According to the American College of Sports Medicine, you should consume 17 ounces of fluid about two hours prior to exercising to be adequately hydrated and to allow time for excretion of excess water.

    If you are looking for a more palatable solution than plain water but don’t want to reach for an artificially flavored/colored sports drink, consider this refreshing alternative—Create your own tea spritzer!  It’s delicious, portable, and it will get you ready and hydrated for your workout.

    Directions:

    1. Fill a tall glass (or thermos) with unflavored seltzer water.
    2. Squeeze ⅛ or ¼ of a lime into the water.
    3. Steep 1 tea bag for 5 minutes.  Fruit-flavored teas work really well, and they are caffeine free!
    4. Drink up, and enjoy your workout.
  • Start Your Backbend Journey with Bridge Pose

    Start Your Backbend Journey with Bridge Pose

    Backbends are extremely powerful and energizing poses. They open up the heart, the chest and the shoulders.  They stretch out the spine, the neck and the entire front body. They flood the body with oxygen and have the ability to quickly get you out of a funk.  Backbends are also known to offer relief from fatigue, stress, anxiety and depression, to name a few.

    Deep backbends can be extremely intimidating for beginners. Bridge pose or Setu Bandha Sarvangasana is a great intro pose to set you on your backbend journey. Take it slow and be mindful.  Do not do this if you have any neck or shoulder injuries. Always respect your limits.


    Step 1: Lie down on your mat. Extend your legs out and take a couple of deep breaths. Bend your knees and bring your feet down onto your mat. Your feet should be parallel to one another and hip-width distance apart. Relax your shoulders and release any tension you may have in your face.

    Photo Mar 06, 8 44 50 AM

    Step 2: On an exhale, press your feet and hands firmly into your mat as you lift your hips up. Keep your neck long, do not bring it down towards your chest. Draw your tailbone up and be careful not to clench your bottom. No squeezed cheeks allowed!

    Photo Mar 06, 8 45 05 AM

    Step 3: Keeping a firm base, start to work your shoulders underneath your body. Your shoulder blades draw in towards one another. Clasp your hands together underneath your body and straighten your arms. Press your arms firmly into your mat as you actively reach your clasped hands toward your heels. Be mindful to stay evenly on the soles of you feet and keep your knees directly stacked over your ankles. Do not let them sway in or out. Stay here and take 5-10 breaths. To release, unclasp your hands and set them down beside you, then slowly lower your hips down. Relax.

    Photo Mar 06, 8 45 20 AM

     Optional Variation: Extend on leg up and hold for a 3-5 breaths.  Lower the leg and extend the second leg up.  Hold for the same number of breaths as the first side. Lower the leg and hold in regular Bridge pose for 3-5 breaths…Then slowly lower down and relax.

    Photo Mar 06, 8 45 29 AM

    Remember to have patience with yourself and your practice. Speaking from experience, backbends can be frustrating…but they can also be very rewarding. Take your time.  In the words of K. Pattabhi Jois: “Practice and all is coming”.

    XOXO

    Blog Signature


  • Instagram Quick Tip:  Accentuate Muscle Tone

    Instagram Quick Tip: Accentuate Muscle Tone

    Navigating the world of photo-editing apps is tedious, especially if you are new to photography and new to Instagram. Rather than wasting money on apps that you may not like or use, let me introduce you to my favorite tips and programs for creating visually appealing photos.

    “Simply HDR” is one of my favorite apps for adjusting shadow, light, grain and contrast. The result of using such an app? Greater detail and more dramatic photos. Do you want to accentuate your existing muscle tone? If so, this is the app for you.
    HDRBeforeAfter
    Take a look at the two images of me lifting my leg over my shoulder. The top photo is straight out of the camera with no editing at all. The bottom photo is the same image with about 10 seconds of editing in “Simply HDR.” As you can see, the app doesn’t create muscles where there are none, but it certainly accentuates what currently exists!

    Photo editing is a fun and creative way to express yourself. Create beautiful and dramatic images by adding depth and shadow. Please keep in mind that I just focused on one aspect of this app. Obviously it can be used in many ways, not just to define one’s physique. Accentuating bodies is clearly not the purpose of this program, but it’s one application of it. Take a look at this app, and research some others on your own. Have fun!

  • Instagram Quick Tip:  Use Your Glassware!

    Instagram Quick Tip: Use Your Glassware!

    Over the past year and a half, we have received numerous questions about our Instagram photos.  These questions have ranged from, “Who takes your photos?” to “What app did you use to create that effect?”

    In order to help you navigate the fun world of Instagram, we will be writing short posts to bring you Instagram quick tips!  We will share our ideas for creating fun and interesting content for your own Instagram pages, and we will share our favorite apps for editing photos and videos.

    Today’s Quick Tip
    Stop putting your phone at risk each time you take an Instagram photo!  Many of you who use a self-timer to take your own yoga portraits are leaning your phones on precarious ledges around the house in order to find the perfect photo angle.  If you haven’t cracked your phone screen as a result of it tipping over onto a hard surface, InstagramQuickTip
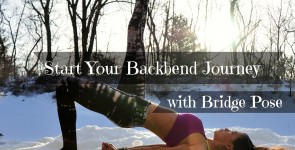
consider yourself lucky.

    Here’s our solution to taking photos and videos with your phone safely.  Place your phone into a heavy, short glass.

    Carry the glass around the house with you and place the glass, rather than the phone itself, onto ledges, bookshelves, counters, etc.  If necessary, stuff a washcloth in front of (or behind) the phone to get the desired photo angle.  Get the perfect shot every time using this method without the fear of cracking your phone screen!