Category: Backbend

  • Balanced Body, Balanced Mind

    Balanced Body, Balanced Mind

    As busy mothers, yoga instructors and business owners, we are on the constant quest to live balanced lives.  With young children to care for and multiple schedules to juggle, there’s hardly a moment in the day that isn’t pre-scheduled with children’s activities, meal preparation or work obligations.

    At first glance, it seems counterintuitive to add a yoga practice to a seemingly never-ending list of daily tasks, but we realize that the intense focus required to maintain balance and BalanceCollage
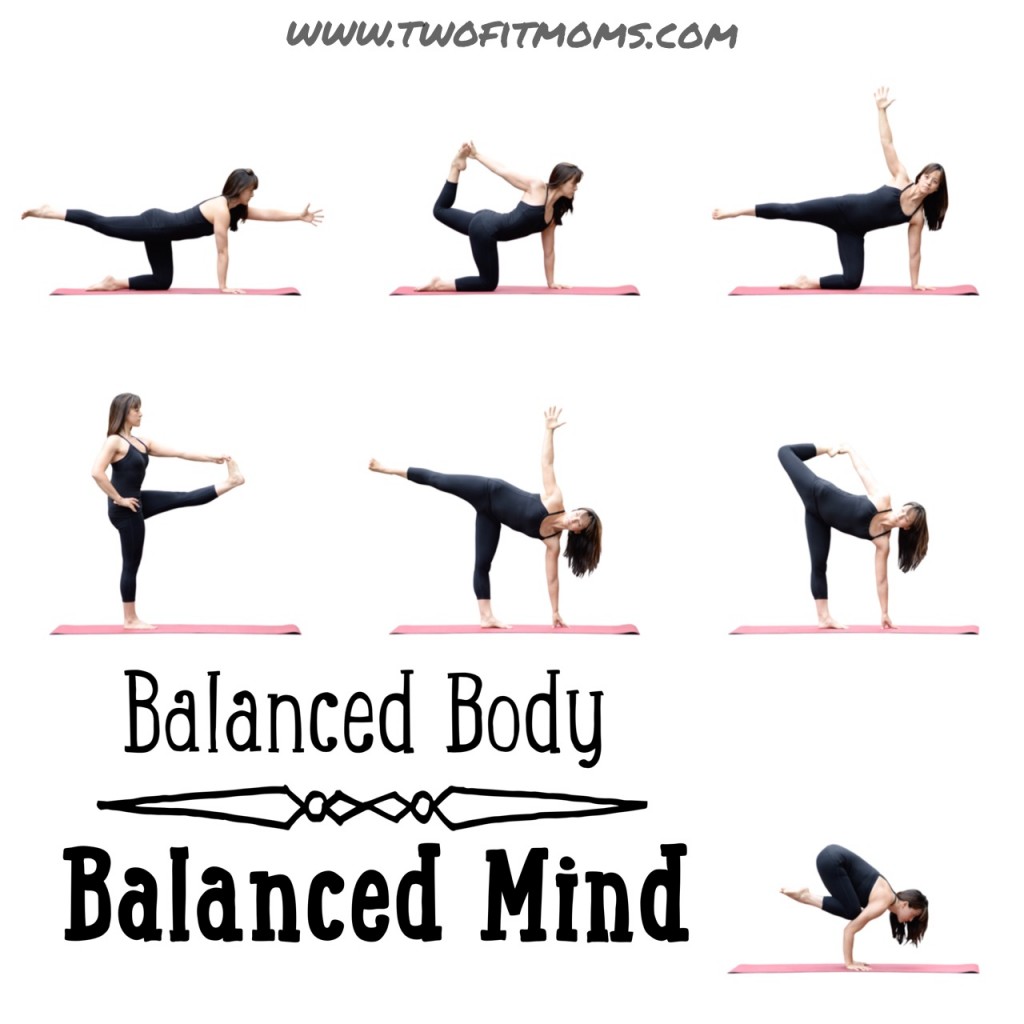
alignment on the yoga mat is the same focus necessary to navigate life’s many challenges and obligations. Whether you have a pending deadline at work, an hour of traffic during your commute, or a house full of kids, your ability to manage stress and face the day will seem that much easier after an intense yoga class.

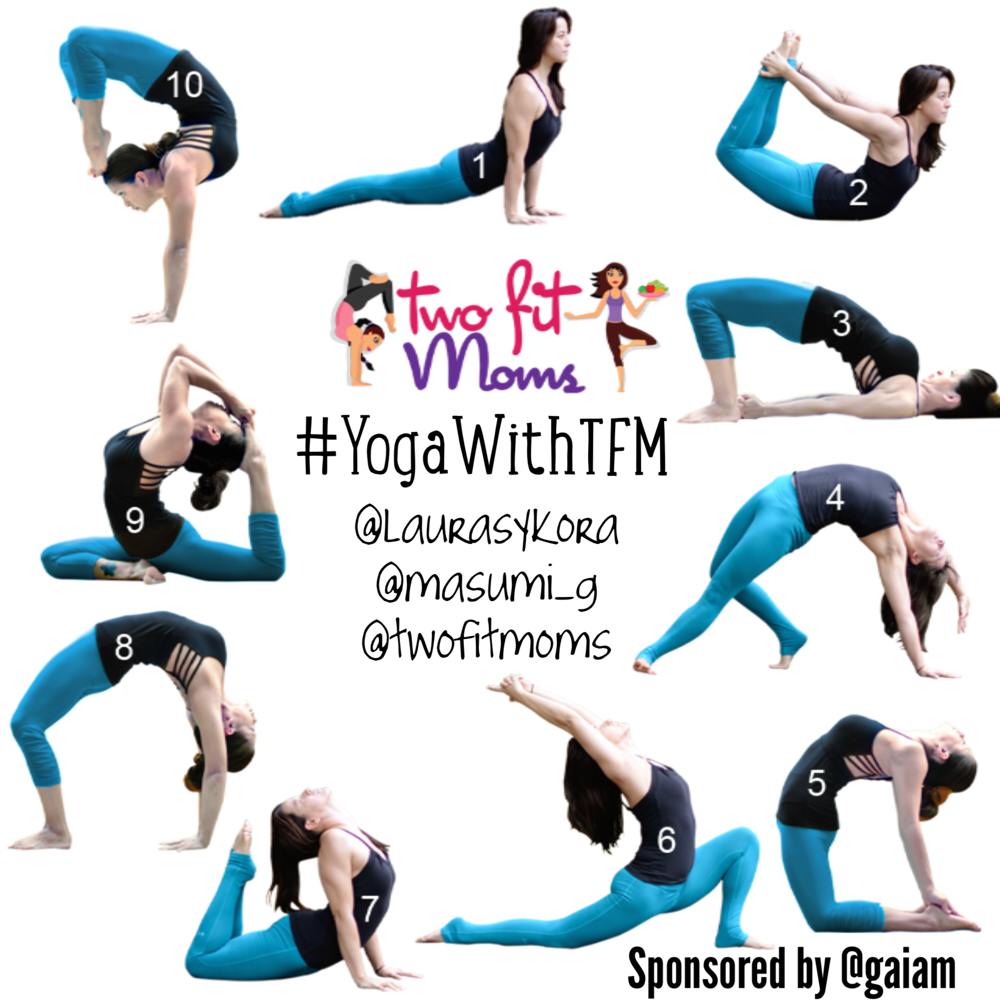
    Practicing on the mat is perfect training for managing a stressful, busy schedule off the mat.  Each balance pose requires an even breath and a commitment to focus solely on the current posture.  A balance practice gives no thought to the poses that come before the present moment.  Each balance pose, just like each life task, can be successfully performed with this strategy of focusing and dedicating one’s undivided attention to the effort. Test your own strength and hone your balance skills by practicing the seven poses below.  Remember to breathe deeply, find a focal point in each posture to help maintain your balance, and practice on both sides of your body.

    If you would like a complete yoga practice, the postures shown below are featured in our Downloadable Balance Practice class.

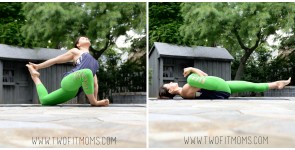
    Tabletop Variation: Begin in tabletop position with shoulders stacked over wrists and hips stacked over knees. Slowly extend your left arm and your right leg. Engage your core, find your balance, and remember to breathe. Return to tabletop position.
    TabletopVariation

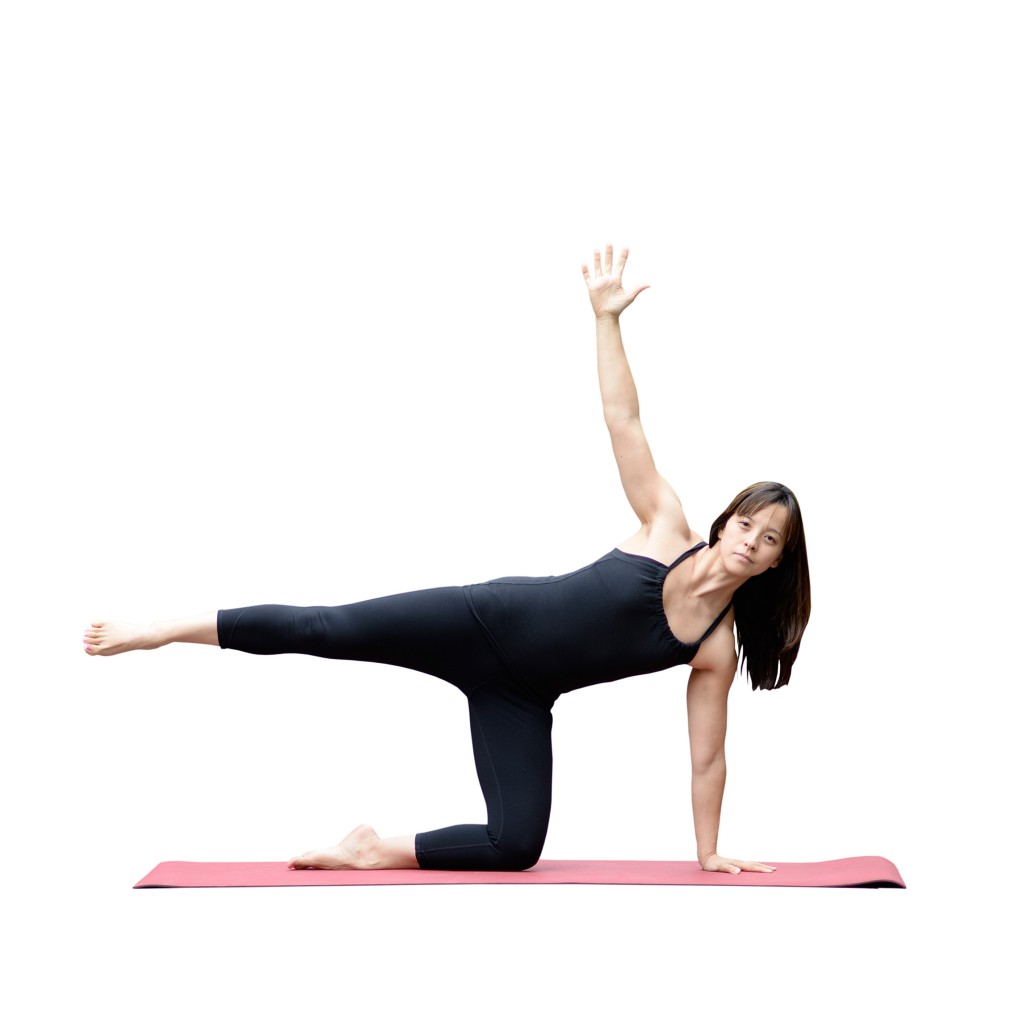
    Modified Side Plank: From tabletop position, begin to shift your weight into your left hand and left shin. Bring your right foot in line with your left foot.  Once you feel stable, slowly lift your right leg so that it is parallel to the mat.  Extend your right arm toward the sky, and remember to keep your hips lifted.
    ModifiedSidePlank

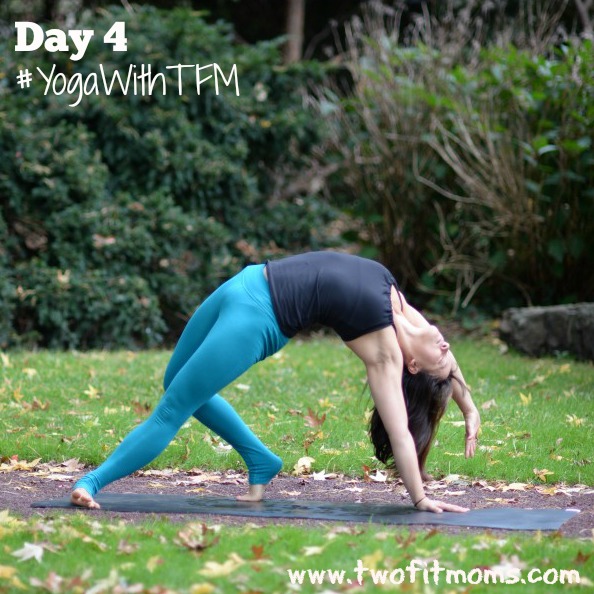
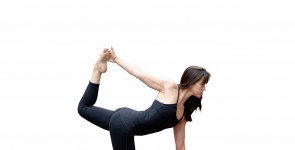
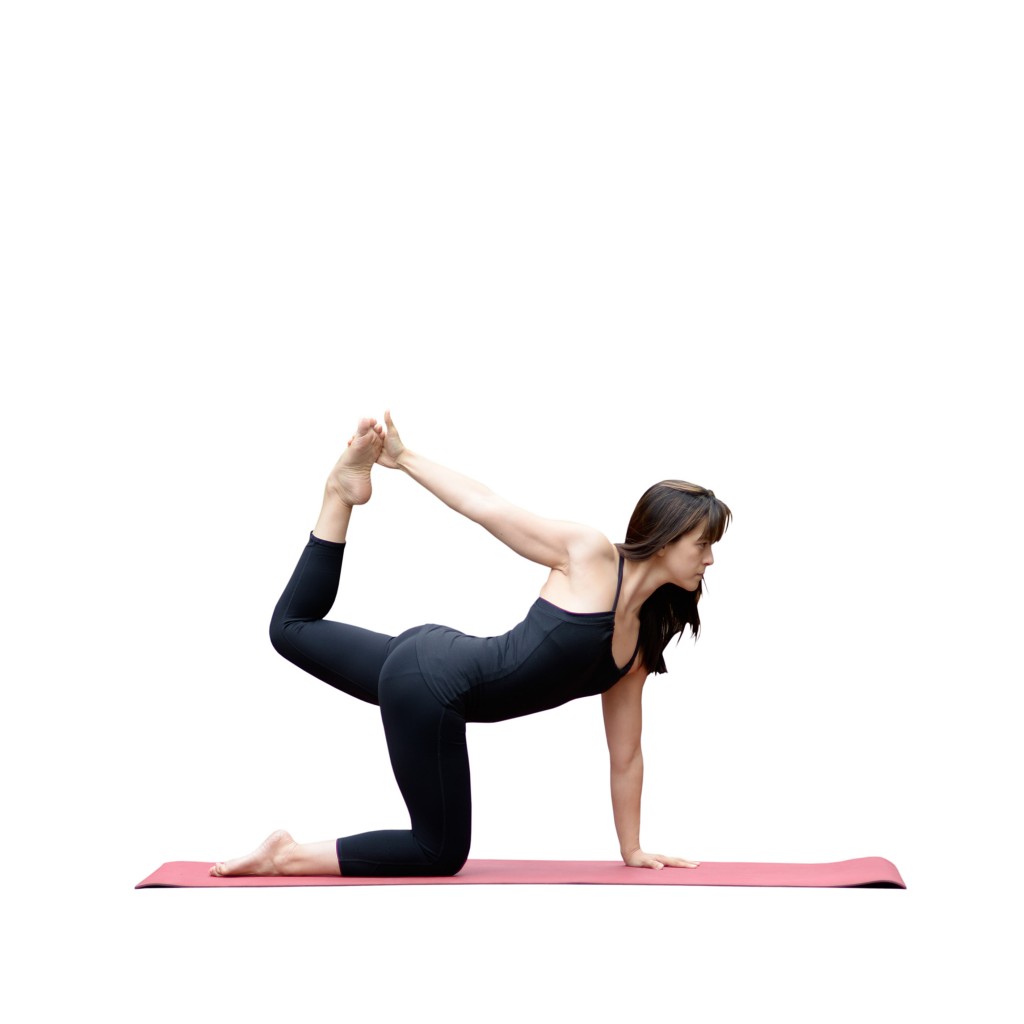
    Tiger Pose: From Modified Side Plank, return to tabletop position, and test your balance with tiger pose. In Tiger pose, opposite hand and opposite foot connect for a feel-good backbend. If your flexibility allows, try an overhand grip!
    Tiger

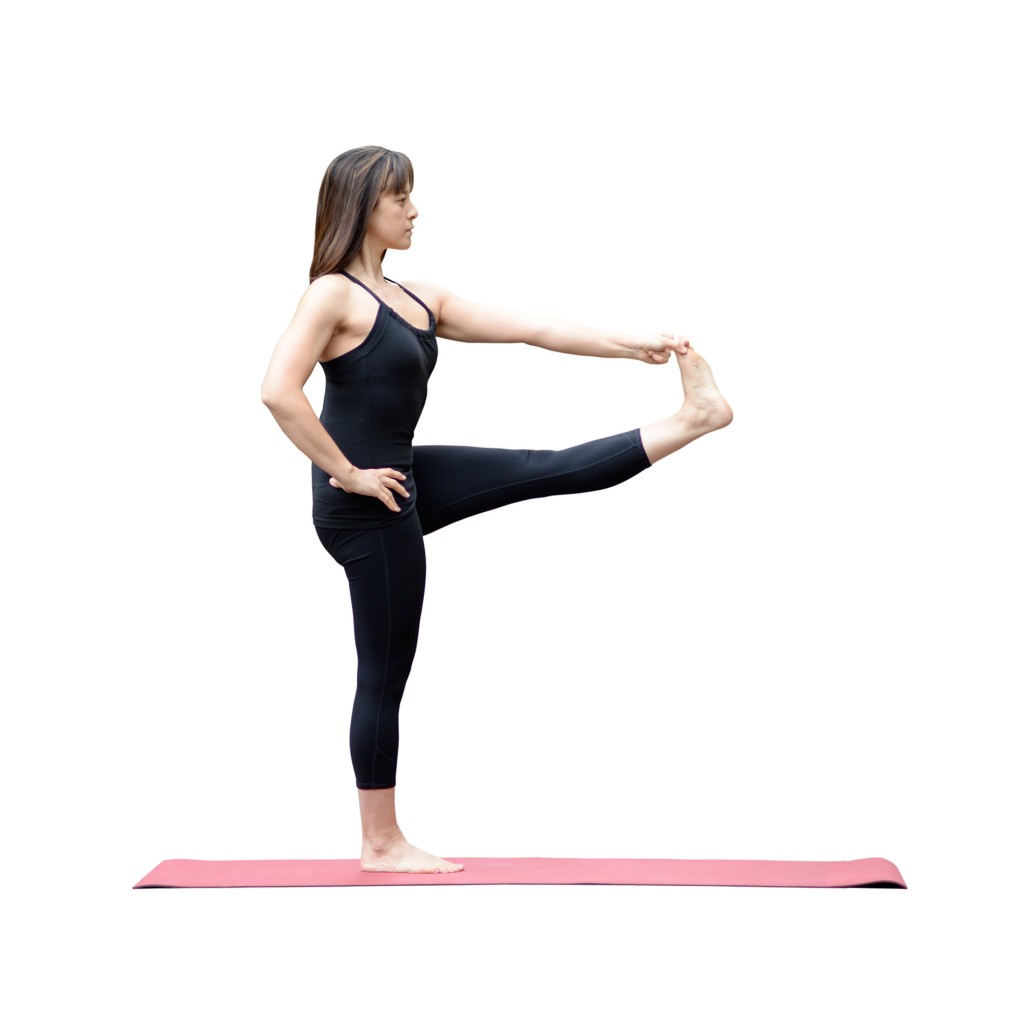
    Hand-to-Big-Toe Pose: After testing your balance on the floor, come to a standing position with your hands on your hips. Begin to shift your weight into your right foot. Bend your left knee, and lift it so that your left hip is inline with your left knee. Wrap your “peace fingers” (index and middle fingers) around your left big toe, and seal the grip with your thumb. Feel free to balance with a bent knee. If you feel stable, begin to extend your left leg. Roll your shoulders back, pull your left hip back in space, and breathe deeply.
    HandtoBigToe

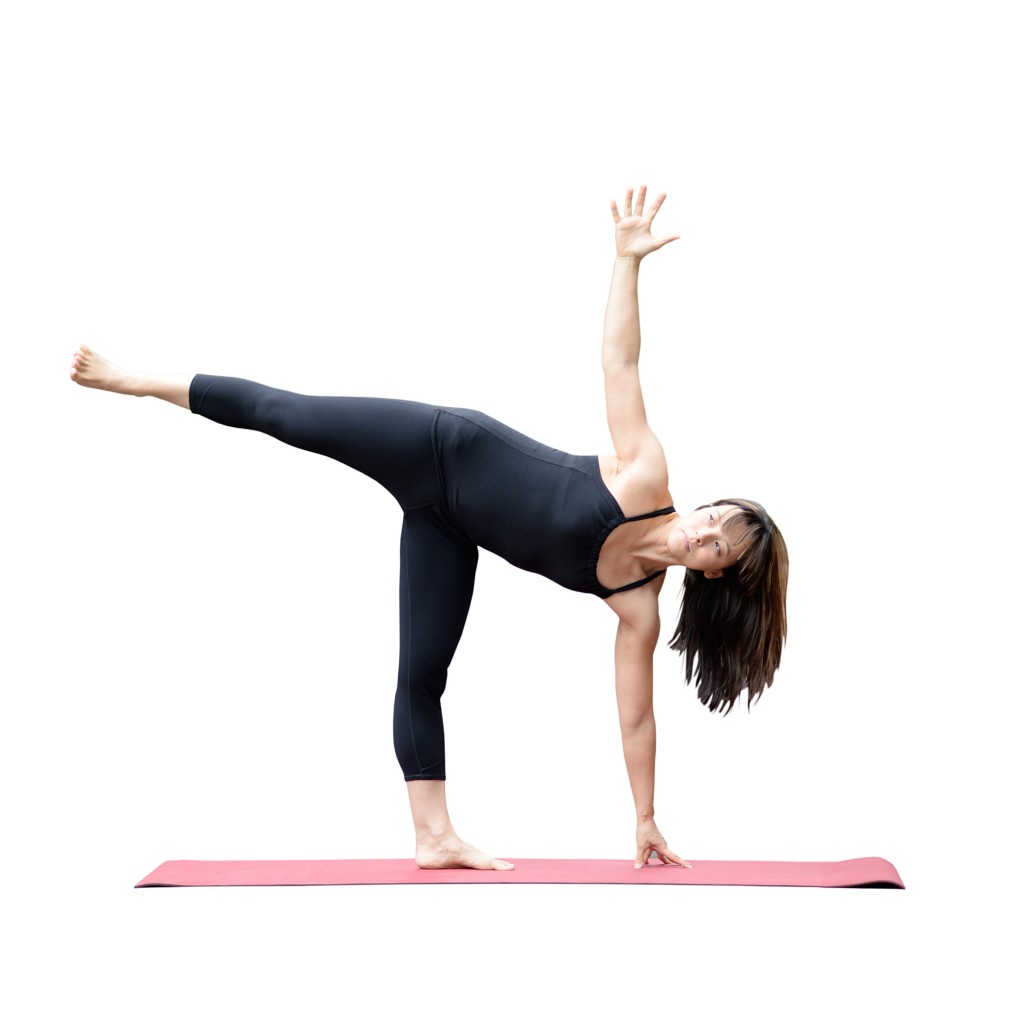
    Half Moon Pose: It’s not easy to stack the shoulders and hips while balancing on one foot. Be patient, move slowly, and keep your gaze downward until you are able to balance with ease. If you feel stable, challenge yourself by gazing out to the side or up toward your extended arm.
    HalfMoon

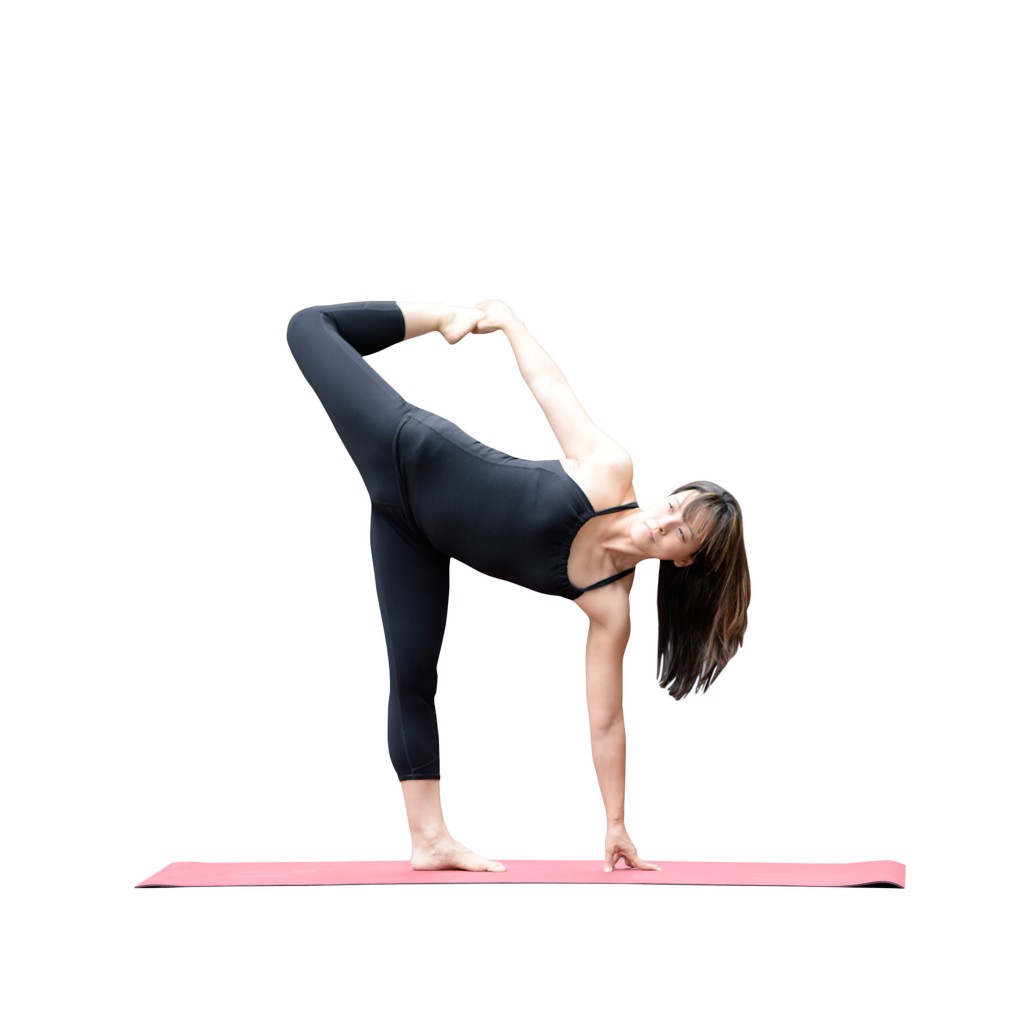
    Sugar Cane Pose: This is a challenging balance pose that happens to also be a great chest-opener and hip flexor stretch. From Half Moon pose, bend your top leg, and catch the pinky side edge of your foot with your hand. Kick your foot firmly into your hand to create resistance to maintain your balance. Enjoy the stretch, and then slowly transition back into Half Moon pose before lowering your leg to the mat.
    SugarCane

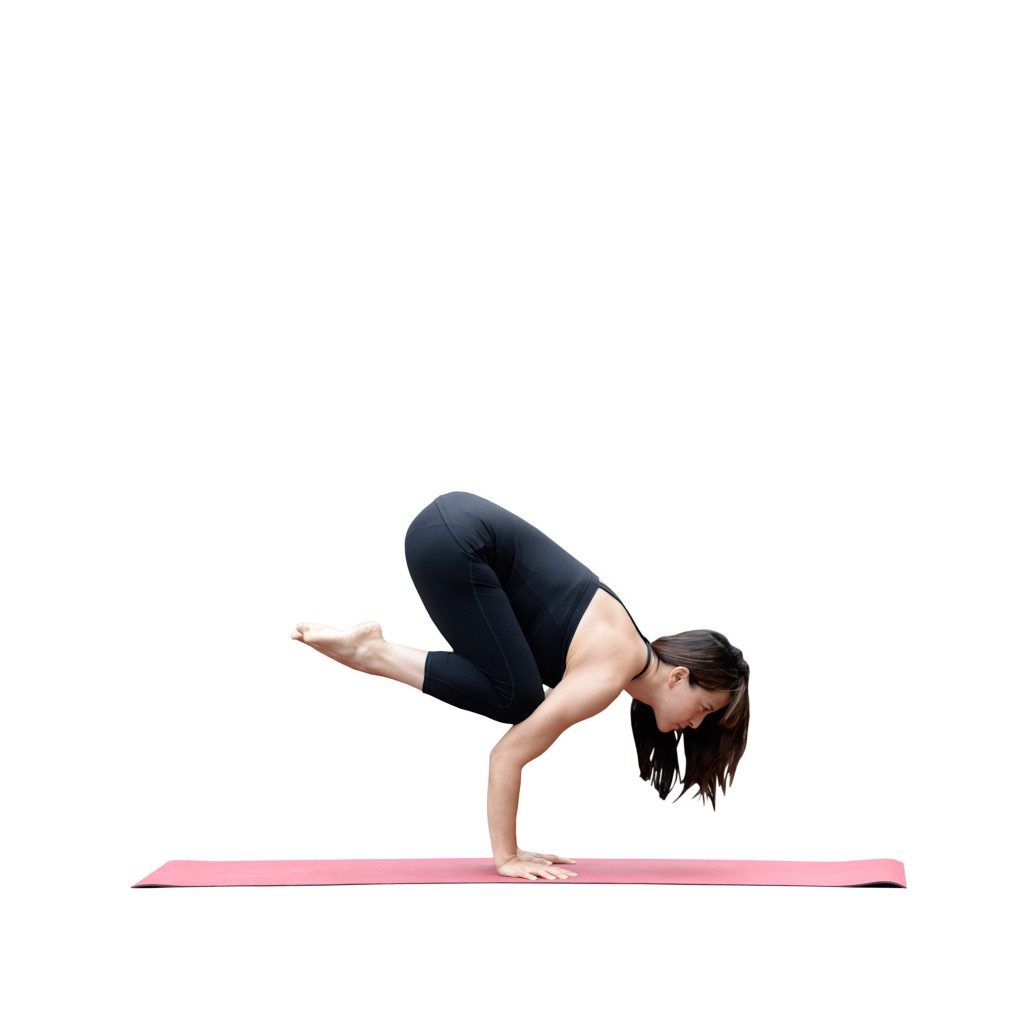
    Crow Pose: Most yoga students begin their arm balance journeys with this pose. For a step-by-step tutorial, click here.
    Crow

  • Day 7: King Cobra Pose or Bhujangasana (Toes to Head)

    Day 7: King Cobra Pose or Bhujangasana (Toes to Head)

    Welcome to Day 7 of the November #YogaWithTFM 10-Day Challenge! Today’s pose is King Cobra Pose or Bhujangasana (Toes to Head). Day-7 IG

    See the video below for a tutorial on how to get into Cobra Pose, and keep in mind these three tips:

    1.  Don’t get discouraged if your toes do not reach your head!  Do not push your body beyond its physical limits.  You will still benefit from the deep chest-opening stretch.

    2.  Do not force your arms to straighten completely.  Your ability to completely straighten your arms will be dependent upon your flexibility.  It is safer to maintain a slight bend in the elbows than to force the arms to straighten and strain the back.

    3.  Create an even backbend throughout the length of your spine, and remember to breathe!

    [KGVID width=”568″ height=”320″]http://www.twofitmoms.com/wp-content/uploads/2014/10/KingCobra.mov[/KGVID]

    Please remember to warm up before participating in any challenge.  If you would like to practice with us, download our 24-minute Backbends Practice class here

  • Day 6: Low Lunge Pose or Anjaneyasana

    Day 6: Low Lunge Pose or Anjaneyasana

    Welcome to Day 6 of the November #YogaWithTFM 10-Day Challenge.  Today’s pose is Low Lunge Pose or Anjaneyasana. Day-6 IG

    See the video below for a tutorial on how to get into Low Lunge Pose, and keep in mind these three tips:

    1.  Keep your biceps along side your ears.  Do not allow your head to fall back through your arms.

    2.  Feel free to lunge into your front leg as much as your flexibility allows.  It is acceptable for the front knee to extend past the front ankle in this pose.  Just keep the heel of your front foot rooted onto your mat to maintain stability.

    3.  Try to focus on creating an even backbend with your spine, and avoid collapsing into your lower back.

    [KGVID width=”568″ height=”320″]http://www.twofitmoms.com/wp-content/uploads/2014/10/Anjaneyasana.mov[/KGVID]

    Please remember to warm up before participating in any challenge.  If you would like to practice with us, download our 24-minute Backbends Practice class here.

  • Day 4: Wild Thing or Camatkarasana

    Day 4: Wild Thing or Camatkarasana

    Welcome to Day 4 of the November #YogaWithTFM 10-Day Challenge.  Today’s pose is Wild Thing or Camatkarasana. Day-4 IG

    For a step-by-step tutorial, read our article HERE.  See the video below for a tutorial on how to transition into Wild Thing from downward facing dog.  Keep in mind that you can also enter wild thing from side plank.  Give both transitions a try and see which you prefer!

    [KGVID width=”568″ height=”320″]http://www.twofitmoms.com/wp-content/uploads/2014/10/WildThing.mov[/KGVID]

    Please remember to warm up before participating in any challenge.  If you would like to practice with us, download our 24-minute Backbends Practice class here.

  • Day 3: Bridge Pose or Setu Bandha Sarvangasana

    Day 3: Bridge Pose or Setu Bandha Sarvangasana

    Welcome to Day 3 of the November #YogaWithTFM 10-Day Challenge! Today’s pose is Bridge Pose or Setu Bandha Sarvangasana.Day-3 IG

    See the video below for a tutorial on how to get into Bridge Pose, and keep in mind these three tips:

    1. Keep your feet and thighs parallel while actively pressing into the inside edges of your feet.

    2. Press into your arms coming onto the tops of your shoulders.

    3. Keep your neck long, bringing your chest up towards your chin.

    Please remember to warm up before participating in any challenge.  If you would like to practice with us, download our 24-minute Backbends Practice class here.


    [KGVID poster=”http://www.twofitmoms.com/wp-content/uploads/2014/11/Video-Nov-02-1-26-08-PM_thumb7.jpg” width=”640″ height=”360″]http://www.twofitmoms.com/wp-content/uploads/2014/10/Video-Nov-02-1-26-08-PM.mov[/KGVID]


  • Day 2: Bow Pose or Dhanurasana

    Day 2: Bow Pose or Dhanurasana

    Welcome to Day 2 of the November #YogaWithTFM 10-Day Challenge.  Today’s pose is Bow Pose or Dhanurasana.Day-2 IG

    See the video below for a tutorial on how to get into Bow Pose, and keep in mind these three tips:

    1.  Grab the outside edges of your ankles, and begin to kick your legs into your hands.

    2.  Lift your knees, thighs and chest from the mat as you press your tailbone toward the floor.

    3.  Maintain a comfortable space between your knees throughout the pose.  Your legs should not splay wider than hip width apart.

    [KGVID width=”568″ height=”320″]http://www.twofitmoms.com/wp-content/uploads/2014/10/Bow.mov[/KGVID]

    Please remember to warm up before participating in any challenge.  If you would like to practice with us, download our 24-minute Backbends Practice class here.

  • Welcome to the November #YogaWithTFM 10-Day Challenge!

    Welcome to the November #YogaWithTFM 10-Day Challenge!

    Welcome to the November #YogaWithTFM 10-Day Challenge! Today’s pose is Upward-Facing Dog or Urdhva Mukha Svanasana.Day1 IG

    See the video below for a tutorial on how to get into Upward-Facing Dog, and keep in mind these three tips:

    -When in doubt about hand placement and general alignment for Upward Facing Dog, start out in plank pose (top of a push-up).  Align your shoulders over your wrists, keep your elbows pinned to your sides, and lower half way into a tricep (chaturanga) push-up.  Roll over your toes, and straighten your arms for upward facing dog.

    -Only the palms of your hands and the tops of your feet should touch the mat in upward facing dog.  Keep your thighs lifted!

    -Roll your shoulders down and away from your ears.

    [KGVID width=”568″ height=”320″]http://www.twofitmoms.com/wp-content/uploads/2014/10/UpDog.mov[/KGVID]

  • #YogaWithTFM November Challenge!

    #YogaWithTFM November Challenge!

    Our November yoga challenge has not yet been announced on Instagram, but we wanted to give our @TwoFitMoms followers a sneak peak of what’s to come next month. Here are the 10 poses we will be covering starting on November 1.

    NovChallengeAnnouncment

    Welcome to our #YogaWithTFM November Challenge, sponsored by Gaiam! This month’s focus will be on backbends. As always, this challenge will be open to all levels, and modifications will be given each day on our website.


    Be sure to follow @TwoFitMoms, @laurasykora, @masumi_g and @gaiam on Instagram, and remember to always use the #YogaWithTFM hashtag when posting challenge photos.


    Need help preparing for this challenge?  Check out our Backbends practice available for purchase here.

  • Yoga Straps 101

    Yoga Straps 101

    When I first started practicing yoga, I received all sorts of advice. One great suggestion was to go out and buy a yoga strap. A yoga strap, I was told, would assist me greatly in my practice. As a newbie, I was excited to buy all sorts of yoga gear, so I ran out to Target and immediately bought a strap. For months, I used this strap without any guidance. I ignored the fact that the strap had metal ends. I’m not even sure if it crossed my mind that those metal ends had any purpose! I just wrapped the strap around my foot repeatedly until it felt secure. Some days, my foot was so wrapped up, it appeared as if I had a foot injury with a large Ace bandage.

    If this scenario sounds familiar, this article is for you. I know that there must be others out there who are new to yoga and have no idea how to deal with a yoga strap. I will not discuss the many stretches and exercises you can perform with your strap in this article. The purpose here is to just get you accustomed to the idea of creating an adjustable loop with your strap. (This loop would then slide over your foot and be used for a variety of exercises, which we can discuss in future posts.)

    Here is your Yoga Strap Looping Lesson 101:

    Your yoga strap should have metal ends. One end will have two rings, and the other end will have a single flat metal strip. If you are right handed, use your left hand to hold the end of the strap with the two rings. Your right hand will hold the end of the strap with the flat metal strip.

    Step1

    I know this may sound ridiculous, but my yoga teacher taught me how to loop a yoga strap with a choo-choo train analogy. Yes, she actually used the phrase “choo-choo”. It felt juvenile, and I laughed, but she didn’t have to explain it twice. Let me teach you with that same choo-choo train. Pretend that the end of the strap with the single metal strip is a train. The train goes through both tunnels. (That is, put the end of the strap with the flat metal strip through both metal loops.)

    step2

    The train forgot something. It goes back over the first tunnel it sees, and through the second tunnel.

    step3

    It’s as simple as that. Now continue pulling the end of the strap with the flat metal piece until you have a small adjustable loop that can fit over your foot.

    step4

    You are now ready to use your strap! Stay tuned for future tutorials…

  • 4 Poses for Stress Relief

    4 Poses for Stress Relief

    We all have days, weeks or even longer stretches of time when the stress of life is overwhelming and suffocating. The shoulders and neck muscles tighten, the jaw clenches, and the back may even round with grief. Stress causes a wound-up emotional state, and our insides feel twisted and tight. In these difficult periods, be kind to yourself, and try to find even a few minutes to unwind and decompress. Counteract the tightening, gripping power of stress with a few expansive, heart-opening, shoulder-stretching poses. Trust me, you will feel much better.

    Here are four of my favorite stretches for stress relief. Breathe and sink into each of these postures for a minimum of five breaths, and be sure to practice the relevant poses on both sides of the body.

    Puppy Pose
    Start out on hands and knees (tabletop position). Make sure your shoulders are stacked directly over your wrists, and your hips are stacked over your knees. Keep your hips stacked over your knees, and begin to walk your hands forward, sinking your chest toward the floor. Depending on your flexibility, you may rest your forehead, chin or chest on the mat.
    Puppy

    Twisted Monkey Pose
    From downward facing dog, step your right foot forward between your hands. Lower your back knee, and untuck the toes on your back foot. Lift your back foot from the mat. Sweep your right arm back (palm facing up), and grab the pinky-side edge of your left foot. Begin to kick your back foot into your hand. Puff your chest, and roll your shoulders down. Roll onto the outer edge of your right foot, and allow your right knee to fall away from the body. Enjoy this full-body stretch for 30-60 seconds before repeating on the opposite side.TwistedMonkey

    Prasarita Padottanasana
    Step your feet about a leg’s distance apart, and position your feet so that they are parallel to one another. Interlace all ten fingers behind your back, and squeeze your palms together. Roll your shoulders down and away from your ears, and engage your thighs by pulling your quadriceps up and into the body. Inhale deeply, and exhale as you hinge forward from the waist, allowing your clasped hands to fall forward. If possible, allow the crown of your head to rest on the mat.Prasarita

    Supine Pigeon Pose
    Lie on your back with your knees bent and your feet flat on the mat. Cross your right ankle over your left thigh, so that you create a triangle of space between your two legs. Bring your legs toward your chest, and then hook your arms through the triangle of space and cradle your right shin. Pull your shin toward your body as you extend your left leg to hover a few inches above the ground. Hold this hip-opening stretch for 30-60 seconds, and repeat on the other side.SupinePigeon

    Will these four stretches solve your problems and remove the stress from your life? Of course not. Stress is often caused by circumstances that are beyond our control. The goal here is to focus on what we CAN control—our breath, our body, and our response to difficult situations. Good luck in all that you are facing. You are stronger and more resilient than you think!