Author: Laura Kasperzak

  • Pose of the Week: Vasisthasana

    Pose of the Week: Vasisthasana

    Vasisthasana, or Side Plank Pose, helps to strengthen the wrists, arms, core and legs! Feel free to take any modifications or variations in your practice this week.

    Vasisthasana

    1. Start off in Downward Facing Dog.

    2. From Downward Facing Dog, pull forward into Plank Pose.

    3. Shift your weight onto your left hand, and move the right hand forward about 2 inches so the wrist is slightly forward of your right shoulder.

    4. Slowly roll onto the outside edge of your right foot and stack your left foot on top of your right. As you do so, pop up on the fingertips of your left hand. Root down through the right hand, keeping the right arm straight.

    5. Find your balance and extend your left arm up towards the sky.

    6. Keep your hips lifting, belly engaged and legs active.

    7. Stay here and take 5 deep breaths. Repeat on the other side.

  • Pose of the Week: Bakasana

    Pose of the Week: Bakasana

    Time to get our crow on! Here are my top five tips to get your crow flying higher! You can check out the full tutorial here.

    Bakasana

    1. Use your fingertips to help control your balance! Grip the mat to ground you in this arm balance.

    2. Hug your elbows in! Squeezing the arms in helps stabilize your shoulders and engage the muscles in the sides of your torso. Use a strap to assist with this action. The loop of the strap should be placed just above your elbows, and remember to keep your arms shoulder-width distance apart.

    3. Round your upper back! Rounding will help lessen the amount of weight you feel on your arms, and it will help you engage your core.

    4. Step on a block! If you have trouble getting your knees high up on your arms, start by standing on a block…your knees will automatically be higher!

    5. Don’t look down!  Look slightly forward. The slight tilt of your head will prevent you from nose diving into your mat.

  • Pose of the Week: Sirsasana A

    Pose of the Week: Sirsasana A

    Time to get upside down! This week’s TFM Pose of the Week is Sirsasana A or Supported Headstand. Check out the following modifications and feel free to use a wall for support!  You may also like to check out my top 5 reasons to get upside down everyday HERE. Have fun and be safe!

    Level 1 Modification: Keep your feet on the ground! You don’t need to take your feet off of the ground to experience the benefits of inversions. Start by sitting up on your shins and clasp your hands loosely, remembering to tuck the bottom pinky in! Place your forearms down on to your mat, elbows at shoulder width distance. Place the crown of your head in front of your hands. Root down through your forearms as you tuck your toes under and lift the knees up. Squeeze your elbows in as you draw your shoulders away from your ears. Walk your feet in as you begin to stack your hips over your shoulders. Your forearms should be bearing most of your weight.  It should feel like you can almost pick up your head. Stay here and take about 5-10 breaths. Slowly release down into Child’s pose.

    Dolphin Pose

    Level 2 Modification: Knees hug in! Start by sitting up on your shins and clasp your hands loosely, remembering to tuck the bottom pinky in! Place your forearms down on to your mat, elbows at shoulder width distance. Place the crown of your head in front of your hands. Root down through your forearms as you tuck your toes under and lift the knees up. Squeeze your elbows in as you draw your shoulders away from your ears. Walk your feet in as you begin to stack your hips over your shoulders. Slowly bend one knee into your chest. Press actively into your forearms and engage your abs to tuck the second knee into your chest. Your forearms should be bearing most of your weight.  It should feel like you can almost pick up your head. Stay here and take about 5-10 breaths. Slowly release down into Child’s pose.

    Sirsasana Modification

    Level 3 Modification: Time to extend up! Start by sitting up on your shins and clasp your hands loosely, remembering to tuck the bottom pinky in! Place your forearms down on to your mat, elbows at shoulder width distance. Place the crown of your head in front of your hands. Root down through your forearms as you tuck your toes under and lift the knees up. Squeeze your elbows in as you draw your shoulders away from your ears. Walk your feet in as you begin to stack your hips over your shoulders. Slowly bend one knee into your chest. Press actively into your forearms and engage your abs to tuck the second knee into your chest. From here, slowly extend one leg up towards the sky, then the other…or, if you are capable, both legs at one time. Keep your thighs hugging in and feet active! Remember, your forearms should be bearing most of your weight.  It should feel like you can almost pick up your head. Stay here and take about 5-10 breaths. Slowly release down into Child’s pose.

    Sirsasana A

    Be sure to check out our inversion tutorials in the Yoga pull down tab on our website, and if you are considering a headstand practice, check out: Headstands 101: The Art of Falling.

  • Pose of the Week: Ardha Chandrasana

    Pose of the Week: Ardha Chandrasana

    Time to test your balance with one of my favorite standing postures…Ardha Chandrasana or Half Moon Pose!  Feel free to use a block under your hand if you cannot comfortably reach the ground.

    Ardha Chandrasana

    Stand at the top of your mat, big toes touching and hands at heart center in prayer. Sweep both arms up towards the sky and then swan dive down into a standing forward fold, Uttanasana. Lift up half way and bring your hands underneath your shoulders. Slowly lift your left leg up so your legs make a 90 degree angle. Flex your left foot so the toes point down towards your mat. Bring your left hand onto your left hip. Take a deep breath in, and on the exhale slowly start to rotate the left toes out to the left side of your mat. Your left hip will begin to stack on top of your right hip, your left shoulder will begin to stack over your right shoulder. Root down through your right foot to find your balance. Extend your left hand up towards the sky. To challenge your balance, gaze to the side or at the top of your hand.  Stay here for 5 breaths, then repeat on the other side.


  • Pose of the Week: Ustrasana

    Pose of the Week: Ustrasana

    This week’s TFM Pose of the Week is Ustrasana or Camel Pose. Backbends are a great way to open up the front body and to energize yourself. Take your time getting into this one and remember to breathe!

    Level 1 Modification: Start with your shins parallel and toes untucked. Place your hands on your low back with fingers facing down towards your mat. Hug your elbows in. Take a deep breath in, and on the exhale, slowly start to lift your heart up towards the sky as you lean slightly back drawing the shoulder blades together. Keep your hips pushing forward while your thighs remain perpendicular to the ground. If it is comfortable, drop your head back. Try to take five steady breaths. When you are ready to come out, lead with your chest.  Your head should be the last thing to rise. Sit back on your heels and take a moment.  Repeat this sequence two more times.

    Ustrasana Level 1

    Level 2 Modification: Start with your shins parallel and toes tucked under. Place your hands on your low back with fingers facing down towards your mat. Hug your elbows in, and take a deep breath. On the exhale, slowly start to lift your heart up towards the sky as you lean slightly back drawing the shoulder blades together. Slowly bring one hand at a time down to your ankles. Keep pushing your hips forward while your thighs remain perpendicular to the ground. If it is comfortable, drop your head back. Try to take five steady breaths. When you are ready to come out, lead with your chest.  Your head should be the last thing to rise. Sit back on your heels and take a moment.  Repeat this sequence two more times.

    Ustrasana Level 2

    Ustrasana: Start with your shins parallel and toes untucked. Place your hands on your low back with fingers facing down towards your mat. Hug your elbows in. Take a deep breath, and on the exhale, slowly start to lift your heart up towards the sky as you lean slightly back drawing the shoulder blades together. Slowly bring both hands to the tops of your feet. Keep hips pushing forward while thighs remain perpendicular to the ground. Slowly drop your head back. Try to take five steady breaths. When you are ready to come out, lead with your chest.  Your head should be the last thing to rise. Sit back on your heels and take a moment.  Repeat this sequence two more times.

    Ustrasana Level 3

  • Pose of the Week: Upavistha Konasana

    Pose of the Week: Upavistha Konasana

    Upavistha Konasana

    Today we are launching our Pose of the Week series, which is designed to help you focus on making small steps towards your yoga and wellness journey.  Rather than tackling a full sequence or an hour-long class, just make a commitment to yourself to practice this single pose every day this week.  You can make a difference in your health and wellness, one step at a time.

    We are starting with Upavistha Konasana or Wide-Legged Seated Forward Fold.

    Take a comfortable seat on your mat and spread your legs evenly apart. Root down through your sits bones, lengthen up through your spine and flex your feet. Find a little bit of external rotation in your thighs so that your knee caps and your toes point up towards the sky. Press down through the tops of your thighs and shin bones.

    Take a deep breath in.

    On the exhale, slowly start to walk the fingers forward and fold. Fold as deeply as you can without rounding through your spine.  You should feel sensation and stretch through the backs of both legs, but never pain. Relax into the stretch and move deeper as the intensity of the stretch lessens. Stay here for about one minute, then slowly release and shake out your legs.

  • Springtime Flow

    Springtime Flow

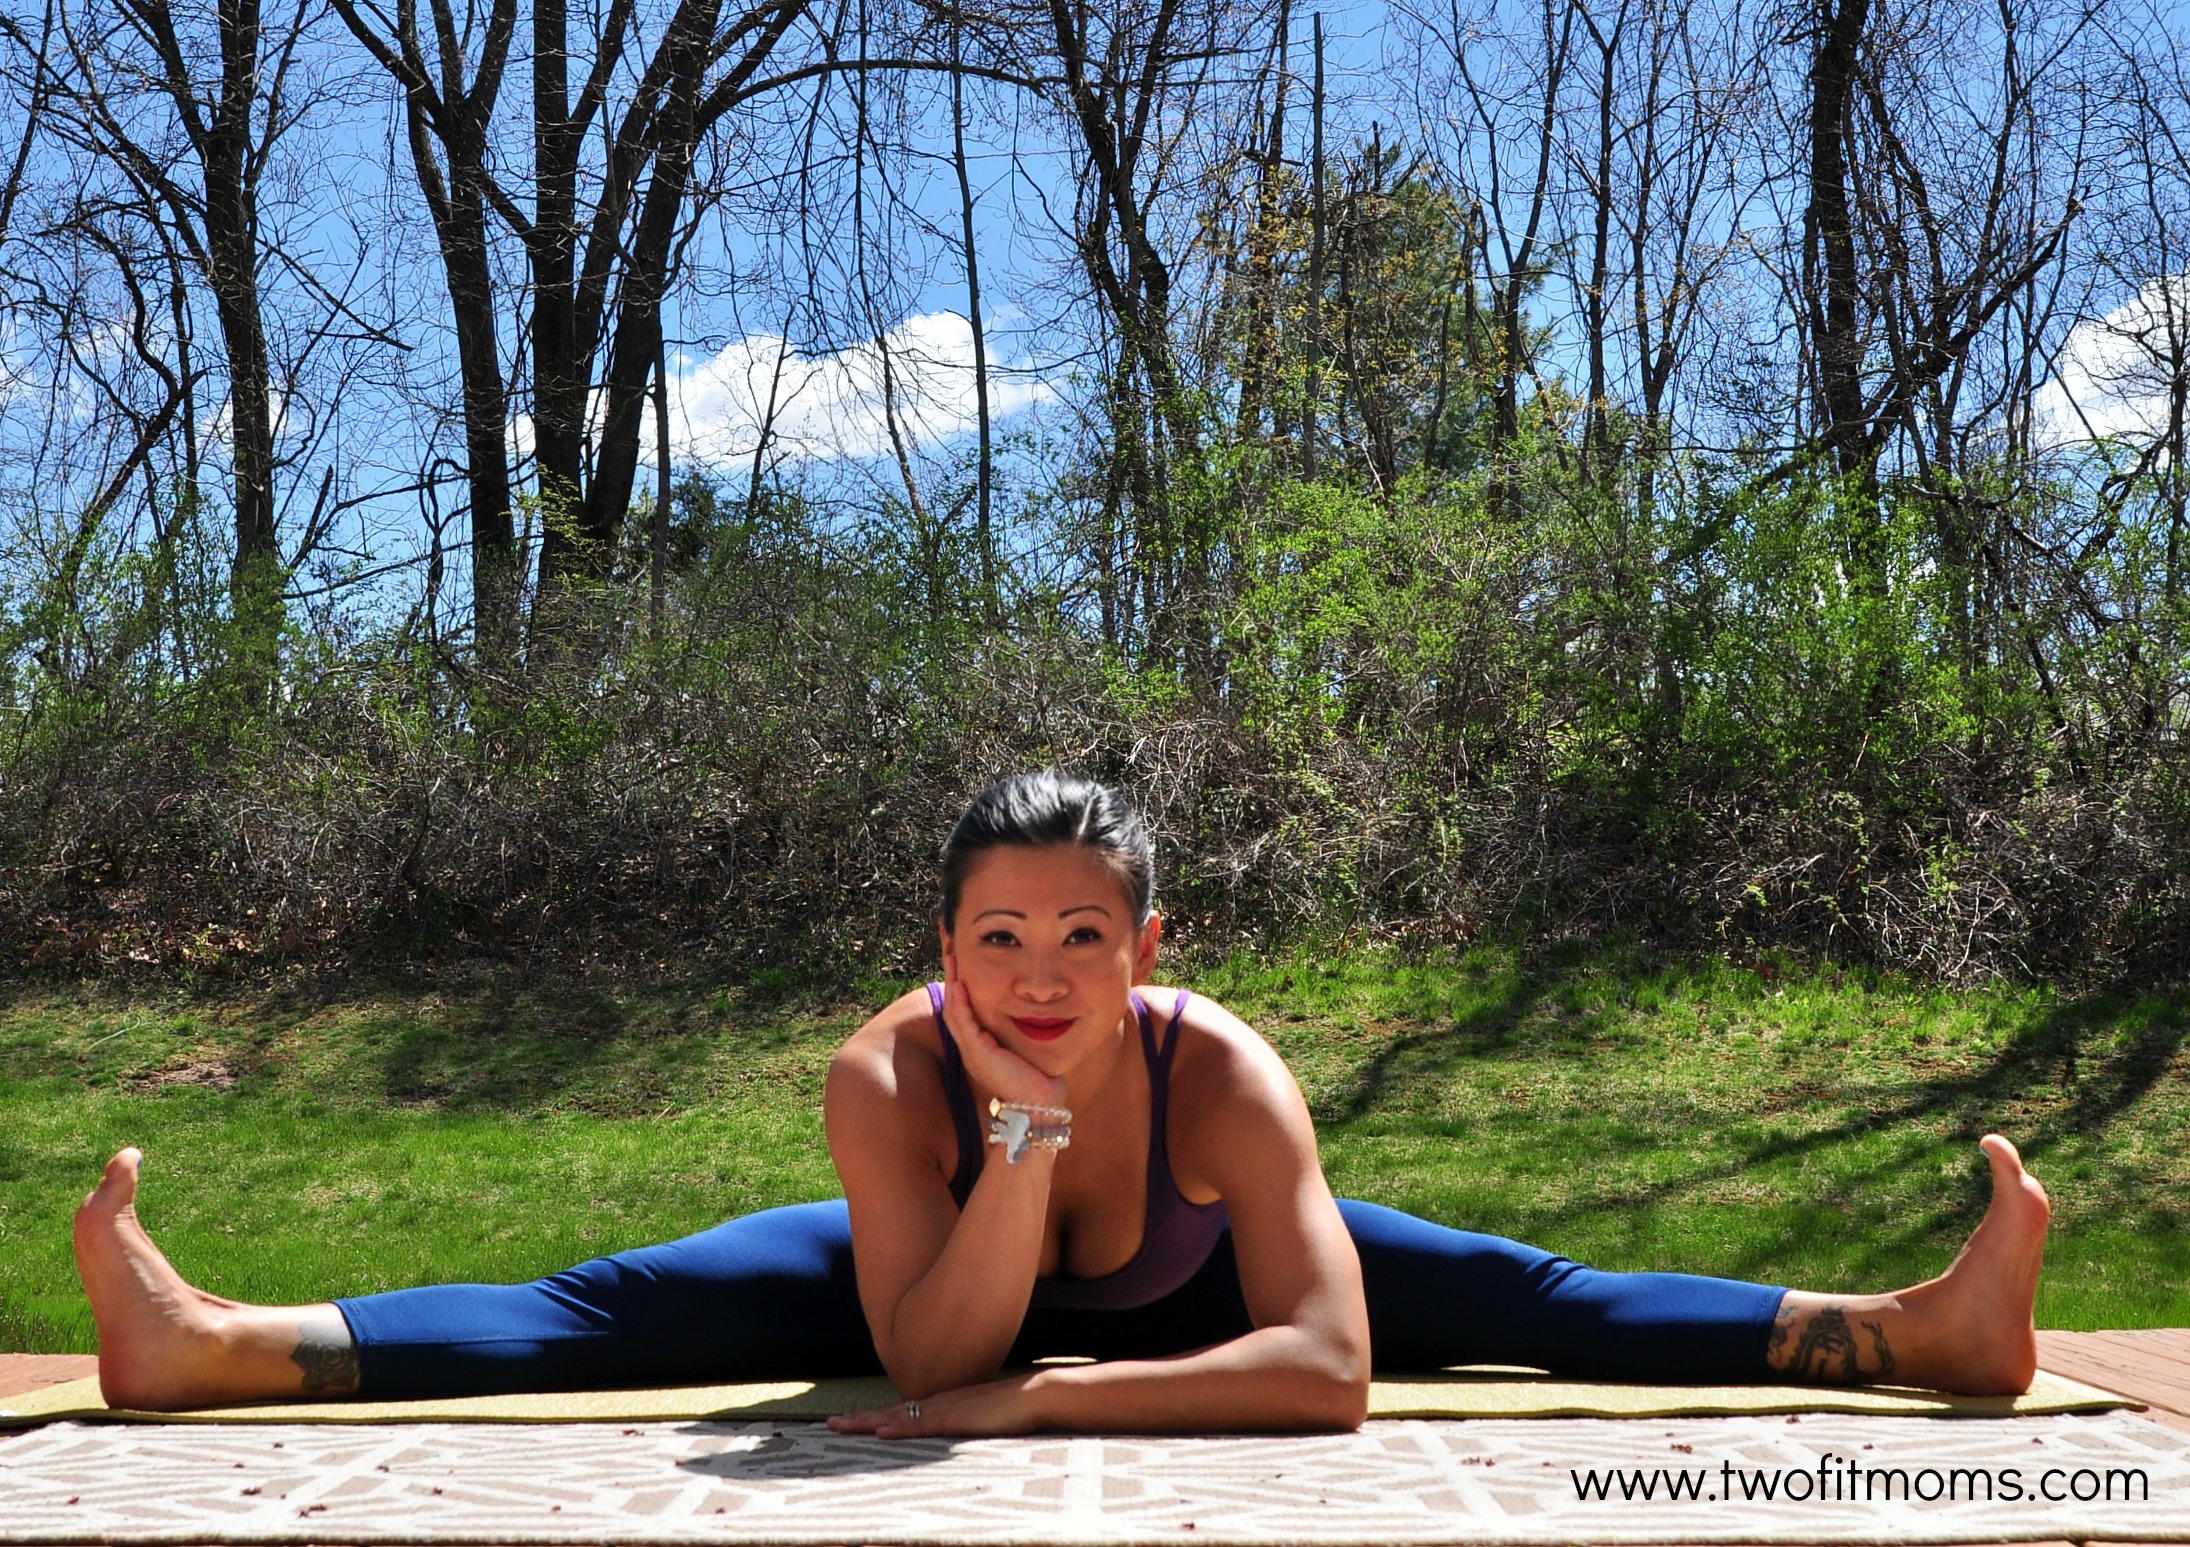
    Spring is a season characterized by rebirth, renewal and growth.springtimeflowforig 
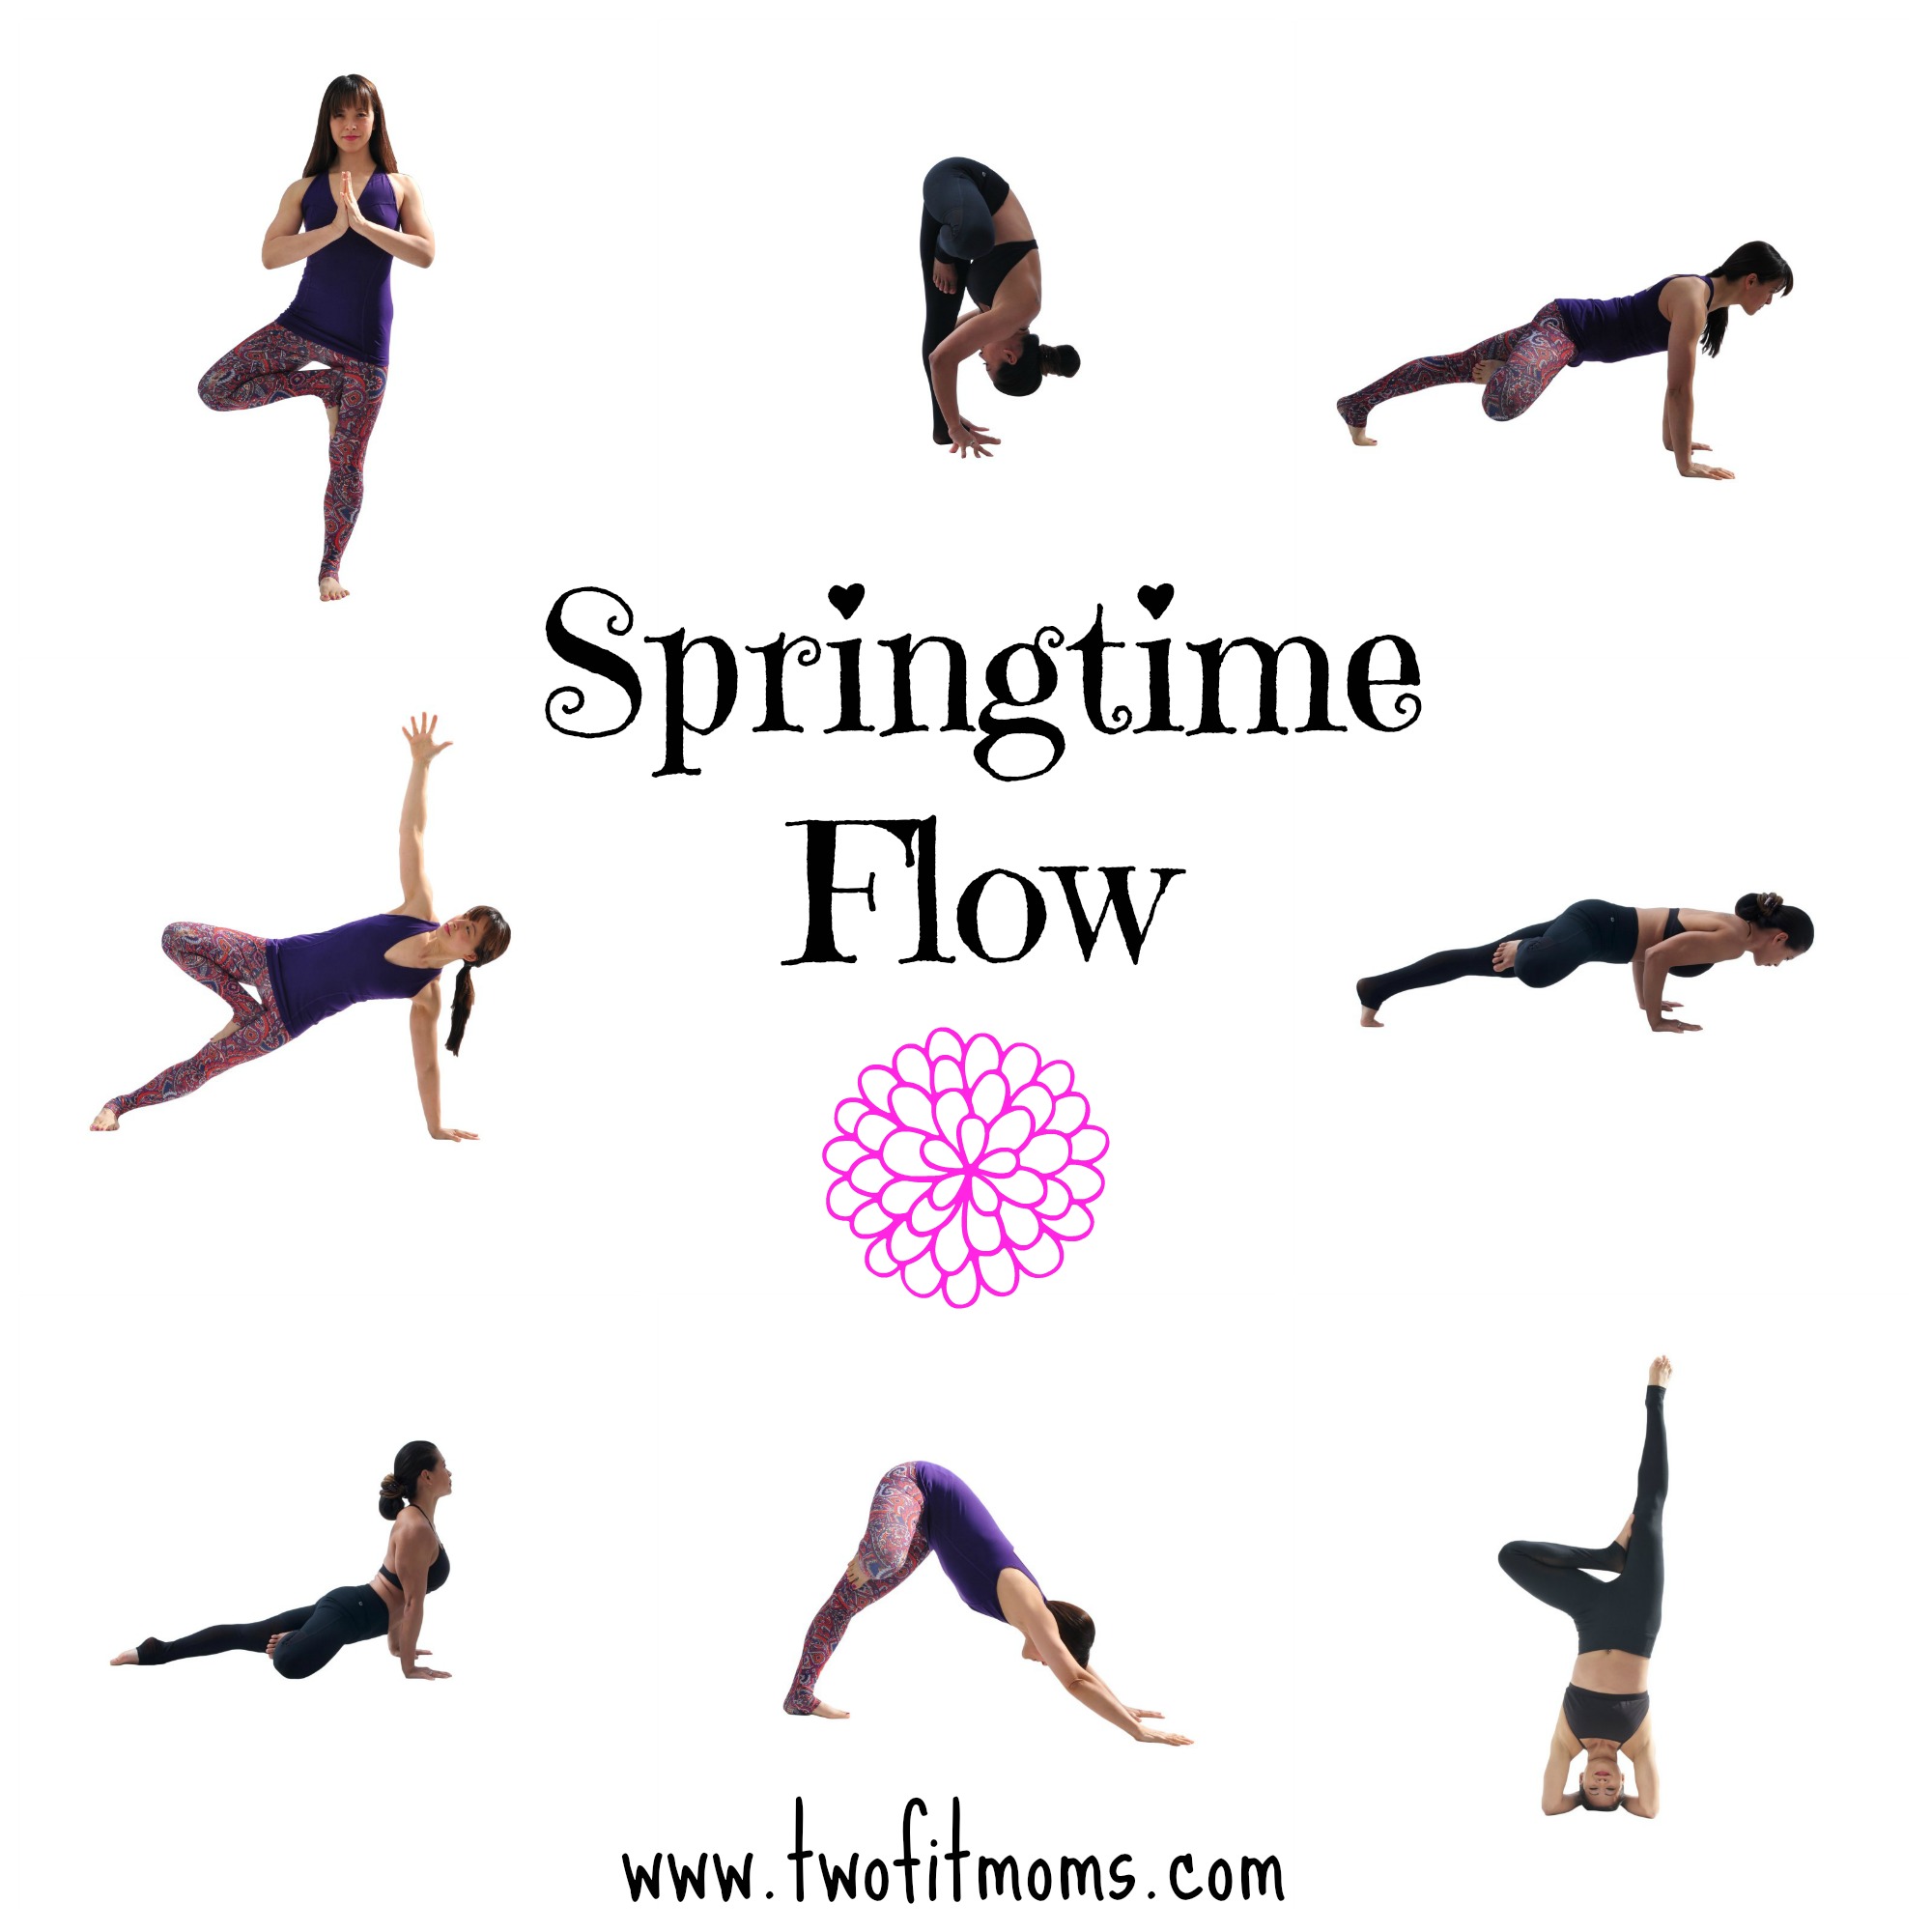
Many of us are looking forward to longer, lighter evenings and the uplifting energy of Spring. To celebrate the season (and to help you out of bed before the sun has risen), we are putting a fresh spin on a traditional sequence. Each pose within the sequence becomes a hybrid — and a hip opener — by keeping the legs in tree pose. Challenge your balance and flexibility by practicing this variation of Sun Salutation that pays homage to blooming trees and fresh routine. Remember to practice the sequence on both sides of your body, and breathe deeply through each pose.
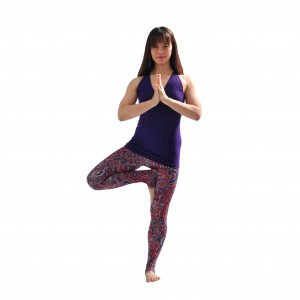
    1. Tree Pose

    Start in Mountain Pose at the back of your mat. Toes are spread, spine is lengthening towards the ground. Slowly shift your weight into your left foot and pick up your right foot. With the help of your right hand, place the sole of the right foot onto the inner left thigh. Find stability in this pose by pressing your right foot firmly into your left thigh, and your left thigh firmly into the sole of your right foot. Keep your right knee pressing out. Bring your hands together at heart center. Take 5 deep breaths, then on your next inhale sweep your hands up towards the sky.

    Tree Pose


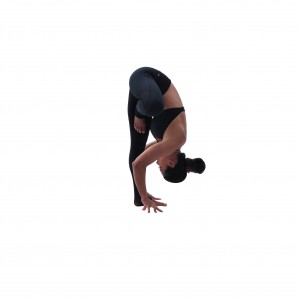
    2. Standing Forward Fold with Tree Legs

    On an exhale, swan dive down into this Standing Forward Fold variation. Continue to keep your right knee open to the side. Feel the hamstring stretch along the back of your left leg and the stretch in your right hip. Stay here for 3-5 breaths.

    Standing Forward Fold

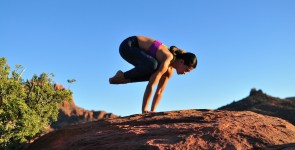
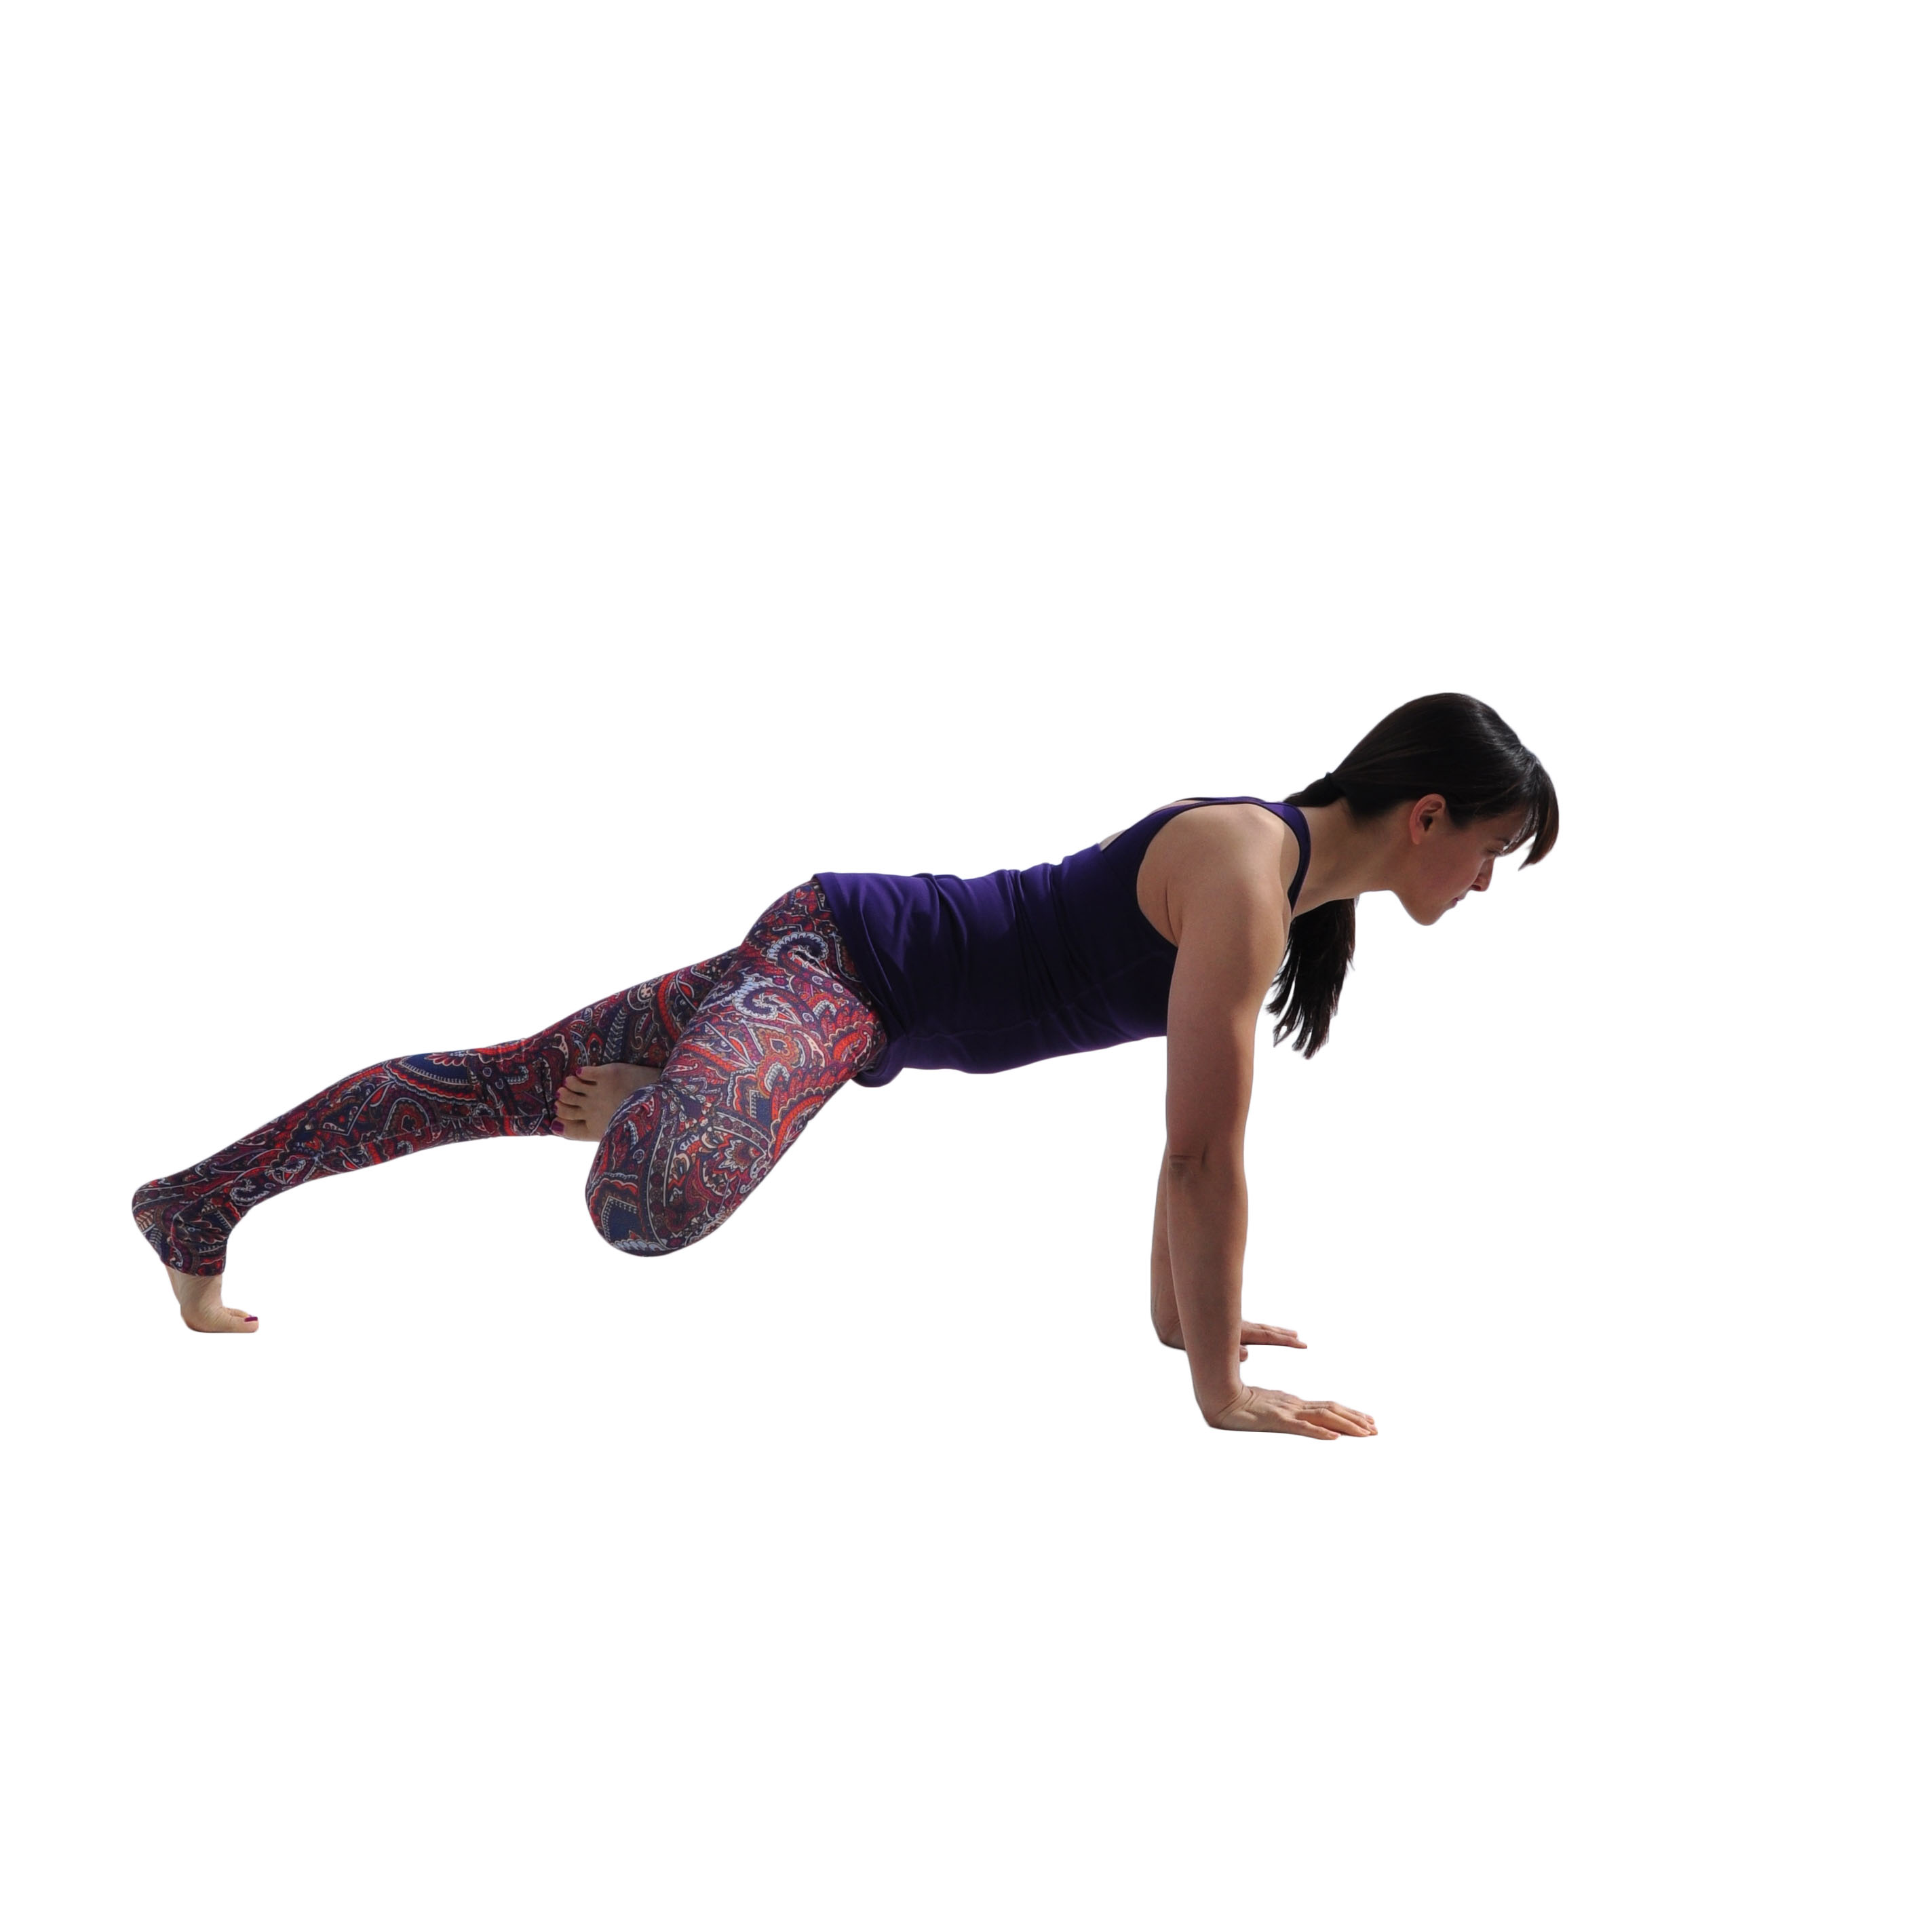
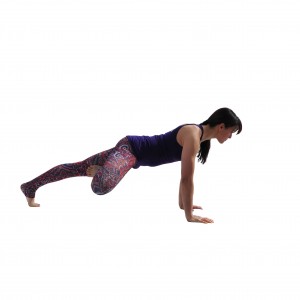
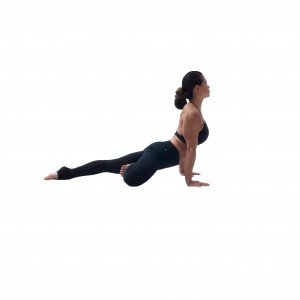
    3. High Plank Pose with Tree Legs

    Rather than stepping or jumping back into Plank Pose, as you would in a traditional Sun Salutation, on an exhale, slowly walk yourself out into Plank Pose with Tree Legs.  Continue pressing your right foot firmly into your left thigh, and try to make a straight line with your body from head to heel. Stay here for 3-5 breaths.

    YJMarch3

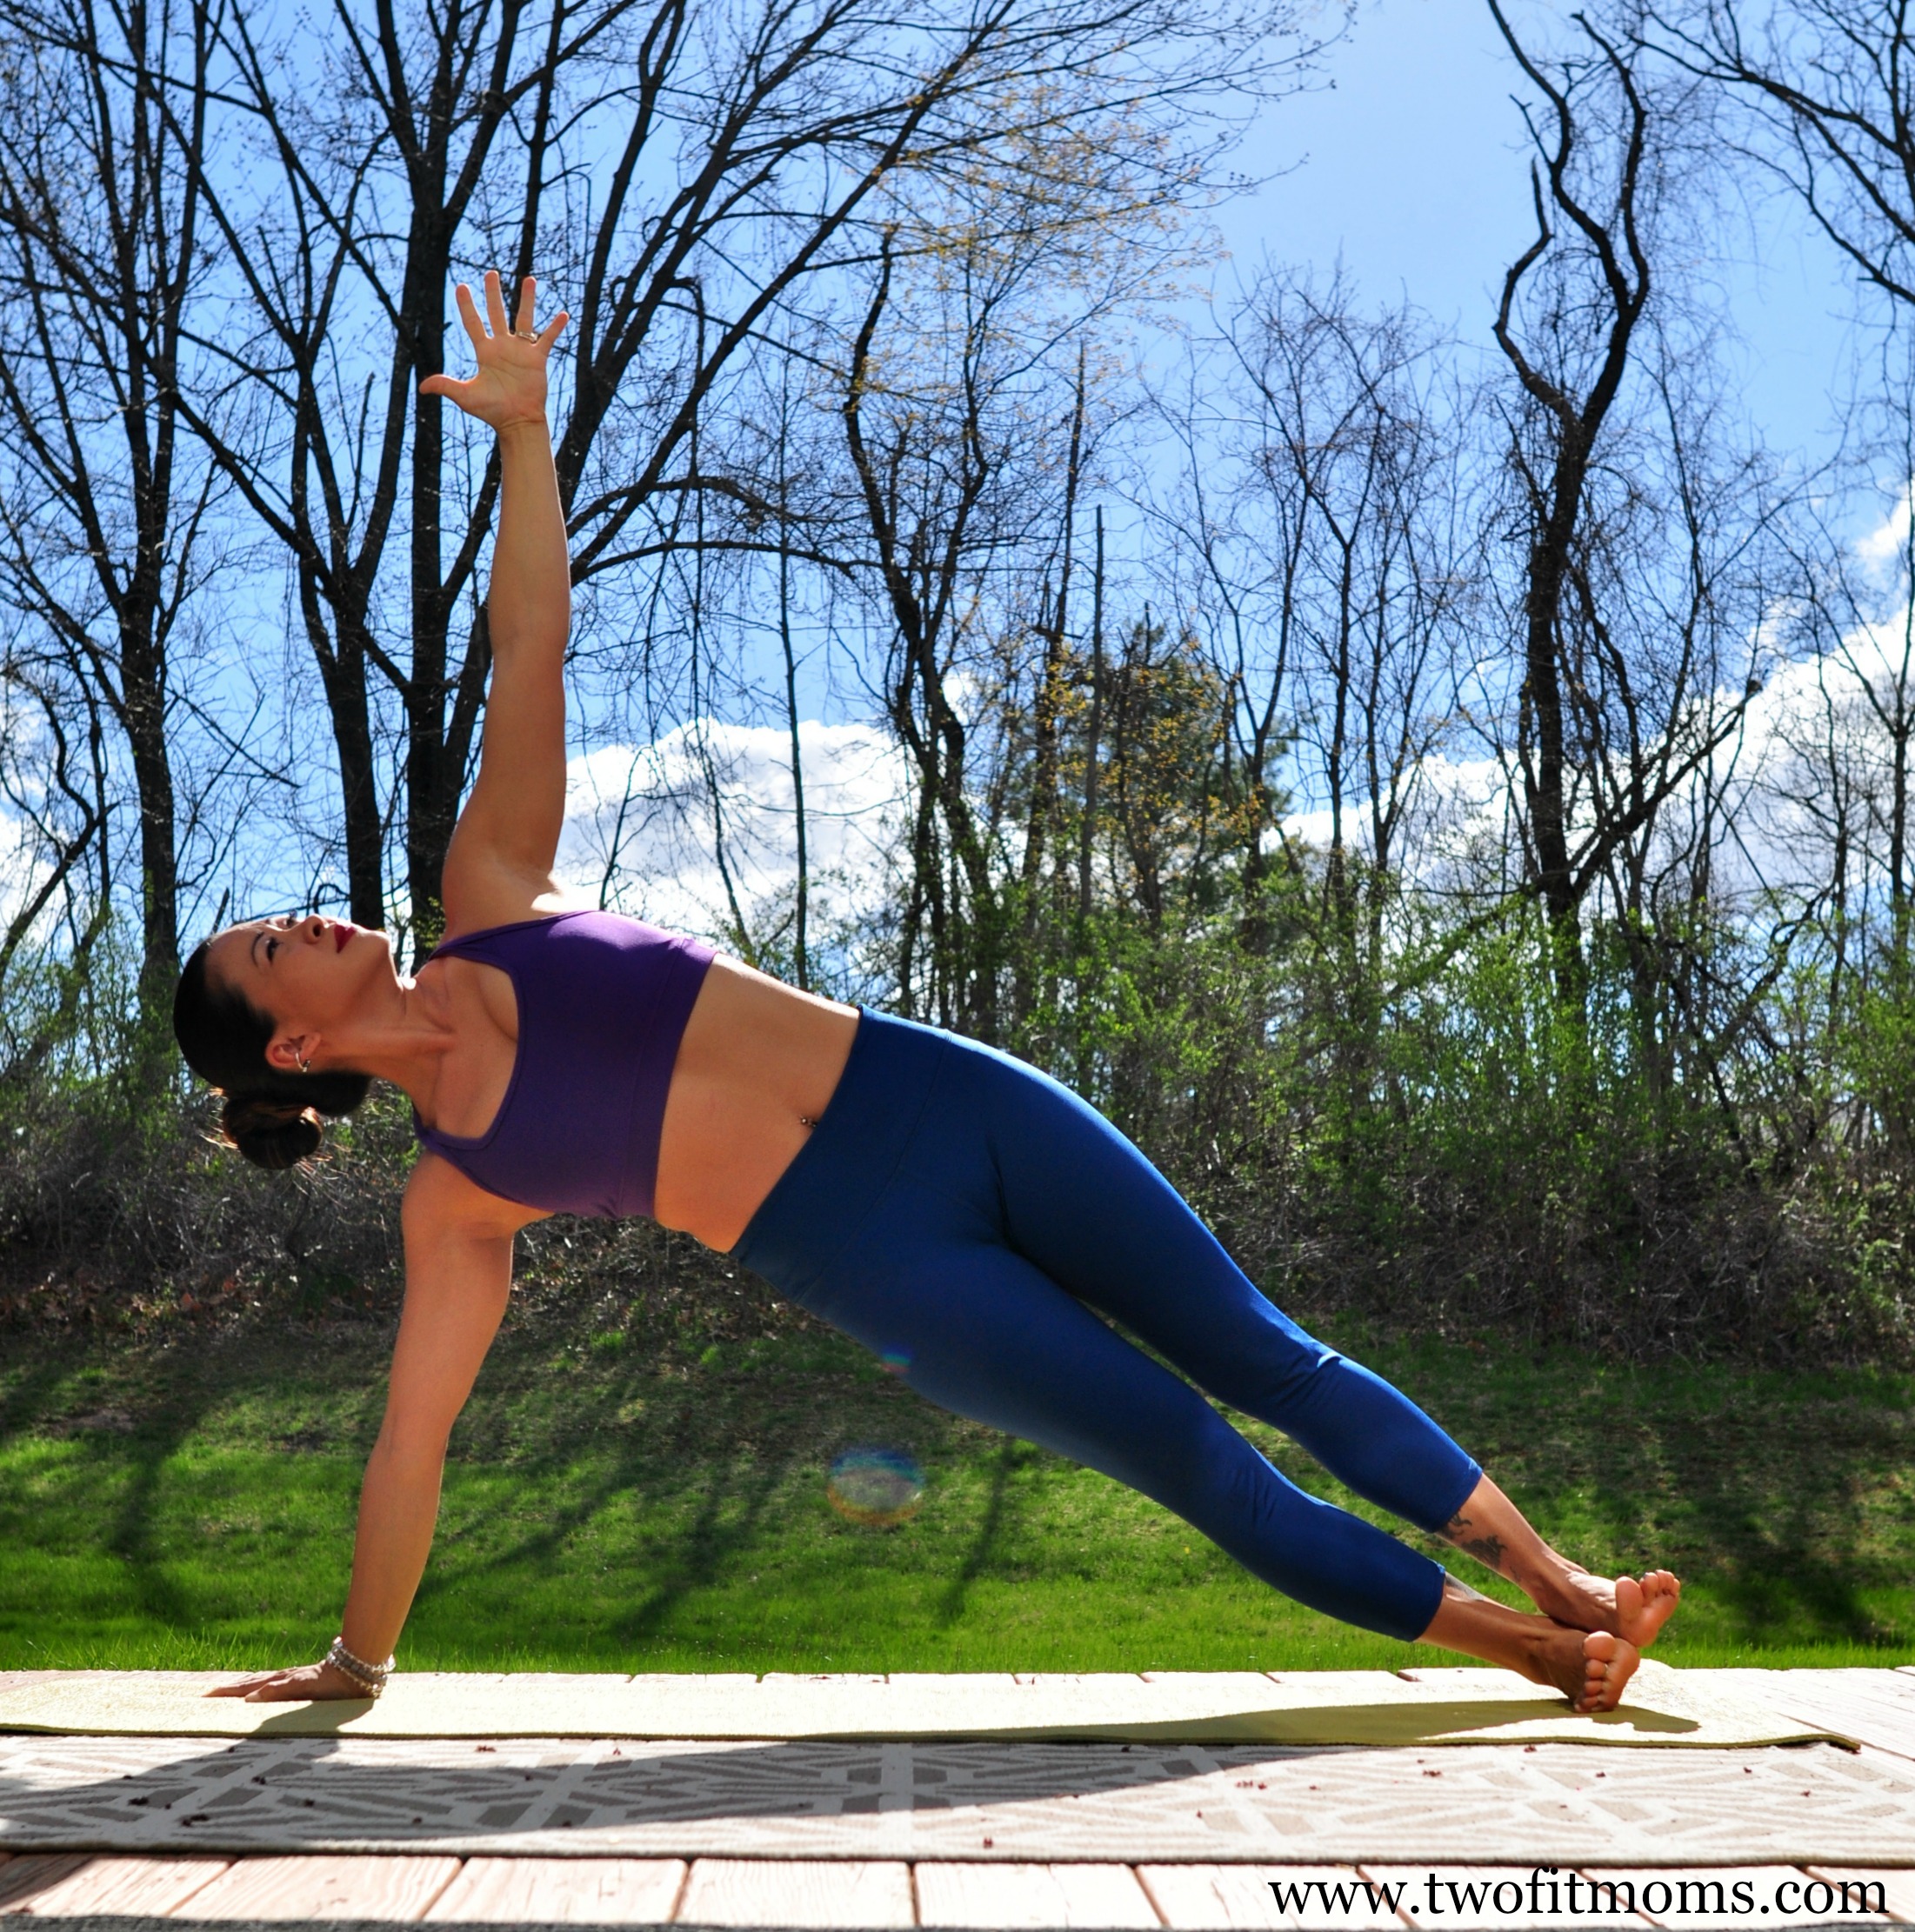
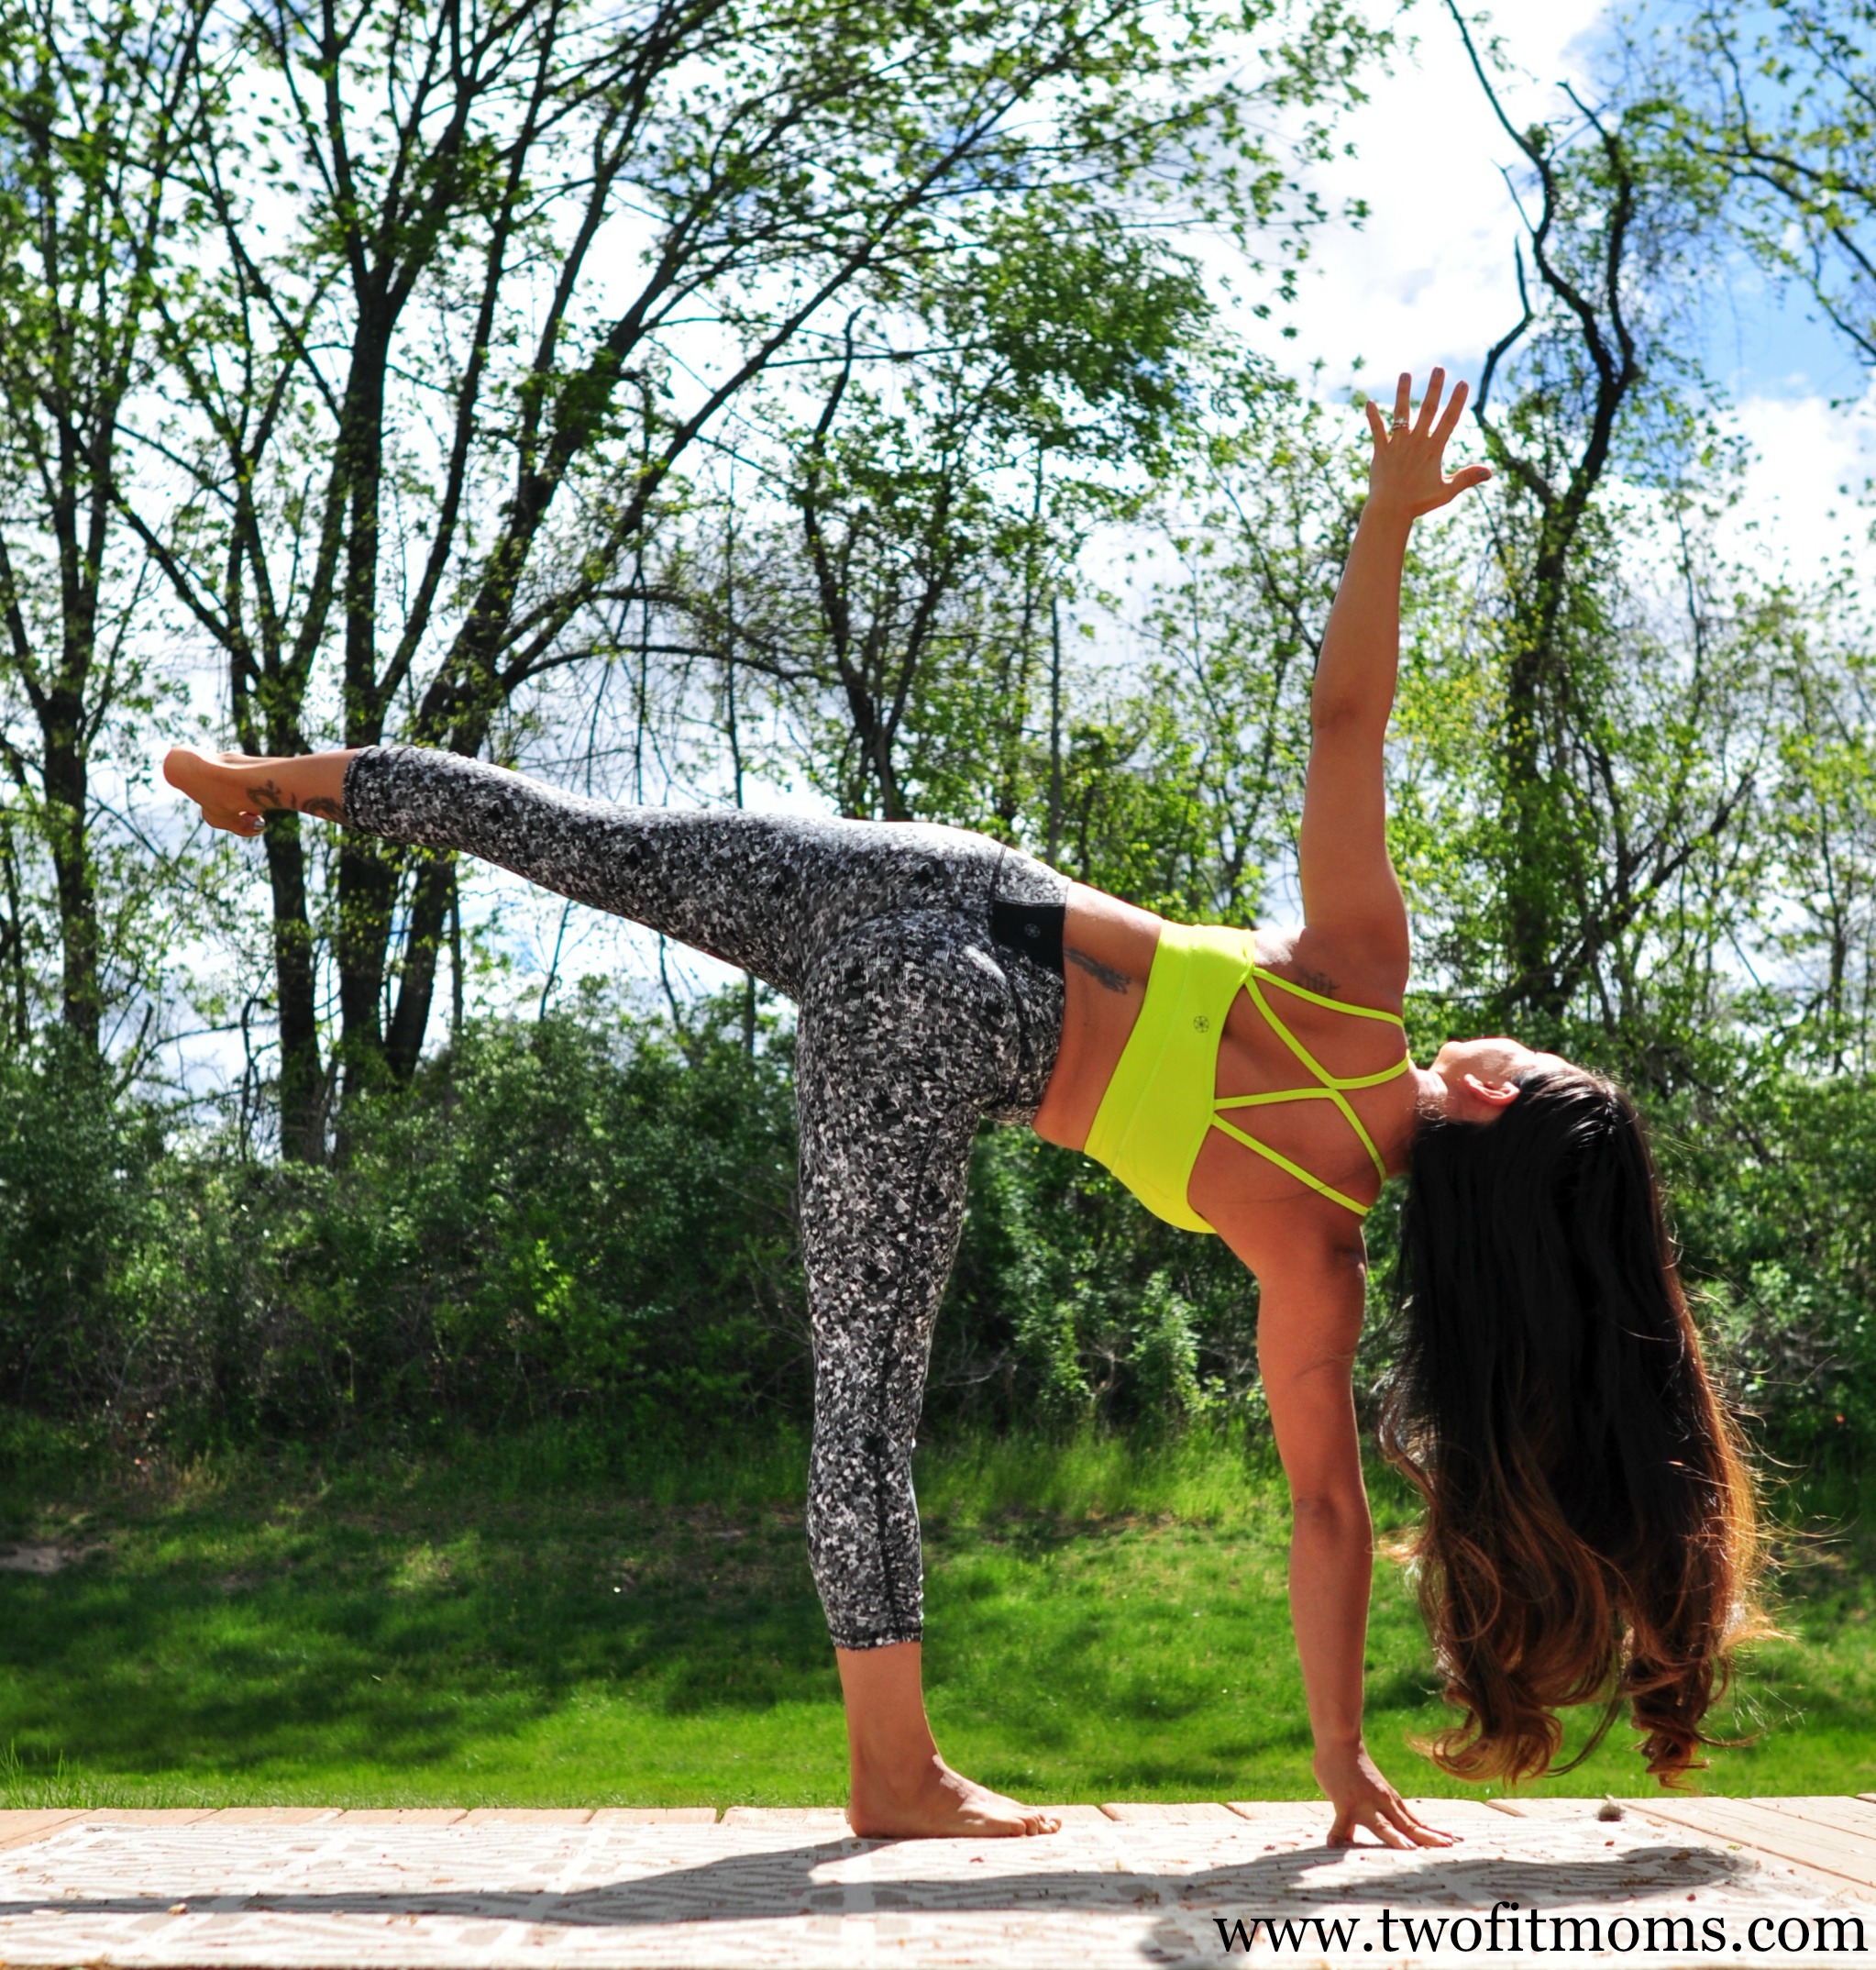
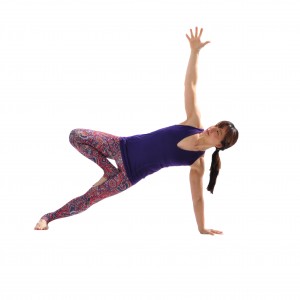
    4. Side Plank Pose with Tree Legs

    Before moving into your Chaturanga Dandasana, which is usually the next pose in the Sun Salutation, take a short detour into Side Plank Pose with Tree Legs. On an inhale, shift your weight onto your left hand, roll onto the outer edge of the left foot and pop up onto your right fingertips. Find your balance here. On the exhale, slowly extend your right hand up towards the sky. Keep your hips lifting as you continue to root down through your left hand. Look up at your right hand for an added challenge.  Stay here for 3-5 breaths and return into your High Plank Pose with Tree Legs.

    YJMarch4


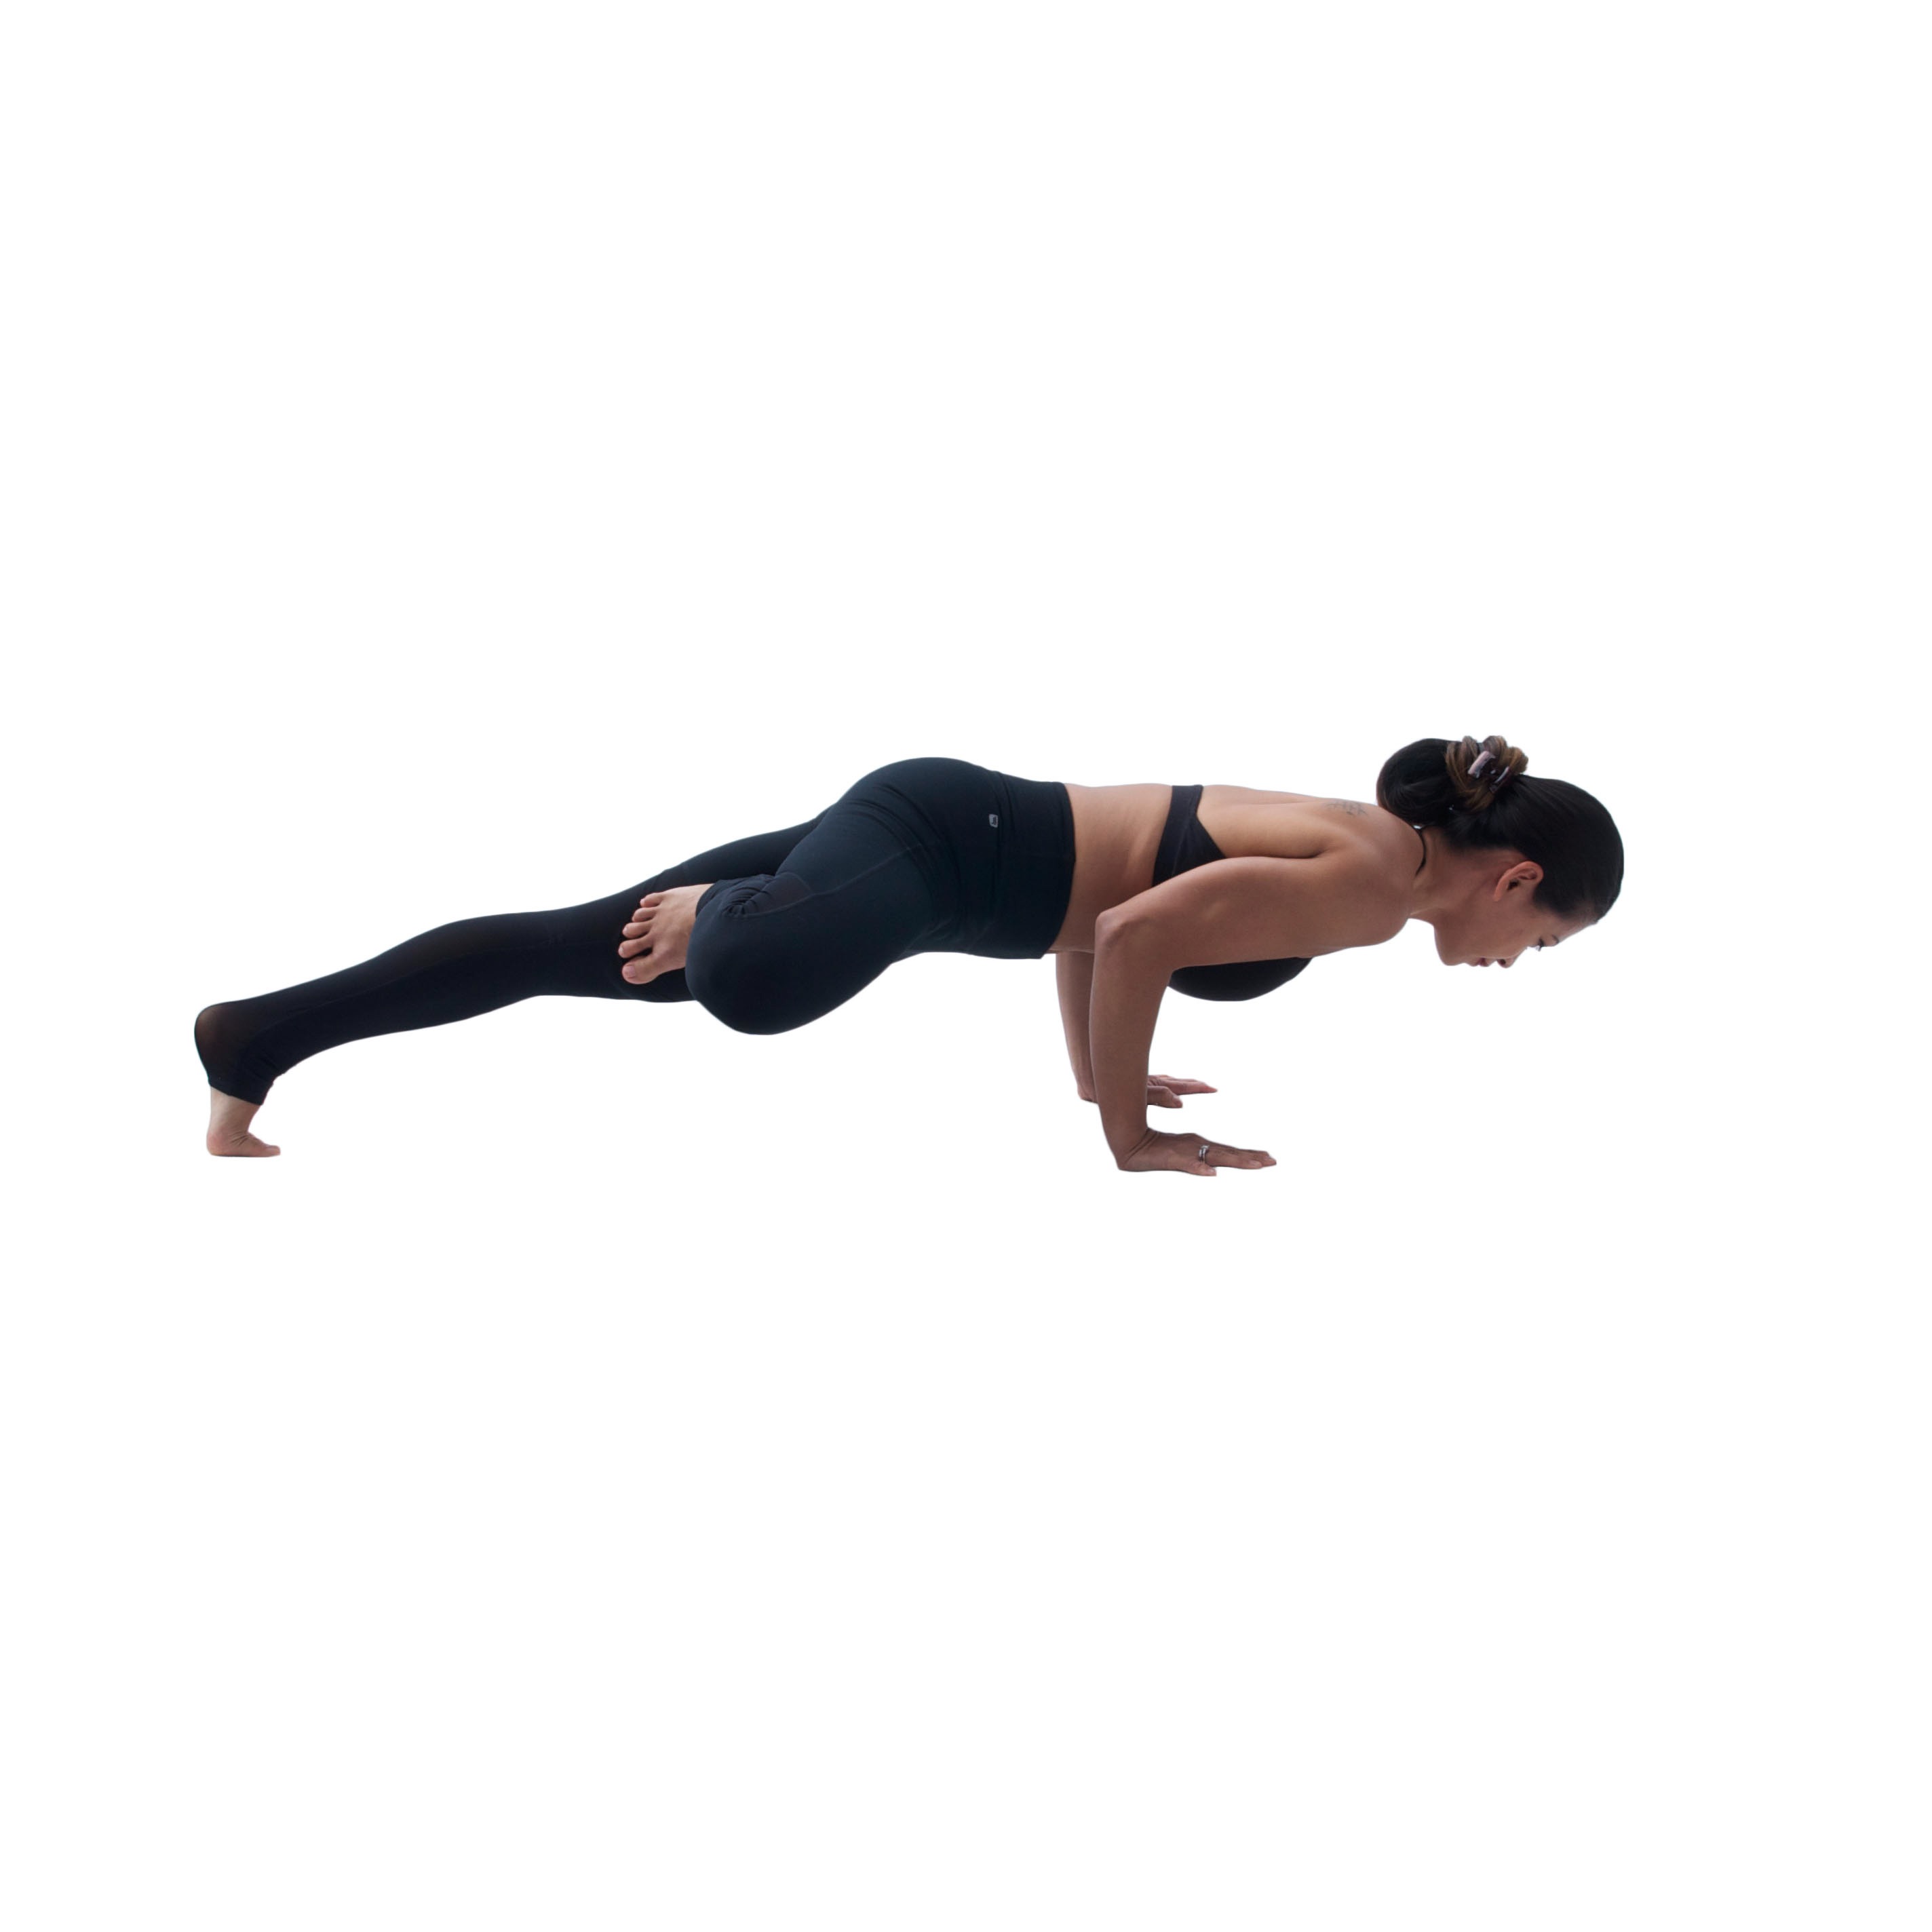
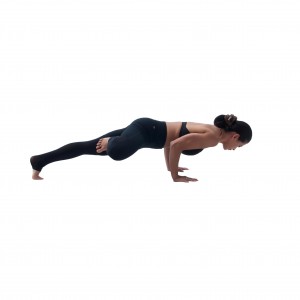
    5. Low Plank Pose with Tree Legs

    From High Plank Pose, slowly shift slightly forward. On an exhale, bend your elbows coming into Low Plank Pose (or Chaturanga Dandasana) with Tree Legs. Hug your elbows in and engage your core to maintain stability.

    YJMarch5

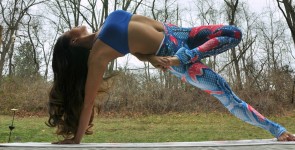
    6. Upward Facing Dog with Tree Legs

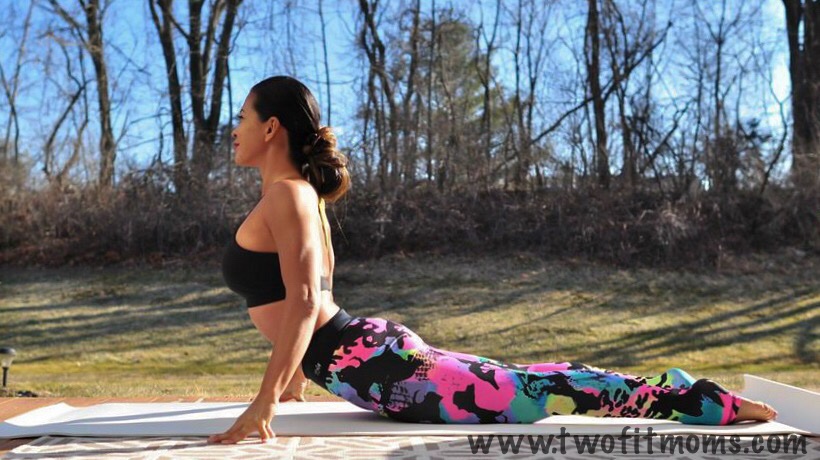
    On an inhale, roll over the left toes and come into Upward Facing Dog with Tree Legs. Feel free to modify by taking the Cobra Pose variation with hips on the ground. Press into your hands, lift your heart and relax your shoulders. Take 3-5 breaths.

    YJMarch6

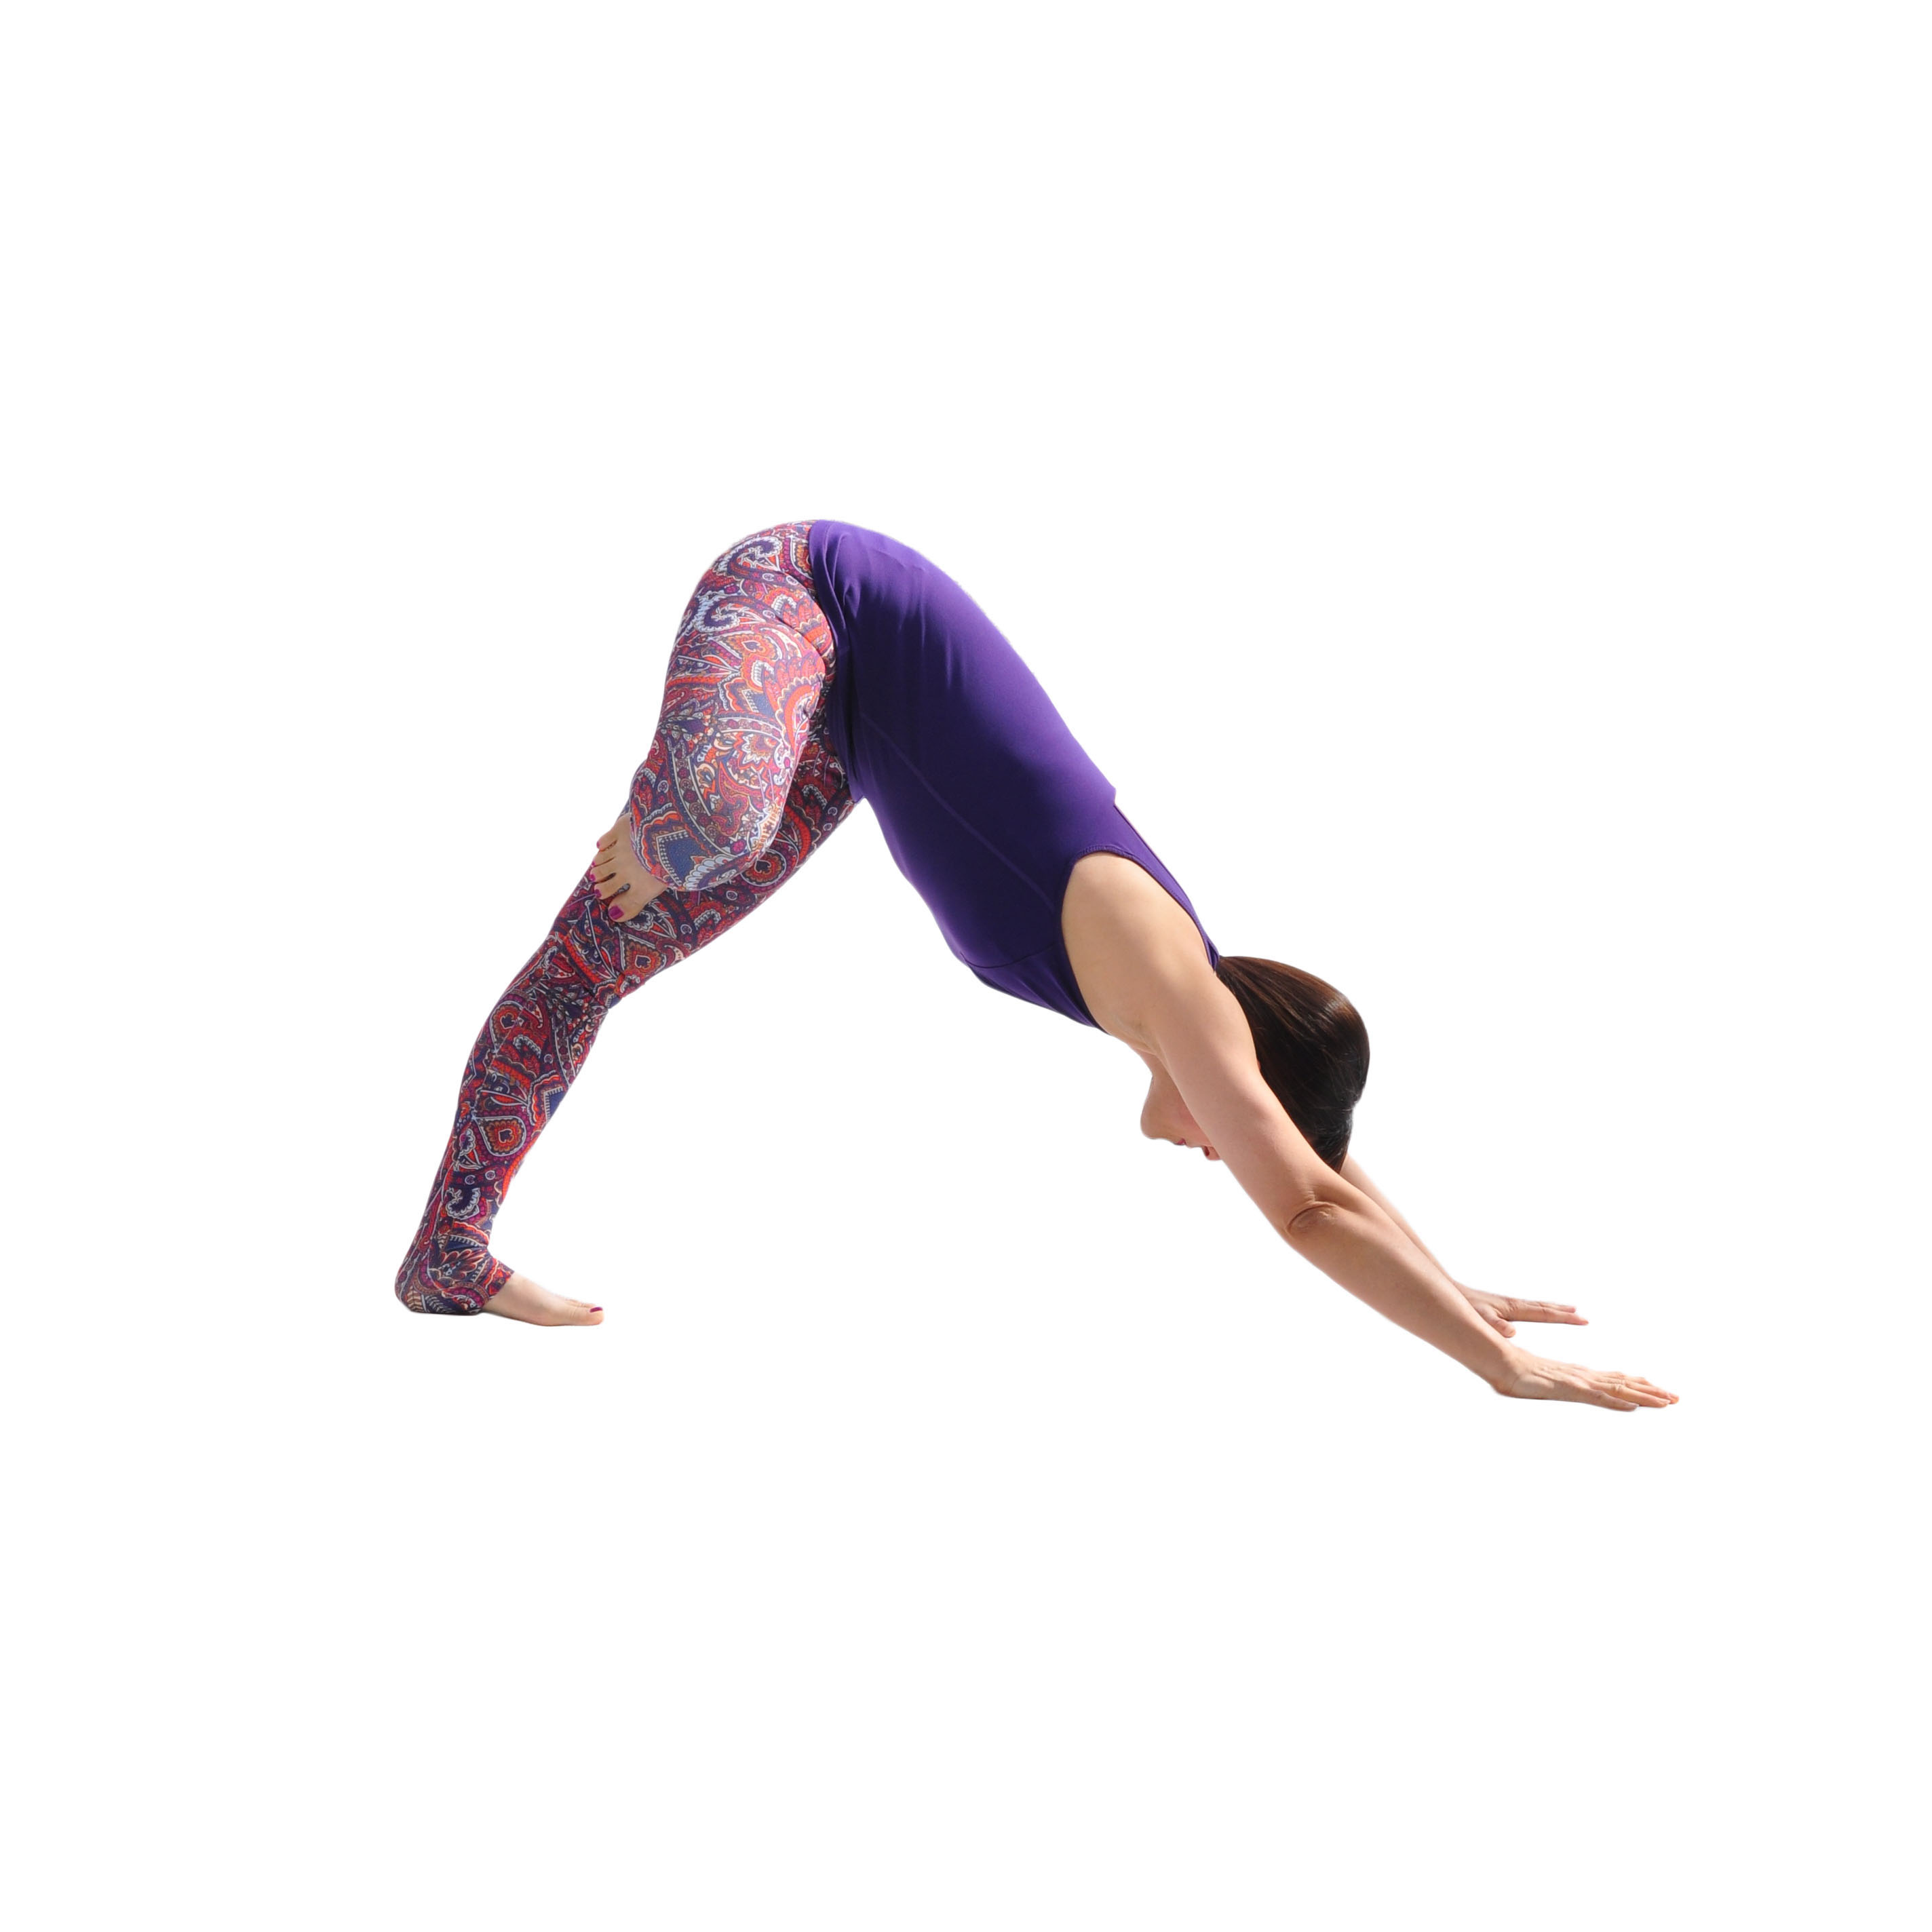
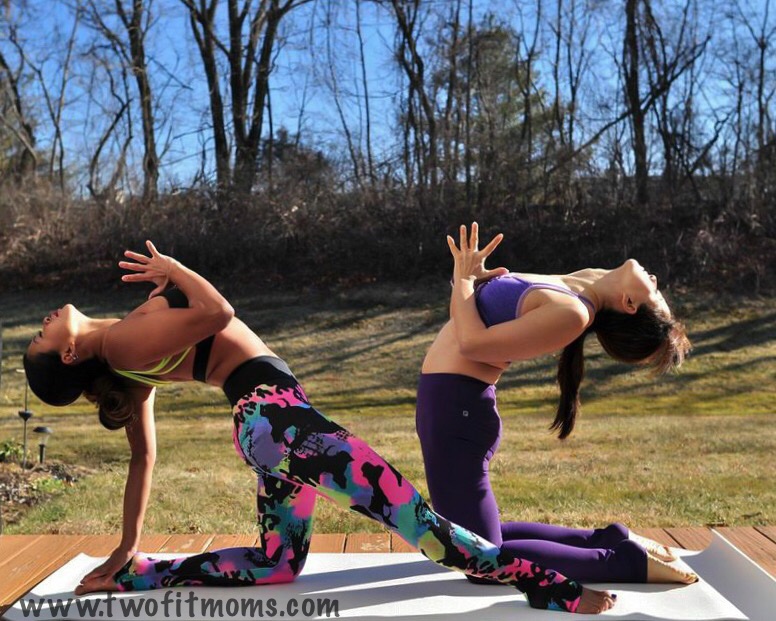
    7. Downward Facing Dog with Tree Legs

    On an exhale, roll back over your left toes and come into your Downward Facing Dog with Tree Legs. Spread your fingers wide, relax your shoulders and engage your belly. Stay here and hold for 5 deep breaths. Complete your Sun Salutation by walking your hands back to your left foot and then slowly lifting back up into Tree Pose! Release the right foot, shake it out and repeat on the other side.

    YJMarch7

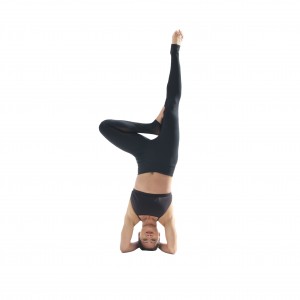
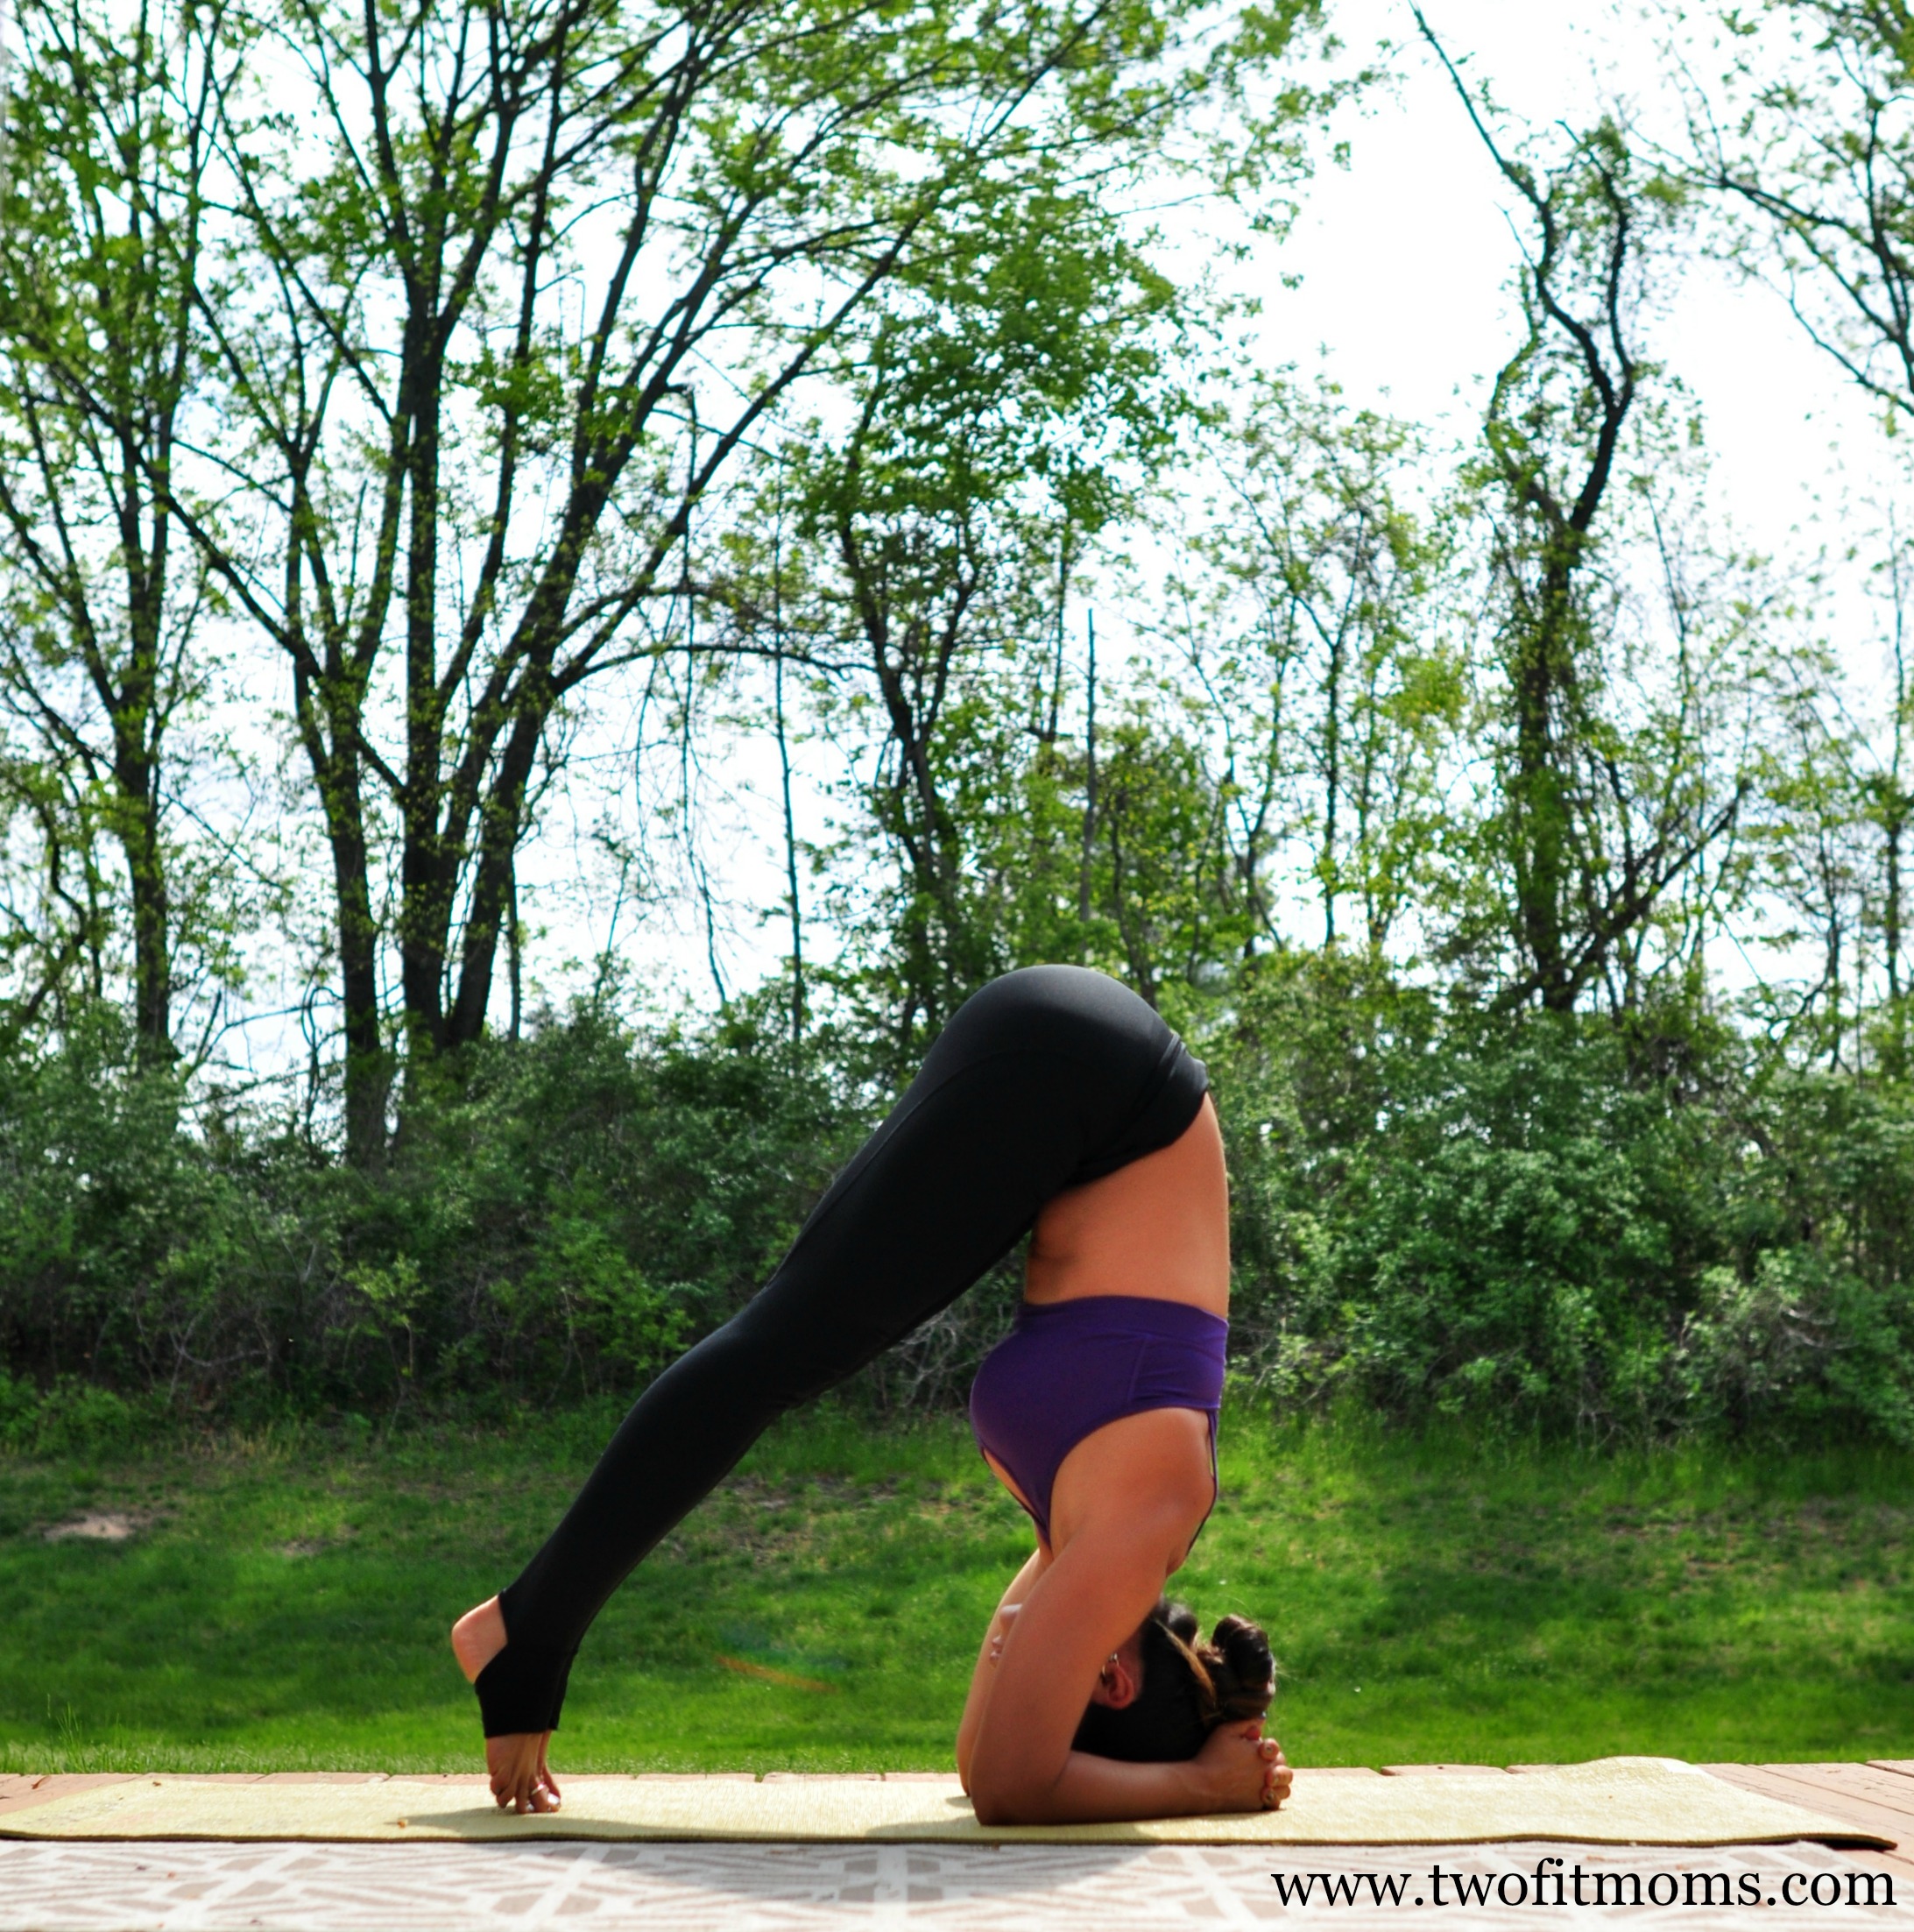
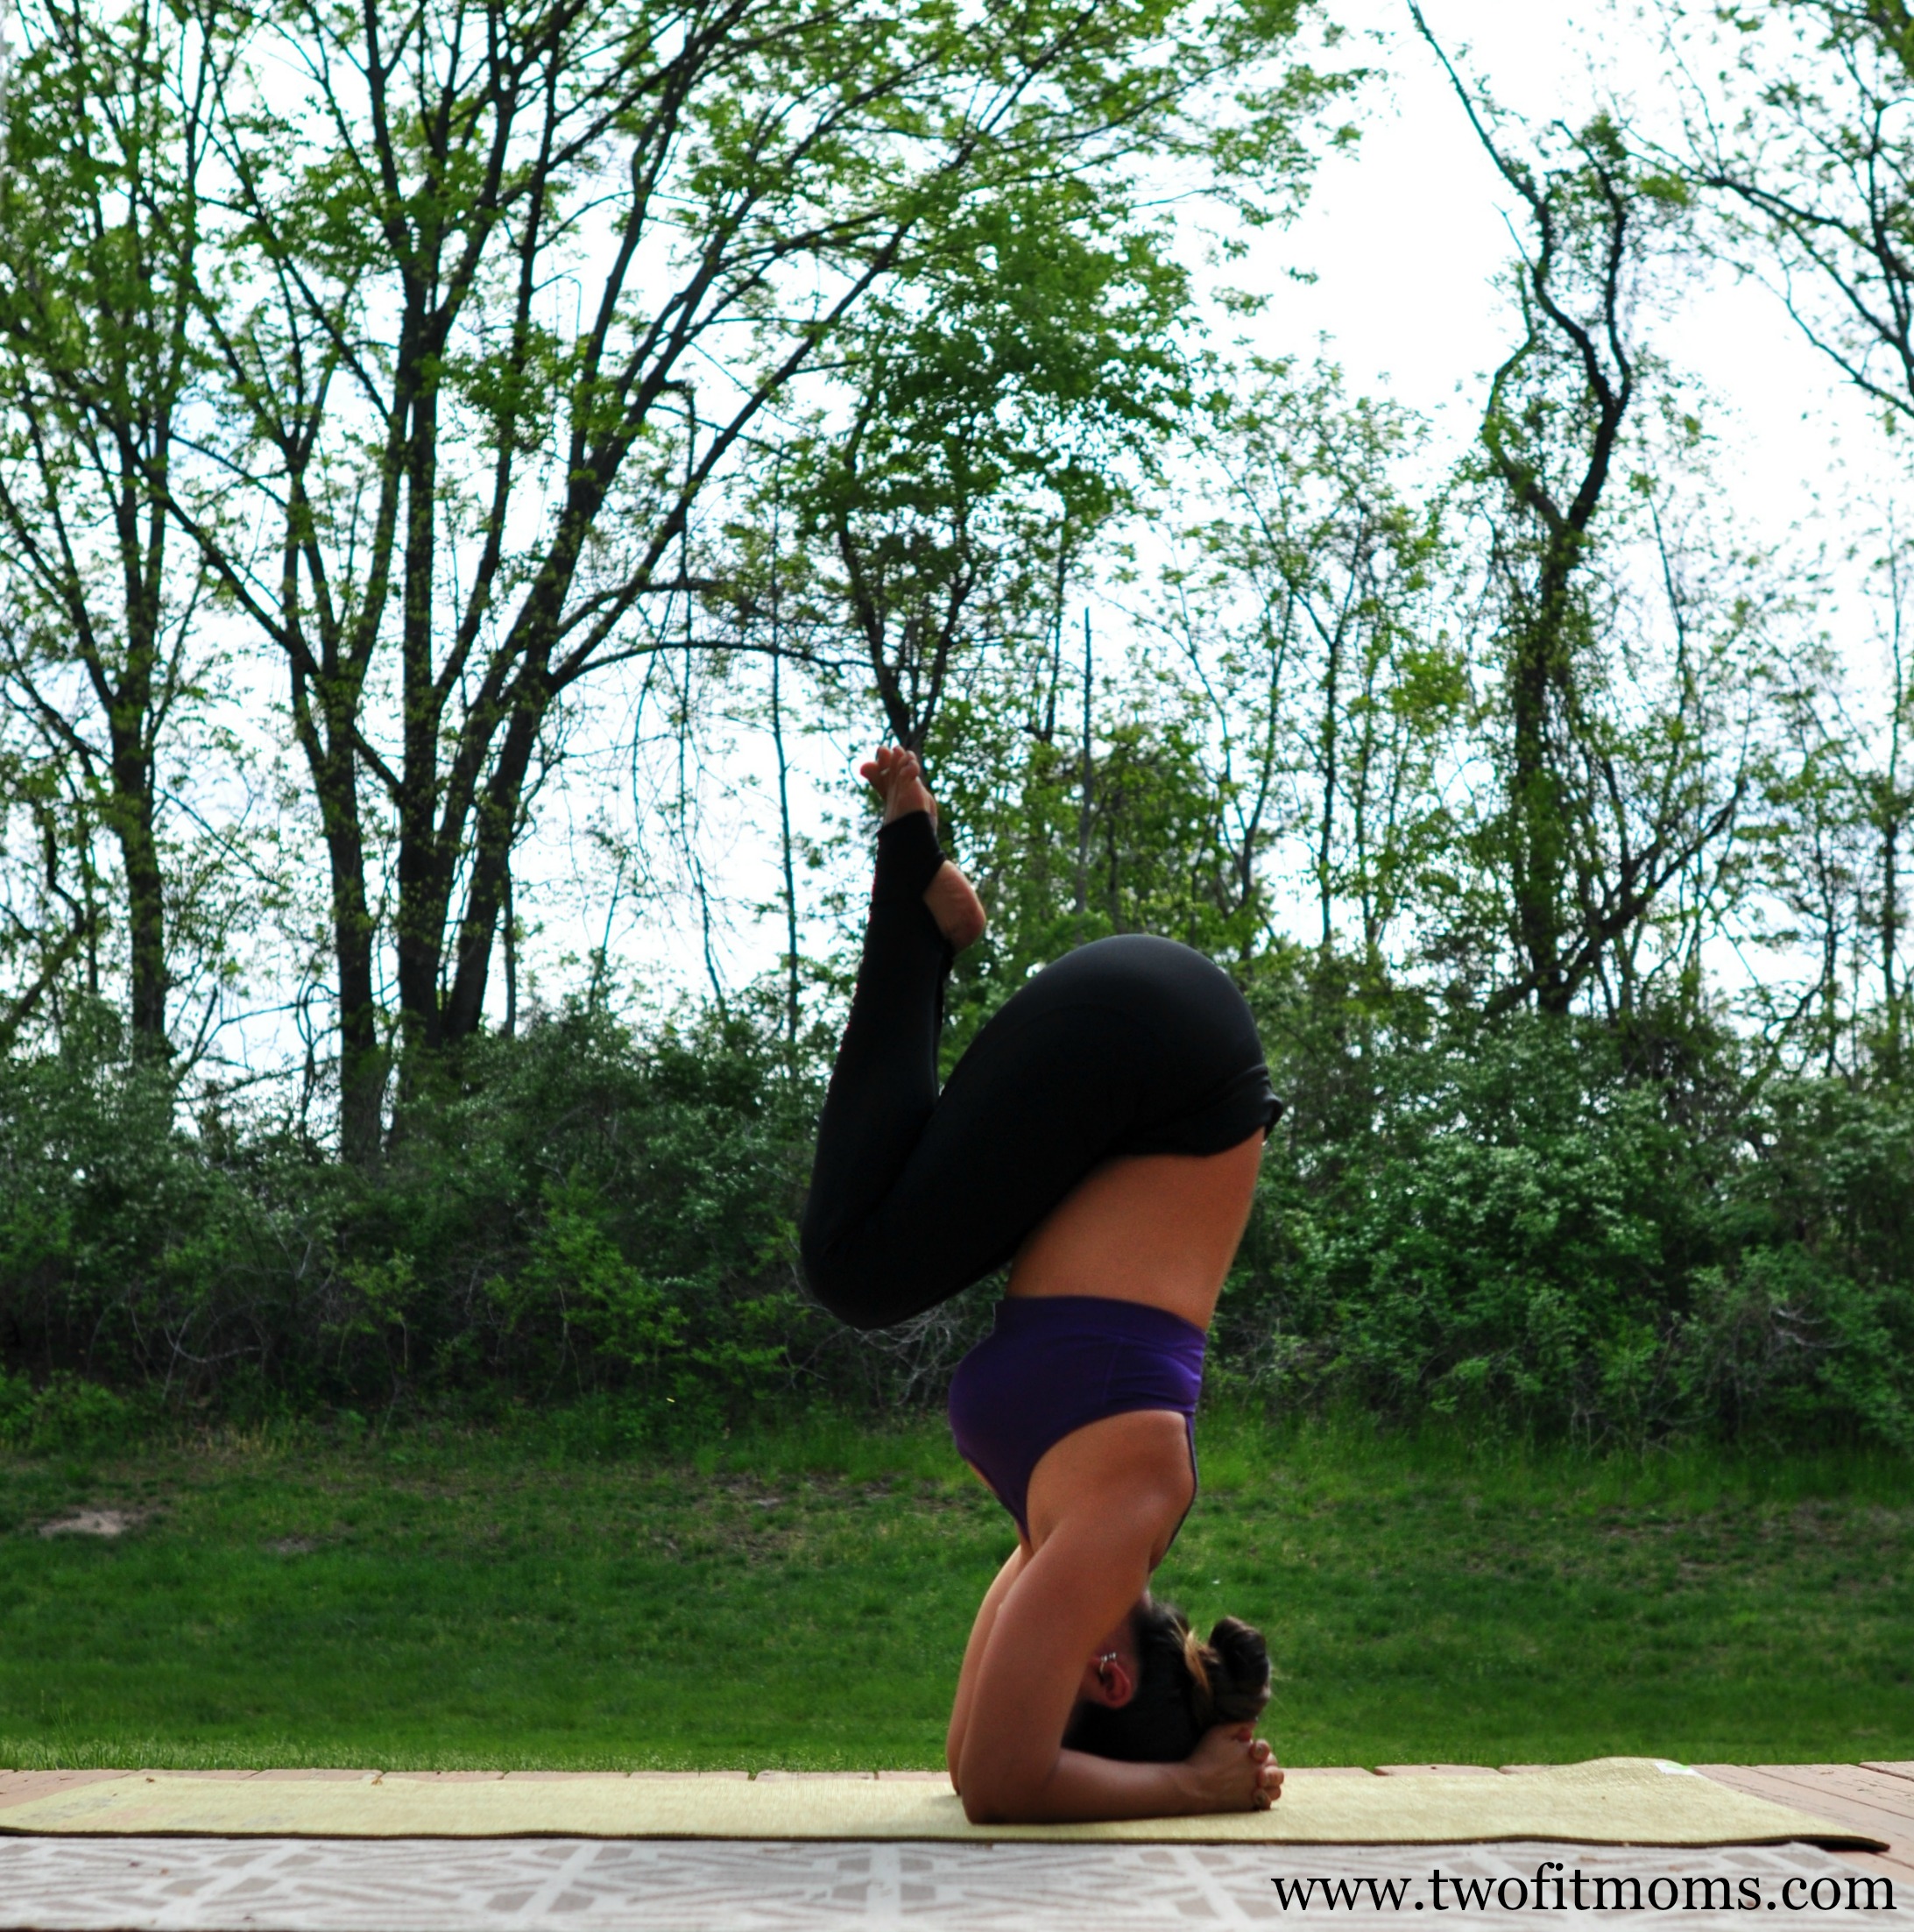
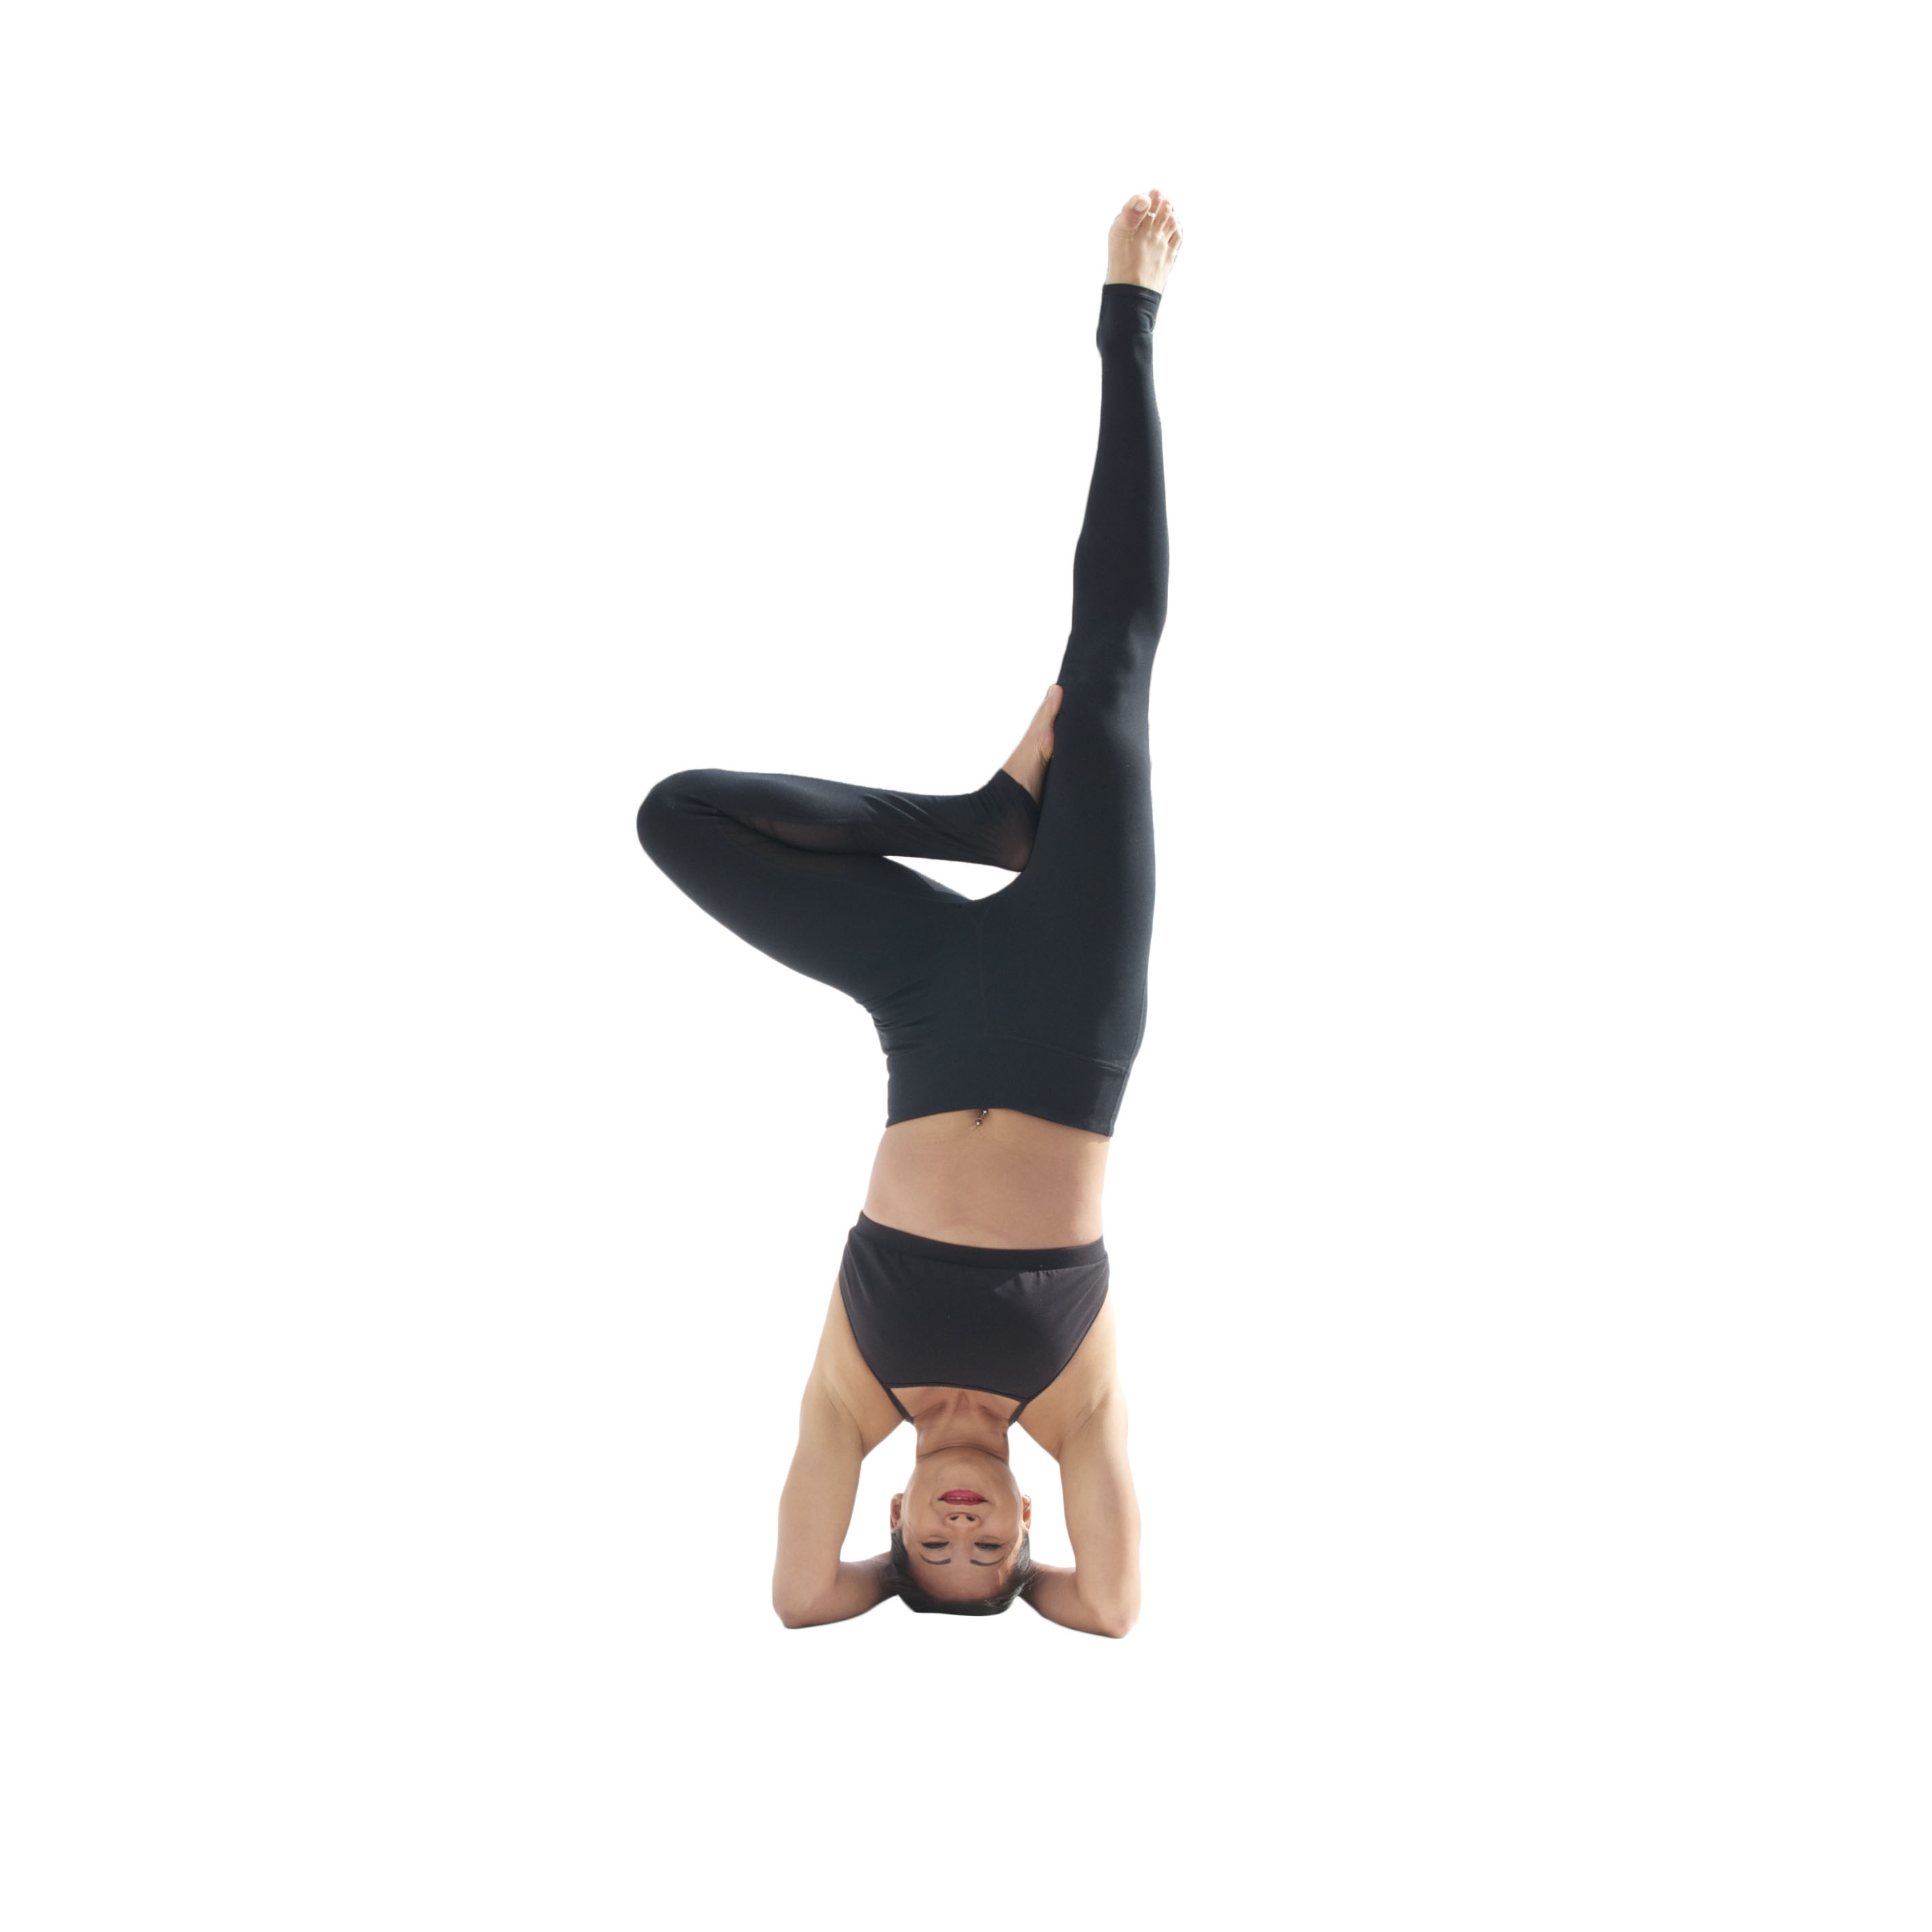
    8. Optional: Supported Headstand with Tree Legs

    For an added challenge, feel free to add an inversion at the end of your Sun Salutation practice. Keep your elbows hugging in, neck long, belly engaged and legs energized! To maintain our tree theme, slowly bend on knee and bring the sole of the foot to the inside of the other thigh, then switch! Remember to continue breathing. Take a well deserved Child’s Pose after you come down.

    YJMarch8

  • Bali-Inspired Ginger Tea

    Bali-Inspired Ginger Tea

    As I sit here on my couch in New Jersey, thinking about my recent two-week trip to Bali, there are many wonderful moments that spring into my mind…The sights, the smells, the smiles of the Balinese people, the crazy drivers, the beautiful landscape and the food! The one thing that stands out though is the Ginger Tea. After my first sip, I remember thinking, I need to recreate this at home!

    DSC_1269TFM

    The combination of ginger and cayenne pepper has numerous benefits…They both reduce nausea, pain and inflammation, help prevent the common cold and also aid in digestion. Give it a try!

    Ingredients:

    1 tea bag (Any kind that you like!  I use Lipton brand)
    1 inch of fresh ginger root
    1/8 teaspoon cayenne pepper (More or less depending on how much heat you like)
    1 tablespoon agave (More or less depending on your taste!)
    8-10 oz water

    Bring the water to a boil. Peel the ginger and cut into small chunks. Put the ginger into the mug along with a tea bag, cayenne pepper and agave. Pour the boiling water into the mug, and let it steep for a good 3-4 minutes. You can strain the tea if you like or simply enjoy!

  • Open Your Heart

    Open Your Heart

    February is all about opening up the HEART! So, try incorporating our favorite heart opening stretches and backbends into your practice this month.

    These six postures will open up your shoulders and your entire front body. In fact, they will leave you feeling stretched, energized and ready to tackle your day!

    Ready to get started? Grab a few blocks and a strap. As always, be mindful of your body, modify when necessary and remember to breathe. Try to hold each of these postures for at least 5-10 breaths.

    Reclined Heart Opener with Blocks

    Photo Feb 06, 9 54 39 PM

    Lie onto your mat with one block (at its lowest height) under your head like a pillow and a second block (at a higher height) between your shoulder blades. Relax your arms alongside your body and stay on the blocks for at least one minute.

    Hero Pose with Gomukhasana Arms

    Photo Feb 06, 9 54 46 PM

    Start out on your shins, bringing your knees together and separating your feet slightly wider than your hips. From there, have a seat in between your ankles coming into Hero Pose. Feel free to prop yourself on a block if this pose hurts your knees.  Sitting up tall, slowly make your way into Gomukhasana arms. Use a strap if you cannot clasp your hands. Relax your shoulders and pull the elbows back. Stay here and hold for 5-10 breaths, then repeat on the other side.

    Wide Cobra Pose

    Photo Feb 06, 9 54 53 PM

    Lie on your belly and bring your feet hips’ width distance apart. Take your hands wide off of your mat and come onto your fingertips. On an inhale, slowly push into your fingertips lifting your heart high. Keep your elbows slightly bent and actively roll your shoulders back.

    Bow Pose

    Photo Feb 06, 9 55 00 PM

    Lie on your belly and relax your forehead on your mat. Bend your knees and grab onto the outside edges of your feet. On an inhale, kick your feet into your hands lifting your heart high. Use the strength of your legs to lift you up! Stay here and hold for 5-10 breaths, then repeat two more times.

    Funky Camel

    Photo Feb 06, 9 55 07 PM

    It’s time to start working on some deeper backbends. Feel free to take a traditional Camel pose or if you’re feeling adventurous, try our funky variations above! Start out on your shins, knees are hips’ width distance apart. From there, step your right foot forward planting the sole of your foot down on your mat. Bring both hands onto your hips squaring them off to the top of your mat. Slowly sweep the left hand up and around bringing your left hand onto your left ankle or sole of your left foot behind you. Take a moment and square your hips once again. Extend your right arm up or bring it to heart center. Take 5 deep breaths, then slowly come up. Repeat on the other side. 

    Wheel Pose

    Photo Feb 06, 9 55 16 PM

    Make your way onto your back and set up for Wheel. Feet should be hips’ width distance apart and parallel to one another. Hands should be shoulder width apart, fingers spread wide. Both arms and legs squeeze in towards one another. Feel free to bring one hand up to heart center as you hold for 5-10 deep breaths.

  • The Backbend Flow to De-Stress

    The Backbend Flow to De-Stress

    After a long day hunched over a computer, the body craves movement – particularly, expansive movement to counteract the back-rounding posture that is so commonly seen in office parks around the world. Paperwork, computer work, web surfing and, even texting on mobile phones, are all culprits in creating tightness in the chest, shoulders and back.

    A backbend practice is a great way to relieve everyday stress and loosen up a tight upper body.

    2014-10-28 11.56.32


    The biggest misconception about backbends is that you need a flexible back in order to do poses such as Full Wheel or Camel, or asanas involving an over-hand grip such as One-Legged King Pigeon or King Dancer. Yes, you do need some mobility in your back, but in reality, it is the entire front body and shoulders that can make or break a backbend.   With consistent practice, you will find that your backbends will be deeper and easier to perform.


    As with any asana, take your backbend practice slowly, and never force your body into postures.  Start off your practice with a few rounds of Sun Salutations, then use our Backbends Practice to fire up your entire front body and shoulders.  Make sure to keep your abdominals engaged in your backbends and more importantly, make sure to breathe!


    Extended Puppy Pose (Uttana Shishosana)
    5

    This is one of our favorite poses for stretching the upper back and shoulders. Beginners should consider modifying the pose by placing their forehead on the mat. This will help relieve any potential strain in the neck. Start off in tabletop position and slowly walk the hands forward dropping your chest onto the mat. Keep your hands actively pressing into the mat and arms hugging in towards one another.

    High Lunge or Crescent Lunge Variation
    7

    While in high lunge, open your chest and shoulders by bending your elbows to create 90 degree angles with your arms (think goal-post arms!)  A more traditional version of this pose is with arms extended straight overhead.  Regardless, be sure to keep your head aligned between your arms.  Do not allow the head to fall back which will cause strain to your neck. Remember to engage the back quadricep and sink your hips toward the floor to activate your hip flexor and psoas muscles.

    Low Lunge or Anjaneyasana Variation
    2

    Clasp your hands behind your back, drawing your shoulder blades together to open up the front of your shoulders and your chest. Keep your core engaged as you take a mini-backbend moving your clasped hands towards your mat.

    Reclined Half Hero or Ardha Supta Virasana
    4

    Try a gentler modification of this pose. Rather than lying down completely, begin by leaning back onto your forearms.  This will produce a nice stretch in the front of the thigh.  For a more intense stretch, lie back further.  You should not experience any discomfort in your knee.

    Bridge Pose or Setu Bandha Sarvangasana
    6

    This is a great backbend for beginners. Use a block or blanket to relieve stress from your lower back or neck. Your feet should be parallel to each other and your knees should stack directly over your heels.  When you begin to lift up, keep your thighs hugging into the midline. Press actively into the mat with your arms and shoulders. Keep the neck long. You can lift one leg up for a deeper posture.

    Camel Pose or Ustrasana
    1

    There are many variations of this pose – from keeping your hands on your low back for support to tucking your toes under so that the backbend is not as deep to the full posture shown here. Find the one that works for you! Just remember to keep your hips pushing forward so the thighs remain perpendicular to your mat.

    Upward Bow or Urdhva Dhanurasana
    3

    Make sure your front body and shoulder are warmed up before trying this pose. Keep your feet parallel, hug your knees and thighs in – and don’t forget to breathe!