Category: Z Featured

Our editors pick the cool stuff for you

  • Small Space Yoga

    Small Space Yoga

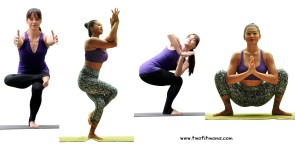
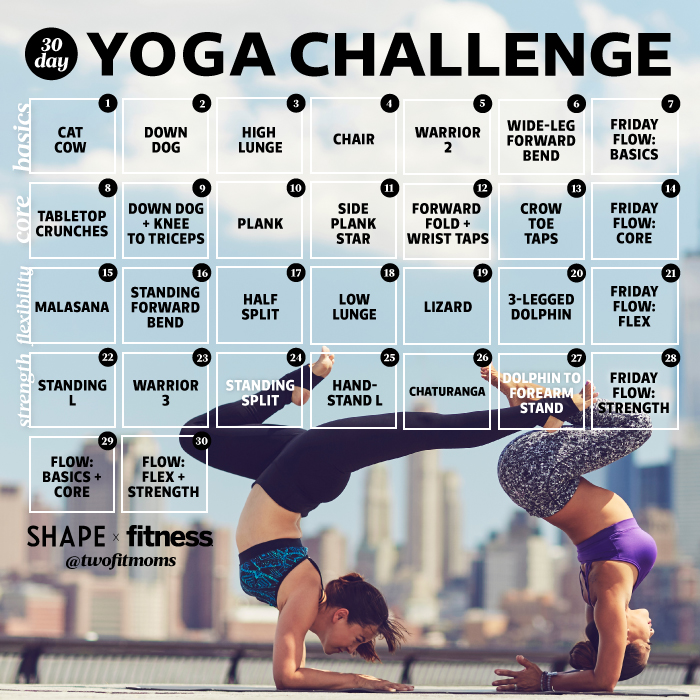
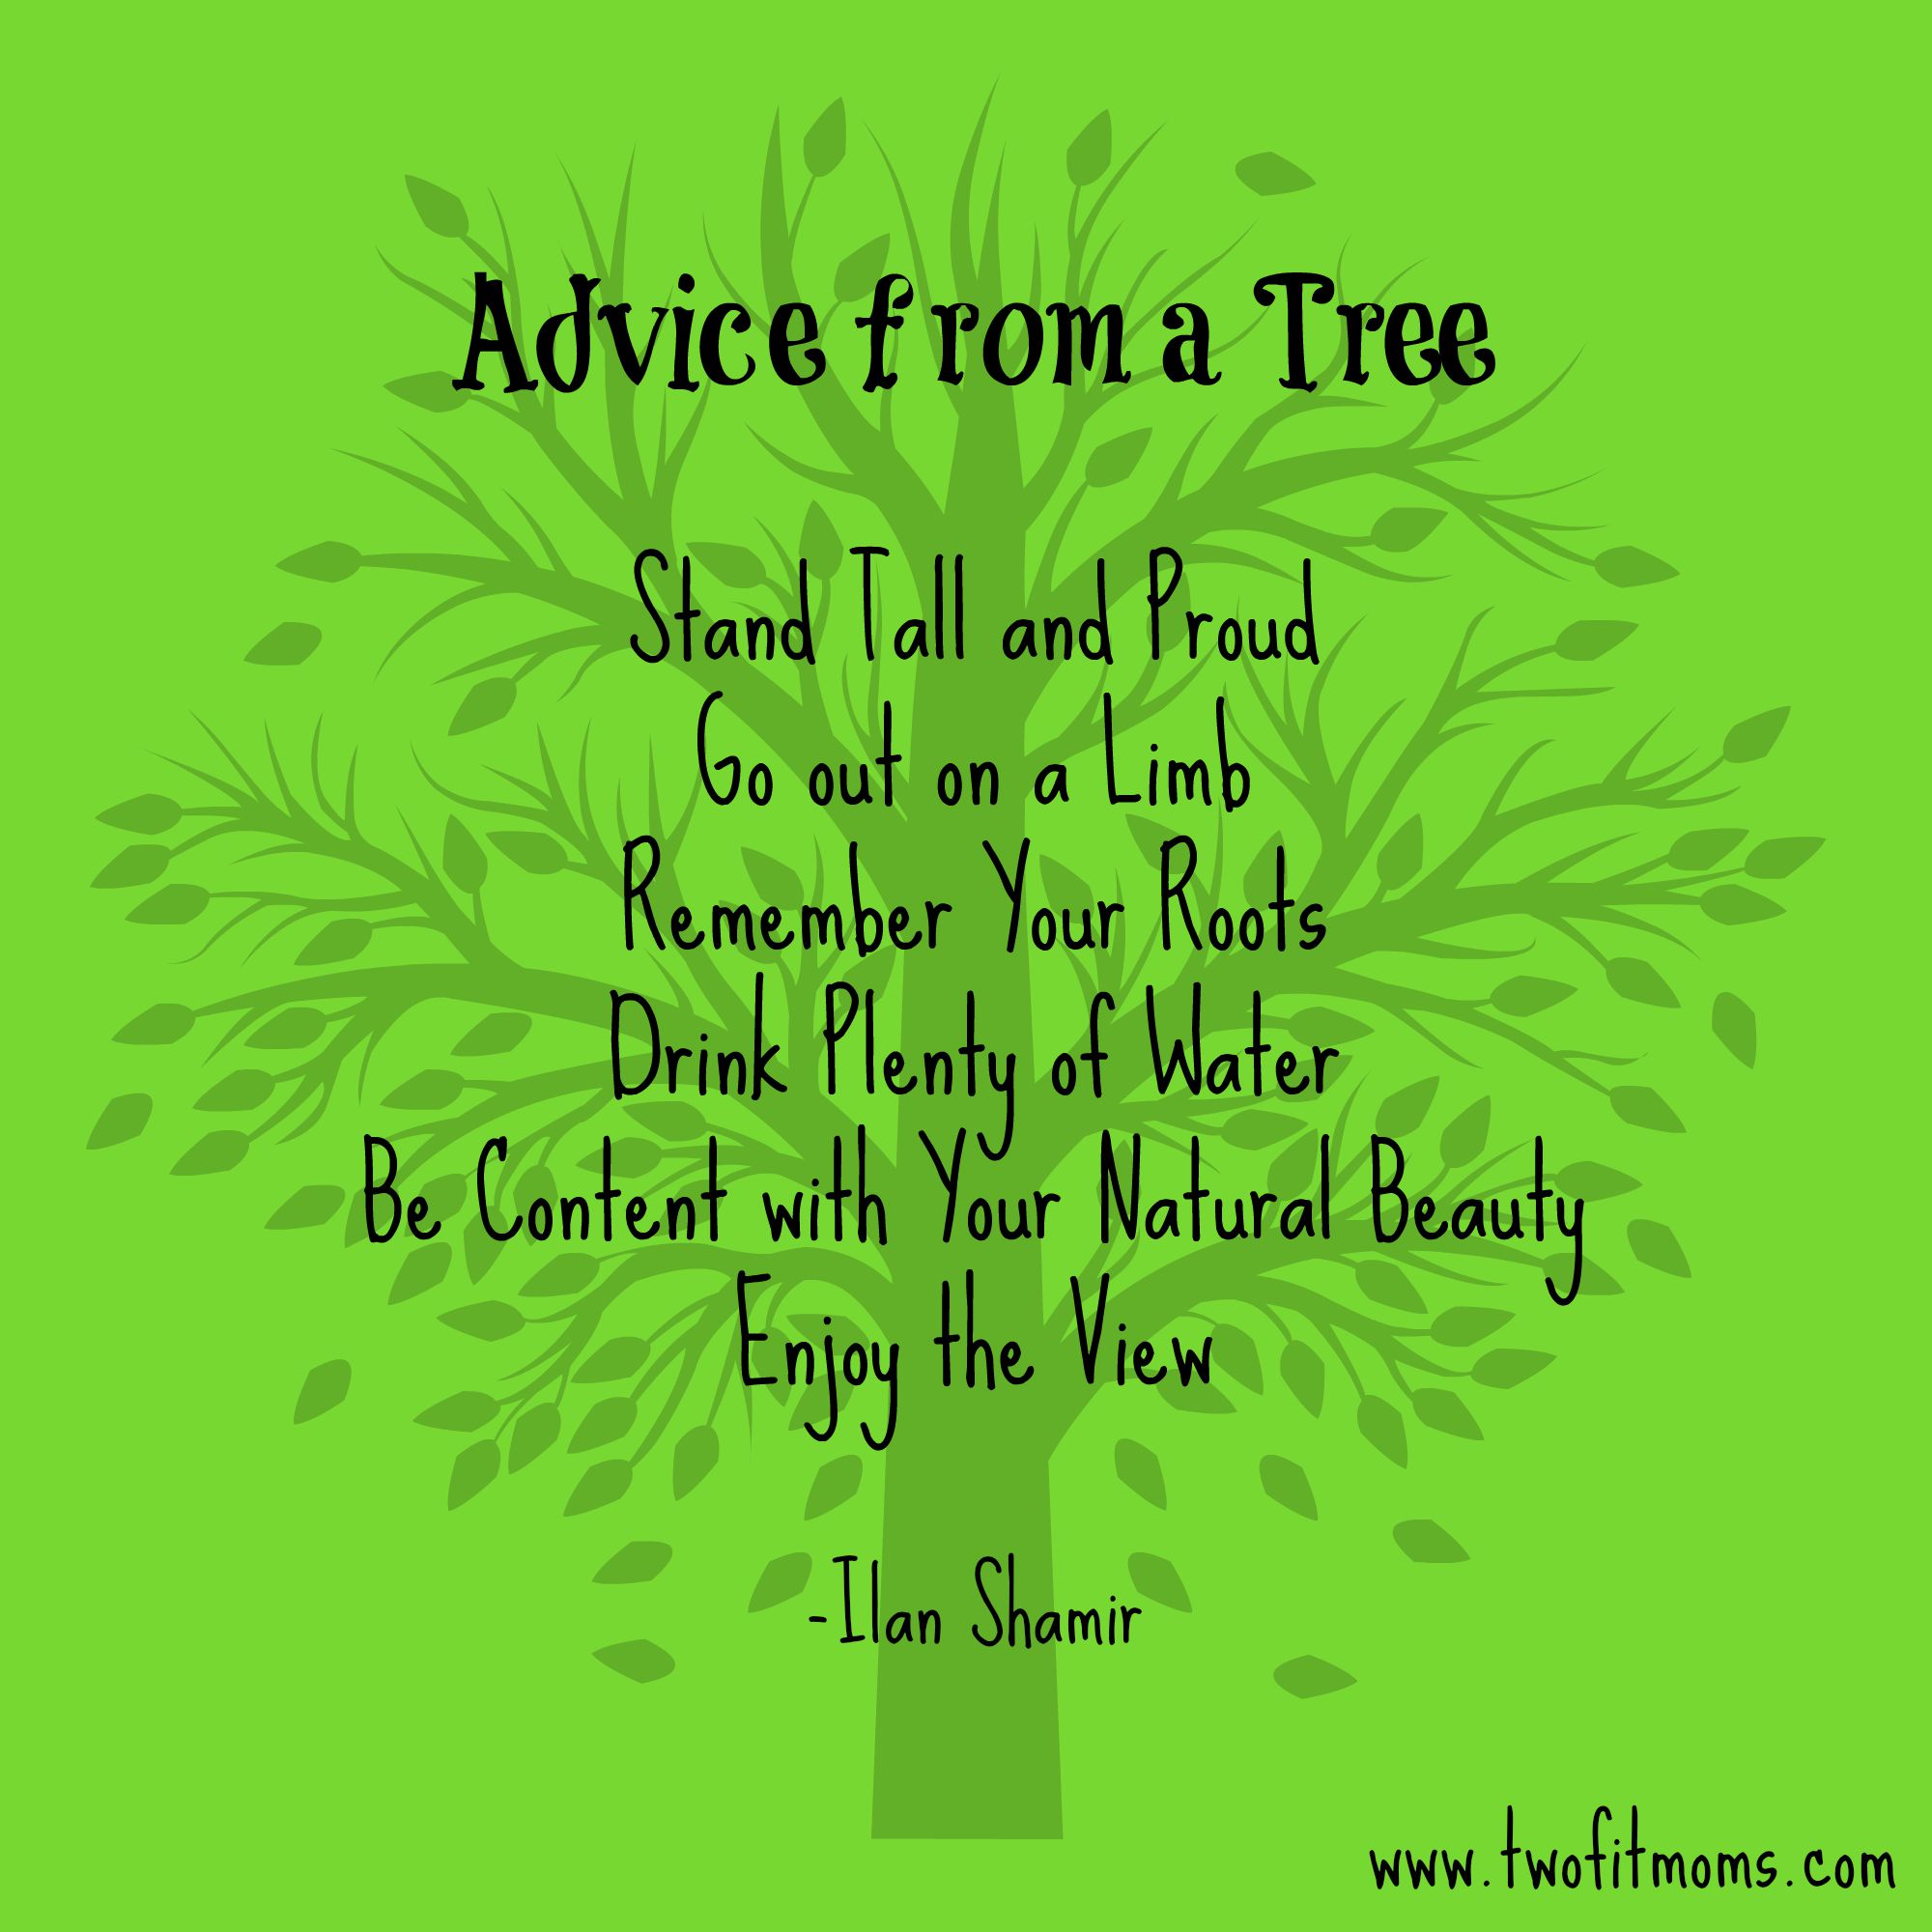
    When you’re confined to a small space, you don’t have to give up on your yoga practice! These eight standing poses can be your go-to postures when space is limited, and there’s no yoga mat in sight.

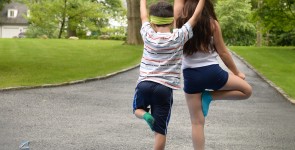
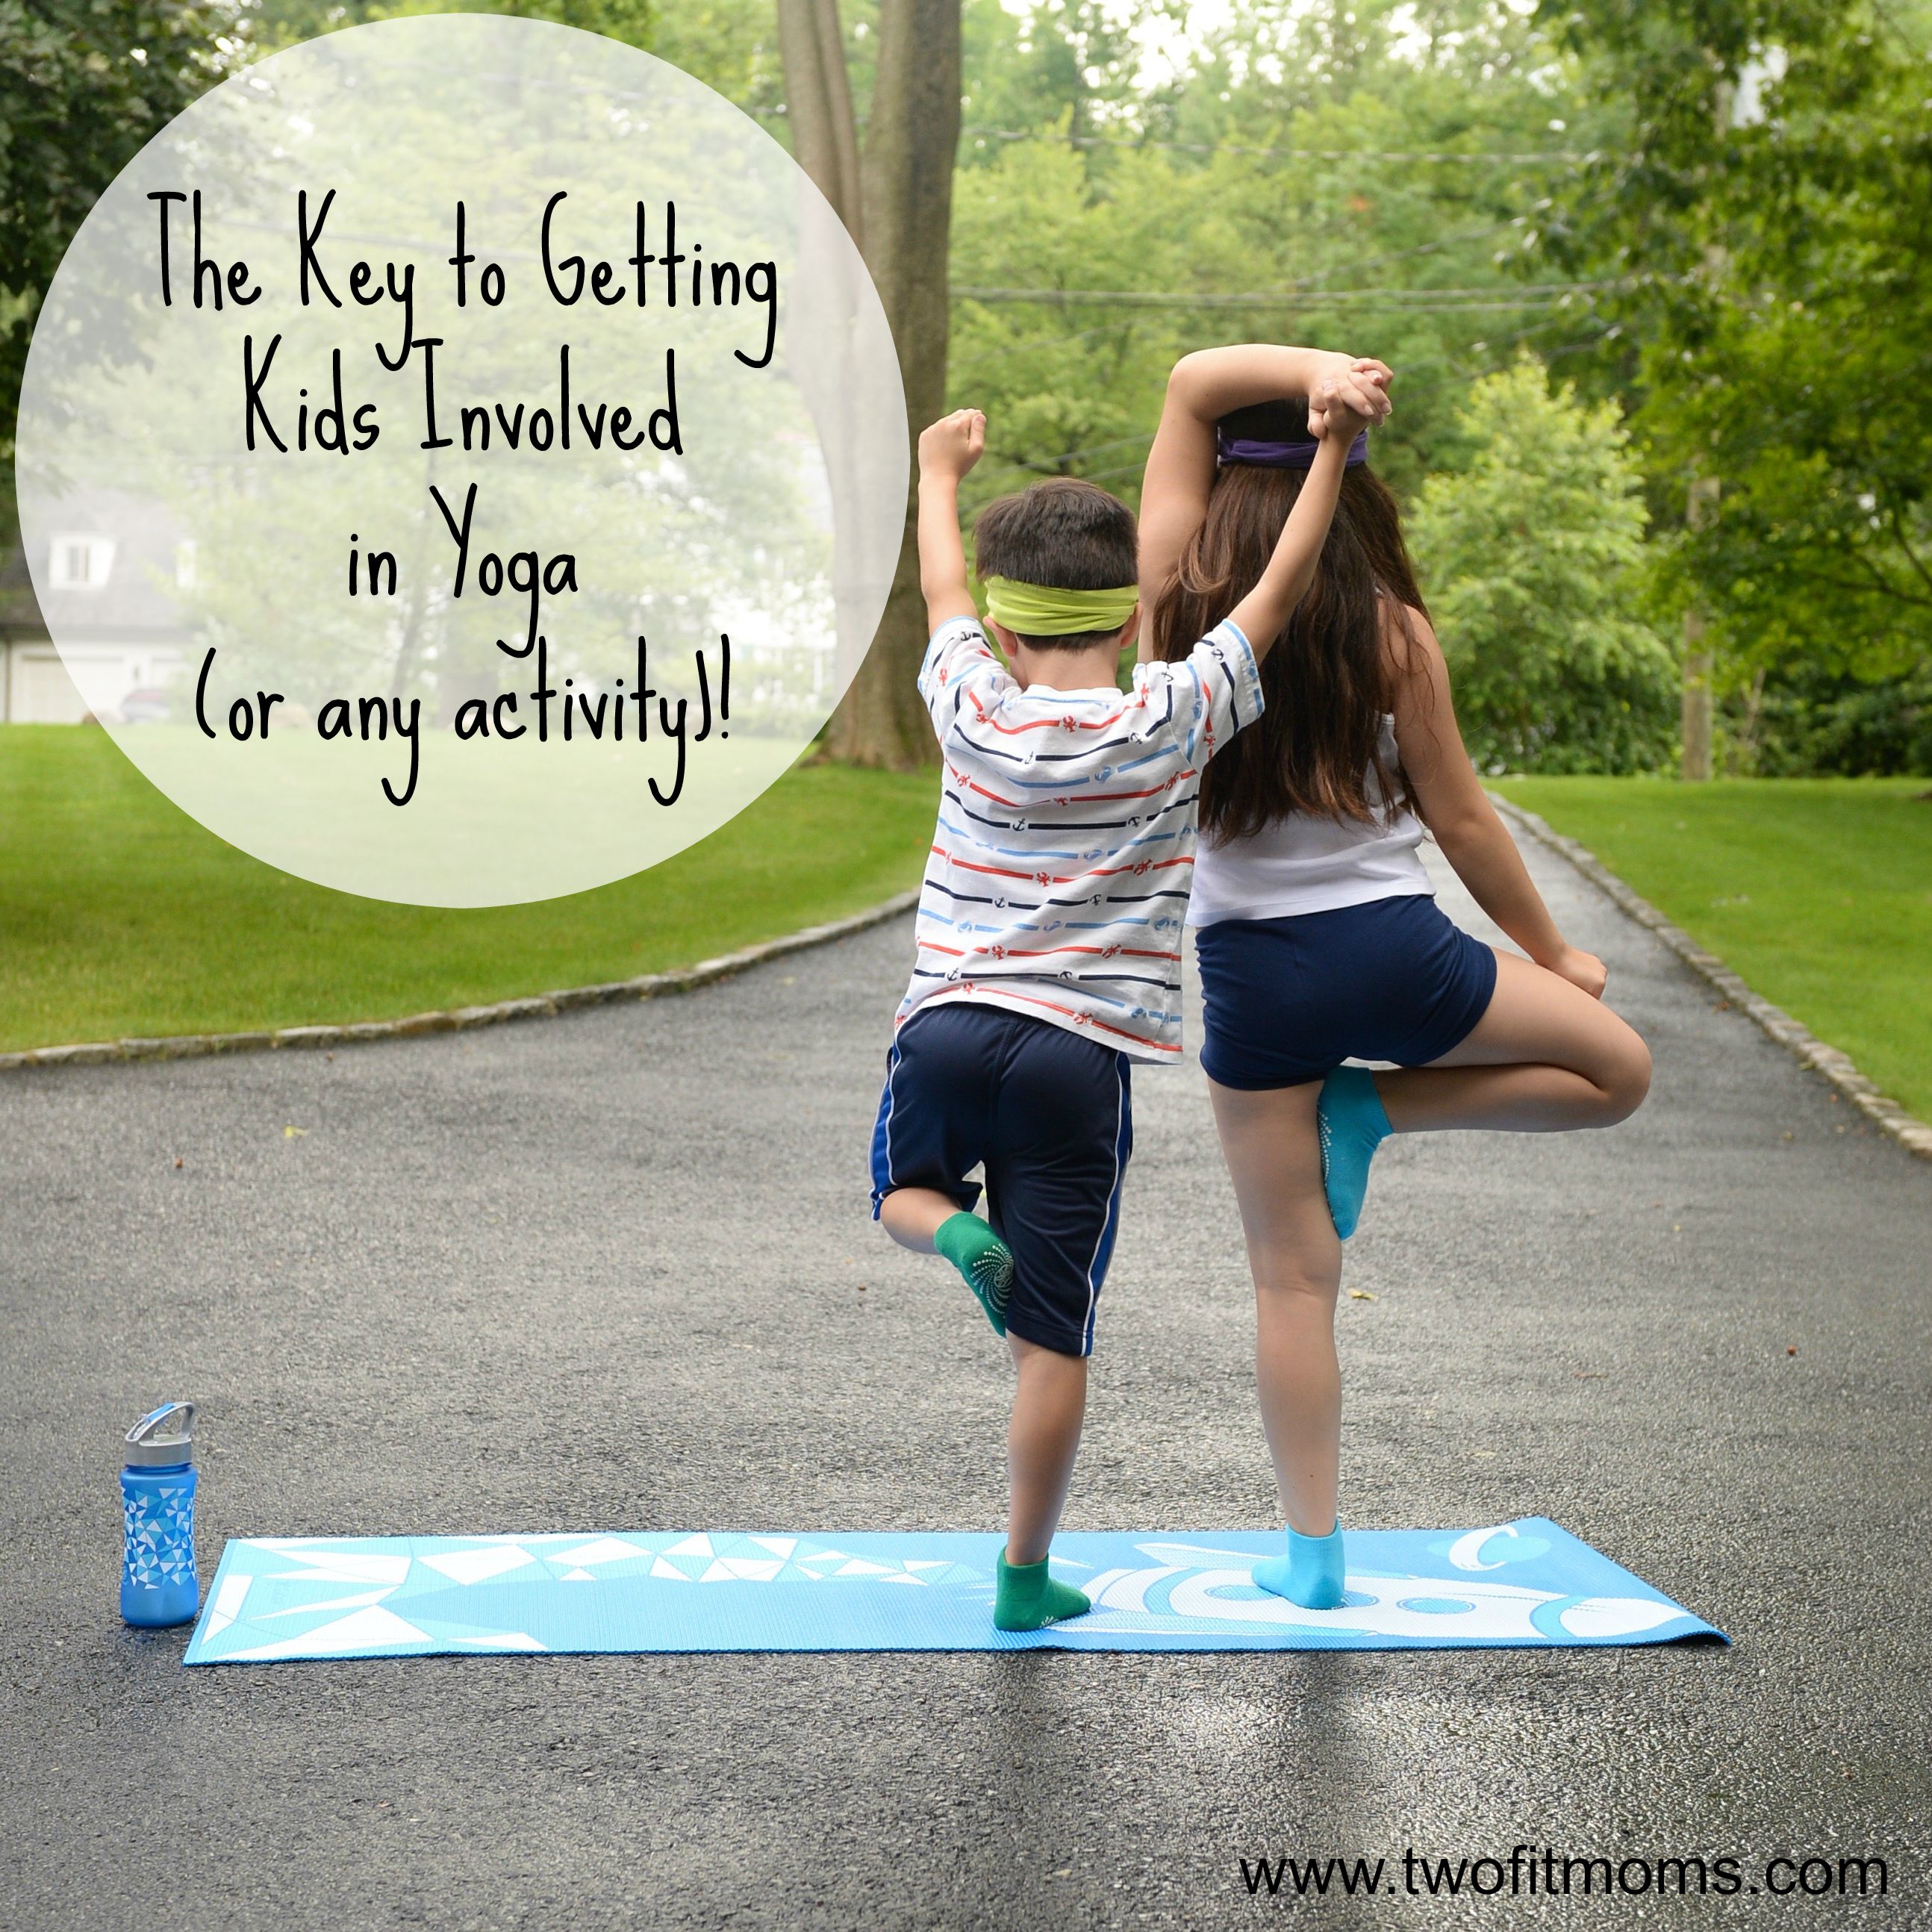
    Most of you know that I’ve spent a lot of time in the children’s hospital this past year. I never brought my yoga mat into the hospital, but I always managed to stand up and stretch regularly. (You can get really stiff sitting/standing/hovering at a bedside.) I’m a major germaphobe, so I never wanted my hands to touch the dirty hospital floor. Instead of touching the floor, I managed to get creative and effectively stretch each body part in a standing position with very limited space. It’s this experience of no-mat yoga that inspired these poses below. This is a set of poses that can be done while on vacation in a tiny hotel room or even in the airport. I hope you give them a try and add them to your regular practice. Enjoy!

    Dangle Pose
    Separate your feet hip-width’s distance apart, bend your knees, and bring your chest to your thighs. Fold forward, grab opposite elbows, and settle into this pose for two to three minutes. While this pose may resemble Uttanasana, which is an active stretch of the hamstrings, the goal in this yin pose is to dangle the upper body for a longer period of time to help release the lower back.  Remember to relax your head and neck, unclench your jaw, and release any tension that you might be holding in your face.Dangle

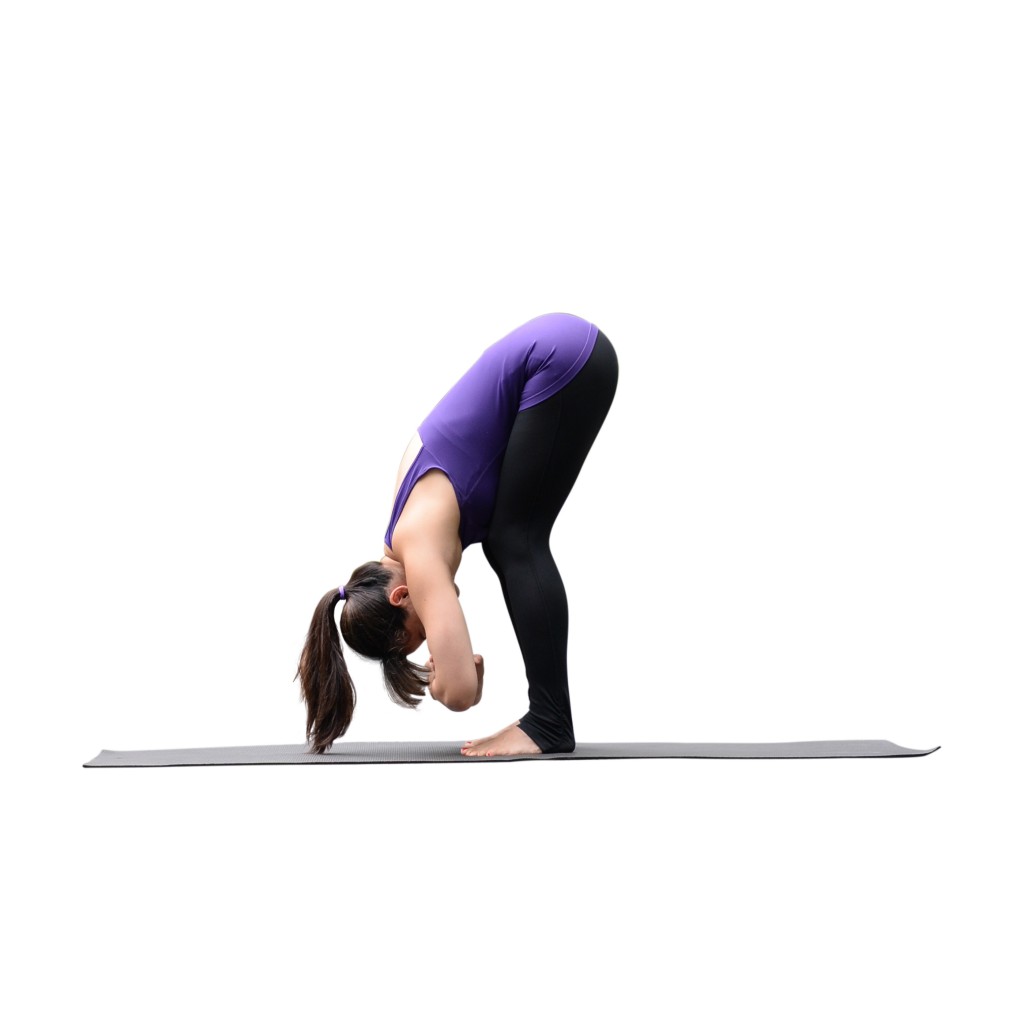
    Garland Pose (Malasana)
    From Dangle pose, bend your knees and lower your hips into Garland Pose.  Rotate your feet outwards by 45 degrees, and bring the palms of your hands together.  Press your inner thighs back in space with your triceps as you keep your chest lifted.  Hold this pose for five breaths before slowing rising to a standing position.Garland

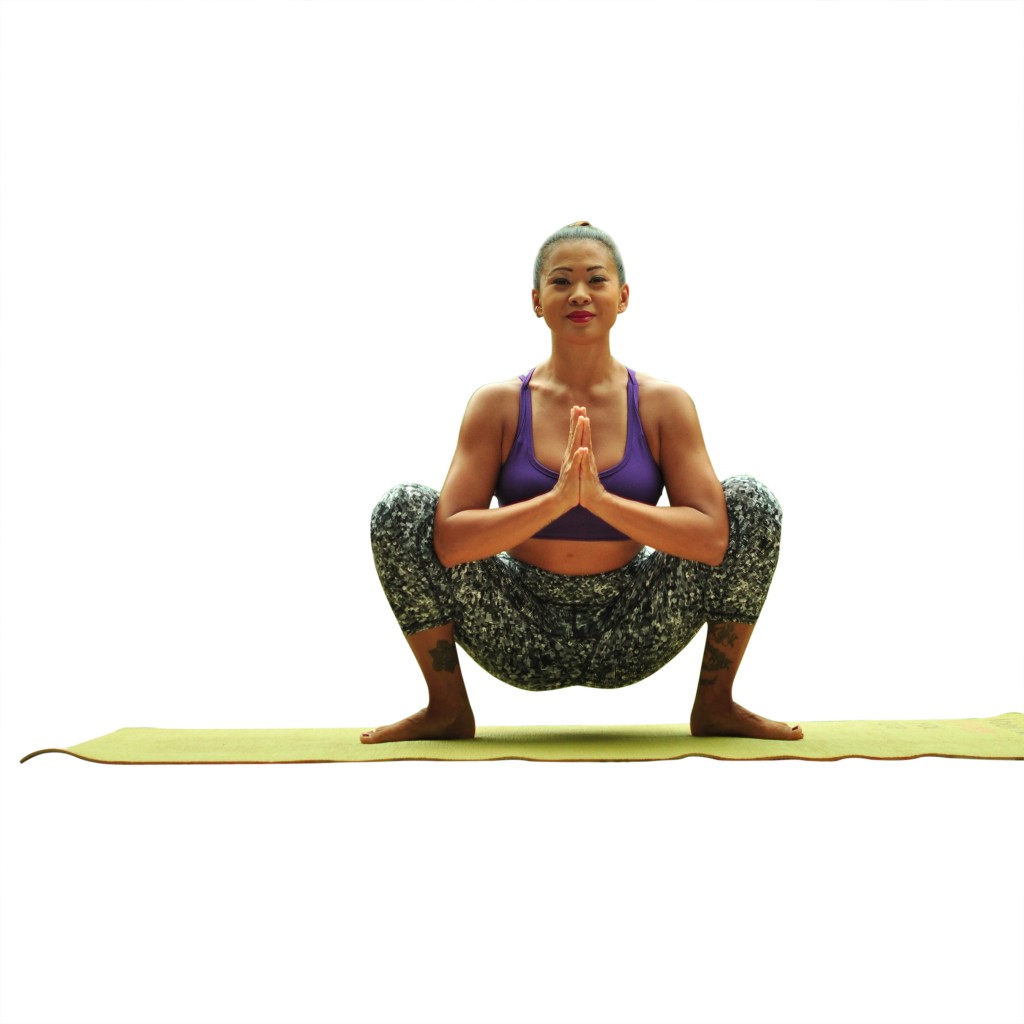
    Flying Pigeon Prep (Eka Pada Galavasana Prep)
    Cross your right ankle over your left thigh, and flex your right foot to activate the your leg muscles and protect the knee. Begin to sink your hips down into a squat, and extend your arms in front of you to help you balance.  You should feel a stretch in your outer right hip as you sink further into the pose.  Hold this hip-opening pose for five breaths before rising back up and repeating on the opposite leg.FlyingPigeonPrep

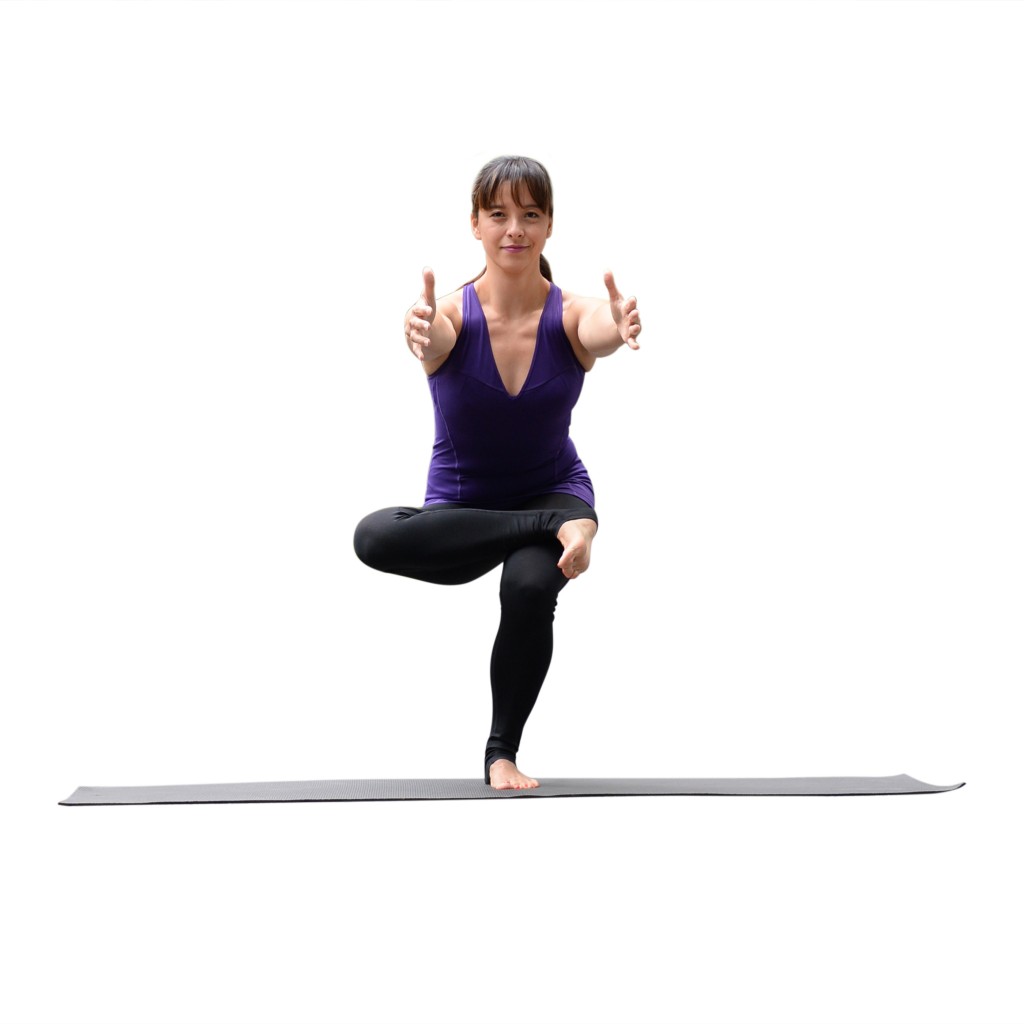
    Lord of the Dance Pose (Natarajasana)
    Stretch your entire front body while strengthening your legs and ankles in this standing balance pose. Focus on a stationary point a few feet in front of you to help find your balance, and kick your foot firmly into your hand to create the tension required to lift the leg higher and hold this posture. Maintain your balance for five breaths, and then practice on the opposite side.LordofDance

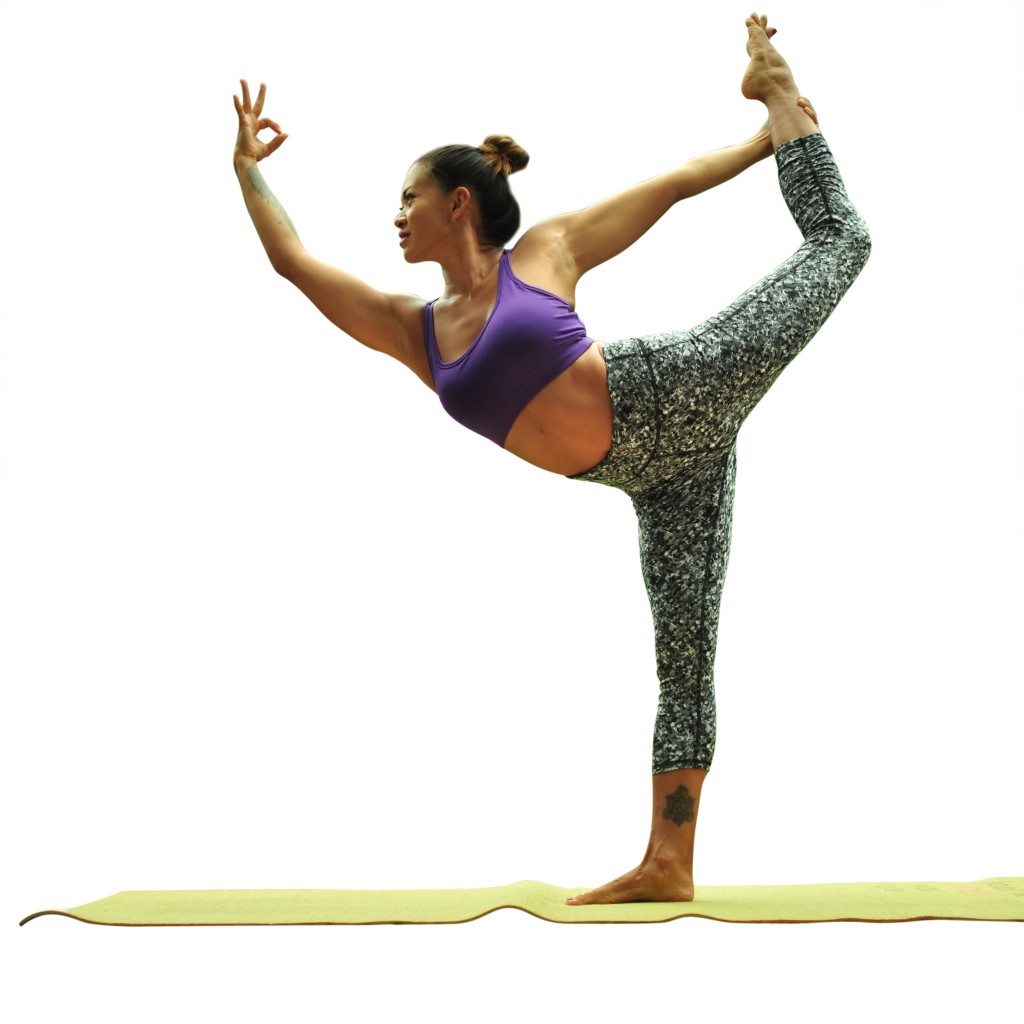
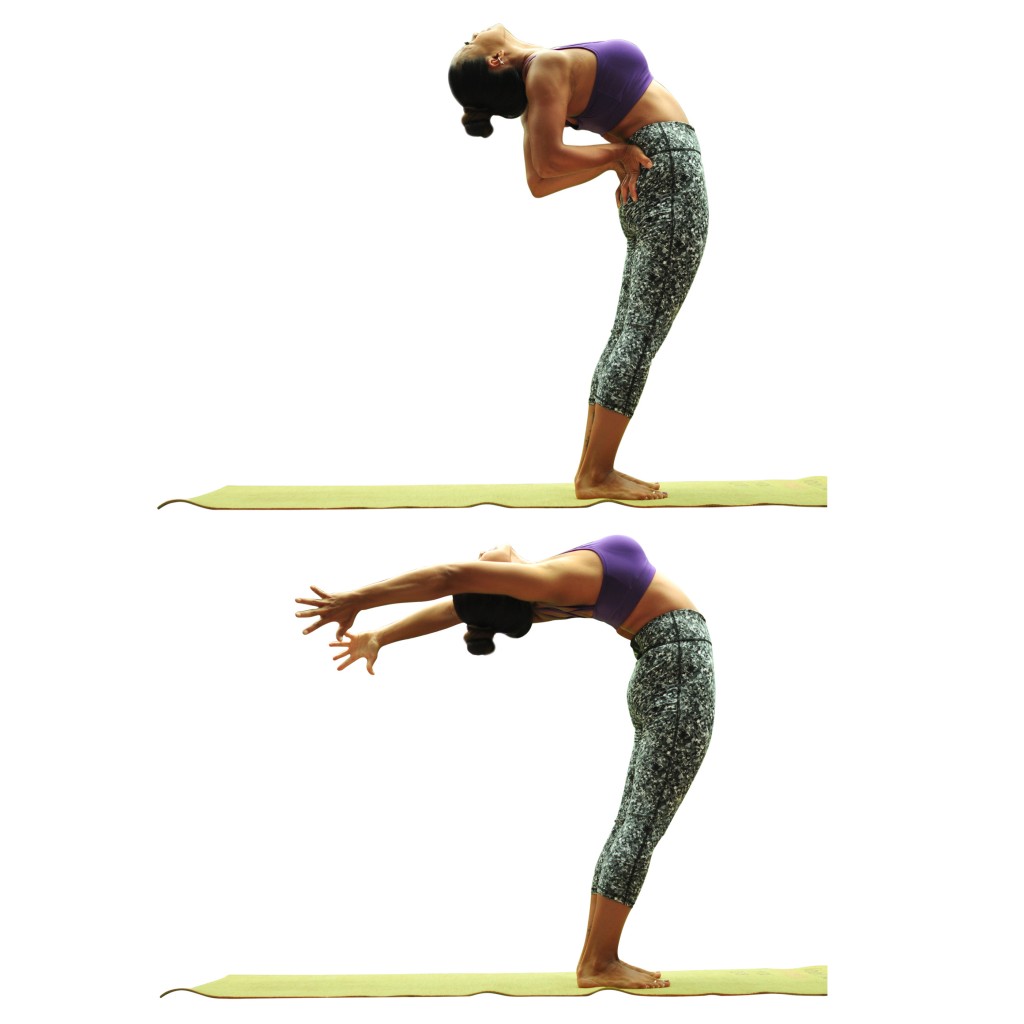
    Standing Backbend (Anuvittasana)
    Choose either of these standing backbends to stretch the chest and reverse the hunching that many of us do throughout the day. In the supported version of this pose, the hands are on the lower back, and in the deeper variation, the hands are actively reaching overhead.  Remember to keep your biceps alongside your ears in the deeper version of this pose to avoid neck strain. Both versions of the backbend will stretch the chest and lengthen the spine to relieve tension.
    StandingBackbend

    Revolved Chair Pose (Parivrtta Utkatasana)
    Yoga twists are thought to massage the internal organs, tone the belly and flush toxins from the body. With the possibility of such amazing benefits, we had to include one strengthening twist in the sequence. Press your palms firmly together to gain leverage for a deeper twist. Lift and lengthen your spine with each inhalation and twist deeper with each exhalation. Both knees should be aligned with one another, and your weight should be over your heels, rather than the balls of your feet. Hold this pose for five breaths before twisting to the opposite side.RevolvedChair

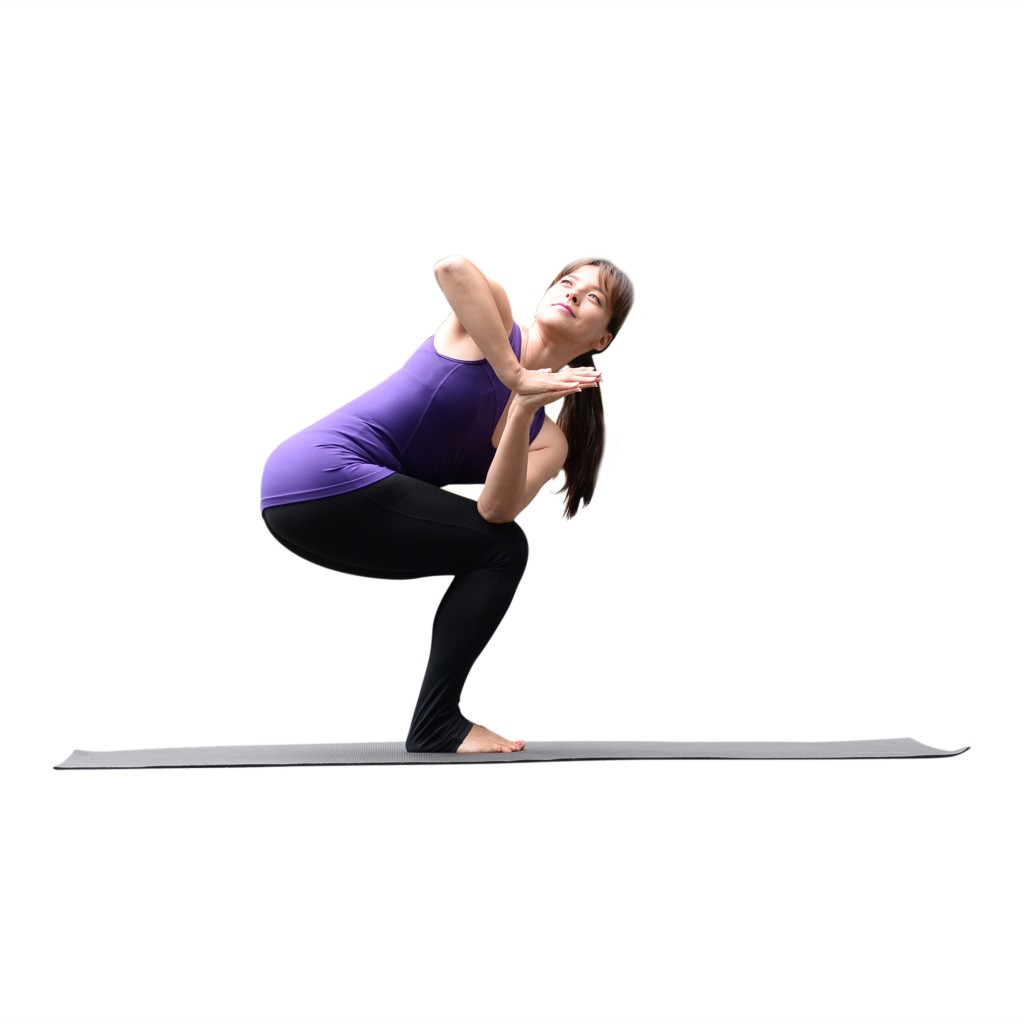
    Eagle Pose (Garudasana)
    This standing balance pose will stretch the upper back and shoulders while challenging your balance and stretching the hips, thighs and ankles. If you have a knee injury or would like a modification, just cross your thighs without adding the element of hooking the raised foot behind the standing-leg calf.  Quick tip:  Remember that your arms and legs are folded in opposite directions!  If your right leg is crossed over your left leg, your left arm is crossed over your right arm.  Hold this pose for five breaths and then practice balancing on the other leg.Eagle

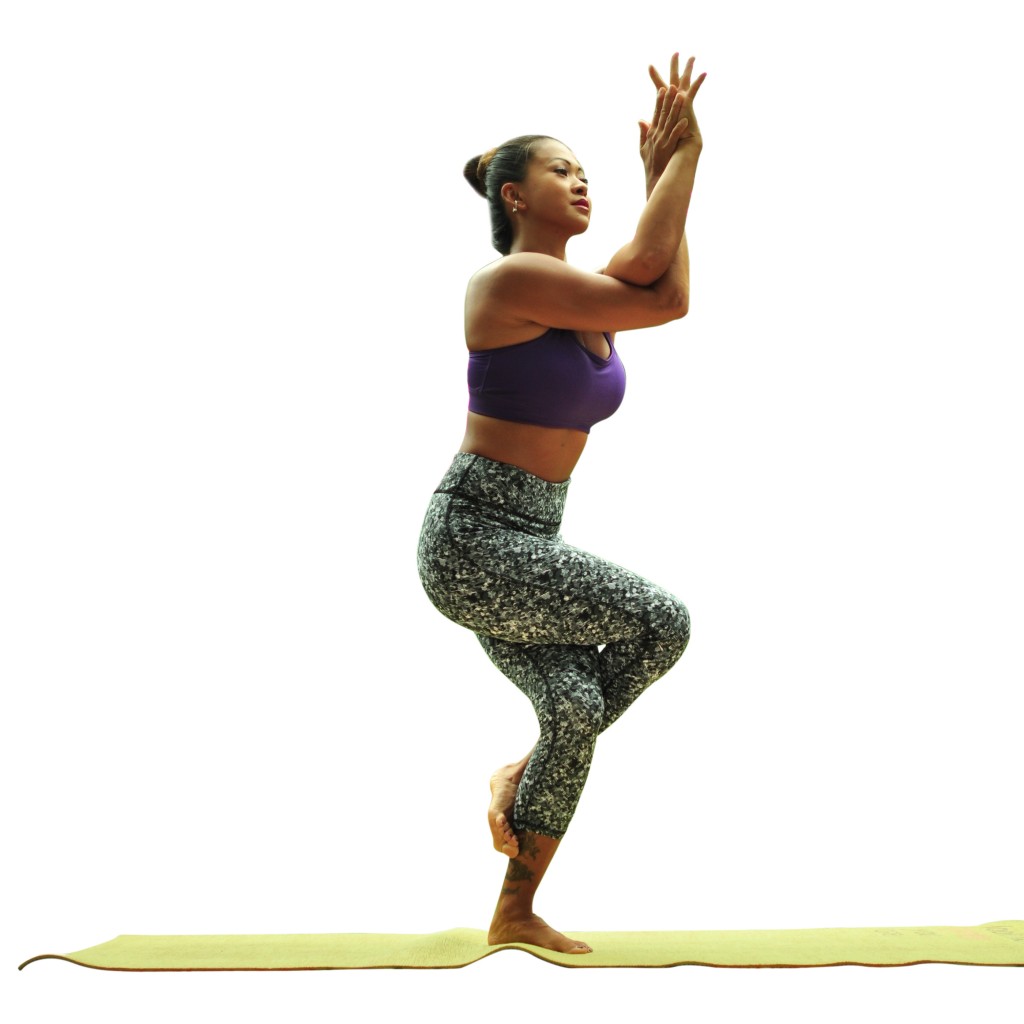
    Wide-Legged Forward Bend (Prasarita Padottanasana C)
    In this variation of a wide-legged forward fold, not only will you stretch your hamstrings, but you will also get a great stretch across your shoulders and chest. Keep your feet parallel as you hinge from the hips, and allow your clasped hands to fall forward for the deepest shoulder and chest stretch. Hold for five breaths before releasing the pose.Prasarita

  • Back-to-School Blueberry Corn Muffins (gluten-free!)

    Back-to-School Blueberry Corn Muffins (gluten-free!)

    Struggling to get the kids up, dressed, fed and out the door?  You are not alone! Breakfast is always the one part of my family’s routine that suffers. If your house is like mine, you are probably searching for quick and easy ways to get your kids to eat a healthy breakfast. I know it’s a challenge, especially if your kids are picky eaters.  So, I thought a healthy breakfast muffin would be the best and most welcomed fuel for their busy school day! Muffins are also transportable, so if you and your family have no time to sit down and eat, you can take them on the road.
    blueberrycorn
    In addition to making a healthy muffin, I thought a gluten-free one would be an added bonus. I happen to love corn muffins, and corn meal is gluten free, so it works perfectly. In order to boost the health factor (and to ensure it is gluten-free), I replaced white flour with oatmeal.  Oatmeal has lots of health benefits.  In addition to being high in fiber, oatmeal helps lower cholesterol. However, not everyone loves the texture that rolled oats bring to baked goods. So, I threw my oats into the food processor and turned them into a flour. You will never know there’s oatmeal in these muffins, but you will reap the incredible health benefits! My muffins are also studded with blueberries which happen to be high in fiber, potassium, vitamin C — and also help lower cholesterol. I think they are the perfect addition. However, if you are not high on blueberries, try adding peaches or another berry of your choice!

    If I were you, I would make a batch of muffins on Sunday, and save them for the week. They will last a few days if stored in an air-tight container. But, you might want to make two batches, these muffins are yummy!

    Back-to-School Blueberry Corn Muffins
    Yields 12 muffins

    1 cup of rolled oats (broken down into a flour in the food processor)
    1 cup of corn meal
    1/4 cup of grade B maple syrup
    1/4 cup of milk
    1/4 cup of safflower oil
    1 egg
    1 banana (mashed)
    2 teaspoons baking powder
    1/2 teaspoon salt
    1 cup of fresh blueberries

    Pre-heat your oven to 400 degrees.

    Line a muffin tin with paper liners. You will only need a 12-cup tin for this recipe.

    Put your oats in a food processor and pulse until it forms a flour-like consistency.

    In a large bowl, add the wet ingredients (maple syrup, milk, oil, egg) and mix. Add the mashed banana and the oatmeal, flour, baking powder and salt. Stir until combined. Add the blueberries last, and mix gently so they don’t break up.

    Spoon the mixture evenly amongst the 12 muffin cups. Bake for 15-20 minutes. Enjoy!

  • Tzatziki as Easy as 1-2-3

    Tzatziki as Easy as 1-2-3

    I do a lot of entertaining in the summer, and my family loves Mediterranean food, so you will likely find hummus and other yummy dips at our house.  This week we made Tzatziki Sauce – which is a Greek cucumber yogurt sauce. Generally, you might find it alongside a gyro at your favorite Greek restaurant.  And, while it’s not usually served as a dip — more of a condiment — we use it as one.  We like to dip pita chips and fresh raw veggies in Tzatziki Sauce.  It’s full of cool cucumbers, zesty garlic and fresh dill making a refreshing dip which is perfect for the warm weather.
    tzatziki
    If you don’t want to eat it as a dip, and prefer to serve it as a sauce, you can use it alongside grilled chicken or fish (I think it would be great with grilled wild salmon!) — and I bet it would taste pretty good on a burger (whichever kind you fancy).

    It’s pretty simple to make — just three easy steps — grate, drain, mix (see more details below). It’s also the perfect recipe for those of you have a garden full of cucumbers!

    Tzatziki as Easy as 1-2-3
    Yields 3+cups 

    2 cups of shredded cucumber, salted and drained (see note below)
    3 cups of plain Greek yogurt
    2 tablespoons chopped dill
    1 tablespoon lemon juice
    1 tablespoon olive oil
    1 clove of garlic, crushed
    1/2 tsp white vinegar
    salt
    pepper

    There are basically three steps involved in making this dip.  Grating the cucumber, salting/draining it and then mixing it together with the rest of the ingredients.

    Peel and slice the cucumber lengthwise. Remove the seeds with a spoon. Use a hand grater to grate the cucumber. Place the cucumber in a colander and add a little salt (1/3 teaspoon) in order to extract some of the liquid. Let it sit as you prepare the rest of the sauce.

    In a large bowl, add the yogurt, dill, lemon juice, olive oil, garlic, white vinegar, salt and pepper.

    Drain as much liquid from the grated cucumber and add the cucumber to the bowl with the yogurt mixture.  Mix to combine and serve.

  • Rustic Summer Berry Pie

    Rustic Summer Berry Pie

    It’s berry season and what better way to eat them than in pie form! I like to make rustic pies — pies with a single overlapping crust. I think it looks more casual than a traditional double crust, and it also happens to be easier to assemble (i.e., no crimping of any edges).

    With just one crust, this pie automatically cuts down on the number of calories that you’d consume with a double crust. I also made it a point to replace all of the white sugar in my recipe with maple syrup. The maple syrup adds liquid, which complicates my traditional rustic pie form, so my healthier version needs to be baked in a pie plate (rather than on a baking sheet, which is my usual pie-baking method).  It’s all good and works out perfectly fine.

    RusticSummerBerryPie

    I love this pie for many reasons.

    One, I love pie.
    Two, I love that you can easily use one crust — and one pre-made crust, which means you are cutting down on prep time.
    Three, I love that the pie is sweetened with natural grade B maple syrup versus processed white sugar!
    Last, but not least, I love that my kids had no idea that they were eating a “healthier” pie. They devoured it — no questions asked.

    That being said, the pie is delicious — bursting with berry flavor and hints of lemon. You can serve it as is, or top it with fresh whipped cream or, better yet, ice cream, which is my personal fave.

    Rustic Summer Berry Pie
    Yields one 9-inch pie

    2 cups of fresh raspberries
    2 cups of fresh blueberries
    2 cups of fresh blackberries
    1/2 cup of grade B maple syrup
    1/4 cup of unbleached flour
    1 tablespoon of freshly squeezed lemon juice
    zest of one lemon
    1 pre-made pie crust — rolled to approximately 12 inches in diameter
    Preheat the oven to 375 degrees

    Roll out your crust.  I buy the pre-made crust that comes rolled up in the refrigerator or freezer case.  I let it defrost and then roll it out until it’s approximately 12 inches in diameter.  You want the crust to overlap your 9-inch pie plate.

    In a large bowl add the berries, maple syrup, flour, lemon juice, lemon zest.  Mix gently to incorporate all of the ingredients. Be careful not to break the berries up too much when mixing.

    Pour berry mixture into the pie crust. Instead of crimping the edges, you want to pull the crust hanging over the side of the plate onto the berries.  I kind of work my way around the pie plate, folding the dough over itself.  Check out the picture above.

    Bake the pie for approximately one hour until the berry bubble and crust is a nice golden brown.


  • Yoga Challenge with Shape Magazine

    Yoga Challenge with Shape Magazine

    For the month of August, we are teaming up with Shape Magazine to bring you a daily yoga challenge that is accessible to all levels.  We encourage you to join us and build strength and flexibility. By practicing a single pose each day, you will develop the discipline to hit your mat on a regular basis.YogaChallenge

    Each week, we will be presenting a different theme:

    Week 1:  Basics

    Week 2:  Core

    Week 3:  Flexibility

    Week 4:  Strength

    At the end of each week, you will have six poses that can be pulled together for a short flow that you can practice at home.  For full details, check out the Shape website.  To connect with others, who are also participating in the challenge, post your daily pose on Instagram and use the hashtag #PostYourPose.

    If you are looking for other opportunities to flow with us, download our Yoga Rising classes from Gaiam.  This month, the classes are offered at a special discounted rate!
    Yoga_Challenge_Calendar


  • The Key to Getting Kids Involved in Yoga (or any activity)!

    The Key to Getting Kids Involved in Yoga (or any activity)!

    If you are a parent of young children, you may have noticed that kids are naturally inclined to want to try any activity that you are participating in — whether it be an every day household task or your exercise routine.

    KidsyogabannerTheir attention span varies, however, and, oftentimes, it’s very short.  So, what’s the best way to keep them engaged in an activity?  Give them ownership — their own part/role in the process, their own gear/tools.  If you make them feel like they own the activity, they will be more interested in not only participating, but completing the activity.

    Case in point. . . Recently we received a delivery of some nifty kids yoga gear.  All three sets of kids (seven in total . . .) were very interested.  However, speaking for myself, my daughters completely flipped over this gear — there were mats, headbands, water bottles, yoga grippy socks — all specially made for kids.

    The mats were rolled out in my living room.  The girls’ headbands were on and they were ready to get their yoga on – or at least pretend to teach yoga to each other.  It was very cute.  While they were not actually practicing “yoga” it showed me that if you give them their own gear — their own ownership over the process — they are more likely to get involved and stay involved in the activity.

    So, while purchasing kids yoga gear may not be a priority for you and your family’s budget, it may be something to consider if you are trying to get your kids involved in some physical activity.  You don’t necessarily have to purchase new — you can hand down your gear.

    This concept holds true for any activity. For example, if you are trying to get them to cook, give them their own apron or kitchen tools.  If you are trying to get them to clean, buy them a vacuum – okay, well, this may not work LOL . . .

    The super cool yoga kids mat and gear in the photo above is from Gaiam

  • #1 Tip for Finding Time to Exercise

    #1 Tip for Finding Time to Exercise

    I know it’s a struggle to find time to exercise. It doesn’t seem to matter if you are a new mom or a college student—the day feels like a never-ending cycle of tasks that must get done, and working out doesn’t always cycle to the top of the task list.

    I have a tip for you that will change the way that you approach exercise. You WILL find time to workout. You might even laugh at the simplicity of this piece of advice, but hear me out. FindingTime
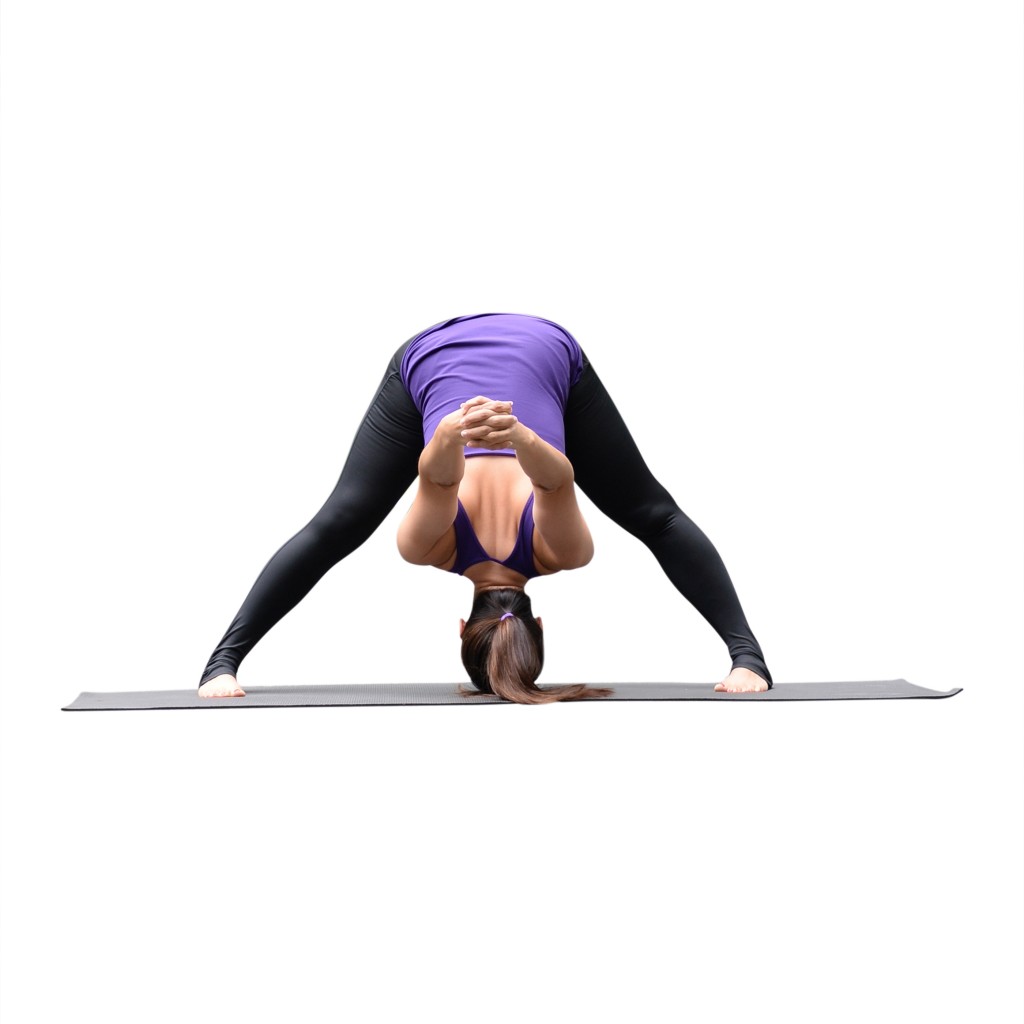
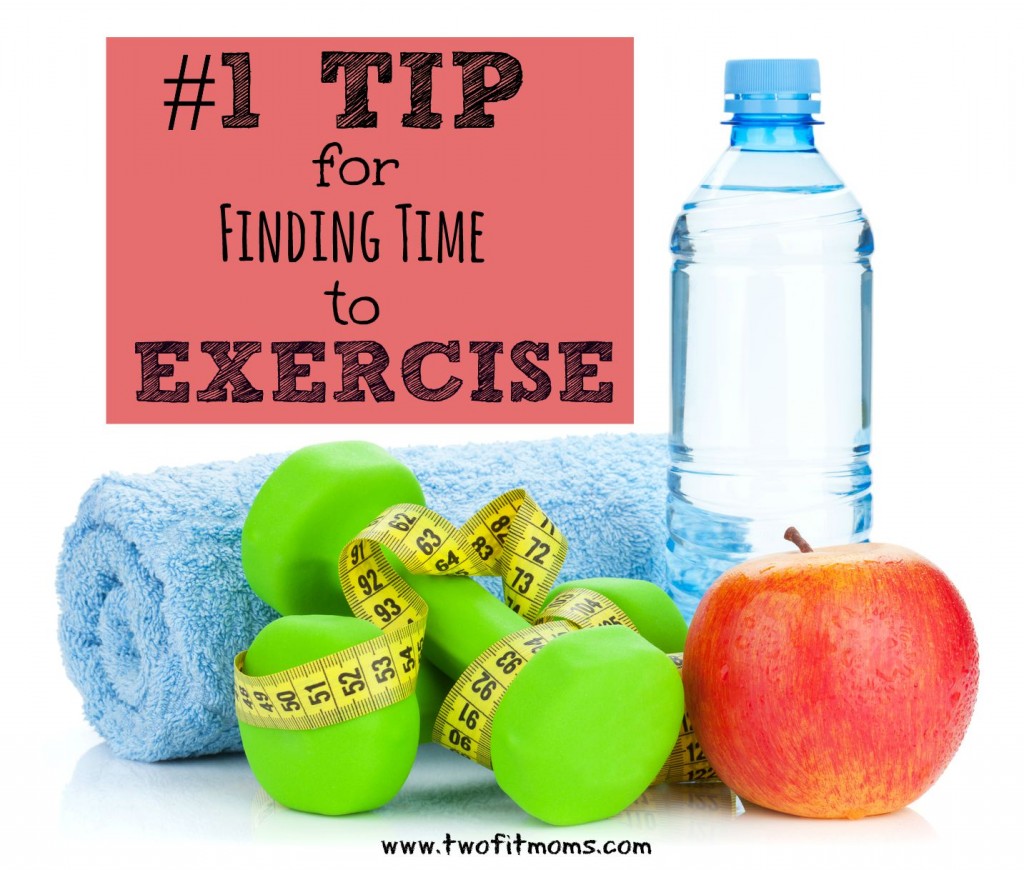
I’ve managed to exercise during periods of my life when I was working 90-hour weeks in an office, and I’ve also managed to exercise when I was a sleep-deprived new mom.
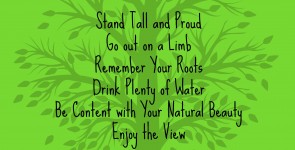
    Here’s my tip for you:

    Find time to exercise by prioritizing your workout above all of your non-negotiable, must-do tasks.

    What do I mean by this?

    Well, we all have a list of items on our to-do lists that MUST get done. Paying bills is a good example. It doesn’t seem to matter how short on time you think you are, you somehow find time to pay the electric bill and the mortgage every month. You also find time to bathe. You find time to buy food and toilet paper. These are examples of non-negotiable tasks.

    If you are a new mom at home and use your baby’s precious naptime to pay bills, your workout will never happen. Before you know it, the baby will be awake. BUT, if you exercise during naptime, not only will you somehow manage to exercise, but you’ll also find that your bills manage to get paid before their due dates, too. It’s a mini miracle. You will find new time that you never realized that you had by squeezing in your workout before doing the must-do tasks.

    This phenomenon reminds me of the tedious process that I used to experience when writing a paper for school.  If I allowed myself a month to work on it, I would use the whole month.  If I only allowed myself a week to work on it, I would get it done in a week.  There was no option to not get it done, and I seemed to work with whatever amount of time I had, even if it was a minimal block of time.  Fitting exercise into my life along with other obligations works the same way.  Even if I think I’m too busy to exercise, if I just go ahead and do it, all of the other necessary tasks in my life still manage to get done.

    Besides the obvious human needs that we all have, non-negotiable tasks will vary from person to person. You need to determine what your must-do list is, and whatever it is, place exercise ahead of the items on that list.

    The reason why you are not squeezing in a workout as it stands right now is because you do not consider exercise to be a non-negotiable activity. Make it one. In the beginning, your workout may only be 15 minutes long because your life is so busy. Who cares? Build the habit today. If you build the habit now, you will automatically increase the length of your workout when your schedule allows for it. Right now, 15 minutes may be as good as it gets, and that’s just fine. Commit to a program, even if it’s brief, and fit it into your life like a non-negotiable meeting.


  • Advice from a Tree: Looking for Unexpected Sources of Inspiration

    Advice from a Tree: Looking for Unexpected Sources of Inspiration

    I stumbled upon this verse from Ilan Shamir called “Advice from a Tree.”  I love how our stature, our sense of self and beauty, our nutrition and our perspective on life can be compared to a tree’s existence.

    It really struck a chord, so I wanted to share it with all of you.

    AdvicefromTreeUpdateWe draw wisdom from all different sources — but maybe we should look more closely at nature for inspiration and guidance on living.

  • Understanding Your Eating Style

    Understanding Your Eating Style

    Most mornings, I wake up and make a smoothie for my kids. It sounds like a simple and quick breakfast, but in my house, nothing is that simple. My kids don’t consider a smoothie to be a meal. Once I hand them their smoothies, they ask me what else I’m making.

    The smoothie, in their minds, is just a drink—an accompaniment to their meal, and not a meal on its own. So, each morning, I make smoothies along with scrambled eggs or pancakes or something else that they consider to be a real meal.EatingStyle

    BUT, if I placed all of the smoothie ingredients onto the table and announced that breakfast was served, I bet that my kids would laugh in disbelief at the quantity of food before them. Look at the ingredients in this morning’s smoothie: nut milk, blueberries, a whole banana, a whole peach, and a quarter cup of strawberry yogurt. They would say that they couldn’t eat all of that food in one sitting. It doesn’t cross their minds that they DO eat all of that food in one sitting (in addition to the “real” meal that I’ve prepared).

    This got me thinking…

    How many adults go through the motions of either buying a smoothie or blending one at home each day without any appreciation for the significant quantity of food that they are consuming? Perhaps some adults realize it. My husband happens to be one of those people, which is why you’ll never see him eating plates of fruit and yogurt and milk. He’s not a big breakfast eater, and the thought of eating plates of food first thing in the morning is just too much for him. A smoothie, which hides all of the bulky volume of fruit, is a perfect solution for someone like him, who would otherwise not eat breakfast at all. He knows he’s getting all of the benefits of fruits, vegetables, nut butters, etc., without actually having to sit down and eat all of that food with utensils.

    I happen to be on the other end of the spectrum. If I choose to drink a smoothie for breakfast, I am looking for snacks within an hour, even if I’m not actually hungry. I am like my children, and my brain interprets the smoothie as a drink, not a meal. I would much rather see an abundant breakfast in front of me—a breakfast that I can chew and savor, rather than gulp down. I don’t care about the convenience of having a smoothie in a cup that can travel from the home to the car. I’d much rather sit down with multiple plates and bowls of food to taste. Eating the individual ingredients of the smoothie would be a much more satisfying experience than drinking the blended version of those same ingredients.

    If you are working towards healthier eating habits, it’s SO important to understand your thought processes surrounding food so that you can tailor your meals and snacks to complement your tendencies.

    Eating mindfully is key.

    If you are wondering whether smoothies are a good breakfast option, ask yourself these questions:

    -Am I a volume eater? Do I like having lots of food in front of me?

    -Do I need various textures of food to feel satisfied?

    -Can I be satisfied with a liquid meal?

    -Am I better off eating the unblended ingredients of a smoothie in whole form? Do I prefer liquid meals? If so, why? Does convenience and portability have anything to do with my preference for smoothies?

    If you answer each of these questions and really consider how and why you think the way you do, you can begin to understand why you eat the way you do. Once you get a handle on why you eat the way you do, you will become more mindful of your food choices and begin to develop healthier eating habits.

    In the past, I’ve touched upon the subject of different eating habits. Not everyone has the same approach to eating, and that’s okay. Just becoming more mindful of your own approach and your own inclinations can help you figure out how to create healthy habits that will work for you.


  • Grilled Pizza with Fresh Tomato, Mozzarella and Basil

    Grilled Pizza with Fresh Tomato, Mozzarella and Basil

    Who doesn’t love pizza?  It happens to be a mainstay at our house, especially on those busy nights, but store bought pizza has nothing on a delicious homemade grilled pizza.  All you need is a grill and a few fresh ingredients.
    grilledpizzacollagetitle
    We started grilling pizza a few years ago.  We couldn’t believe how amazing it turns out — and we’ve been making this delicious treat ever since.  I can guarantee you will never find a better tasting pie.  It’s great for a family meal or for entertaining.  You can dress it up any way that you’d like.  You can make it with pre-made pizza sauce and your favorite toppings. But, today, I’m offering you one of my family’s favorite preparations which happens to include only seven fresh ingredients – tomatoes, garlic, olive oil, basil, mozzarella cheese, Parmigiano-Reggiano cheese and pizza dough.  It’s perfect for those lazy summers when turning on the stove is the last thing on your mind — and it happens to be an excellent recipe for the multitude of summer tomatoes in your garden.  This pizza is like a grilled bruschetta — topped with melted cheese — but so much better than you would ever imagine.   Mmmmmm, my mouth is watering just thinking about it.

    In order to make the recipe more manageable, I purchase the pizza dough. You can buy it from your local pizzeria or supermarket.  I like to get mine at Trader Joe’s (which also happens to offer a whole wheat dough and an herbed dough option).  However, for this pizza, I recommend an original dough — nothing fancy.  Just enjoy the simplicity of the fresh ingredients.

    The process is not complicated, it just involves a few steps.  I’ve included some pictures below to help explain the process.  Before you get started make sure you have the following tools on hand:

    • BBQ grill
    • Pastry brush for the olive oil
    • Pizza peel or flat cutting boards for transferring dough to grill
    • Tongs
    • 2 large baking sheets

    And, here is a visual breakdown of the steps — which I detail in the directions:
    pizzaprocess

    Grilled Pizza with Fresh Tomato, Mozzarella and Basil
    Yields 2 pizzas

    For the sauce:
    20 ounces of tomatoes, chopped (grape tomatoes, plum tomatoes, any kind you like)
    1-2 cloves of garlic, crushed
    3 tablespoons olive oil
    1 teaspoon salt
    fresh ground pepper to taste
    1 tablespoon of fresh basil, chopped

    2 packages of store bought pizza dough (I used 16 ounce dough from Trader Joes)
    12 ounces of mozzarella cheese (I use low moisture mozzarella cheese since the sauce is so loose, you don’t want extra water)
    1/2 cup of grated Parmigiano-Reggiano cheese
    salt and pepper to taste
    olive oil for the grill

    Directions:

    Preheat grill on high; coat grill grates with olive oil.

    Assemble tomato sauce, combining chopped tomatoes, garlic, olive oil, basil, salt and pepper.

    Slice mozzarella cheese and grate parmigiano-reggiano cheese.

    Roll dough out on a floured surface.  Transfer dough to pizza peel (or a flat cutting board). Coat top of dough with olive oil.

    Flip dough onto hot grill.  Let it cook until bubbles form on top of dough — timing really all depends on width of dough — but 5 minutes is a good estimate.  I usually close the grill for this part — but, if this is your first time making grilled pizza, keep an eye on the dough and the grill flame.  You don’t want to burn the dough.

    Once bubbles form, and the underside of dough is browned (with grill marks), flip the dough with tongs.

    Top dough with tomatoes, cheeses — and salt and pepper if you’d like.  Close grill lid and cook until the cheese melts and the bottom of the pizza is nice and brown and branded with grill marks — you are looking at another 3-5 minutes depending on the thickness of the dough.

    Serve immediately.

    Helpful hint: Make the pizza with a friend — or your partner. It helps to have an extra set of hands – especially if you plan on making more than one pizza. 
    pizzapinterest