Author: Kate Alexander

  • Blueberry Crisp (No White Sugar, No Dairy, No Gluten)

    Blueberry Crisp (No White Sugar, No Dairy, No Gluten)

    blueberry crispI love dessert. I love butter, sugar and cream — and all of the other sinful ingredients that go into a decadent dessert.  However, I’ve been on a quest to lighten up my desserts, to reduce my sugar intake and to substitute more “healthy” ingredients into my recipes.

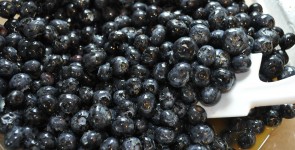
    I thought I would start with a crisp.  I made a light version of a strawberry rhubarb crisp a few months ago.  It was delicious.  But, now blueberries are in season, so I thought I would try my hand at a healthy blueberry crisp. I swapped out white sugar for maple syrup — a natural sugar.  I included orange juice to add some natural sweetness as well as the zest of orange and lemon which pairs perfectly with the blueberries. Instead of butter, I used safflower oil as the “fat” in the topping.  I added walnuts and oats for texture.

    I’m really pleased with how it turned out.  In fact, my whole family thoroughly enjoyed this crisp — even my mother (who can see right through my healthy dessert recipes) raved about it!

    The beauty of this recipe is that you can swap the blueberries for other berries of your choice.  You can eat it just as it is, or you can top it with ice cream, a dollop of cream or greek yogurt. I bet this would work out great with apples.  I can’t wait for apple season . . . .

    Blueberry Crisp
    Serves 8-10 people

    8 cups of blueberries
    1/4 cup of freshly squeezed orange juice
    1/4 cup of freshly squeezed lemon juice
    zest of one orange
    zest of one lemon
    3/4 cup of maple syrup (grade B)
    1.5 tablespoons of cornstarch

    For the topping:

    3/4 cup of brown rice flour
    3/4 cup of almond meal
    1 cup of quick cooking oats
    1/2 teaspoon of salt
    1/2 cup of safflower oil
    3/4 cup of maple syrup
    1/3 cup of chopped walnuts

    Preheat oven to 350 degrees.

    In a large bowl, combine blueberries orange juice, lemon juice, zest, maple syrup and cornstarch.  Mix to combine.  Pour blueberry mixture into a 9 by 13 inch baker.

    In a separate bowl, add brown rice flour, almond meal, oatmeal, salt, safflower oil, maple syrup and chopped walnuts.  Mix to combine. The topping will be loose. It will not be crumbly like a more traditional crumb topping made with butter. I’ve included a picture below so you can see the consistency.crumb topping

    Spoon topping over blueberry mixture.  Bake for 1 hour at 350 degrees. Crisp is done when berries burst open and bubble.cooked crisp

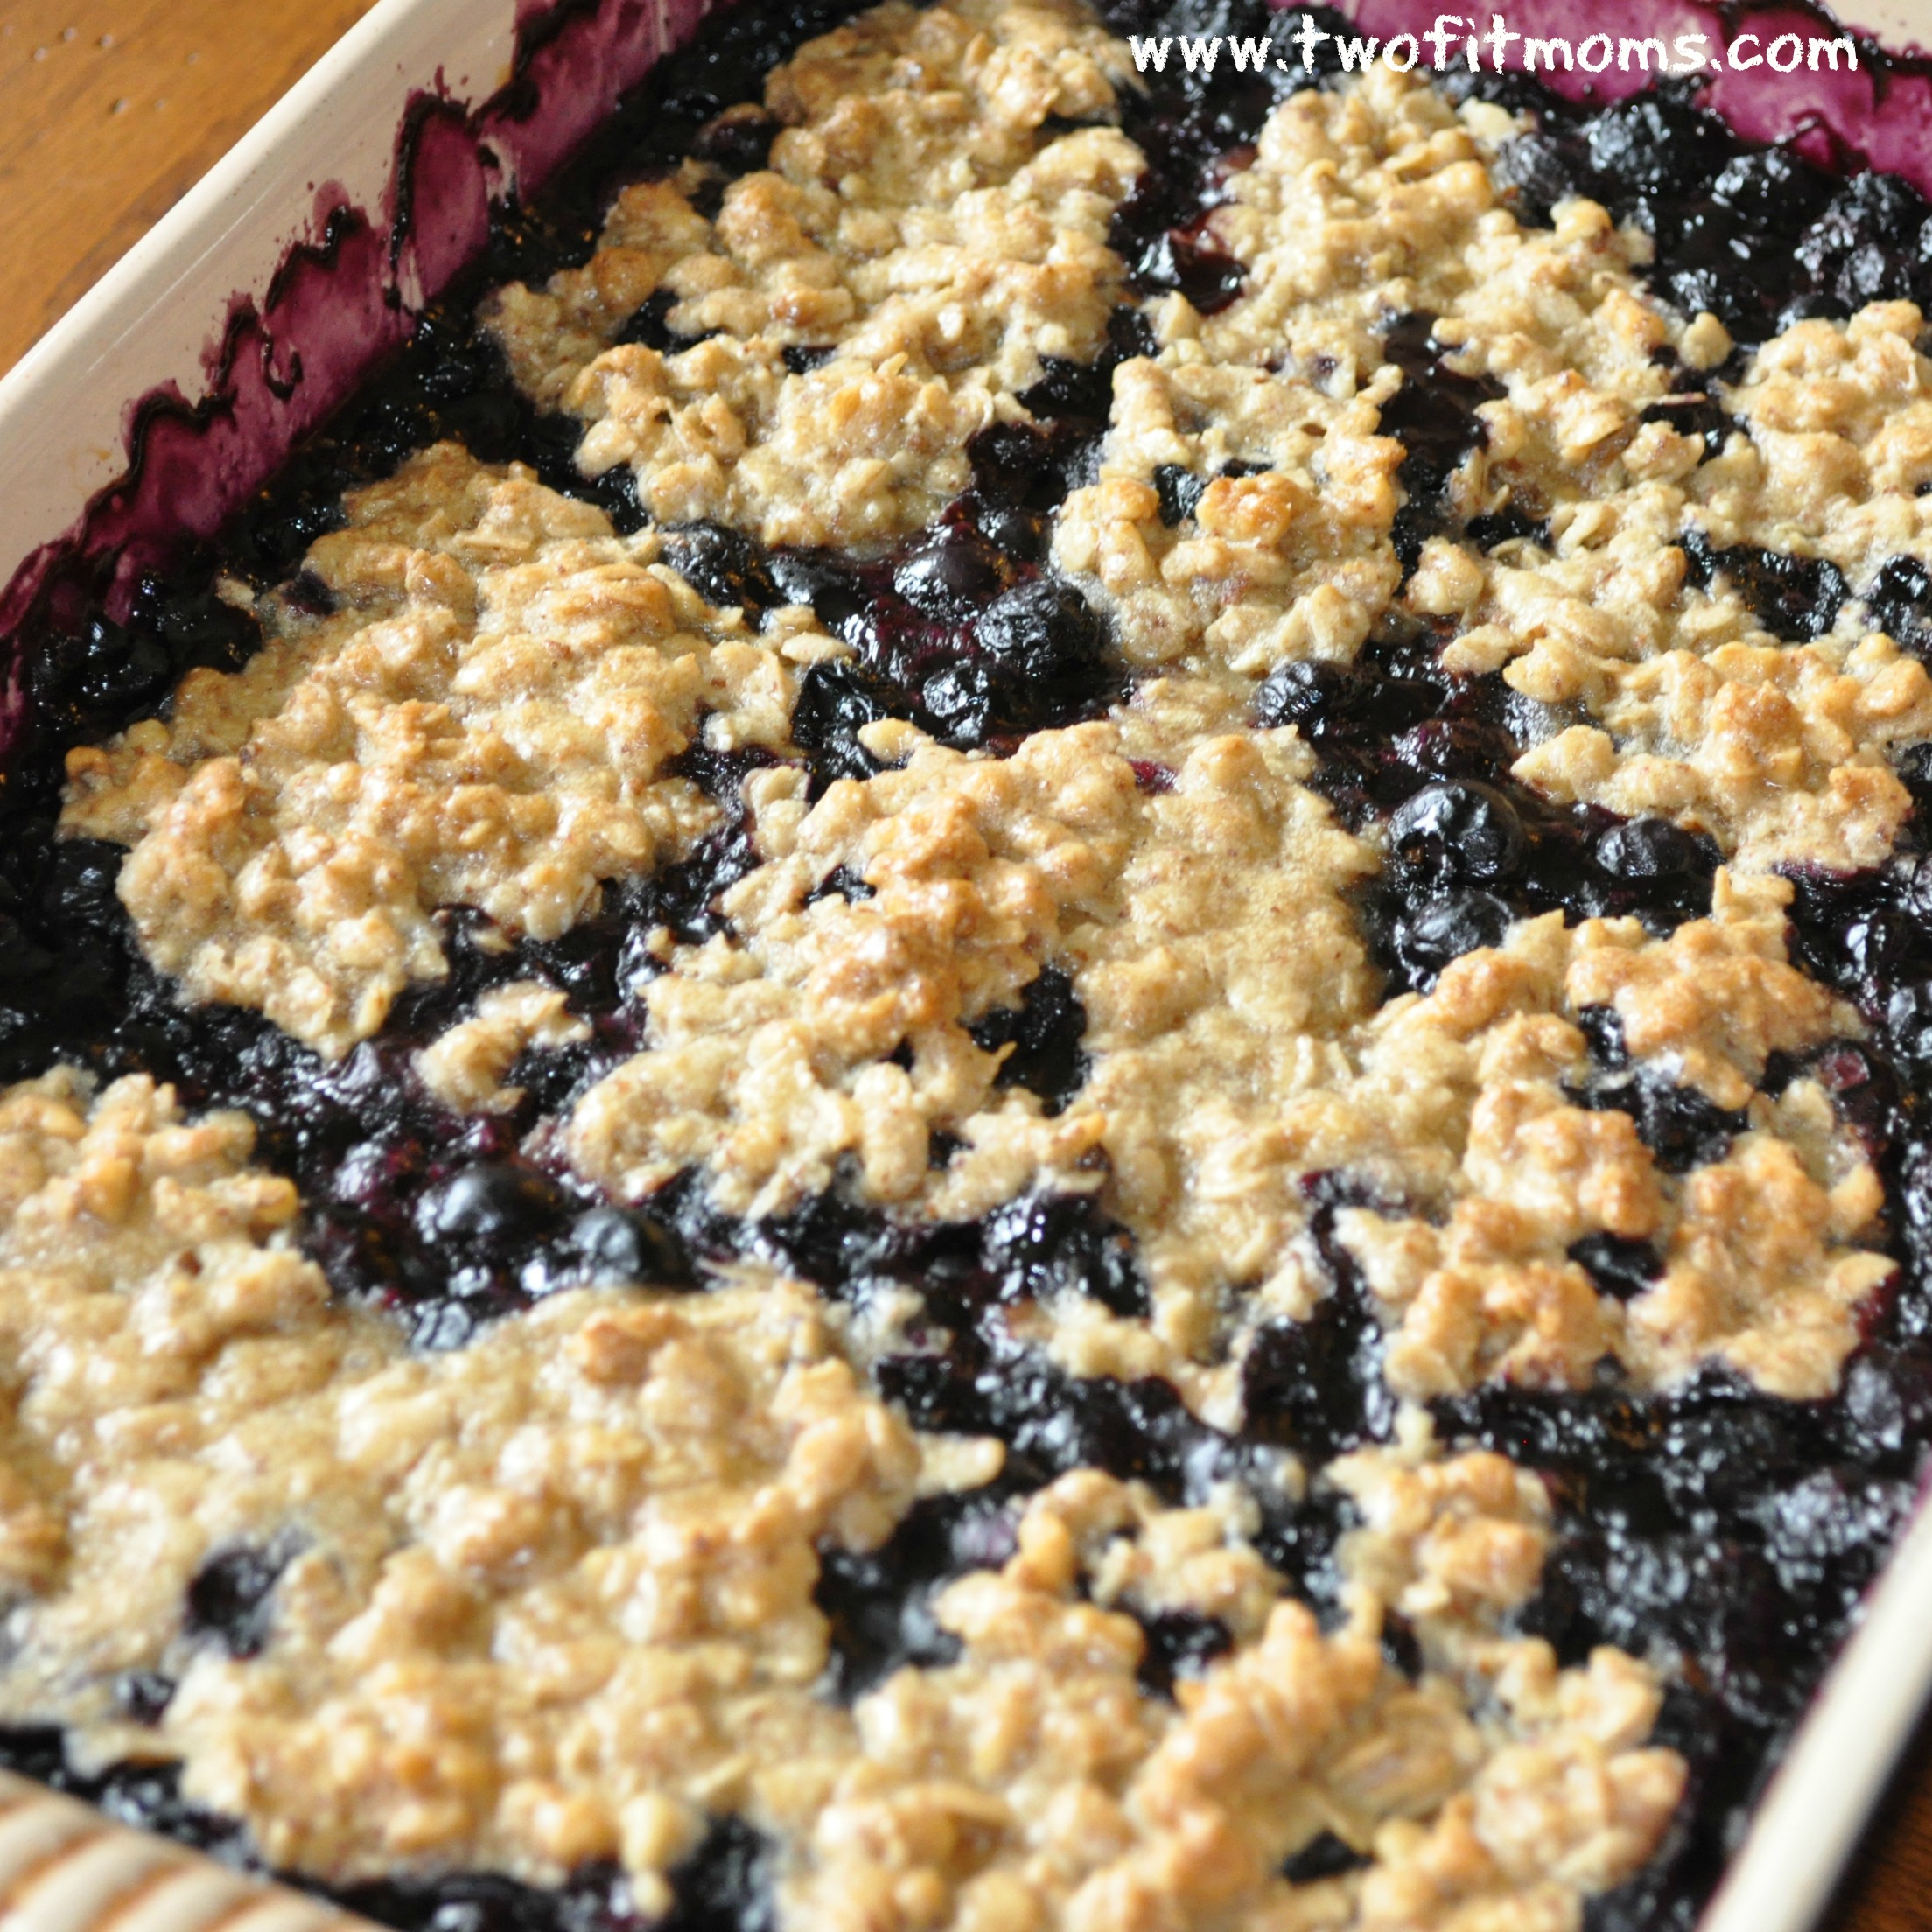
    Helpful hint: Don’t serve the crisp right from the oven.  Let it sit a bit so that it sets up — it will be easier to dish out.

  • Herb Marinated Grilled Vegetables

    Herb Marinated Grilled Vegetables

    grilled veg bannerGrilled veggies are a mainstay summer side dish at our house, and the recipe that I’m sharing with you is not just any grilled vegetable recipe — it’s the best grilled vegetable recipe!

    It’s based on Giada De Laurentiis’ recipe which I’ve modified.  To be honest, the marinade is what really sets it apart.  It’s an olive oil and balsamic vinegar dressing infused with garlic, rosemary, basil and parsley.  The dressing brings your grilled veggies to a whole new level!

    Cutting the vegetables is a little time intensive, but I promise you will not regret the effort you put into making these veggies.  In fact, you will likely get more than one meal out of them — and the longer they marinate, the better they taste.

    I generally serve these veggies as a side dish, but they are delicious on a sandwich (with hummus or goat cheese). You can also chop up the leftover veggies and serve over salad greens or mix them into quinoa or farro.

    You can modify the recipe based on the veggies you have on hand (e.g., substituting summer squash for zucchini), and you can adjust the quantity of marinade depending on whether you want to make more or less veggies.

    Herb Marinated Grilled Vegetables

    3 zucchini
    3 Japanese eggplant
    3 red, yellow or orange bell peppers
    12 baby portobello mushrooms (e.g., cremini or baby bella mushrooms)
    1 bunch of asparagus
    2-3 bunches of scallions
    Olive oil (approximately 6-8 tablespoons — but don’t be afraid to use more, if necessary)
    Salt and pepper to taste

    For the marinade:

    1/2 cup of olive oil
    4 tablespoons balsamic vinegar
    2 cloves of garlic, crushed
    1 tablespoon fresh basil, chopped
    1 tablespoon fresh parsley, chopped
    1 tsp fresh rosemary, chopped

    Turn on your grill, and set it to high.  In the meantime, prep your veggies.  You want thick cuts in order to survive the grilling process.  Cut zucchini and eggplant in 1/4 inch thick slices (long ways).  Seed the bell peppers and cut into quarters (the larger slices will be easier to grill vs. smaller strips).  Trim the asparagus (check out our article on how to properly prep asparagus!), and wash and remove the bottom stems of the mushrooms.  Trim bottoms and tops of scallions.

    Arrange cut and prepped veggies on a large baking sheet.  Drizzle with a few tablespoons of olive oil — not a thick coating, but a light coating on all the veggies so that they don’t stick to the grill.  Season with salt and pepper to taste.

    While grill is heating, make the marinade.

    In a small bowl, add olive oil, balsamic vinegar, garlic and chopped herbs. Whisk until incorporated.  Set aside.

    When the grill comes to temperature, arrange vegetables and cook until they are tender and have grill marks.  You will likely need to grill the veggies in batches.  Once they are cooked, place them on a large cookie sheet and keep adding to the pan as additional veggies are ready.
    veggie collage

    While the grilled vegetables are warm, pour the marinade over them.  Seal the pan with foil and let them sit until they come to room temperature.  You can serve the veggies at room temperature or you can place them in the refrigerator for use at a later date.  The longer they marinate, the better they taste!

    Helpful tips: Make sure your grill is very hot and the grates are clean.  Grilled veggies don’t taste good with leftover charred bits on them! Additionally, if you don’t use all of the marinade, use the extra to dress your salad!


  • Yoga For Everyone

    Yoga For Everyone

    When you gather nearly 200 people for a free yoga event in New  York City, you realize that the concept of “yoga for everyone” is possible.  In fact, it’s happening.  We see this message unfold on Instagram daily.  People of all ages, sizes, ethnicities — all walks of life — have embraced yoga.  But being able to see this in real life is truly amazing.

    As we debriefed after the event, the first topic of discussion was the amazing demographic of our yoga community.  It really made us feel proud that we have helped bring so many different people together for the same purpose — yoga!banner for article

    The event was intended for all levels of yoga experience—Inversions were optional!  Whether you were a beginner or a more seasoned yogi, you were welcomed.  Many attendees tried AcroYoga for the first time or attempted their very first headstand!  It was amazing to see so many people take a leap of faith and soar.

    We created this event to help inspire, to build confidence, and to build an even greater comradery.  We think we achieved this — and maybe more.

    As we sort through all of the pictures we took during FamJam, we see lots of smiles beaming back at us.  Pure happiness exudes from everyone in attendance.  Meeting the yogis we’ve been following on Instagram, achieving a yoga posture we never thought was possible, learning to trust others to the extent that you’d let them balance you on their feet — all of this was achieved on Saturday.

    Thank you to Gaiam, our gracious event sponsor. Thank you to our partners, Claudine and Honza, of YogaBeyond. And, most importantly, thank YOU for making it such a memorable day!

    To see the full album of photos from Yoga FamJam, please visit our Facebook page.

    Namaste.

    bottom famjam collage


  • Summer Pasta with Fresh Tomato & Arugula

    Summer Pasta with Fresh Tomato & Arugula

    arugula pasta bannerNo one wants to turn on the stove to make tomato sauce in the summer.  And, while the tomatoes are ripe, it’s the best time to try your hand at a fresh, uncooked tomato sauce.  All of the ingredients in this sauce are raw.  The only thing you need to cook is the pasta — the heat of which will help bring these raw ingredients to life and create a “sauce”!

    The beauty of this dish is that it can be made in less than 30 minutes.  And, you can decide what type of pasta works for your diet.  I used a multi-grain pasta, but you can use  any type of pasta that meets your family’s needs (just be mindful that not all pastas will translate well once cooled, such as corn pasta which may get gummy).

    That being said, you can serve this pasta hot or cold — although I prefer eating it warm.

    Summer Pasta with Fresh Tomato & Arugula

    Serves 4-6 people, dinner portion

    3 cups of chopped tomatoes (I used three medium-sized vine tomatoes)
    2 cups of arugula, chopped
    10 basil leaves, chopped
    1/2 cup of olive oil
    2 tablespoons of balsamic vinegar
    2 cloves of garlic, crushed
    salt and pepper, to taste
    1, 1 lb box of penne pasta  (my box was just under 1 lb and it worked perfectly fine!)

    Bring a large pot of well-salted water to a boil.

    In the meantime, chop the tomatoes, arugula and basil and add to a large serving bowl.  Whisk together the olive oil, vinegar and crushed garlic in a separate small bowl, creating a dressing.

    Cook pasta according to directions, remove once it is cooked al dente and drain in a colander.  Add cooked pasta, while still warm, to large serving bowl with tomatoes, arugula and basil.  Top with dressing and toss to combine.  Add salt and pepper to taste, and serve.

    Enjoy!

  • Asian Peanut Kale Salad

    Asian Peanut Kale Salad

    kale with headerKale is so mainstream now, you can find it anywhere and on most menus.  In fact, my brother raved about a kale salad he had recently at an upscale chain restaurant, and since we are all about kale, I decided to re-create it.  If you search the Internet you will see that others have tried their hand at re-creating this salad.  But, with some educated-guessing, we came up with our own version!

    Personally, I think all salads should be chopped.  I think they just taste better and the flavors meld together better.  And, when eating Kale raw, cutting it every-so-finely makes a big difference! It creates a much lighter consistency to what can be a tough green.  All of the vegetables in this salad are sliced finely — what we call chiffonade.  In fact, earlier this year we offered tips on preparing your greens which showed you this chopping method.

    This is a great summer salad, and I bet it will convert your non-kale-eating friends into kale-eating junkies.

    Enjoy!

    Asian Peanut Kale Salad

    This is a hefty size salad and will feed a crowd.

    For the salad:

    1 bunch of kale, washed, ribs removed and cut chiffonade (approximately 7 cups)
    1 medium sized Napa Cabbage, bottom removed and cut finely (approximately 4 cups)
    1/2 bunch of cilantro, finely chopped (approximately 1 cup)
    1 bunch of scallions, finely chopped (approximately 1 cup)
    20 leaves of mint, finely chopped (approximately 1/2 cup)
    3/4 cup chopped roasted peanuts

    For the dressing:

    3/4 cup of roasted peanut oil
    1/4 cup of rice wine vinegar
    juice of 1 lemon
    2 tablespoons of honey
    1 tablespoon of Dijon mustard
    1 tablespoon of soy sauce
    1/4 teaspoon of garlic powder
    salt and pepper to taste

    Finely chop (chiffonade) the kale, cabbage, cilantro, scallions and mint (see picture below for desired consistency).
    kale chop logo
    Add greens to a very large bowl and set aside.

    In a separate bowl combine the peanut oil, rice wine vinegar, lemon juice, honey, mustard, soy sauce, garlic powder, salt and pepper, to taste.  Whisk the ingredients until they form a dressing consistency.

    Pour the majority of the salad dressing over the greens and top with the majority of the roasted peanuts.  Toss the salad.  Garnish with reserved chopped peanuts.

    Helpful hint: Check to see whether or not the salad is dressed enough for you.  The cabbage in the salad will break down, releasing water, so you might not find the salad is “wet” enough at first.  If you have the time, let it sit about 30 minutes, before adding the rest of the dressing.


  • Our Favorite Farro Salad

    Our Favorite Farro Salad

    farro bannerFarro is an ancient grain, most commonly found and grown in Italy. It can be added to soups and salads, and if you’ve never tried it before, here’s the perfect introduction.

    This farro salad has been eaten, adapted and shared by all three of us at Two Fit Moms.  It’s a staple, the perfect side dish, great for barbecues and events — and everyone loves it.  I make it about once a week during the summer when tomatoes are ripe and plentiful.

    I can bet that my colleagues make certain additions and substitutions to make this salad their own — but I tried to capture the basic salad recipe here for you.  You can feel free to jazz it up — adding chopped cucumbers, or a vidalia onion for a bit more sweetness or other chopped herbs.

    Please let us know what you think of this recipe.  We hope you love it as much as we do!

    Our Favorite Farro Salad
    serves a crowd, or 4-6 people with leftovers!

    1, 14 ounce bag of farro (rinsed and drained)
    4 1/2 cups of water
    1 pint of cherry or grape tomatoes cut in half
    1/2 red onion, chopped
    1 1/2 cups of steamed string beans, cut into bite-sized pieces
    1/4 cup of parsley, chopped
    1/3 cup of olive oil
    3 tablespoons of balsamic vinegar
    1 clove of garlic, crushed
    salt and pepper

    Add water, two teaspoons of salt and the farro to a large pot and bring to a boil over medium/high heat.  Lower heat and let simmer for approximately 20 minutes until most of the water is absorbed and the farro is tender (but still firm).  Drain the farro and add to a large bowl.  Set aside.

    In a separate bowl, add the olive oil, balsamic vinegar and crushed garlic; whisk until combined.  Add tomatoes, red onion, string beans and parsley to farro. Add the dressing to the farro salad (while still warm). Toss. Season with salt and pepper to taste, and toss again.

    farro collage with mark

    Serve warm, at room temperature or cold (the longer it sits, the better it tastes!)


  • Lemon-Dijon Herbed Salmon

    Lemon-Dijon Herbed Salmon

    lemon dijon salmon with bannerI’m going to be very honest with you. . . . I’ve never liked salmon.

    In fact, I’m the only one in my family who would not eat it.  Even my 2-year old likes it.  Since I’m the odd man out, so to speak, I decided I needed to make a more concerted effort to try salmon.  Plus, it’s healthy and good for your complexion (I’ve heard), so I decided to give it a try.

    I chose wild salmon versus farm-raised salmon at the suggestion of a friend who believes wild salmon has a milder flavor. Plus, wild salmon is supposed to be the healthier option, albeit pricey (a bit of a splurge, and not something we eat every day).

    I went to my local fish monger (luckily I have an amazing one in town), and I bought fresh, wild salmon. Then, I needed to find a good recipe because I think the key to good fish is good preparation.  I can assure you that just throwing some lemon on top would not be appealing to me.

    So, I searched the Internet looking for recipes, and cobbled together a marinade from what I had on hand in my refrigerator – lemon, garlic, dijon mustard, and parsley.  Voila!

    To my surprise, I really liked it.  The whole family liked it!  I’m not sure why — I guess it was just the right combination of flavors between the fresh lemon and parsley, the tangy mustard and spicy garlic.  It was also cooked just right — not overdone, but moist.

    Needless to say, I actually enjoyed the wild salmon.  It was sort of a miracle!  So, I figured, if I like it, you will too.

    Here’s my recipe for Lemon-Dijon Herbed Salmon! Consider serving it with our Shaved Fennel Salad or Lemon-Garlic Scented Roasted Asparagus!

    salmon squareLemon-Dijon Herbed Salmon
    serves 4-6 people

    2 lbs of wild salmon, cut into steaks
    1/4 cup of olive oil
    2 cloves of garlic, crushed
    1/4 cup of parsley, chopped
    1 tablespoon dijon mustard
    1 lemon, juiced and zested
    salt and pepper to taste

    Preheat oven to 400 degrees.

    In a bowl, combine olive oil, crushed garlic, chopped parsley, mustard, juice and zest of one lemon, salt and pepper.

    Place wild salmon in a baking pan, lined with tin foil.

    Evenly distribute marinade over each portion of fish.

    Bake wild salmon for approximately 15 minutes, until firm, but moist.  Serve immediately!

    Helpful hint: Try making this recipe on the grill! You will still want to cook the wild salmon on tin foil.  Try to keep the temperature of the grill at a constant 400 degrees.  I noticed mine cooked a little sooner on the grill, closer to 10-12 minutes.  Keep in mind, cooking times will vary depending on size and thickness of your wild salmon steak. 

  • Smashed Potatoes

    Smashed Potatoes

    smashed pot bannerI love potatoes — mashed potatoes, roasted potatoes, french fries, potatoes au gratin.  The list goes on and on . . . .But, I also like easy recipes and ones that the whole family will enjoy.  This recipe for smashed potatoes is really very simple.  And, they are fun to make, because you get to smash the potatoes with a mug — almost as if you were making tostones.

    However, nothing is fried, so this is a great healthy side dish.  The potatoes are oven baked and seasoned with delicious smoked paprika, garlic powder, salt and pepper. They are a great alternative to a roasted potato — and I market them as french fries to get my kids to eat them!

    So, next time you are at the market, grab a bag of baby new potatoes (they can be white, Yukon gold, or red potatoes).  And because all bags of potatoes seem to come in different weights, you choose the amount of olive oil and seasoning you put on them.

    Smashed Potatoes

    1 bag of baby new potatoes (I like the white or Yukon gold varieties)
    A few tablespoons of olive oil
    Smoked paprika
    Garlic powder
    Salt
    Pepper

    Add cleaned potatoes to a pot of water.  Bring the water and potatoes to a boil over medium-high heat.  Boil until potatoes are fork-tender — mine took about 25 minutes.  Drain potatoes and let them cool so that you can handle them.

    smashing potatoIn the meantime, preheat your oven to 400 degrees.  Take a large cookie sheet and coat the bottom lightly with olive oil.  Place potatoes on the cookie sheet a few inches apart so that you can allow them to spread when you smash them.  With a flat bottomed coffee mug, push down on the potato until it flattens (check out the picture to the right).  Once you have flattened all of the potatoes, drizzle a few tablespoons of olive oil over them and sprinkle with paprika, garlic powder, salt and pepper.  There’s no precise measurement for the spices, but take a look at the picture in the header to get a sense of how much spice I used.

    Bake until potatoes crisp up a bit – time will all depend on how many potatoes you have and their size, but 20 minutes is probably a good estimate.

    Enjoy!

    Helpful Hint: If you tend to be short on time in the evening, boil your potatoes during your morning routine. Drain them, and leave them on your countertop (or in the fridge, if you prefer) for smashing and oven roasting later.


  • White Bean Dip with Seasoned Pita Chips

    White Bean Dip with Seasoned Pita Chips

    white bean dipThis white bean dip recipe that I’m sharing with you is a modified version of a dip that I found in a Giada DeLaurentiis cookbook (Everyday Italian) years ago.  It’s become our hummus alternative.  In fact, it’s a family favorite and frequently graces our events (right alongside my husband’s famous guacamole!).  And, it very may well be on the menu this Memorial Day weekend!

    It’s really a cinch to make.  With only a few ingredients, and a food processor on hand, you will have a delicious homemade white bean dip in no time!

    I serve my dip with seasoned pita chips — a homemade take on a store-bought favorite.  This too requires very little effort and, I bet you have most, if not all, of the ingredients in your pantry.  Once you make homemade pita chips, you will turn your nose up at the store-bought kind! The pita chip recipe follows as well.

    As with most of our recipes, this one can be modified and adapted to suit your needs and tastes.  You will also notice that we generally “season to taste” which allows you to control the amount of spices, specifically salt.

    Enjoy!

    white bean fp upcloseWhite Bean Dip

    Yields approximately 2 cups of dip.

    2, 15 ounce cans of white cannellini beans, rinsed and drained
    1/2 cup of olive oil
    1/2 cup of parsley
    1 clove of garlic, crushed
    1 teaspoon of salt
    1/8 teaspoon of pepper
    4 tablespoons of fresh lemon juice

    Add beans, olive oil, parsley, garlic, salt, pepper and juice of one lemon to the bowl of a food processor.  Pulse until combined and creamy.

    Serve with homemade pita chips (recipe follows) or fresh veggies.

    pita  upclose
    Homemade Seasoned Pita Chips

    four large, whole wheat pita rounds, cut into eighths
    olive oil
    oregano
    garlic powder
    salt
    pepper

    Preheat oven to 400 degrees.

    Arrange pita on an oiled sheet pan (you might need two depending on the size of your pan).  Drizzle with olive oil and sprinkle with oregano, garlic powder, salt and pepper.

    Bake for 10-15 minutes until toasted and lightly browned.

    Pita will harden as it sits.

  • Weeknight Marinara

    Weeknight Marinara

    marinaraWhy would you open up a jar of marinara sauce when you can easily whip up a homemade batch? I know, it seems like way too much work, especially on a weeknight when time is limited, but I can guarantee, in just a few simple steps you will have a hearty tomato sauce (a double batch, in fact) that would put any jarred sauce to shame.

    The beauty of this marinara, is that it only requires a few ingredients, all of which you likely already have in your pantry: canned tomatoes (I prefer crushed), olive oil, garlic, onion, dried herbs, salt and pepper.

    And, you can modify it to your liking.  If you have more time and can let the sauce cook for a few hours, throw in a bay leaf.  If you like a spicy sauce add some crushed red pepper. If you prefer other herbs, throw in some oregano, parsley – and of course, use fresh herbs when they are available.

    This marinara can also serve as the basis for other tomato-based sauces.  Add some veggies and create your own primavera, or add some ground turkey, beef or sausage and you have a meat sauce . . . the possibilities are endless.

    Weeknight Marinara

    Yields enough for a pasta dinner for four with leftovers!

    2, 28 ounce cans of crushed tomatoes (I use San Marzano, but you can use any brand that you like)

    1/2 onion, chopped

    2 cloves of garlic, crushed

    a few tablespoons of olive oil

    1/2 teaspoon of dried basil (or oregano, parley, etc.)

    salt and pepper to taste

    Add a few tablespoons of olive oil to a large pot over medium heat.  Add the chopped onion, and let it cook until softened, 5-7 minutes.  Add the garlic until lightly browned (but not burned!).  Add the dried basil to the onion and garlic mixture — cooking it at this stage helps draw out its flavor.  Then, add the crushed tomatoes, salt and pepper to taste. If your sauce is too thick, feel free to add some water (or wine) — I would start with 1/2 cup.

    Let the sauce come to a full boil, and then reduce to low heat. Simmer for a minimum of 20 minutes.  Serve over a pasta of your choice.