Tag: inversion

  • Pose of the Week: Sirsasana A

    Pose of the Week: Sirsasana A

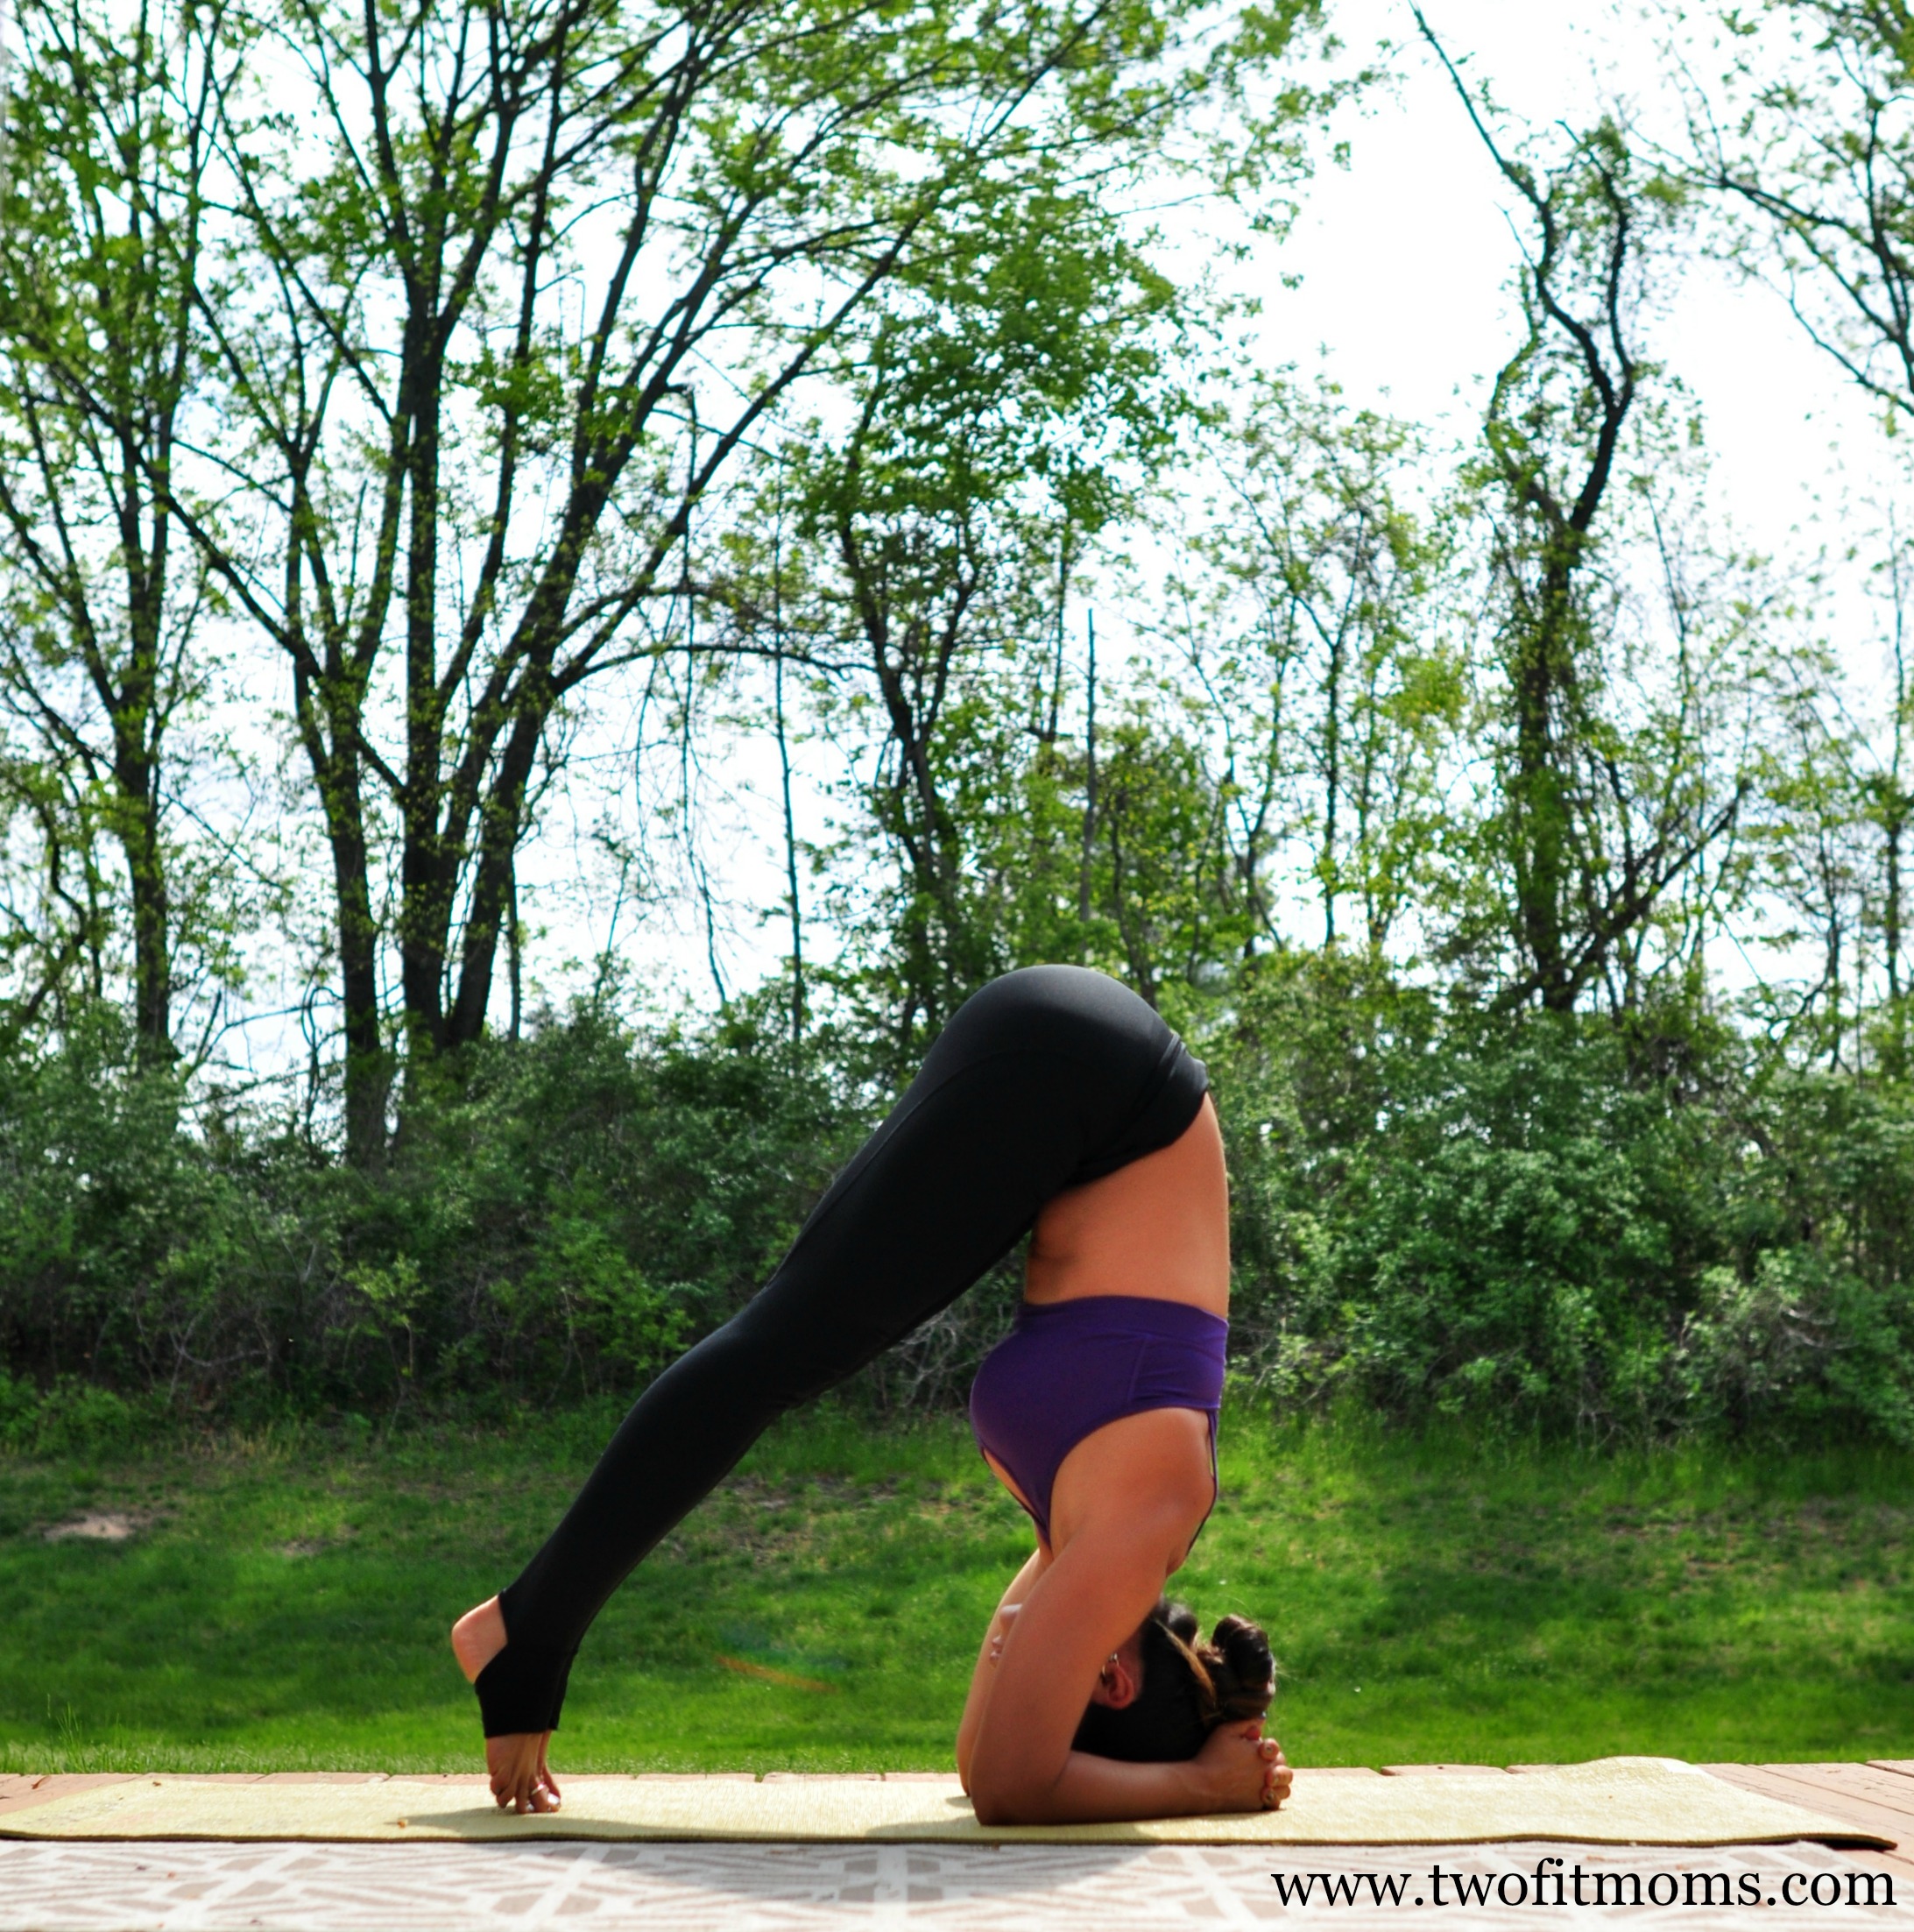
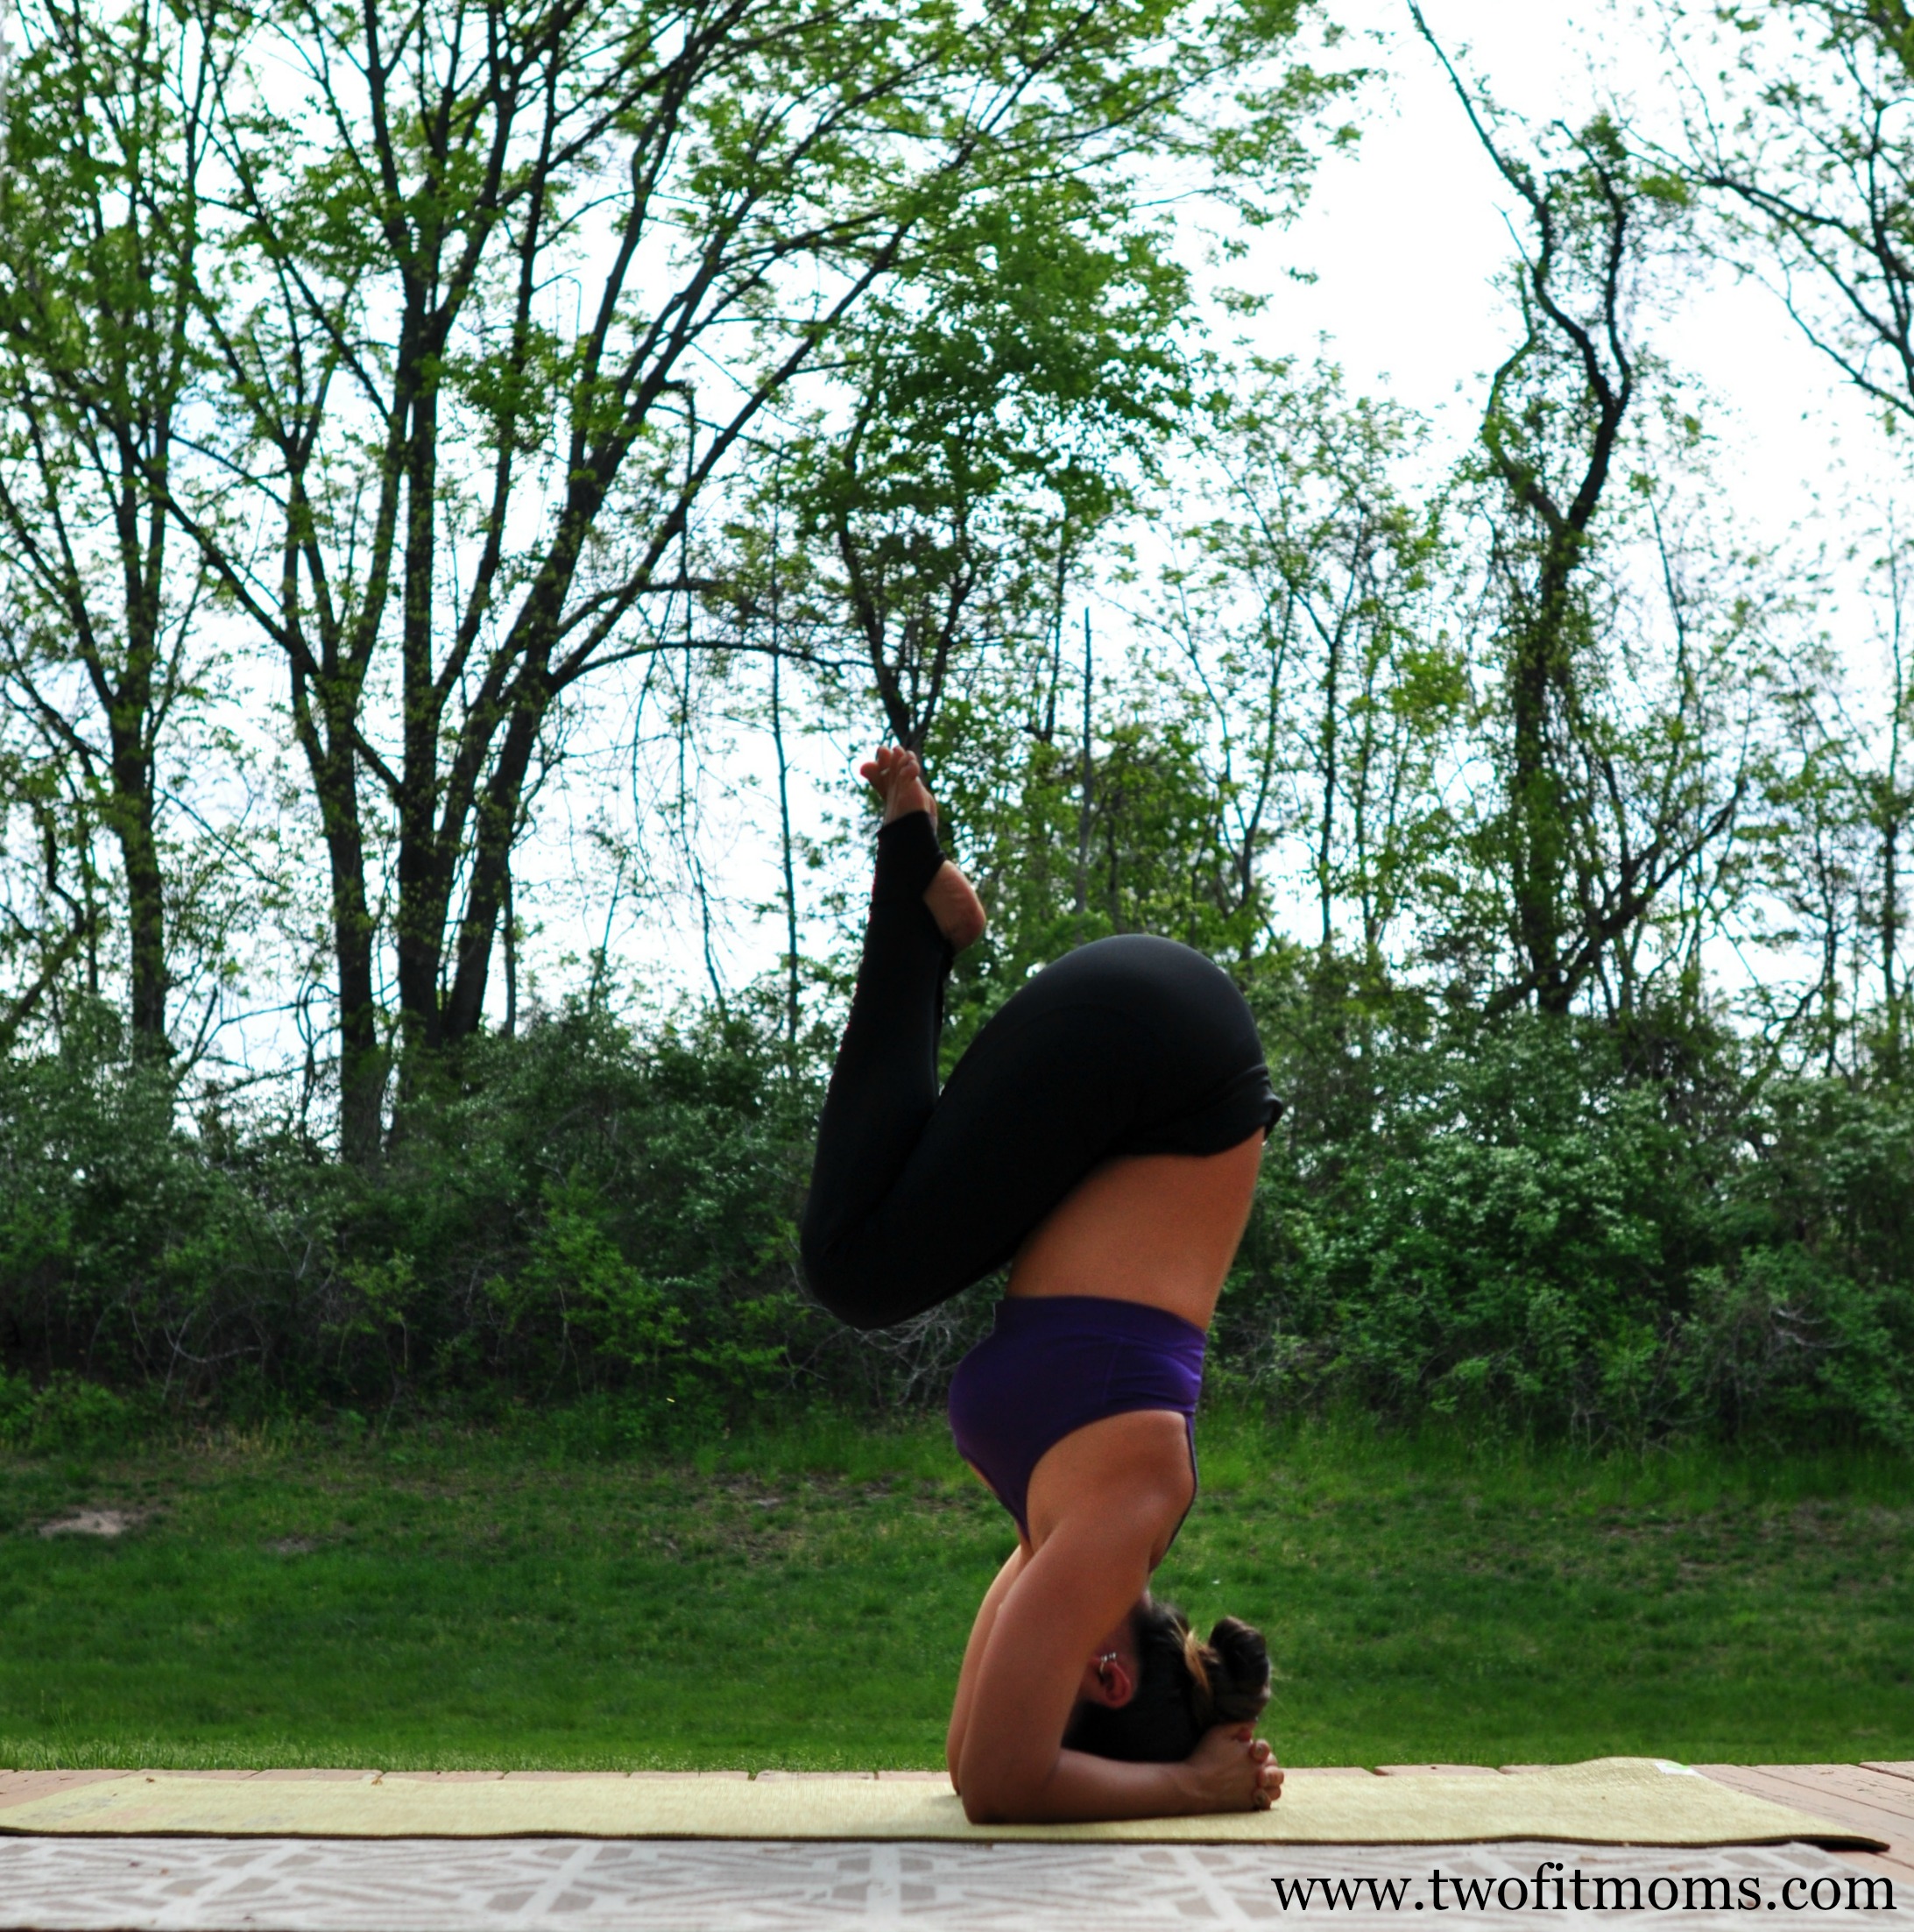
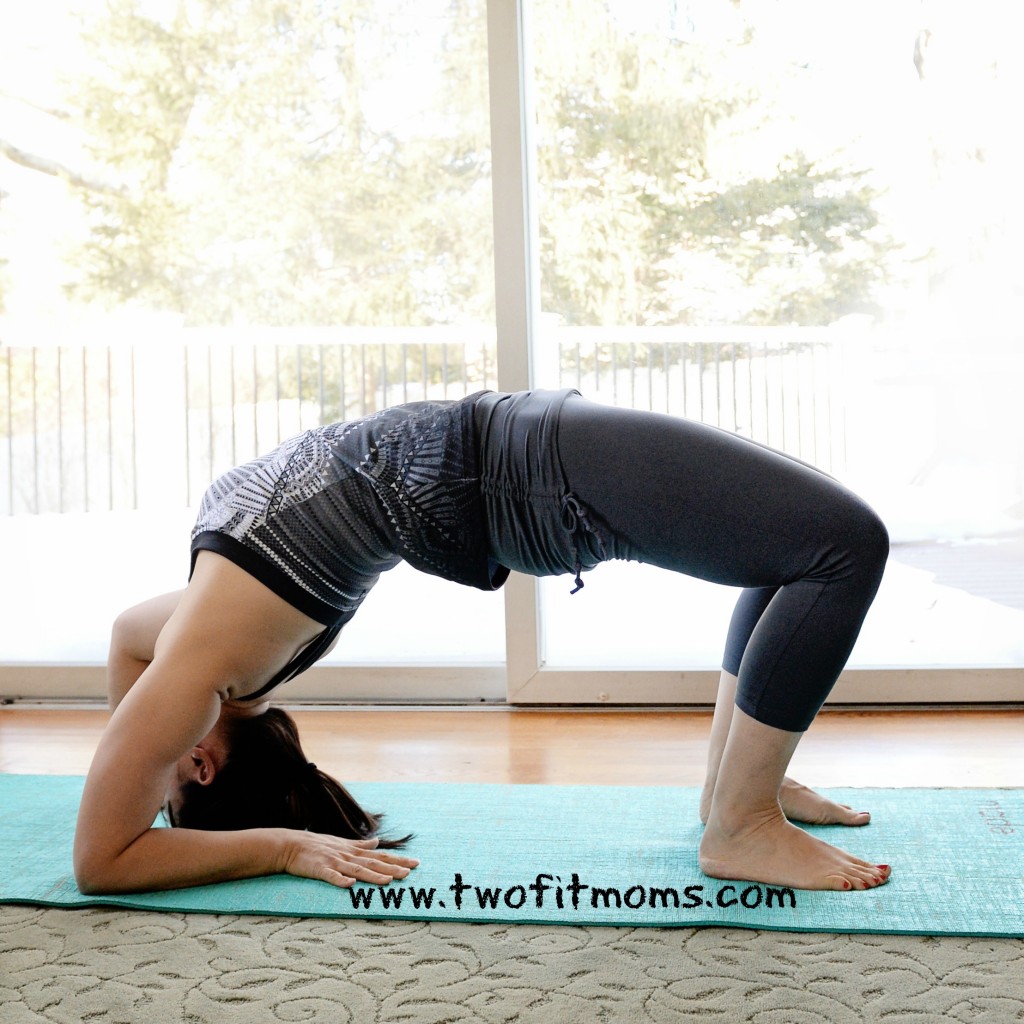
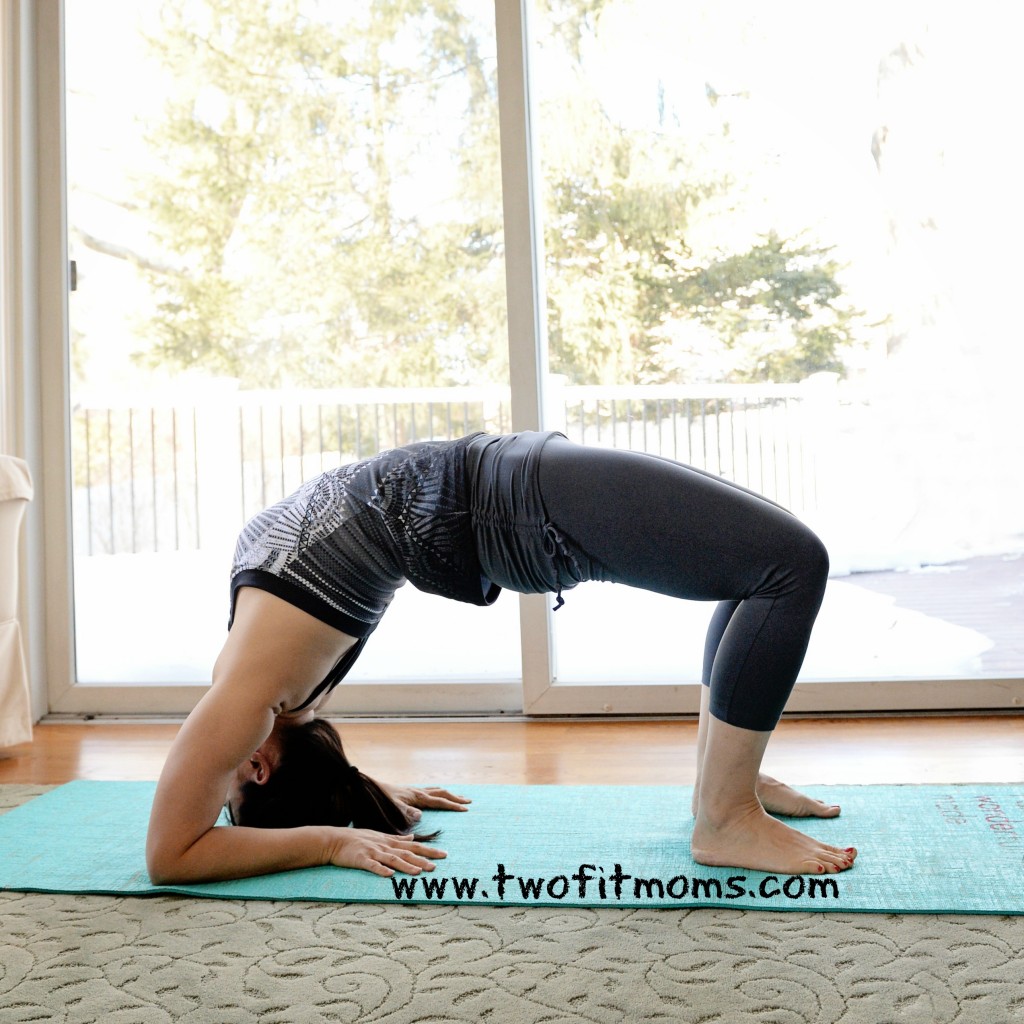
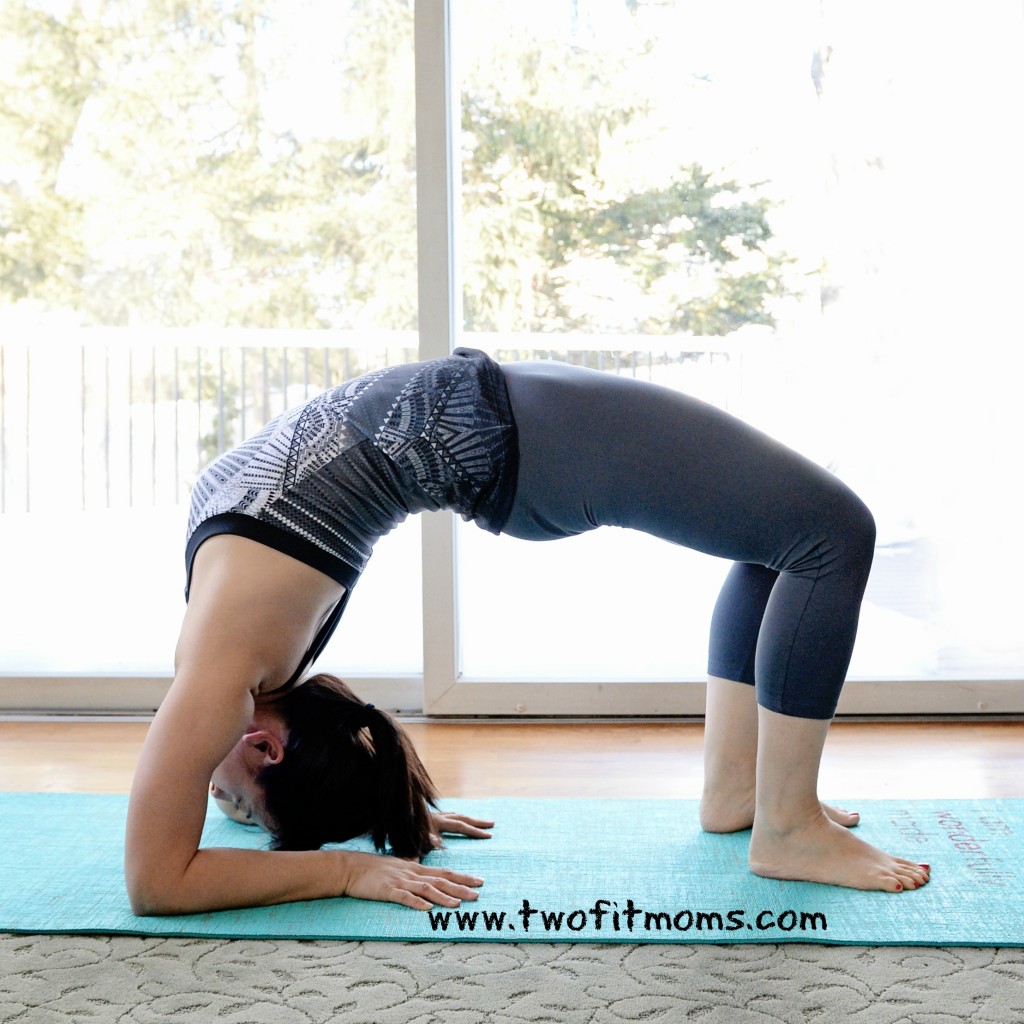
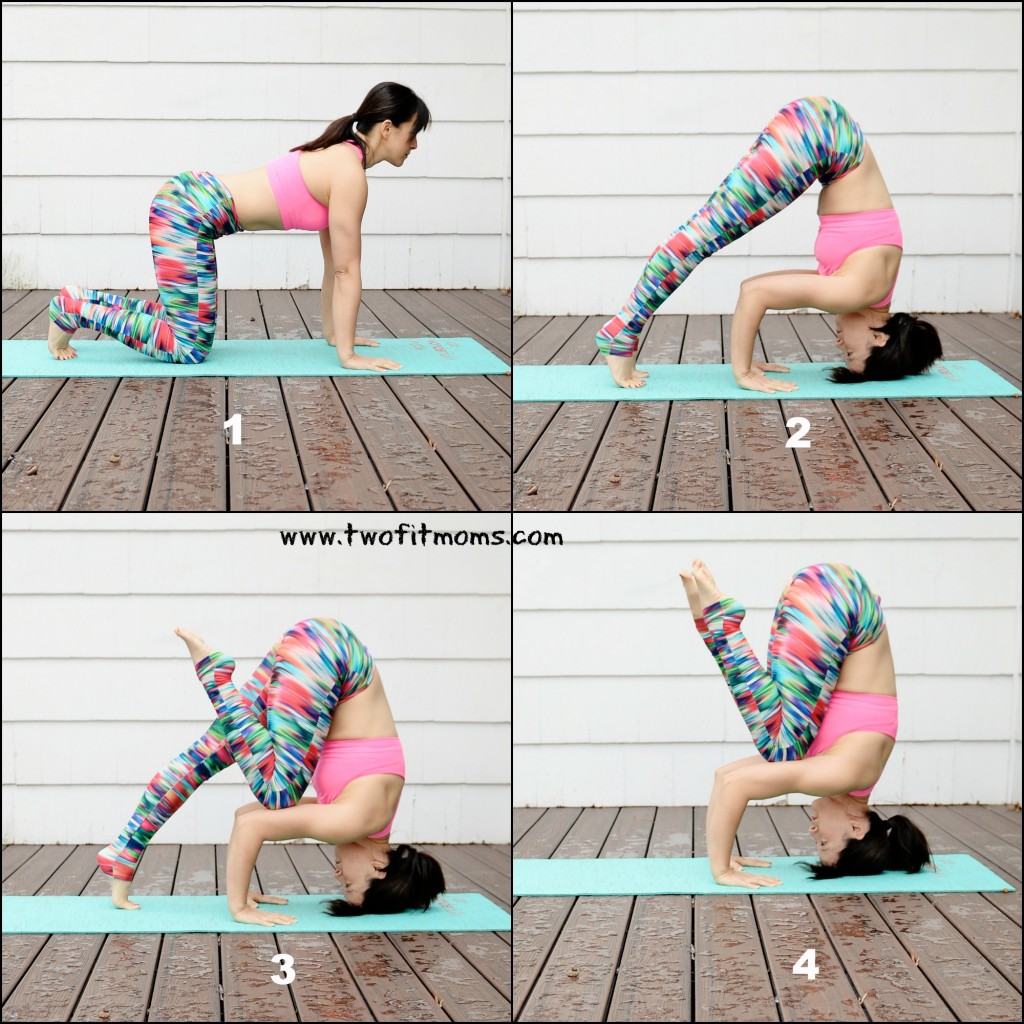
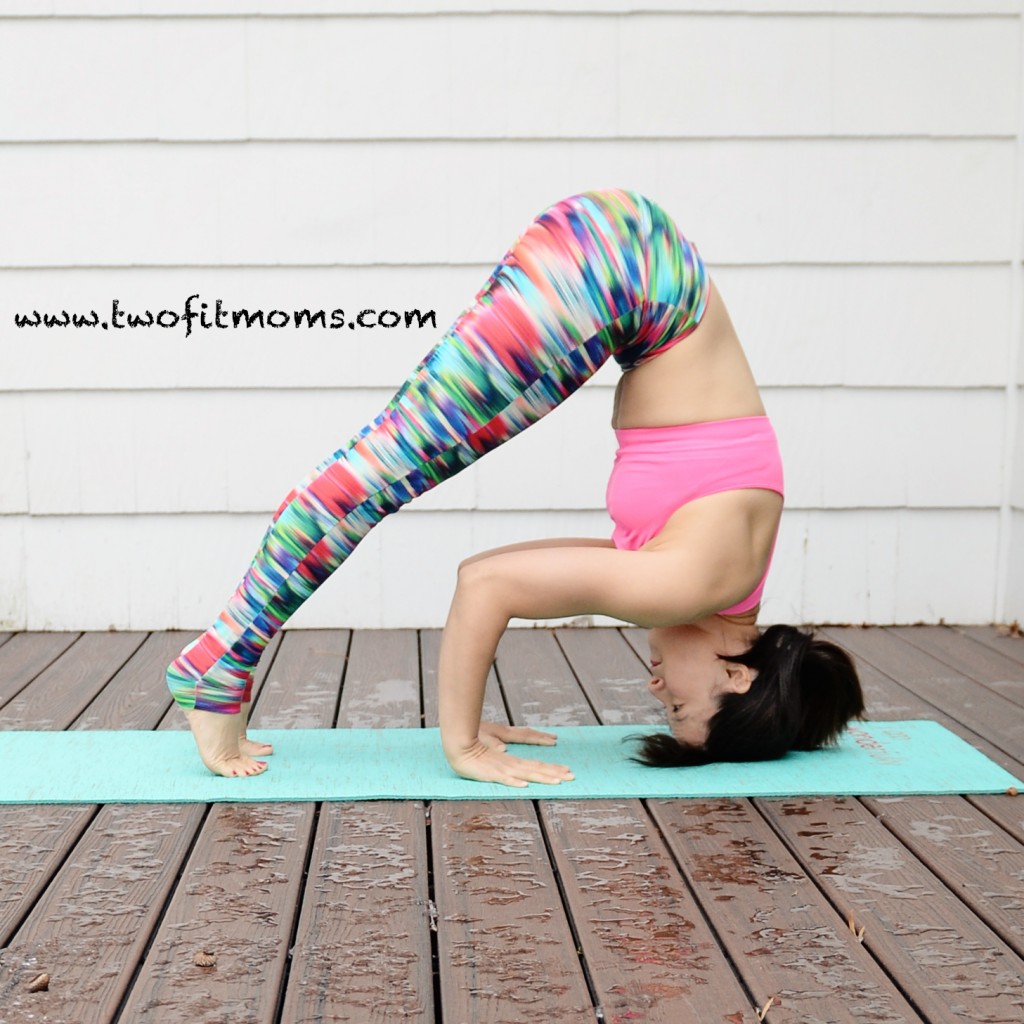
    Time to get upside down! This week’s TFM Pose of the Week is Sirsasana A or Supported Headstand. Check out the following modifications and feel free to use a wall for support!  You may also like to check out my top 5 reasons to get upside down everyday HERE. Have fun and be safe!

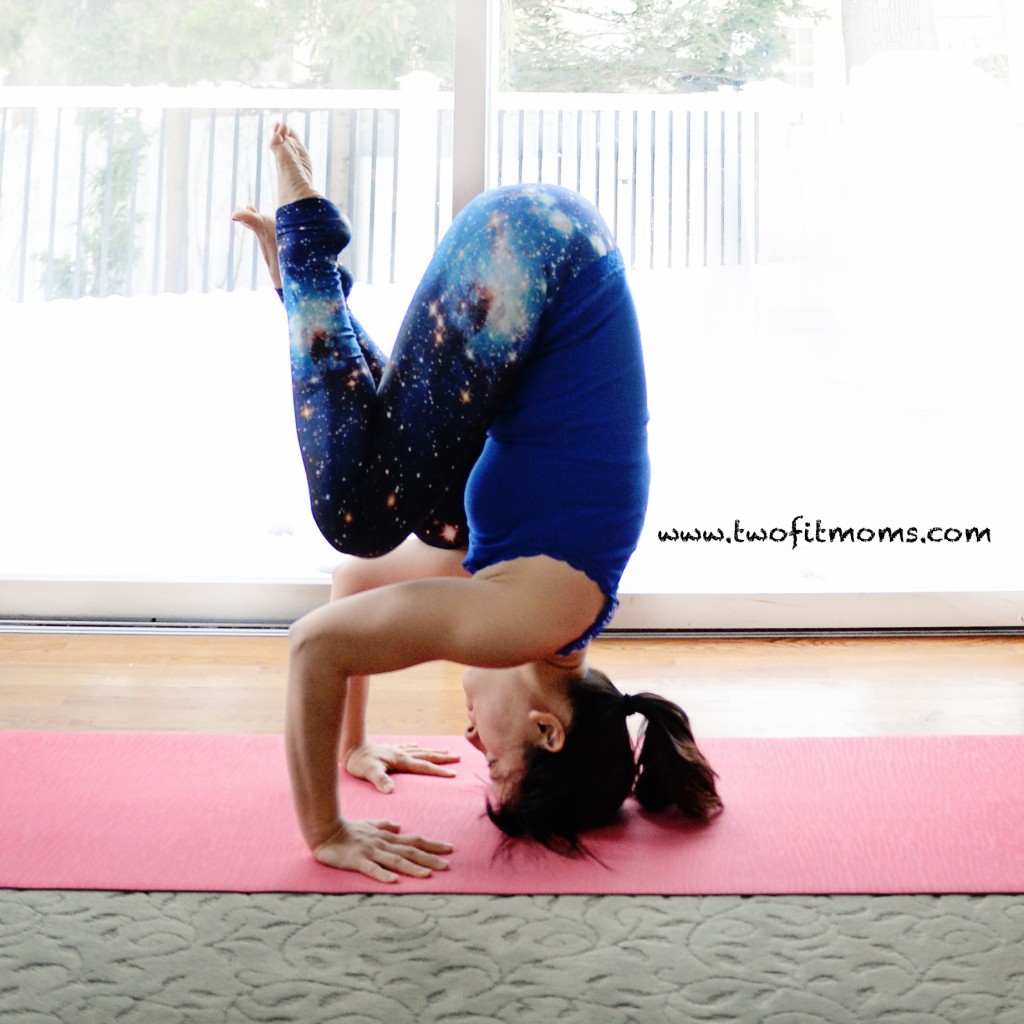
    Level 1 Modification: Keep your feet on the ground! You don’t need to take your feet off of the ground to experience the benefits of inversions. Start by sitting up on your shins and clasp your hands loosely, remembering to tuck the bottom pinky in! Place your forearms down on to your mat, elbows at shoulder width distance. Place the crown of your head in front of your hands. Root down through your forearms as you tuck your toes under and lift the knees up. Squeeze your elbows in as you draw your shoulders away from your ears. Walk your feet in as you begin to stack your hips over your shoulders. Your forearms should be bearing most of your weight.  It should feel like you can almost pick up your head. Stay here and take about 5-10 breaths. Slowly release down into Child’s pose.

    Dolphin Pose

    Level 2 Modification: Knees hug in! Start by sitting up on your shins and clasp your hands loosely, remembering to tuck the bottom pinky in! Place your forearms down on to your mat, elbows at shoulder width distance. Place the crown of your head in front of your hands. Root down through your forearms as you tuck your toes under and lift the knees up. Squeeze your elbows in as you draw your shoulders away from your ears. Walk your feet in as you begin to stack your hips over your shoulders. Slowly bend one knee into your chest. Press actively into your forearms and engage your abs to tuck the second knee into your chest. Your forearms should be bearing most of your weight.  It should feel like you can almost pick up your head. Stay here and take about 5-10 breaths. Slowly release down into Child’s pose.

    Sirsasana Modification

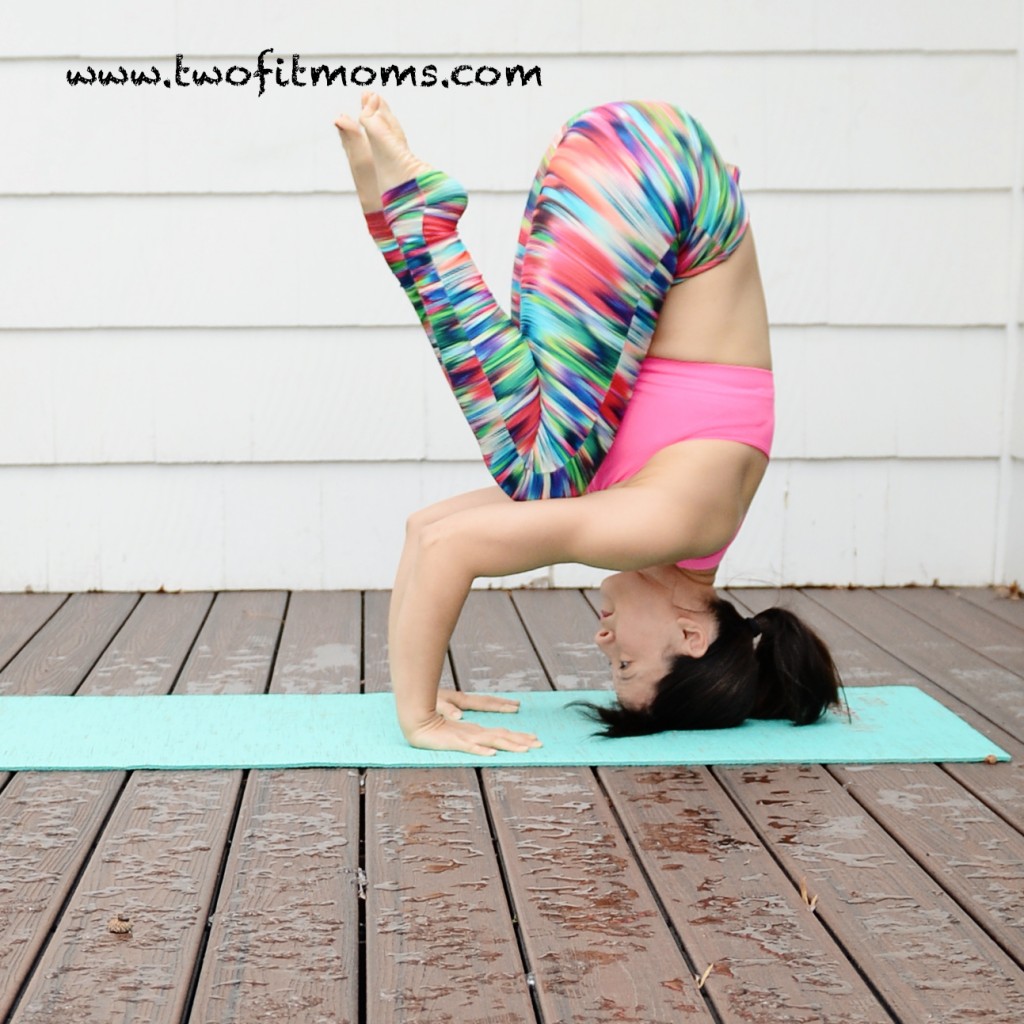
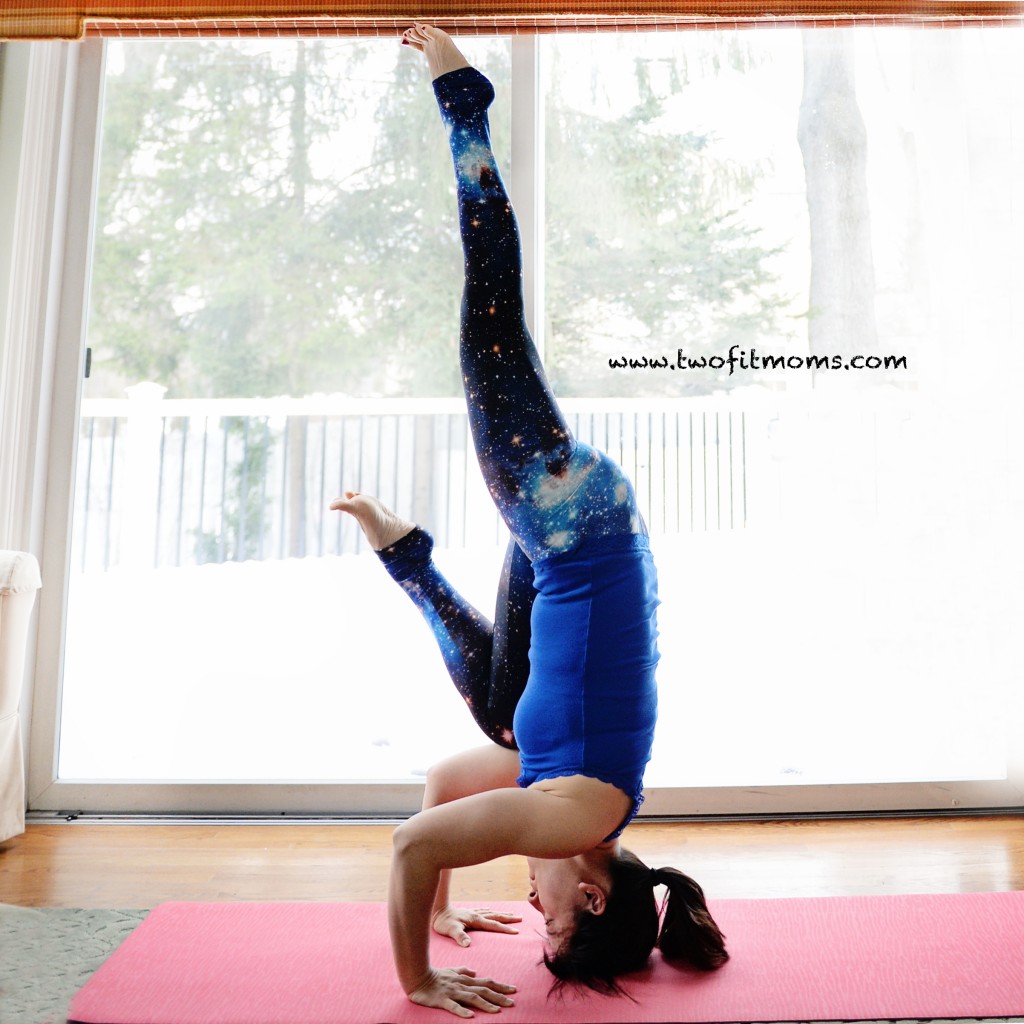
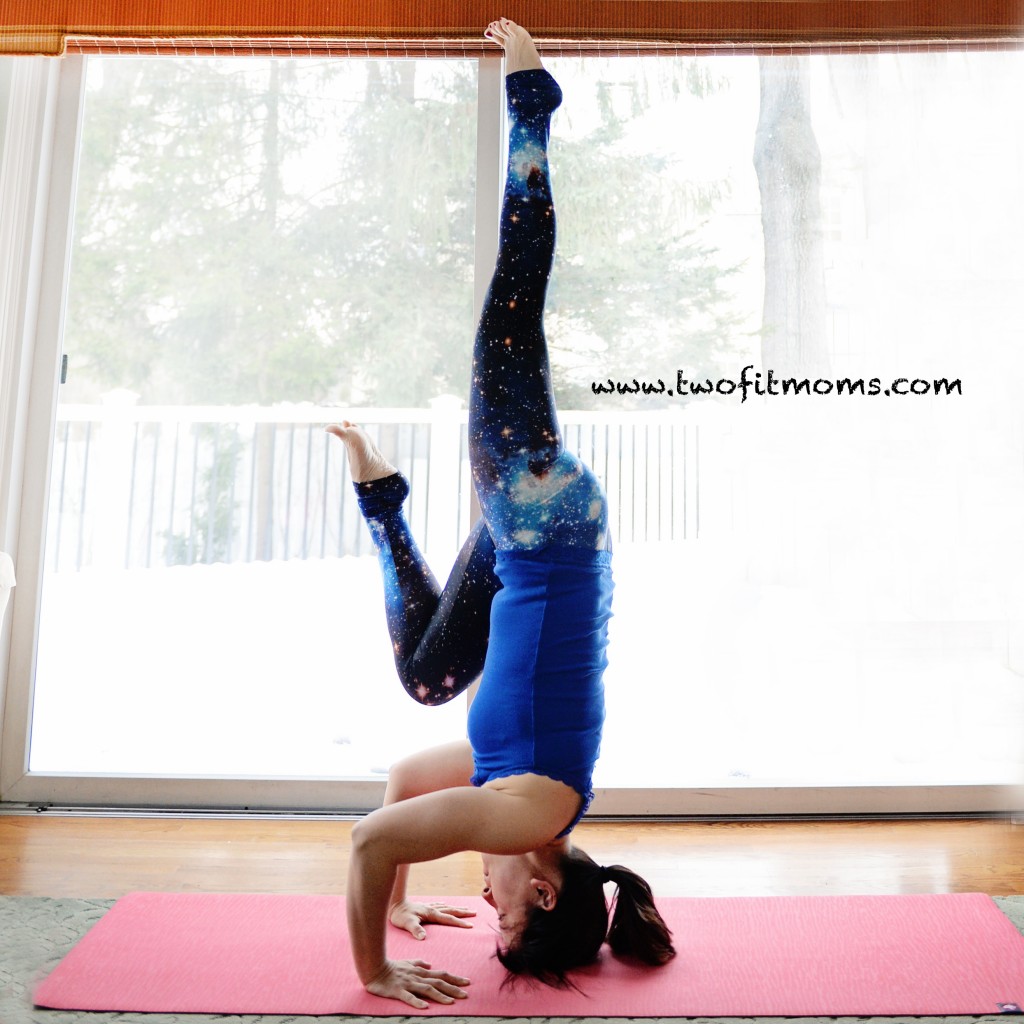
    Level 3 Modification: Time to extend up! Start by sitting up on your shins and clasp your hands loosely, remembering to tuck the bottom pinky in! Place your forearms down on to your mat, elbows at shoulder width distance. Place the crown of your head in front of your hands. Root down through your forearms as you tuck your toes under and lift the knees up. Squeeze your elbows in as you draw your shoulders away from your ears. Walk your feet in as you begin to stack your hips over your shoulders. Slowly bend one knee into your chest. Press actively into your forearms and engage your abs to tuck the second knee into your chest. From here, slowly extend one leg up towards the sky, then the other…or, if you are capable, both legs at one time. Keep your thighs hugging in and feet active! Remember, your forearms should be bearing most of your weight.  It should feel like you can almost pick up your head. Stay here and take about 5-10 breaths. Slowly release down into Child’s pose.

    Sirsasana A

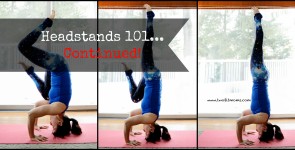
    Be sure to check out our inversion tutorials in the Yoga pull down tab on our website, and if you are considering a headstand practice, check out: Headstands 101: The Art of Falling.

  • Move over Cupid:  Fallen Angel Tutorial

    Move over Cupid: Fallen Angel Tutorial

    With Valentine’s Day on the horizon, you may be looking to channel your inner cupid.  Well, we are here to help.  Put on your wings and get ready to enter one of the prettiest yoga poses—Fallen Angel.

    Fallen Angel is a great hybrid pose for anyone looking to dabble in the realm of arm balances and inversions — its hybrid nature combines elements of both worlds, resulting in a posture that offers a surprising amount of stability.Photo Feb 02, 1 14 00 PM

    We love teaching this pose because of its beauty and accessibility.  A rock solid arm balance practice is not required.  Side crow is just a brief moment in the transition to Fallen Angel—it’s okay if you can’t hold it for five long breaths!  Likewise, an advanced inversion practice is not a prerequisite for this pose.   The arched shape eliminates the possibility of tipping over, which is a common fear for beginners attempting a traditional headstand where the hips are stacked directly over the shoulders.

    If you need a bit of a pep talk before getting started, start HERE and read about the empowering nature of arm balances.  Once you are inspired, warm up your body by doing a few rounds of Sun Salutations and a series of twists.  You are now ready to move forward.


    Step 1
    Lower your body into a squat, resting on the balls of your feet.  Twist your body to the left, placing your hands onto the mat so that the outside of your left thigh rests along your triceps.

    Step 2
    Begin to lean and shift weight onto your hands, being mindful to keep your elbows squeezing inward.  If you are comfortable, slowly lift your right foot from the mat.

    Step 3
    Here is your (modified) side crow transition!  It’s modified because you are resting your left thigh across both triceps rather than on just the right tricep.  If you are unable to hold this balance for long, don’t worry.  Move right on through to step 4.

    Step 4
    Slowly lower the left side of your head onto the mat, and see if you can lift your right leg off of your left leg even by just an inch or two.  If that goes well, keep lifting the right leg, extending it straight into the air.

    Step 5
    The left thigh will remain on the back of the right arm throughout the pose, but you will need to rotate the left leg a bit in order to be able to point the left leg up to the sky.  In the final expression of the pose, the left leg is parallel to the right leg.


  • Day 7: Adho Mukha Vrksasana Prep or “L” Handstand

    Day 7: Adho Mukha Vrksasana Prep or “L” Handstand

    Welcome to Day 7 of the #YogawithTFM 10-Day Challenge! Today’s pose is Adho Mukha Vrksasana Prep or “L” Handstand.

    If you are new to Handstands, you must check out our article, “Handstands 101: Building Your Foundation.” You might also want to check out our Inversions Tutorial available on iTunes!

    If you are more experienced view the video below:

    [KGVID poster=”http://www.twofitmoms.com/wp-content/uploads/2014/10/Video-Oct-06-3-44-01-PM_thumb10.jpg” width=”640″ height=”360″]http://www.twofitmoms.com/wp-content/uploads/2014/10/Video-Oct-06-3-44-01-PM.mov[/KGVID]

    Remember to take a few gentle kick ups to get the feel of being on your hands! Actively engage that top leg and send energy all the way up through your toes!

  • Day 6: Baddha Hasta Sirsasana A or Supported Headstand

    Day 6: Baddha Hasta Sirsasana A or Supported Headstand

    Welcome to Day 6 of the #YogawithTFM 10-Day Challenge! We are more than half way there! Today’s pose is Baddha Hasta Sirsasana A or Supported Headstand.

    View the video below for variations and check out the three steps below to help you get into this inversion!

    If you are new to headstands and are looking for guidance, check out our Inversions Tutorial HERE!

    [KGVID poster=”http://www.twofitmoms.com/wp-content/uploads/2014/10/Video-Oct-03-2-36-10-PM_thumb9.jpg” width=”640″ height=”360″]http://www.twofitmoms.com/wp-content/uploads/2014/10/Video-Oct-03-2-36-10-PM.mov[/KGVID]

    – Most of the weight should be in your forearms!  It should feel like that at any moment, you could slide a piece of paper under your head.

    – Draw the shoulders down and away from your ears…keeping your neck long.

    – Engage everything…especially your core and legs!

  • Pincha Mayurasana:  The Art of Falling

    Pincha Mayurasana: The Art of Falling

    If you’ve recently added Pincha Mayurasana (forearmstand) to your inversion practice, you may be wondering when or if you should move away from the safety of a wall.  As a general rule, you should NEVER move your inversion practice away from the wall until you have perfected your exit strategy.

    Falling flat onto your back and injuring yourself is NOT an exit strategy.  Falling safely out of an inversion is FallingFromPincha
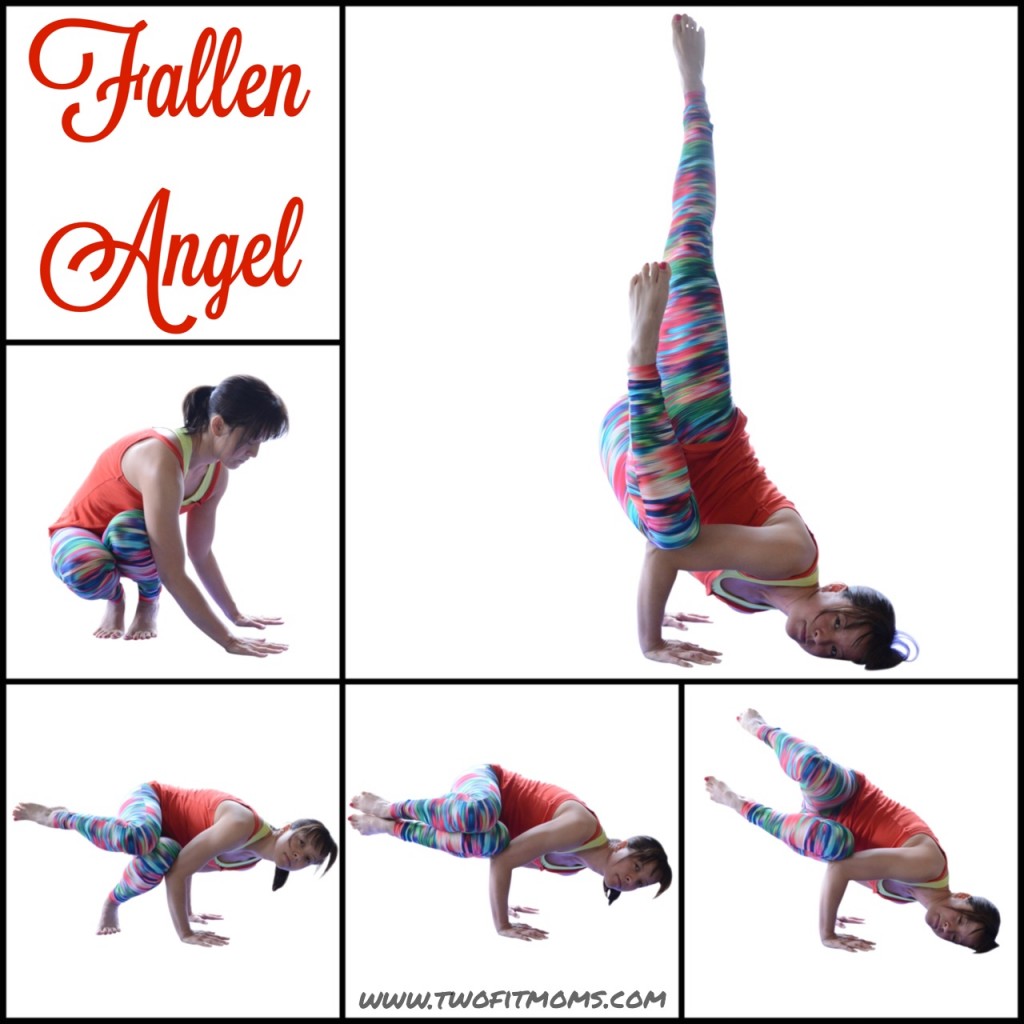
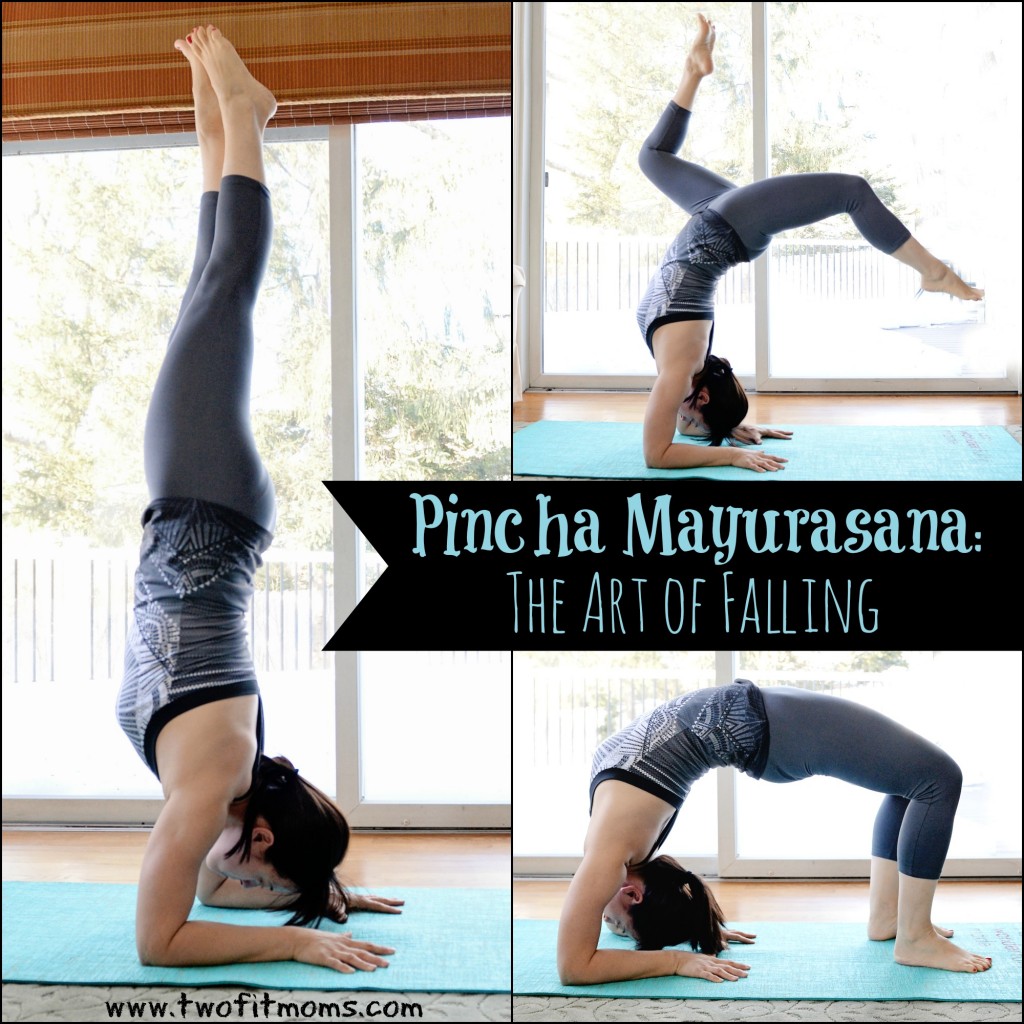
actually a skill, and today, I will show you how to turn your fall out of forearmstand into a controlled transition.

    The goal?  Forearmstand into forearm wheel.  Yes, forearm wheel is a deep pose requiring flexibility, but once you master this pose and this transition, you will practice in the middle of the room without fear.

    Getting into Forearm Wheel
    The first step in perfecting this transition is to practice the final pose:  forearm wheel.

    Step 1
    Lie on your back, with your knees bent and feet flat on the floor. Place your palms onto the mat on either side of your head with your fingers pointing toward your feet.  Press through your hands and feet and gently lift up onto the crown of your head for a breath or two.  Continue to press through your hands and feet, lifting your head from the floor. Straighten both arms and lift your hips toward the sky for wheel pose.  If you are unable to do wheel pose, please continue to practice your forearmstands against a wall and re-visit this article at a future date.  Being comfortable with your backbends is essential for this exit strategy.
    WheelPose
    Step 2
    Slowly bend your elbows and gently lower the top of your head to the mat. Keep your elbows stacked above your wrists and your chest lifted.
    LowerOnToHead
    Step 3
    Slowly lower yourself onto one forearm.  If the stretch feels too intense, stop.
    WheelOneArmDown
    Step 4
    If your back is not straining, lower yourself onto the other forearm.
    WheelBothArmsDown
    Step 5
    Press down firmly through your forearms and lift your chest to raise your head off the mat.
    ForearmWheel
    If you are unable to do this forearm backbend with ease, then please continue practicing your forearmstands with a wall.  Falling into a deep backbend from a height is potentially harmful until your flexibility improves.  Each day, make it a point to work on your backbends and to open up your chest, shoulders and hip flexors.  The sooner you become comfortable in your backbend practice, the sooner you will become free from the wall.

    Practicing the Transition
    Now that you’ve mastered the forearm wheel, let’s practice falling into it.  Make sure you are thoroughly warmed up before attempting.  When you begin to lose your balance in your forearmstand, your natural inclination is to simply tip over.  Work with that natural momentum, and do not try to fall to the side or to lift your forearms from the ground.  Keep your forearms firmly rooted into your mat, with your elbows stacked right under your shoulders.  Do not collapse into your arms!  If you stay strong through your shoulders and arms, your legs will touch down, your head will never touch the mat, and you will be in a forearm backbend.

    Remember:
    Keep your inversion practice at the wall until you perfect your exit strategy.  Perfecting an exit strategy, however, may take a great deal of time.  Do not get discouraged.  Your yoga practice is not a race, and it is here to serve you through your lifetime.  Practicing your inversions with a wall is FINE.  Be prudent and use a wall if your body is not quite ready for the exit strategy presented here in this article.  Good luck!

  • Headstands 101:  The Art of Falling

    Headstands 101: The Art of Falling

    I would be remiss to write a “Headstands 101” series of articles and not touch upon the topic of falling.  Falling is the greatest fear in practicing any inversion.  Nobody wants to fall because it feels so uncontrolled and unexpected and could result in an unwanted injury.

    Today, I’m here to tell you that falling is a skill.  You CAN and WILL turn your falls into transitions.  You will no longer fall out of a headstand.  When you feel your body wavering as you balance on your head, you will not flail around and fall flat onto your back.  Instead, you will execute a controlled transition from one pose into another.  The goal?  Tripod headstand into a somersault.  Once you master this transition, your headstand practice will soar to another level.  When you can practice without fear, amazing things will happen on your mat.  Let’s get started.

    Channel Your Inner Kindergartener
    First, remind yourself what it feels like to do a somersault.  Squat down onto your mat as you rest on the balls of your feet.  Keep your knees together and place your hands down onto the floor in front of you.  Spread your fingers and begin to lean forward, putting pressure into your hands.  Tuck your chin to your chest and place the back of your head onto the ground, slightly in front of your hands.  Round your back, push off of your feet, and turn yourself into a tight ball.  Somersaulting should not hurt!  Keep practicing this move until it feels natural and smooth.

    Once you feel comfortable somersaulting, come into a tripod egg to practice the exit strategy.  If you need a refresher on getting into a tripod egg, click HERE to review the steps for this pose.

    Banner
    From your tripod egg, tuck your chin to your chest, round your back by squeezing your knees into your body, and safely roll out of the headstand.  Practice this over and over until it is second nature to tuck and roll as soon as you feel as though you no longer have control of the pose and may tip over.  Once you can tuck and roll out of a tripod egg, lift your knees from your triceps a few inches and try somersaulting again.  Keep lifting your legs and practicing your forward roll until you can safely tuck and roll out of the full expression of the pose with your legs fully extended.

    If you cannot master the somersault, don’t worry about it.  You can always re-visit this transition at some later date.  Until you can MASTER the somersault, however, you should NOT move your headstand practice away from the support of a wall.  There is no purpose in practicing if you put yourself in danger.  You must be able to safely exit a headstand in the middle of a room via forward roll, and until you are comfortable practicing somersaults, you should continue practicing with a wall behind you.  This is all a process, so please do not be discouraged if you are struggling.  It does not need to happen today.  Or tomorrow.  Or even a year from now.  Let yoga be a lifelong practice.  Be safe, have fun, and practice without fear.

  • Headstands 101…Continued

    Headstands 101…Continued

    Last week, I posted a tutorial for a basic tripod egg headstand. If you missed it and would like to join in on the inversion fun, please click HERE to get started.

    If you’re still reading, I will assume that you’ve managed to get through the first Headstand 101 article and perform your first inversion. Congratulations! Getting yourself to this point is significant—I know many of you had to overcome fears and put aside a mountain of self-doubt, but here you are, experiencing success.

    TripodEggCollage

    In this tutorial, I will guide you through the remaining steps to get yourself into a full, tripod headstand with extended legs. Let’s get started.

    From your tripod egg pose (step 4 in the collage above), engage your abs and begin to shift your weight into your left knee. As you push your left knee firmly into your left tricep, your right knee should feel light on your right tricep.

    Your first goal is to lift your right knee just 1 or 2 inches off of your tricep. If you can manage to do that, lower your right knee, and repeat the exercise on the other side Step1
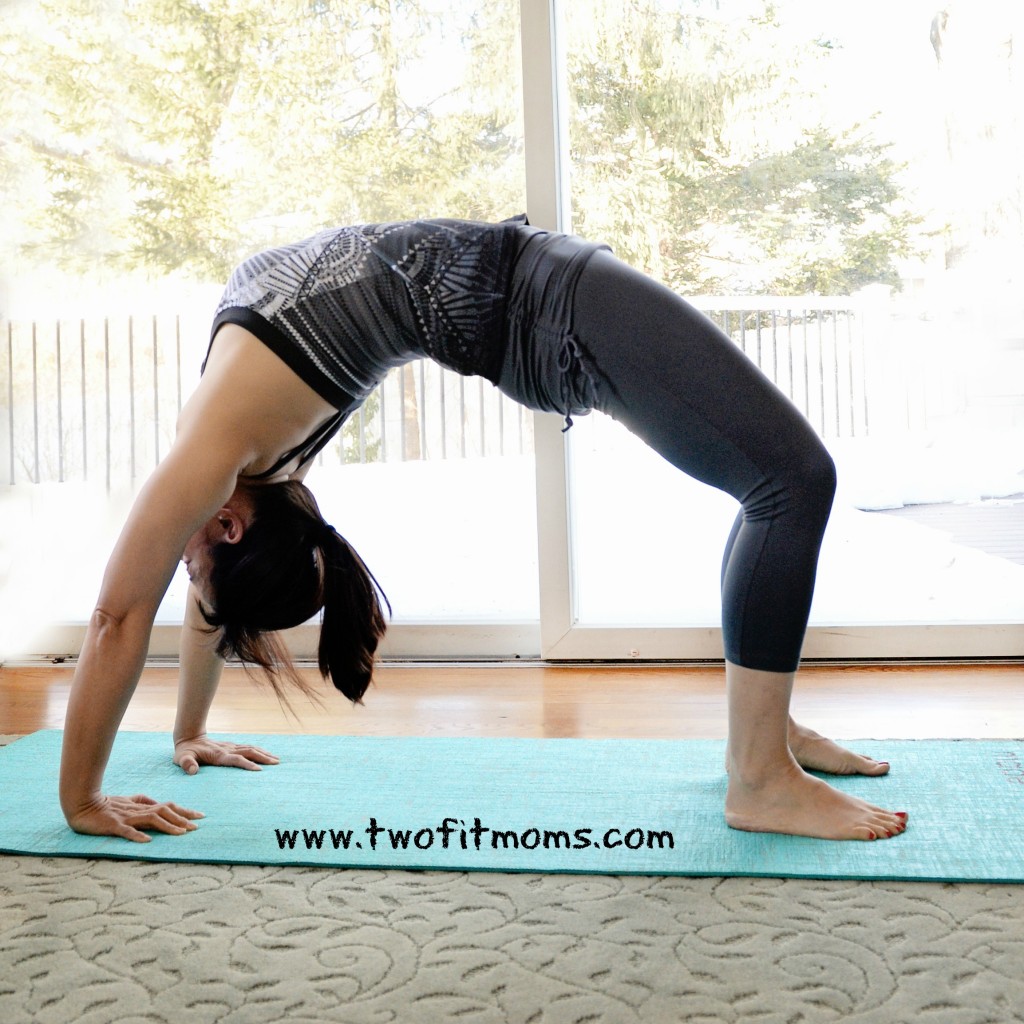
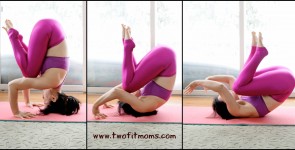
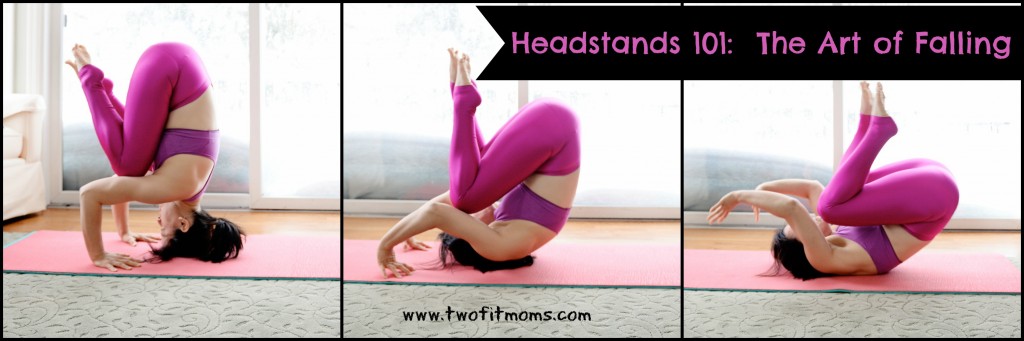
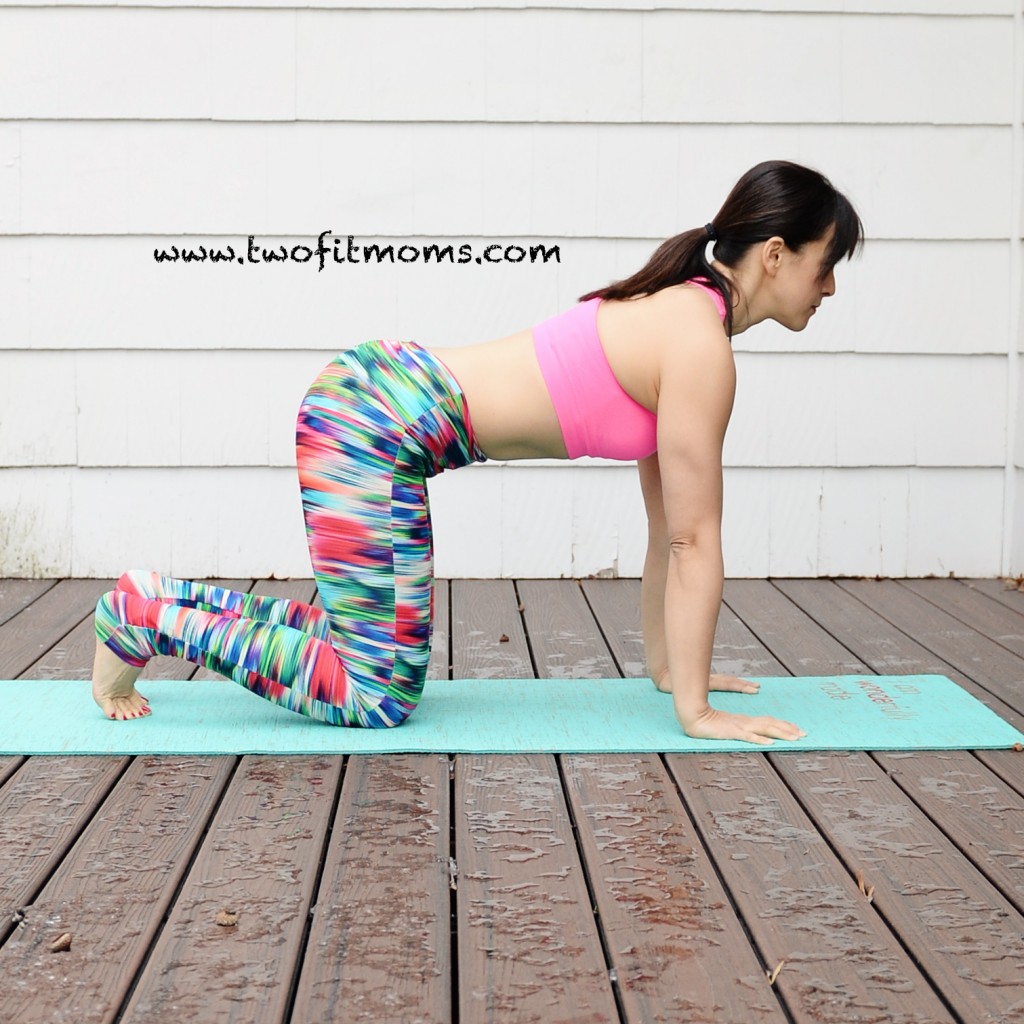
(shifting weight onto the right knee and lifting the left knee a few inches instead). Most people will find this task to feel more natural on one side. Although we traditionally practice both sides in yoga, in these beginning stages of learning a new inversion, I advise you to just work on getting comfortable by practicing on the side that feels more natural.

    Once you’ve determined which side feels more comfortable, practice lifting that one knee a few inches at a time into the air. Move slowly, and please resist the urge to throw both knees into the air simultaneously.  Lifting both legs simultaneously adds much more core instability to the pose. For beginners, our strategy is to maintain as much stability as possible by keeping one knee planted on one tricep until the other leg is fully extended.

    Step3

    If you are unable to lift your knee at all, continue practicing the exercise of shifting your weight back and forth between triceps. You will build the strength and stability in due time.  Please do not rush the process by deciding to kick up into a headstand. NEVER kick up into a headstand. Your head and neck are bearing your body weight, and the last thing you need to do is to add the instability and sharp movement of a kick-up.

    If you DO manage to extend one leg into the air, notice whether your body is swaying.  If so, make an effort to engage all of your muscles.  Keep your core tight and energize your extended leg by pointing, flexing or “flointing” your foot.  Flointing is essentially pointing with the ball of your foot—think of Barbie feet that look like they are perpetually in high-heeled shoes.

    Keep practicing your headstand with one-leg extended until it feels stable. Do not move on to the next step until you are comfortable and stable with one leg fully extended.

    Step4

    Before you extend your second leg into the air, run through this checklist in your mind:

    -Is your core engaged?

    -Are you remembering to breathe?

    -Are you flointing/flexing/pointing the foot of your extended leg?

    -Are you making an effort to keep your elbows squeezing in rather than splaying out to the sides?

    -Is your neck nice and long?

    If you’ve answered yes to these questions, slowly begin lifting your second knee into the air. Again, you will feel most stable if you lift in small 2-inch increments.

    Step5

    Lift slowly and maintain an engaged, energized feeling through out your entire body to find stability.  Once you find full extension of both legs, see if you can hold the pose for 5 full breaths.  Congratulations.  You did it!

    Step6

  • Headstands 101:  Your First Inversion

    Headstands 101: Your First Inversion

    If you want to invert but don’t know where to begin, you’ve come to the right place.  You CAN do a headstand safely and without fear—even if you have no prior experience in gymnastics, dance or yoga.  When I began my headstand practice about 14 months ago, I had absolutely NO background in any of these areas. I only started practicing inversions Headstands101
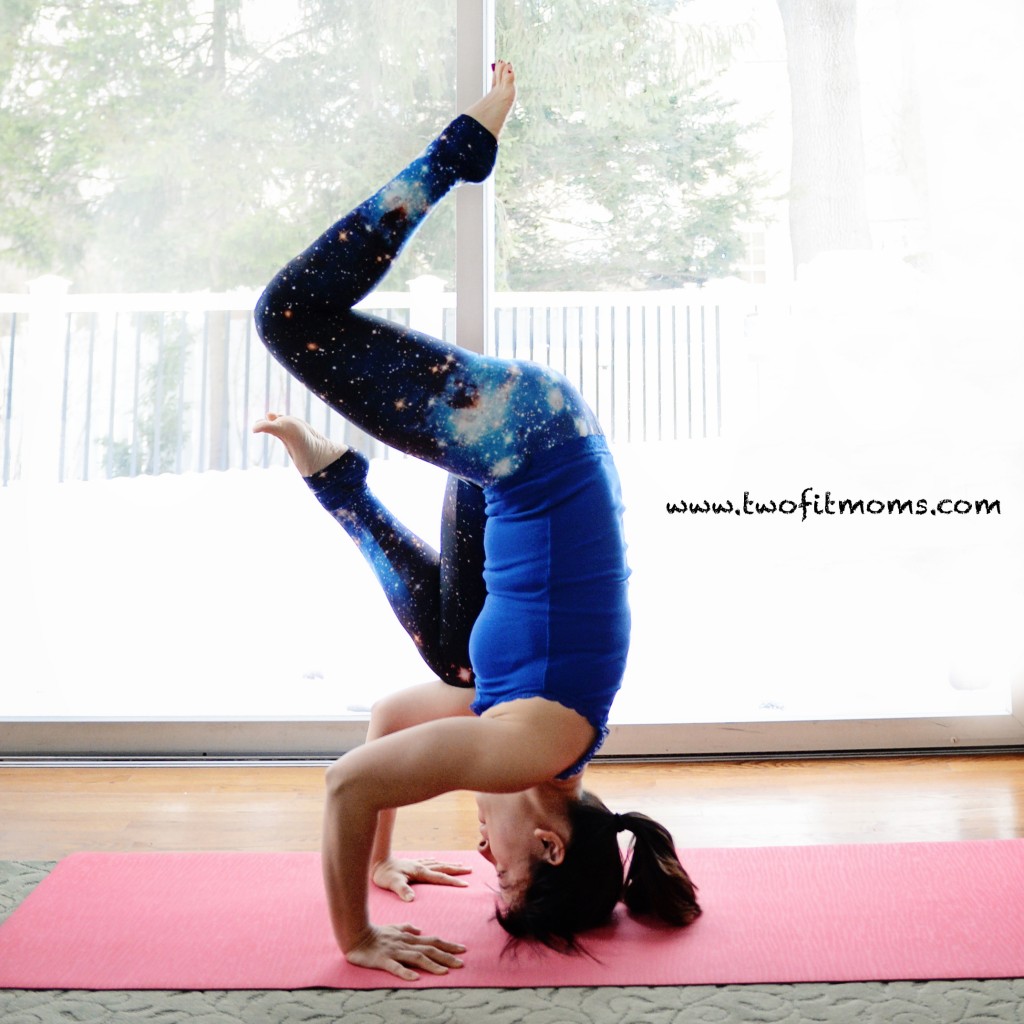
at the age of 36!  It is never too late to learn a new hobby or skill.  Just be patient, and remember to practice.  It may not happen for you today, and that’s ok!  There is no timetable for success.  I will equip you with the tools and knowledge, and you will work at your own pace until you feel comfortable in the pose.

    The inversion I want to introduce today is the tripod egg headstand.  The “tripod” refers to the triangle shape produced by the placement of your hands and the top of your head.  The “egg” refers to the tight oval tuck shape of your body in the final pose.  Please approach this pose with a can-do attitude.  You CAN, and you WILL.

    Before attempting this pose, warm up your body with a bit of movement and stretching.  Hamstring flexibility is very important in this pose.

    Let’s get started:

    BalanceBlock
    Step 1:  Find a book (or yoga block), and place it on top of your head to find the balance point. Press the book firmly onto your head so that you can remember the feeling of that balance point.  The balance point of the book will not necessarily be your balance point in a headstand, but it is a starting point, and you can adjust accordingly once you test that spot for comfort.

    Step 2:  Come onto your hands and knees into tabletop position.  Check your form, and make sure that your shoulders are stacked directly above your wrists, and your hips are stacked above your knees.
    Tabletop

    Step 3:  Bend your elbows to form 90-degree angles, and place the top of your head onto the floor in front of your hands.  Make sure that you can see your fingertips at all times!  Your hands should NOT be along side your ears.  Your hands and head form a triangle rather than a straight line.

    Step 4:  Tuck your toes, and lift your knees from the floor.  Walk your feet in towards your hands/head so that your hips are lifted high into the air.  Assess how you feel.  If your hamstrings are straining, stop and re-visit this pose after you feel Dolphin
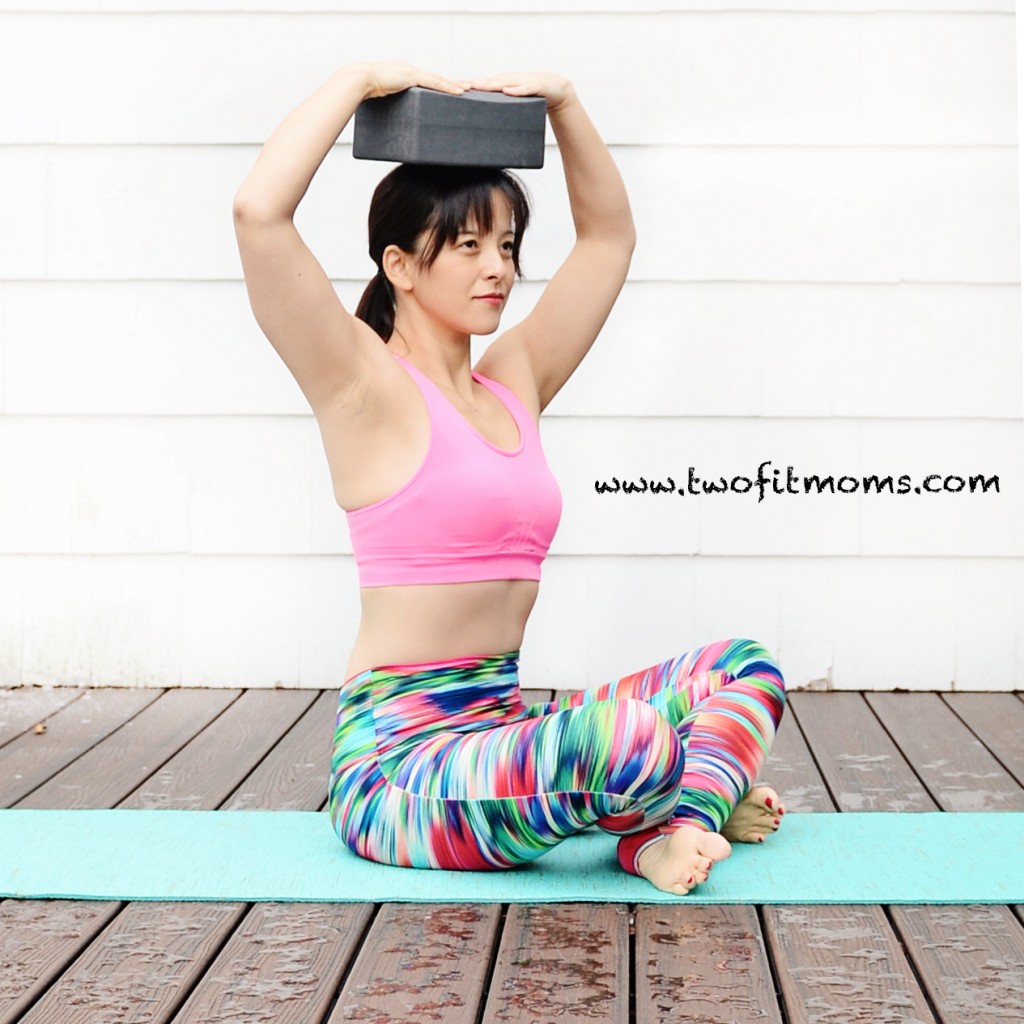
more limber.  If your neck feels strained, focus on lengthening your neck so that your shoulders are drawn away from your ears.  If the top of your head hurts, adjust your balance point a few inches.  Personally, my own balance point in a headstand is not the same as the balance point with the book on my head.  I usually balance a few inches closer to my forehead.  This is an exploration.  Find the right spot for your own body.

    Step 5:  Make sure that your elbows do not splay to the sides.  Your elbows should continue to point in the SAME direction that you are facing!  If you feel comfortable, lift one knee onto one tricep.
    DolphinOneLeg

    Step 6:  If you still feel comfortable, slowly lift your other foot from the floor and place it on the back of your other tricep.  Remember to keep your neck long, and breathe!  Congratulations on your very first headstand.
    HeadstandEgg

    One important point to mention—if you lose your balance, tuck your chin to your chest, round your back, and somersault out of the pose.  You might even want to practice your forward rolling skills PRIOR to starting this tutorial.  It’s no fun to fall, but if you somersault out of the pose, you technically aren’t falling.  It is a controlled and safe way to exit the tripod egg headstand.

    Wherever you may be in your yoga practice today, I assure you that it is perfect.  Honor yourself and your body.  Namaste.