Tag: dessert

  • Decadent Double Chocolate “Ice Cream” (and a Sweet Whole Foods Giveaway!)

    Decadent Double Chocolate “Ice Cream” (and a Sweet Whole Foods Giveaway!)

    This month we are working with Whole Foods to share some healthy and delicious recipes – and a sweet giveaway for you, our followers! Since Valentine’s Day is around the corner, we are starting with a dessert recipe – Decadent Double Chocolate “Ice Cream.” So, scroll down for this delectable recipe, and be sure to visit us on Instagram (@twofitmoms) where you can “like” and “comment” under this recipe post for a chance to win a $250 Whole Foods gift card! This giveaway runs from noon EST on February 3 to noon EST on February 10. 


    Chocolate. Isn’t this the first thing that comes to mind when you think of Valentine’s Day? Well, for a foodie like me, it’s definitely top of mind, and it’s the first thing I turn to when making a Valentine’s Day dessert.
    WFNiceCreamCollage
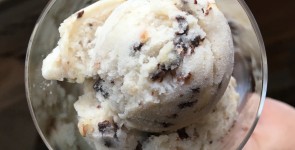
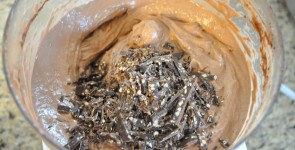
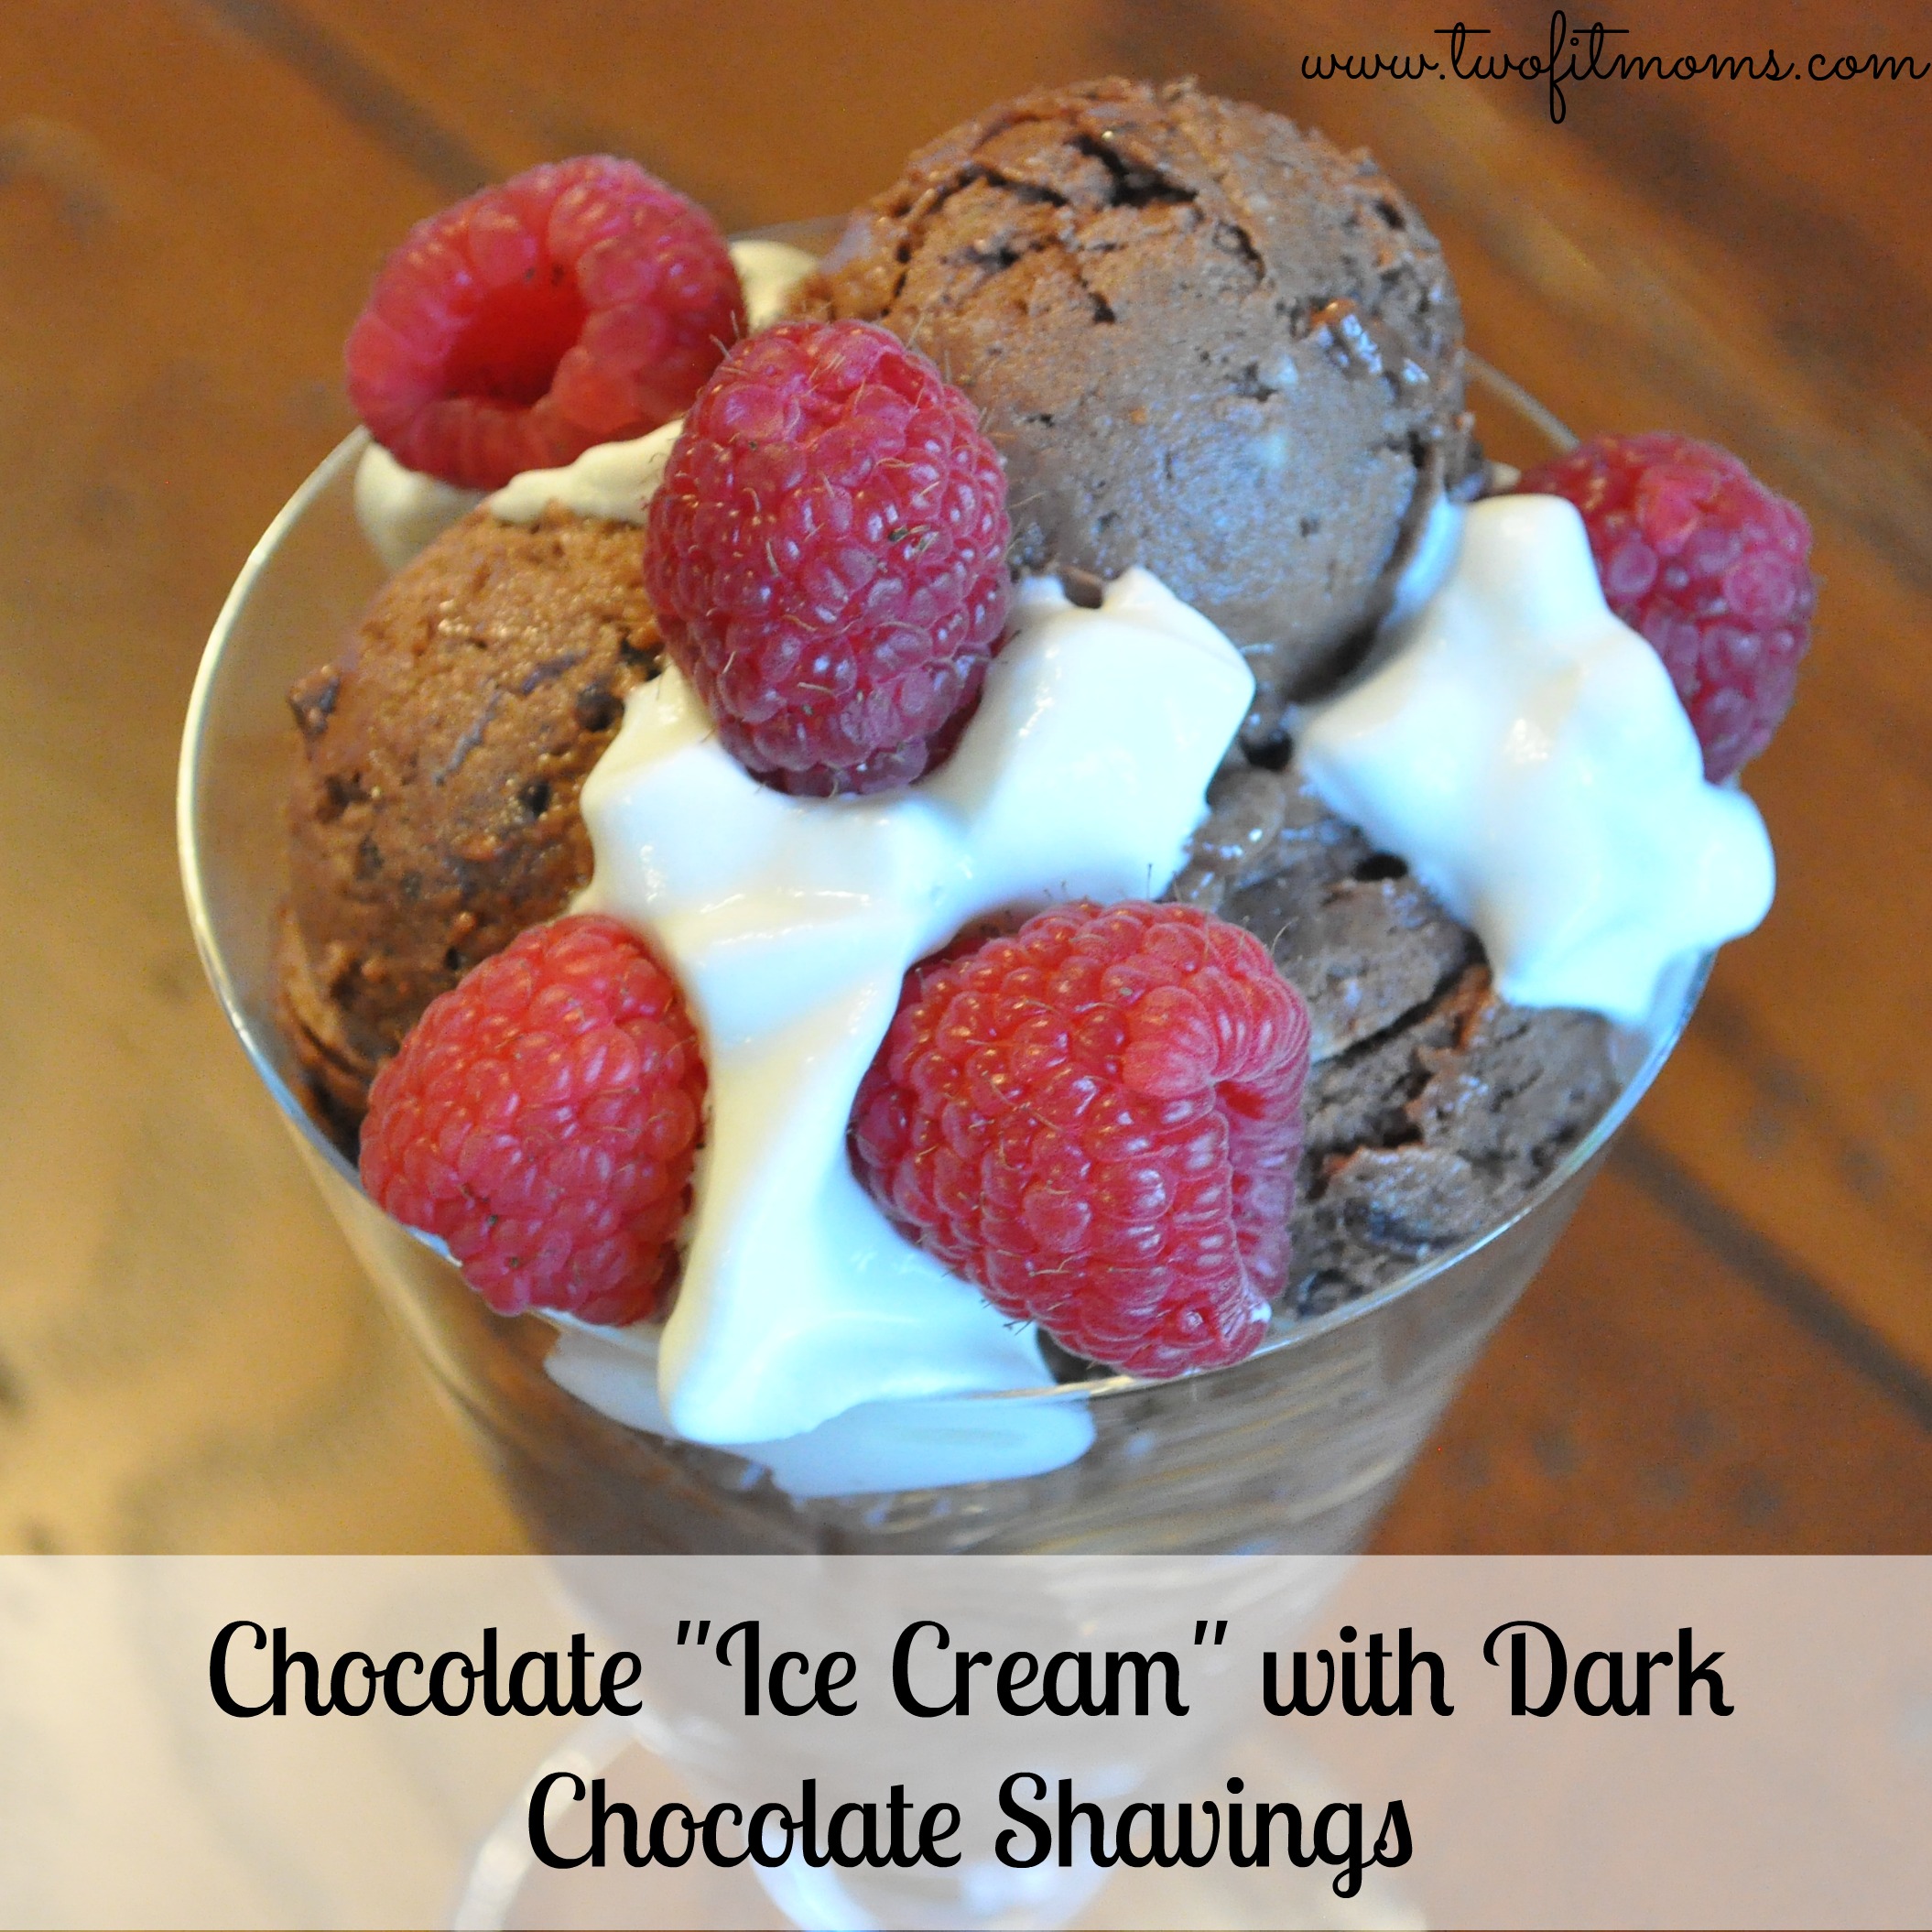
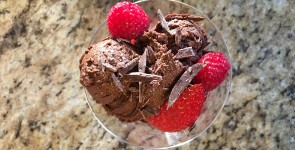
    This year I’ll be making my Decadent Double Chocolate “Ice Cream” which is actually nice cream – no dairy involved — it’s made with frozen organic bananas along with a handful of other all natural ingredients, including: cocoa powder, dark chocolate, coconut oil and a touch of maple syrup.  It’s decadent and healthy all at the same time!

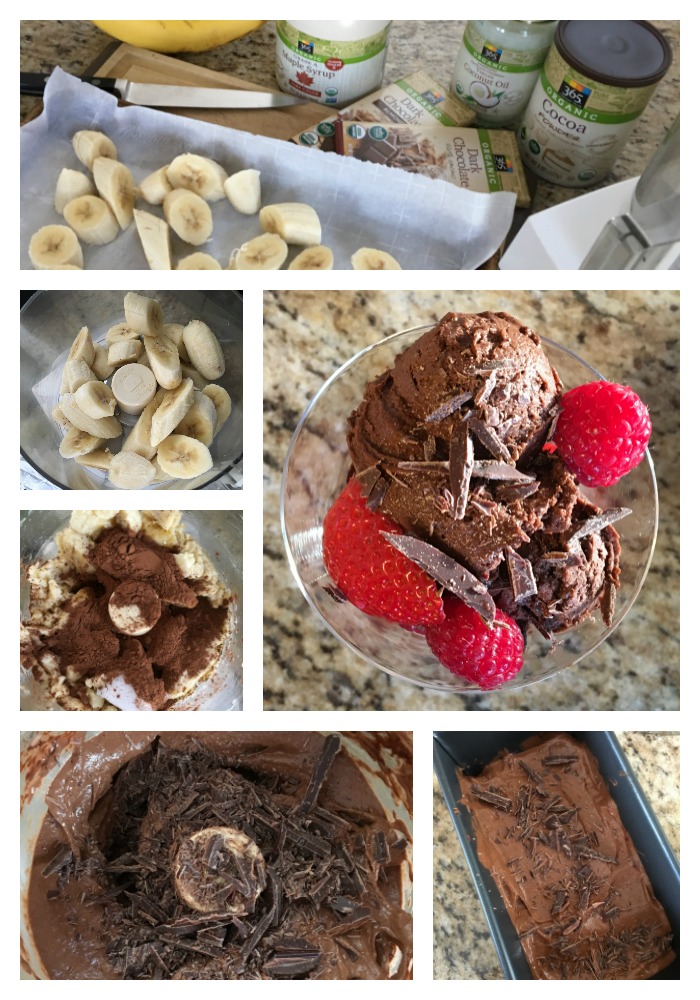
    It’s also a super easy recipe. No ice cream maker is necessary – all you need is a food processor and a loaf pan to make, store and freeze the “ice cream.”

    I used dark chocolate, but you can certainly change up the chocolate — or use a dark chocolate bar with other flavors and additions (I was eyeing a bar of dark mint chocolate at Whole Foods that I think would be amazing!). I also suggest jazzing it up with toppings such as fresh berries, chopped nuts or shredded coconut.

    What’s really nice about this dessert is that because it’s made with all natural, healthy ingredients you won’t mind indulging in an extra scoop!

    Decadent Double Dark Chocolate “Ice Cream”
    Serves 4 

    4 bananas, sliced and frozen
    1/4 cup of cocoa powder
    2-3 tablespoons maple syrup
    1 tablespoon coconut oil (in solid form)
    1/3 cup of shaved dark chocolate
    fresh berries, chopped nuts, shredded coconut for toppings (optional)

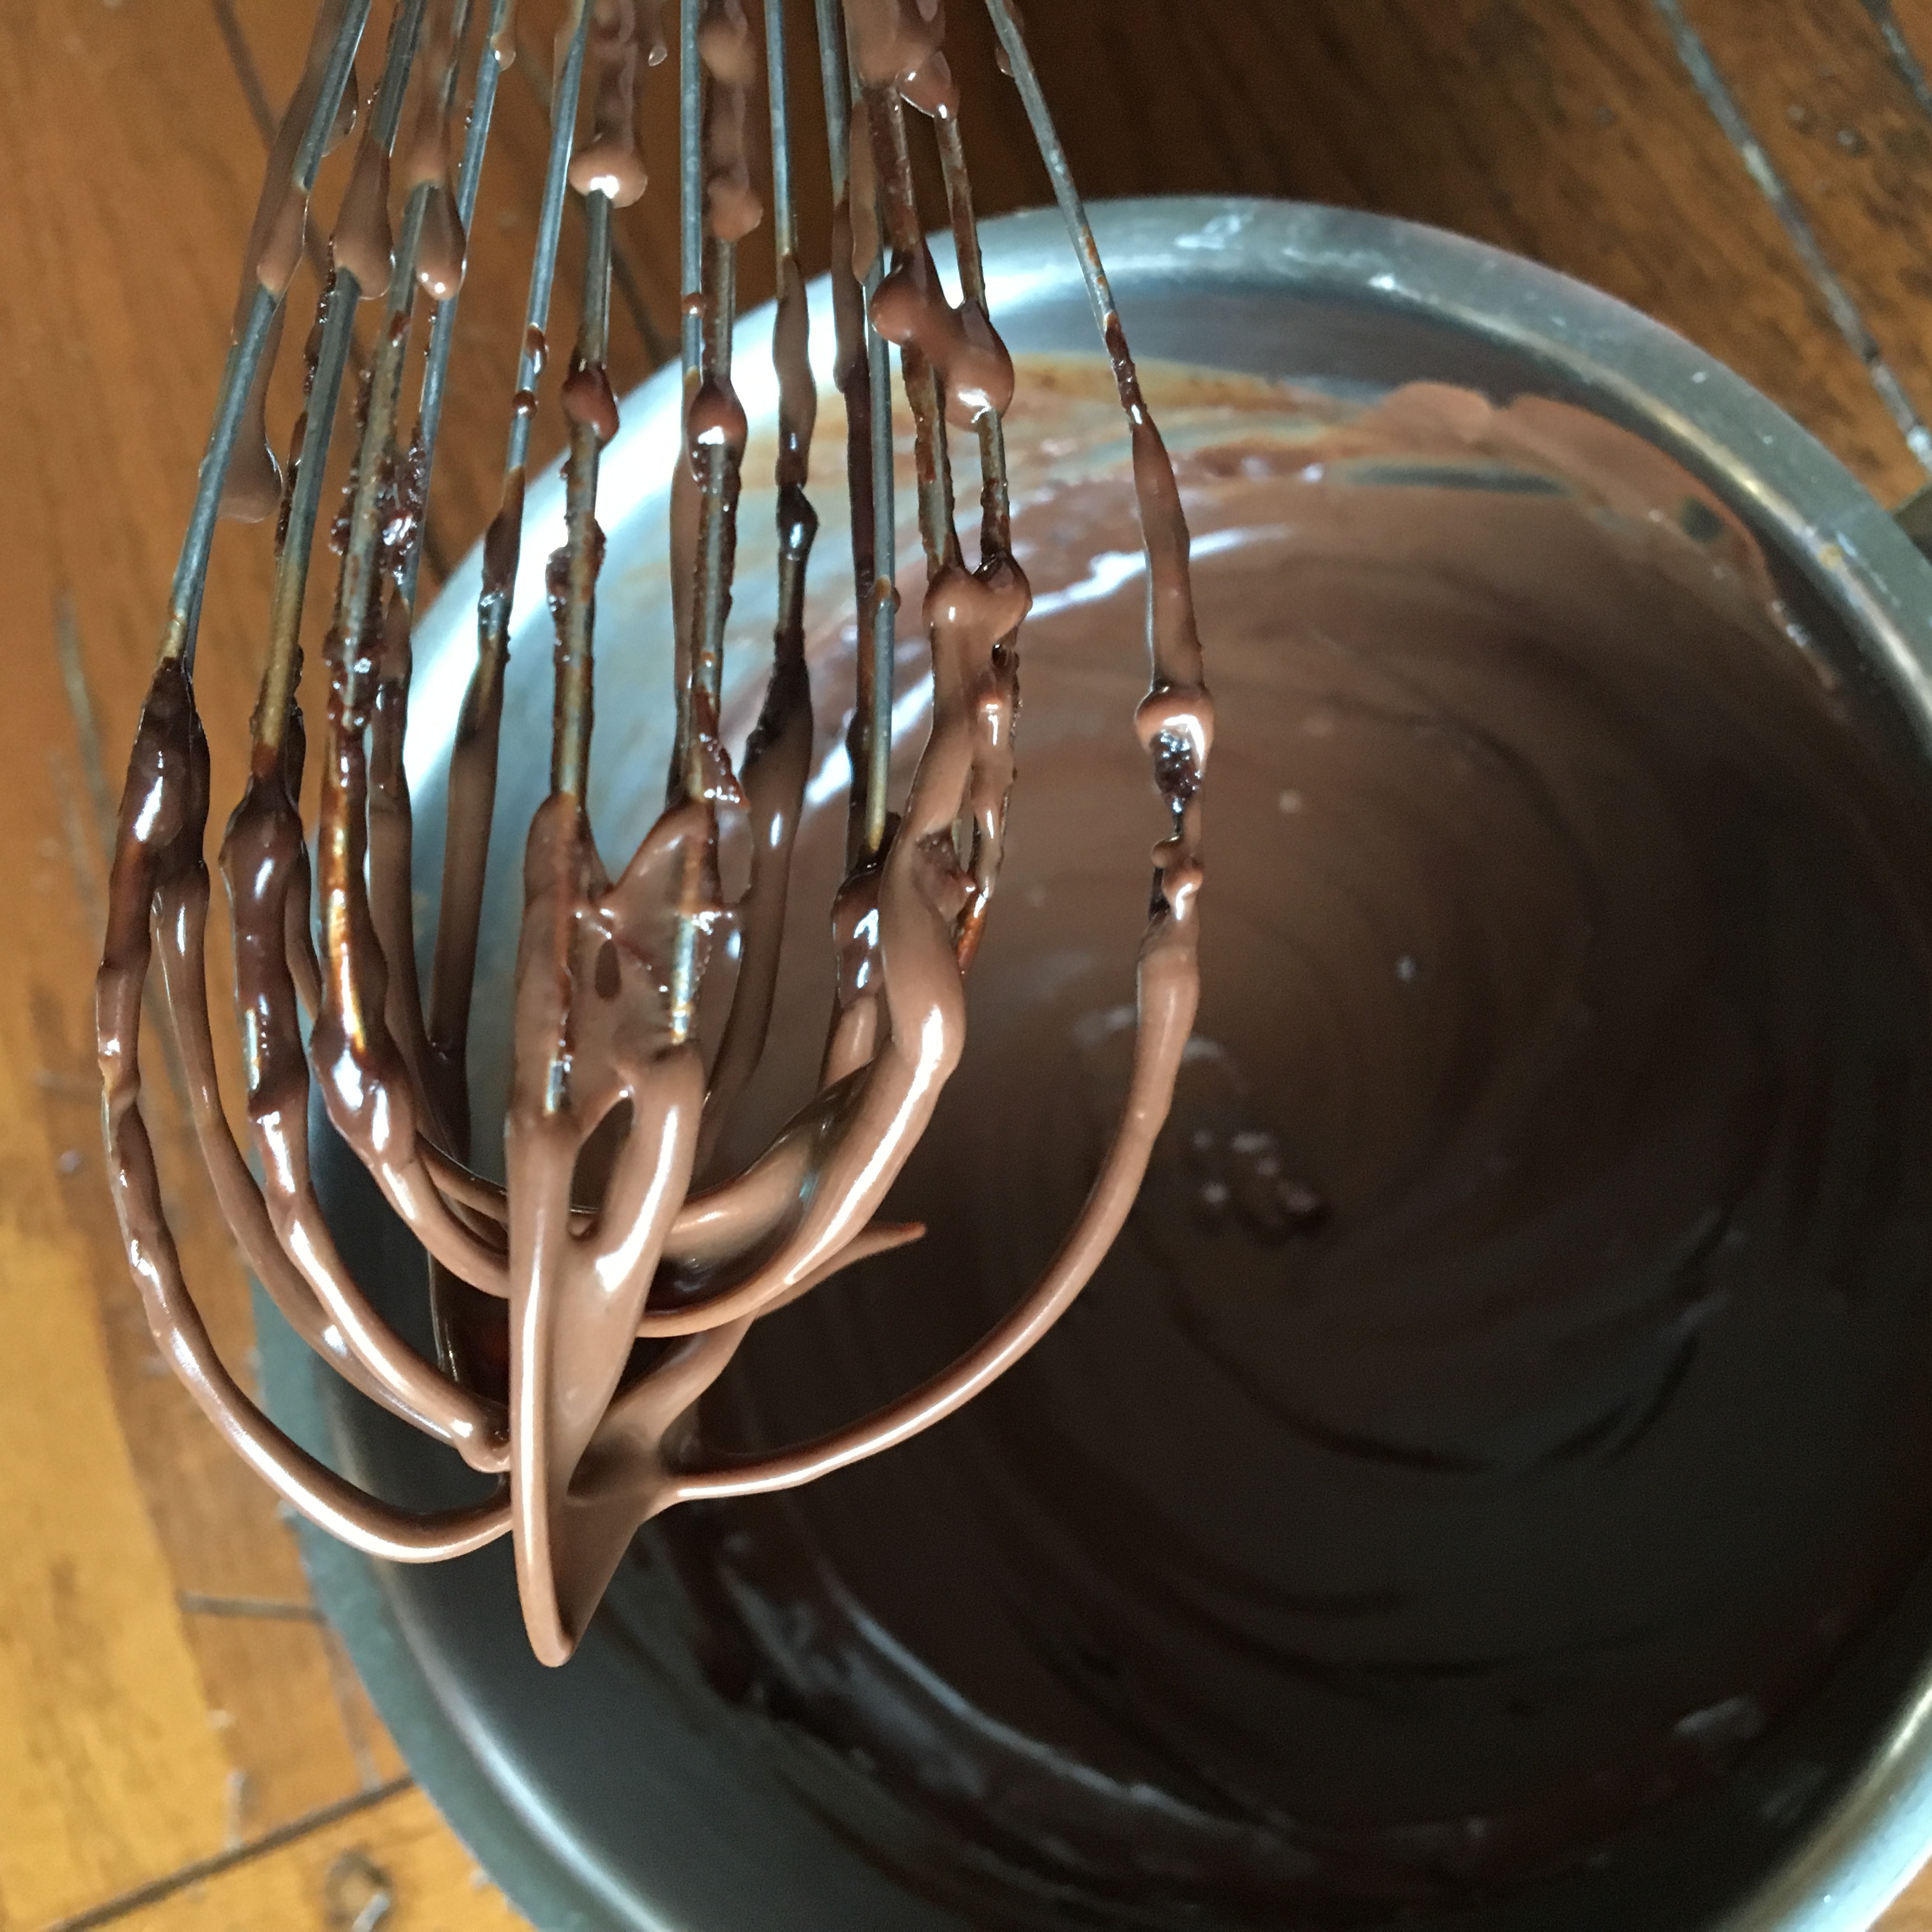
    In the bowl of a food processor add the frozen bananas, cocoa powder, maple syrup, coconut oil and pulse until the bananas break down into a smooth, ice cream-y texture.  Add the dark chocolate shavings and mix until incorporated (depending on what you add, you can either pulse in the food processor, or transfer the ice cream into a bowl and mix the ingredients). Pour the mixture into a loaf pan and pop into the freezer until it hardens.  The mixture, right out of the food processor, will likely be too loose to serve. Once the ice cream sets, scoop, serve and top as you desire!


    Product samples were received for this post. All opinions expressed are solely mine. 

  • Toasted Coconut with Dark Chocolate “Ice Cream”

    Toasted Coconut with Dark Chocolate “Ice Cream”

    This ice cream was inspired by my favorite ice cream shop’s flavor which was named after a dark chocolate coconut candy bar spiked with almonds! (think hard, you totally know which candy I’m talking about) However, it’s base is banana — there’s no cream or milk or anything dairy in the base.  It’s frozen bananas sweetened with maple syrup and blended with chocolate (in this case Dark Chocolate with Toasted Coconut from Sugarpova), chopped almonds and some additional shredded, unsweetened coconut.
    almondjoywithtag
    I’ve made you “ice cream” before — all with this banana base.  Remember my Banana Walnut “Ice Cream” – and my Chocolate “Ice Cream” with Dark Chocolate Shavings? I love this banana “ice cream” because it is so versatile. You can throw anything into it – fruit, nuts, chocolate, etc.

    I thought it was perfect to post given summer’s coming to a close (insert sad face).  But, in no time the autumn will be upon us, and I will be happily posting apple and pumpkin recipes.  But, for now, enjoy the last few days of summer, and this delicious, and healthy Toasted Coconut with Dark Chocolate “Ice Cream”!

    Toasted Coconut with Dark Chocolate “Ice Cream”
    Serve four, 1/2 cup servings

    4 frozen bananas, sliced
    2-3 tablespoons of maple syrup (adjust depending on the sweetness of your bananas)
    1/4 cup of shaved dark chocolate (I used Sugarpova’s Dark Chocolate with Toasted Coconut)
    1/4 cup of chopped almonds
    1/4 cup of unsweetened, toasted coconut

    Directions:

    In the bowl of a food processor, add the frozen bananas and maple syrup.  Pulse until it’s smooth and resembles ice cream. Turn the mixture into a bowl, add the chocolate, almonds and coconut.  Mix to combine.  Pour the mixture into the freezer until it’s set. Scoop and serve!

    For an added treat, you can make your own chocolate sauce.  All you need is 4 ounces of chocolate, chopped; 1 cup of heavy cream and 1 tablespoon of butter.  Cook on the stovetop until the chocolate is melted.  Let it cool and serve on top of your “ice cream.”

    chocolatesauce

  • Cinnamon Walnut Zucchini Bread

    Cinnamon Walnut Zucchini Bread

    I always find myself googling zucchini recipes this time of year when I have lots of it growing in my garden, but I always come back to the same-old, tried and true recipes, which include  Zucchini Bread.  I like Zucchini Bread because it’s a good way to get my kids to ingest zucchini which they would otherwise turn their noses up at (unless it was in quiche or frittata form! — but that’s another article . . . . ).  I also like it because I love cake, and in my book, this sweetened bread falls into the cake category – similar to my Banana Bread.

    And, in my forever quest to lighten up my traditional recipes, I decided to make some healthy substitutions including replacing white sugar with maple syrup, cutting the oil (which is generally 1 cup!) and substituting whole wheat flour.  I also added mashed bananas for additional sweetness and included applesauce to not only moisten the cake, but to compensate for the reduced amount of oil.

    I had my reservations, however.  My main concern was that the batter would be way too dense. I feared the two loaves this recipe yields would be massive dry bricks, but to my surprise they ended up moist and delicious. Hooray!

    zucchini bread header2
    Given my success, I can share my recipe with you, and you can share the recipe with your friends and delight in knowing that it’s a healthy bread. Not only does it contain zucchini, but it cuts out a lot of unnecessary processed ingredients.  It also happens to be sweet enough to eat for breakfast or dessert — but not so sweet that you couldn’t serve it alongside lunch or dinner — so it’s versatile.

    I hope you enjoy it!

    Cinnamon Walnut Zucchini Bread

    Yield: Two loaves

    2 cups zucchini (shredded and drained)
    3 eggs
    3/4 cup maple syrup
    1/2 cup applesauce
    1/2 cup oil (I used grapeseed, but you can use safflower or any other light oil)
    2 over-ripe bananas, mashed (approximately 1 cup)
    2 teaspoons vanilla extract
    2 1/2 cups whole wheat flour
    1/2 cup almond meal
    1 teaspoon baking powder
    1 teaspoon baking soda
    2 teaspoons cinnamon
    1/2 teaspoon salt
    1 cup walnuts, chopped (optional)

    Directions: 

    Preheat the oven to 350 degrees.

    Grease two loaf pans and set aside.

    Grate zucchini and drain the excess water out of it with a paper towel or a clean dish towel. Set the zucchini aside.

    In a large bowl, combine the wet ingredients (eggs, maple syrup, applesauce, oil, bananas and vanilla extract).  Mix to combine. Add the dry ingredients (whole wheat flour, almond meal, baking powder, baking soda, cinnamon and salt) and, once incorporated, add the zucchini and walnuts (which are optional). Stir until all of the ingredients come together nicely.  Remember, the batter is quite thick, so don’t panic.

    Divide the batter evenly amongst the two loaf pans.  Bake, on the middle rack for 40-50 minutes, until a toothpick inserted into the center of the cake, comes out clean (no residual batter).  Let cool and serve.

    Helpful Hint: If you don’t like walnuts, add another nut of choice, or skip the nuts altogether and add semi-sweet chocolate chips! 


  • Chocolate “Ice Cream” with Dark Chocolate Shavings

    Chocolate “Ice Cream” with Dark Chocolate Shavings

    Chocolate is decadent. It’s romantic. It’s indulgent. It’s perfect for Valentine’s Day and, as far as I’m concerned, perfect every day of the year!

    DSC_0950I love chocolate.  I also love ice cream. If you are like me, you are going to love this mock chocolate ice cream. It’s so good. It’s unbelievable actually. You’d never know it was healthy and dairy free!

    It’s made with frozen bananas, cocoa powder, a hint of maple syrup, and, in this case, dark chocolate shavings (but you can add anything to your ice cream, e.g., nuts, fruit, etc.).  This dessert is dairy free so it works for so many of you who are lactose intolerant or for those who have omitted dairy from your diet for other reasons.

    To be honest, I’m still amazed that frozen bananas can yield a frozen dessert so close to a dairy-laden ice cream. All you need is a food processor.

    So, here’s my new favorite chocolate ice cream recipe! I hope you enjoy it — you may even want to make it for your valentine this year.


    Chocolate Ice Cream with Dark Chocolate Shavings
    Serves 4 

    4 bananas, sliced and frozen
    1/4 cup of cocoa powder
    2-3 tablespoons maple syrup (grade B)
    1 tablespoon coconut oil
    1/3 cup of shaved dark chocolate (or anything else you’d like to mix into your ice cream)

    In the bowl of a food processor add the frozen bananas, cocoa powder, maple syrup and pulse until the bananas break down into a smooth, ice cream-y texture.  Add the dark chocolate shavings (or your favorite candy, fruit, nuts) and mix until incorporated (depending on what you add, you can either pulse in the food processor, or transfer the ice cream into a bowl and mix the ingredients). Pour the mixture into a loaf pan and pop into the freezer until it hardens.  The mixture, right out of the food processor, will likely be too loose to serve. One the ice cream sets, scoop and serve!


  • Banana Bread – An Updated Classic

    Banana Bread – An Updated Classic

    The icy weather outside kept me indoors today, so I had some extra time on my hands to experiment in the kitchen.

    I had two nearly black bananas staring at me — begging me to do something with them.  So, I decided I’d try to make a gluten free banana bread — with no white sugar.  I’ve never made such a thing before.  When it comes to dessert, I generally go all in — white flour, white sugar, butter, oil.  I don’t like to skimp on dessert since I hardly make them given my hectic schedule.  However, today I thought I would try to alter a traditional banana bread recipe – a classic, if you will.

    I knew there were certain items that I wanted to use — brown rice flour, almond meal and maple syrup, specifically — oh, and those two over-ripe bananas. So, I pulled together other traditional cake ingredients —  eggs, a little vanilla extract, salt, cinnamon, and yogurt . . . . . and, voila, I had banana bread deliciousness baking in my oven!
    banana bread header 2
    I could hardly wait the 60 minutes it took for the bread to bake.  To be honest, I wasn’t sure how the brown rice flour would work in this recipe so I was anxiously waiting for the timer on my oven to sound.

    I’m happy to say, I was soooo pleased with the results!  In fact, I was overjoyed. I can’t explain the excitement I feel when I make a healthy version of a generally not-too-healthy recipe — especially DESSERT! However, this recipes proves that you can lighten up your desserts and still retain the delicious flavor and texture you are used to – you just need to use some creativity.

    Also, just a side note, banana bread is a completely acceptable breakfast — at least in my house!

    So, here’s my Banana Bread recipe. I hope you try it — modify it — make it your own.  Don’t be afraid to experiment in the kitchen — I’m so happy I wasn’t!

    Banana Bread–An Updated Classic
    Yields 1 loaf

    1 ½ cups of brown rice flour
    ½ cup almond meal
    ½ teaspoon salt
    1 teaspoon baking soda
    ½ teaspoon cinnamon
    2 eggs
    ½ cup of maple syrup
    ⅓ cup of coconut oil
    ⅓ cup of plain yogurt or sour cream
    2 over-ripe bananas, mashed (about 1 cup)
    1 teaspoon vanilla extract

    optional — add ½ cup of chopped nuts or chocolate chips or shredded coconut — or whatever addition suits your fancy. 

    Preheat the oven to 350 degrees. Grease a loaf pan with an oil of your choice.

    In a bowl, add your dry ingredients — brown rice flour, almond meal, baking soda, salt and cinnamon.

    In a larger bowl add your wet ingredients — eggs, maple syrup, coconut oil (heat to liquid form), yogurt/sour cream, bananas, and vanilla extract.  With a hand mixer, beat all wet ingredients until combined.  Add the dry ingredients to the wet mixture and beat until incorporated.

    Pour mixture into the prepared loaf pan and bake in the oven for approximately 1 hour, or until a cake tester comes out clean.

    Let it cool.  Slice and serve.


  • Best Recipes of 2014

    Best Recipes of 2014

    Over the past year, we shared many of our “go-to” recipes with you — simple-to-prepare, seasonal recipes that we regularly make for our own families.

    We also created new dishes by experimenting with old family recipes that tasted great but were in need of a healthy makeover.  We replaced white sugar with maple syrup.  We swapped white flour for brown rice flour.  We relied on cooking methods that yield the most taste — for example, roasting our veggies for optimal flavor.

    We tried to present traditional recipes in a new way.  We made pesto out of broccoli rabe (vs. basil). We offered a baked oatmeal for a spin on your go-to bowl of oats. We created a delectable dairy and gluten-free banana walnut frozen dessert. We even brought you a light and healthy take on a classic French dessert with our Apple Raisin Clafoutis.

    As we say goodbye to 2014, we want to take a moment to recognize those dishes that really stood out, for us, and, we think for you too.  We hope all of our recipes make it into your kitchen in 2015, but if you only choose a few, here are the ones that we consider our “best in class.”

    Best Drink:
    ApplePieSmoothie

    Best Breakfast:
    BananaOatMuffinRecipe

    Best Appetizer:
    guacamole with banner updated

    Best Salad:
    kale with header

    Best Soup:
    butternut squash with header

    Best Side Dish:
    smashed pot banner

    Best Main Course:
    lemon dijon salmon with banner

    Best Dessert:
    blueberry crisp


  • Maple Sweet Potato Pie

    Maple Sweet Potato Pie

    Thanksgiving is one of my favorite holidays because the focus isn’t on gifts, but on family — and food! And, not just any food — familiar and traditional food.

    In fact, I bet your family is expecting a decadent pecan pie, sugared yams and your famous stuffing. I think the one thing to keep in mind is that it’s a special day — a day to splurge — a day to delight in familiar traditions and recipes, but you might want to consider adding a new recipe or two!  This particular recipe is a great alternative to heavier pies made with white sugar and cream.  Everyone will love this version of sweet potato pie that lightens up the ingredients but does not compromise flavor. sweet potato pie

    I used a traditional recipe, but swapped out the white sugar for grade B maple syrup.  I generally substitute maple syrup for white sugar — 1:1.  However, I used half the amount of maple syrup this time, and it was perfect. You would never know the recipe was altered. I promise!

    The key to this recipe is roasting your sweet potatoes.  DO NOT use canned sweet potato puree.  As a busy mom, I tried a short cut.  It didn’t work.  Take the time to roast your own sweet potatoes .  . . it will set up perfectly and have a delicious, dense texture.

    You can use any pie crust that works for you.  I tend to use pre-made pie crust.  There are some really good ones on the market — I like Trader Joe’s frozen pie crust.  It saves time, which is important, especially around the holidays.

    You can make one 9-inch deep dish pie with this recipe — or two shallow 9 inch pies.

    If you are considering a new Thanksgiving dessert, I hope you try our Maple Sweet Potato Pie.  It’s so good, you may even consider it a replacement for your traditional pumpkin pie!

    Maple Sweet Potato Pie
    Yields 8 slices

    2 cups of roasted sweet potato puree (I roasted 3 medium sized sweet potatoes in their skin, in foil, at 400 degrees, until they were fork tender. I peeled them and mashed them in a bowl)
    2 eggs, beaten
    1 cup of milk (I used 2% milk, but feel free to substitute)
    3/4 cup of grade B maple syrup
    1 teaspoon, vanilla extract
    1/2 teaspoon of ground cinnamon
    1/4 teaspoon of ground ginger
    1/8 teaspoon of salt
    1, 9-inch prepared deep dish pie crust or 2, 9-inch prepared shallow pie crusts (like the ones you find in the freezer case of your supermarket!)

    Preheat oven to 400 degrees.

    In a large bowl, add the mashed sweet potatoes, eggs, milk, maple syrup, cinnamon, ground ginger, salt and vanilla extract to a large bowl and beat with a hand mixer until combined.

    Pour sweet potato mixture into a prepared pie shell (or two depending on whether you use one deep dish or two shallow pie crusts).  Bake for 10 minutes at 400 degrees and then lower the temperature to 350 degrees and bake for an additional 30-40 minutes for the two shallow pies and an additional 40-50 minutes for the deep dish pie.  The pie will be done when the center is set and not jiggly.

    Let the pie cool and serve at room temperature — or cold — and top with whipped cream — or nothing — it’s delicious either way!!

    Helpful Hint: If your sweet potatoes are too stringy, you can press them through a potato ricer.

  • Apple Raisin Clafoutis

    Apple Raisin Clafoutis

    One of my favorite fall activities is apple picking.  Not only do our kids love apple picking, but so do my husband and I.  Needless to say, we end up leaving with tons of apples.

    Apple pie, baked apples, applesauce and apple crisp are usually the first recipes that come to mind, but I like to use the apples to make a really delicious, light — and not too sweet —  cake called Apple Raisin Clafoutis.

    apple cake sliceClafoutis is a french baked dessert that involves fruit and a custard-like filling.  Traditionally, cherries are incorporated, but my version is made with apples, raisins and topped with sliced almonds.

    Generally, the cake is made with butter, white sugar and white flour.  I’ve modified the recipe, replacing the white flour with brown rice flour, the butter with safflower oil and the white sugar with natural maple syrup.  And, to be honest, you would never know the difference!!

    The beauty of this cake is that it doesn’t require a lot of effort — not much more than peeling and slicing four apples and making a quick batter in the blender.  It’s a no-fuss cake that’s perfect for any day of the week – but it’s also elegant enough for a dinner party or holiday gathering.

    I like to serve the cake with whipped cream — or ice cream.  If you are limiting your dairy, try cashew cream, or our Banana Maple Walnut Ice Cream! However, you can totally forgo a topping since the cake itself is so delicious!

    Apple Raisin Clafoutis

    Serves eight

    4 apples peeled, cored and thinly sliced
    2 tablespoons of safflower oil
    1/2 cup of raisins
    1/4 teaspoon of nutmeg
    1/2 cup of maple syrup (*I prefer Grade B for baking)
    1/2 cup of milk
    4 eggs
    1 tablespoon vanilla extract
    2/3 cup of brown rice flour
    1/4 cup of sliced almonds

    Preheat the oven to 350 degrees. Grease an 8-cup shallow baking dish or a 12-inch pie or tart pan.

    Add the safflower oil to a large skillet on medium/low heat.  Add sliced apples and cook until lightly browned and tender. Add the raisins, 1/4 teaspoon of nutmeg and 1/4 cup of maple syrup.  Mix to incorporate; turn off the heat and reserve.

    In the base of a blender add the eggs, milk, 1/4 cup of maple syrup, brown rice flour and vanilla extract. Blend on high for one minute.  If you are using a Vitamix or other high performance blender you might want to reduce the blending time.  At the end of the day, all of the ingredients should be well incorporated.

    Spread the apple/raisin mixture in the greased baking dish/pan and pour the batter over the apples.  Sprinkle sliced almonds on top of the cake. Bake one hour and serve warm.